CAB ST400 Manuel utilisateur

Instructions
ST400
MADE IN GERMANY
Cutter with Stacker

2 2
Family Type
Stacker with Cutter ST400
Edition: 04/2023 - Part No. 9009939
Copyright
This documentation as well as translation hereof are property of cab Produkttechnik GmbH & Co. KG.
The replication, conversion, duplication or divulgement of the whole manual or parts of it for other intentions than its original
intended purpose demand the previous written authorization by cab.
Trademark
Windows is a registered trademark of the Microsoft Corporation.
Editor
Regarding questions or comments please contact cab Produkttechnik GmbH & Co. KG.
Topicality
Due to the constant further development of our products discrepancies between documentation and product can occur.
Please check www.cab.de for the latest update.
Terms and conditions
Deliveries and performances are eected under the General conditions of sale of cab.
Further documentation
Conguration Manual cab Printers
https://www.cab.de/media/pushle.cfm?le=3257 Programming Manual cab Printers
https://www.cab.de/media/pushle.cfm?le=3047
Instruction
for the following products
Germany
cab Produkttechnik GmbH & Co KG
Karlsruhe
Phone +49 721 6626 0
www.cab.de
USA
cab Technology, Inc.
Chelmsford, MA
Phone +1 978 250 8321
www.cab.de/us
Taiwan
cab Technology Co., Ltd.
Taipei
Phone +886 (02) 8227 3966
www.cab.de/tw
Singapore
cab Singapore Pte. Ltd.
Singapore
Phone +65 6931 9099
www.cab.de/en
France
cab Technologies S.à.r.l.
Niedermodern
Phone +33 388 722501
www.cab.de/fr
Mexico
cab Technology, Inc.
Juárez
Phone +52 656 682 4301
www.cab.de/es
China
cab (Shanghai) Trading Co., Ltd.
Shanghai
Phone +86 (021) 6236 3161
www.cab.de/cn
South Africa
cab Technology (Pty) Ltd.
Randburg
Phone +27 11 886 3580
www.cab.de/za

3
1 Introduction............................................................................................................................................4
1.1 Instructions...............................................................................................................................................4
1.2 Intended Use............................................................................................................................................4
1.3 Safety Instructions....................................................................................................................................5
1.4 Environment .............................................................................................................................................6
1.5 Technical Data..........................................................................................................................................6
1.6 Device Overview ......................................................................................................................................6
2 Installation..............................................................................................................................................8
2.1 Unpacking ................................................................................................................................................8
2.2 Preparing the Printer................................................................................................................................8
2.3 Mounting the Stacker...............................................................................................................................9
2.4 Adapting the Stacker to the Media Size.................................................................................................10
2.4.1 Adjusting the Side Plates..................................................................................................................10
2.4.2 Mounting the Table...........................................................................................................................10
2.4.3 Mounting the Safety Covers..............................................................................................................11
3 Operation..............................................................................................................................................12
4 PrinterConguration ...........................................................................................................................13
5 Maintenance .........................................................................................................................................14
6 Error Messages / Problem Solutions .................................................................................................15
7 Reference to the EU Declaration of Conformity................................................................................ 16
Table of Contents

4 4
1 Introduction
1.1 Instructions
Important information and instructions in this documentation are designated as follows:
Danger!
Draws attention to an exceptionally great, imminent danger to your health or life due to hazardous
voltages.
!
Danger!
Draws attention to a danger with high risk which, if not avoided, may result in death or serious injury.
!
Warning!
Draws attention to a danger with medium risk which, if not avoided, may result in death or serious injury.
!
Caution!
Draws attention to a danger with low risk which, if not avoided, may result in minor or moderate injury.
!
Attention!
Draws attention to potential risks of property damage or loss of quality.
i
Note!
Advices to make work routine easier or on important steps to be carried out.
Environment!
Gives you tips on protecting the environment.
Handling instruction
Reference to section, position, illustration number or document.
Option (accessories, peripheral equipment, special ttings).
Time Information in the display.
1.2 Intended Use
• The device is intended exclusively as an option for the printers of the SQUIX and XD Q series for cutting and
stacking suitable materials that have been approved by the manufacturer. Any other use or use going beyond
this shall be regarded as improper use. The manufacturer/supplier shall not be liable for damage resulting from
unauthorized use; the user shall bear the risk alone.
• Usage for the intended purpose also includes complying with the operating manual, including the manufacturer‘s
maintenance recommendations and specications.
• The device is manufactured in accordance with the current technological status and the recognized safety rules.
However, danger to the life and limb of the user or third parties and/or damage to the device and other tangible
assets can arise during use.
• The device may only be used for its intended purpose and if it is in perfect working order, and it must be used with
regard to safety and dangers as stated in the operating manual.
i
Note!
All documentations can also currently be found in the Internet.

5
1 Introduction
1.3 Safety Instructions
• Disconnect the printer from the electrical outlet before mounting or removing the stacker (2).
• When using the stacker at SQUIX without base frame the stacker protrudes the base plate of the printer.
Therefore the system must be positioned at the edge of the platform or on a mounting unit. Position the system in
such a way that a risk of tilting will be avoided.
• The stacker may only be operated when it is mounted on the printer.
• Risk of injury, particularly during maintenance, the cutter blades (3,4) are sharp.
• Operate the stacker with properly mounted safety covers (5) only.
• Mount matching safety covers (5) when adapting the stacker for another material width. For a table width greater
than 92 mm no safety covers are needed.
• When the table (6) is not mounted or it is lowered manually the blades (3,4) are accessible. Do not operate the
stacker under these circumstances. Do not touch the area of the blades.
• Warning stickers (1,2) must not be removed, as then you and other people cannot be aware of dangers and may
be injured.
1
2
1
2
3
4
5
6
1
5
Figure 1 Safety covers, safety marking
• The device may only be used in a dry environment, do not expose it to moisture (sprays of water, mists, etc.).
• Do not use the device in an explosive atmosphere.
• Do not use the device close to high-voltage power lines.
• Perform only those actions described in this operating manual.
Work going beyond this may only be performed by trained personnel or service technicians.
• Unauthorized interference with electronic modules or their software can cause malfunctions.
• Other unauthorized work on or modications to the device can also endanger operational safety.
• Always have service work done in a qualied workshop, where the personnel have the technical knowledge and
tools required to do the necessary work.
• The maximum sound pressure level is less than 70 dB(A).
!
Warning!
This is a class A product. In a domestic environment this product may cause radio interference in which
case the user may be required to take adequate measures.

6 6
1 Introduction
1.4 Environment
Obsolete devices contain valuable recyclable materials that should be sent for recycling.
Send to suitable collection points, separately from residual waste.
The modular construction of the printer enables it to be easily disassembled into its component parts.
Send the parts for recycling.
Take the electronic circuit boards to public waste disposal centers or to the distributor.
1.5 Technical Data
ST400
Usability
for printer type SQUIX4M, SQUIX4MP, XD Q4
Power rating
Cuts / min 120
Print stop if : Unable to reach end position of the cutter
Cover open
Maximum stack height is reached
Material
Weight g/m² for cardboard 60 - 300
Thickness mm 0,05 - 0,8
Width mm 20 - 100
Cut length mm 20 - 150
Gap height up to mm 1,2
Stacking
Height mm max. 100
Table 1 Technical Data
1.6 Device Overview
1
7
8
9
3
5
4
11
2
10
6
1 Cover
2 Safety cover
3 Knurled screw
4 Table
5 Handle for height displacement of the table
6 Side plate
7 Upper blade
8 Lower blade
9 Safety cover
10 Scale
11 Side plate
Figure 2 Overview front side


8 8
2 Installation
2.1 Unpacking
Check stacker for damage which may have occurred during transport.
Check delivery for completeness.
Contents of delivery:
• Stacker with cutter
• Base frame
• Documentation
i
Note!
Please keep the original packaging in case the printer must be returned.
!
Attention!
The device and printing materials will be damaged by moisture and wetness.
Set up label printer with stacker only in dry locations protected from splash water.
2.2 Preparing the Printer
1
2
3
4
6
5
Figure 5 Preparing the printer
Loosen screw (2) and remove cover (1).
Loosen screws (4) and remove cover (3).
Loosen screw (5) a few turns and remove tear-o or peel-o plate (6).

9„Installation“
2.3 Mounting the Stacker
!
Attention!
Disconnect the printer from the electrical outlet before mounting or removing the stacker.
1 2 43 5
Figure 6 Mounting the stacker
1. SQUIX only: Place the base frame (1) on a plane surface.
2. SQUIX only: Put the feet of the printer into the holes of the base frame.
3. Insert the pins (4) of the stacker into the holes (2) of the printer.
4. Press the stacker against the printer. That way the plug (5) of the stacker will be connected to the peripheral port
(3) of the printer.
5. Secure the stacker with the screw (5).
10 10„Installation“
2.4 Adapting the Stacker to the Media Size
!
Caution!
Risk of injury!
With inappropriate tables and safety covers the reliability and machinery safety cannot be guaranteed.
Equip the stacker only with a table designated for the media to be used and the matching safety covers.
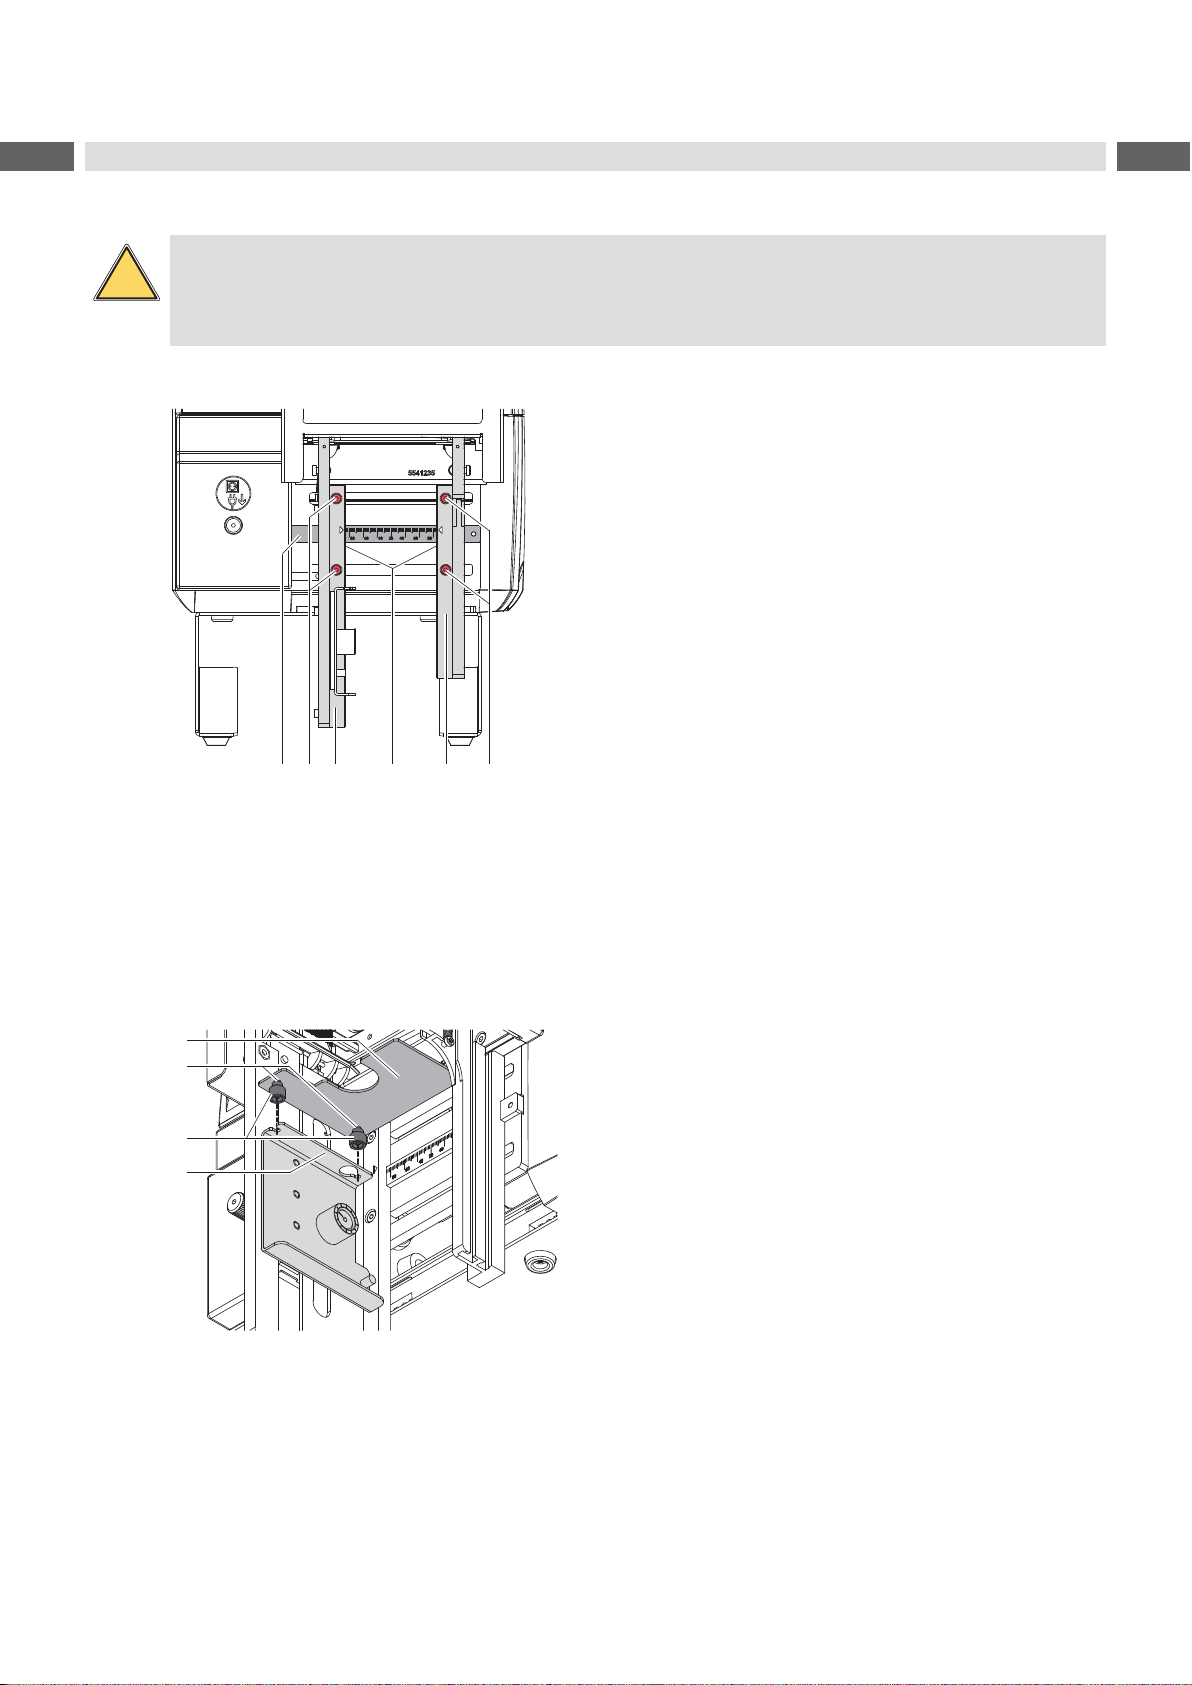
2.4.1 Adjusting the Side Plates
1 2 4 53 2
Figure 7 Adjusting the Side Plates
1. Loosen screws (2).
2. Adjust the side plates (3,5) to the media width using the scale (1). Use the edges (4) of the side plates as
pointers.
3. Tighten screws (2).
2.4.2 Mounting the Table
1
2
4
3
1. Loosely screw the knurled nuts (3) contained in the
delivery contents of the table onto the threaded pins (2).
2. Insert the threaded pins of the table (1) into the holes of
the retainer (4) an move the table to the printer until it
stops.
3. Tighten the knurled nuts (3).
Figure 8 Mounting the table
Table des matières
Autres manuels CAB Coupeur


