
Buffalo Tools APS517 Manuel utilisateur

ITEM # APS517
AIRLESS PAINT SPRAYER
READ ALL INSTRUCTIONS AND WARNINGS BEFORE USING THIS PRODUCT.
This manual provides important information on proper operation & maintenance. Every effort has been
made to ensure the accuracy of this manual. These instructions are not meant to cover every possible
condition and situation that may occur. We reserve the right to change this product at anytime without
prior notice.
IF THERE IS A NY QUE STION AB OUT A CO NDITION BEING SAFE OR U NSAFE , DO
NOT US E THIS PRODUCT!
If you experience a problem, have questions or need parts for this product, visit our website
http://www.buffalotools.com or call Customer Service at 1- , Monday-Friday,
8 AM - 4 PM Central Time. A copy of the sales receipt is required.
KEEP THIS MANUAL, SALES RECEIPT & APPLICABLE WARRANTY FOR FUTURE REFERENCE
OPERATING INSTRUCTIONS
Questions or problems? Contact Customer Service
636-532-9888
Page 2
Symbol Definitions
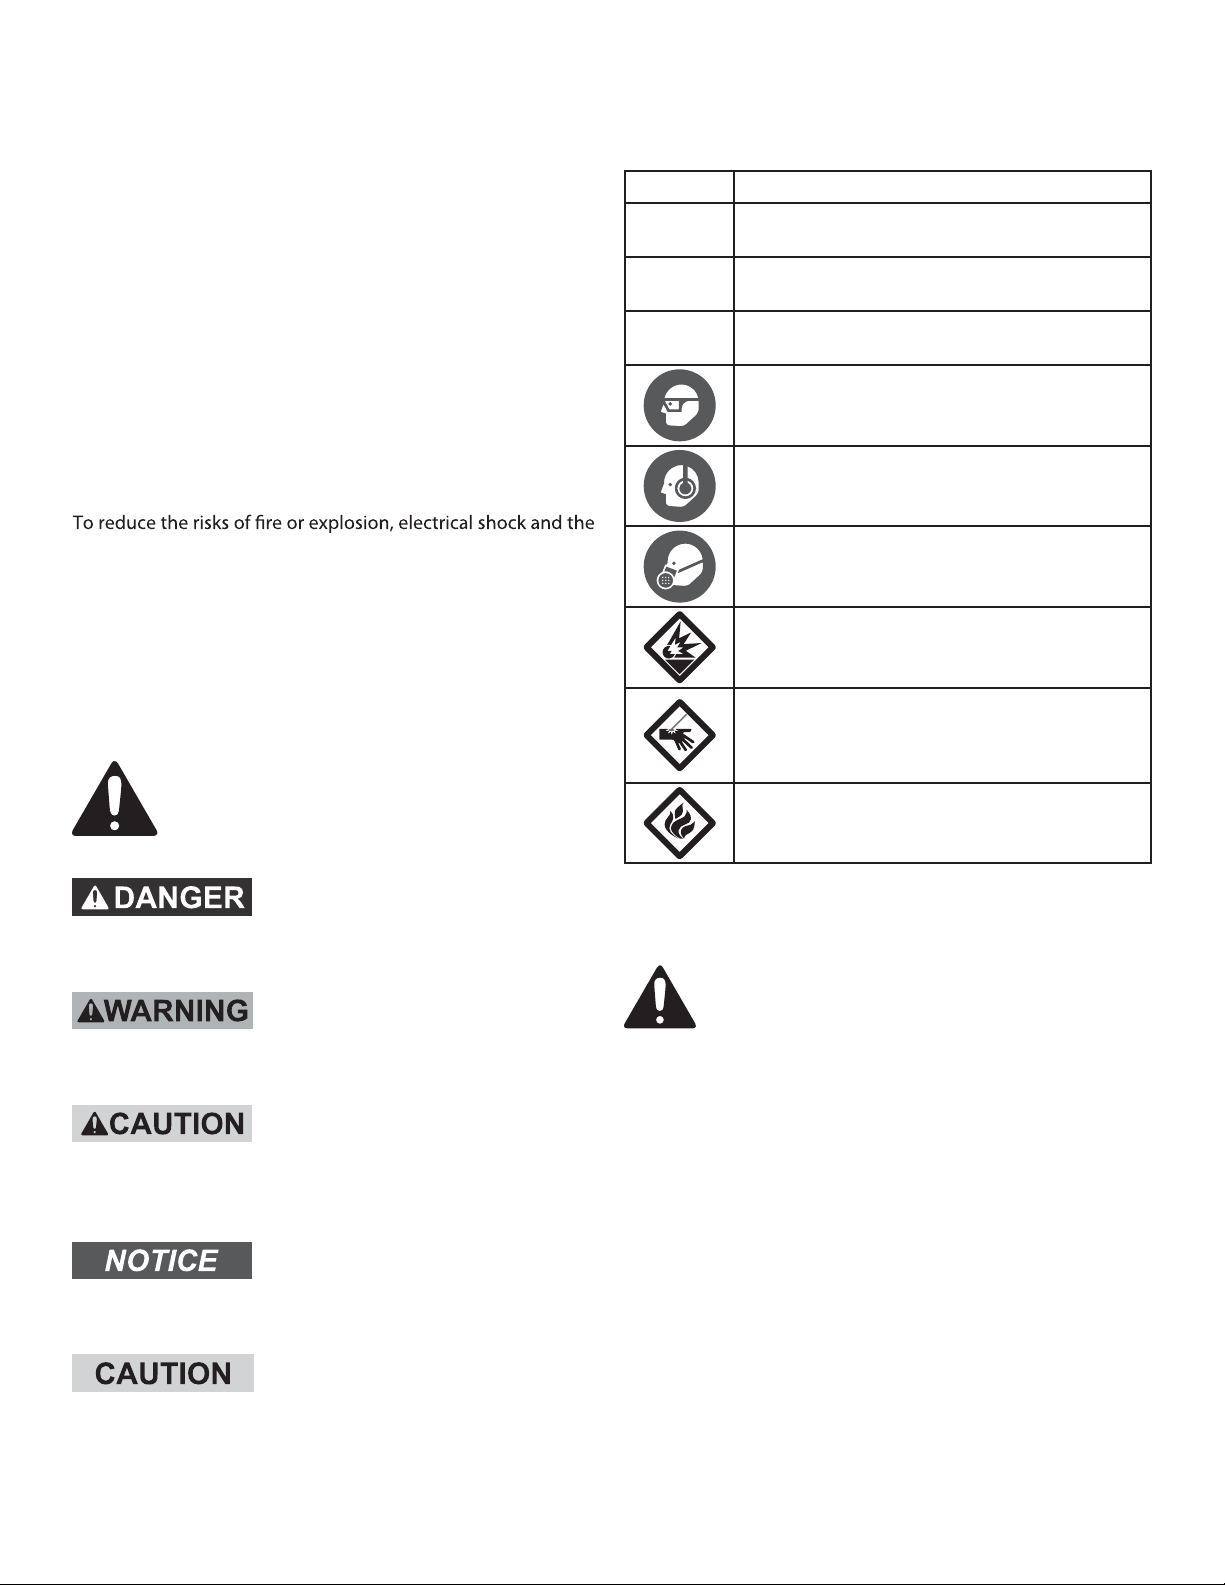
Symbol Property or statement
PSI Pounds per square inch of pressure
NPT National pipe thread, tapered
NPS National pipe thread, straight
WARNING marking
concerning Risk of Eye Injury.
Wear ANSI-approved eye protection.
WARNING marking concerning
Risk of Hearing Loss.
Wear hearing protection.
WARNING marking concerning
Risk of Respiratory Injury. Wear
NIOSH-approved respirator.
WARNING marking concerning
Risk of Explosion.
WARNING marking concerning
Risk of Injection Injury.
Do not direct spray at hands or body.
Have injection injury treated immediately.
WARNING marking concerning Risk of Fire.
Ground any metal bucket used with sprayer.
WARNING! Read all instructions.
Failure to follow all instructions listed below
may result in fire, serious injury and/or DEATH.
The warnings and precautions discussed in this
manual cannot cover all possible conditions and
situations that may occur. It must be understood
by the operator that common sense and caution
are factors which cannot be built into this
product, but must be supplied by the operator.
ITEM # APS517 Airless Paint Sprayer Operating Instructions
Save This Manual
Important Safety Information
In this manual, on the labeling, and all other
information provided with this product:
This is the safety alert symbol. It is used to
alert you to potential personal injury hazards.
Obey all safety messages that follow this
symbol to avoid possible injury or death.
DANGER indicates a hazardous situation which,
if not avoided, will result in death or serious injury.
WARNING indicates a hazardous situation which,
if not avoided, could result in death or serious injury.
CAUTION, used with the safety alert symbol,
indicates a hazardous situation which, if not avoided,
could result in minor or moderate injury.
NOTICE is used to address practices
not related to personal injury.
CAUTION, without the safety alert symbol, is used to
address practices not related to personal injury.
.tnempiuqeehtgnitarepoerofebnoitamrofniytefaslladaeR
Save these instructions.
injury to persons, read and understand all instructions included
in this manual. Be familiar with the controls and proper usage
of the equipment.
• 120 Volts AC
• 650 Watts
• 25 ft. Hose
• Max (Fluid) delivery: 0.3 Gallons /min
• Power cord (ft.): 6.5 ft
• Working pressure: 2200-3000 PSI
• Amperage (amps): 4.0-7.5A
• Horsepower (hp): 7/8 HP
• Tip Size: 517
SPECIFICATIONS:
Page 3
NOTE: ALWAYS clean sprayer immediately to prevent permanent damage.
ITEM # APS517 Airless Paint Sprayer Operating Instructions
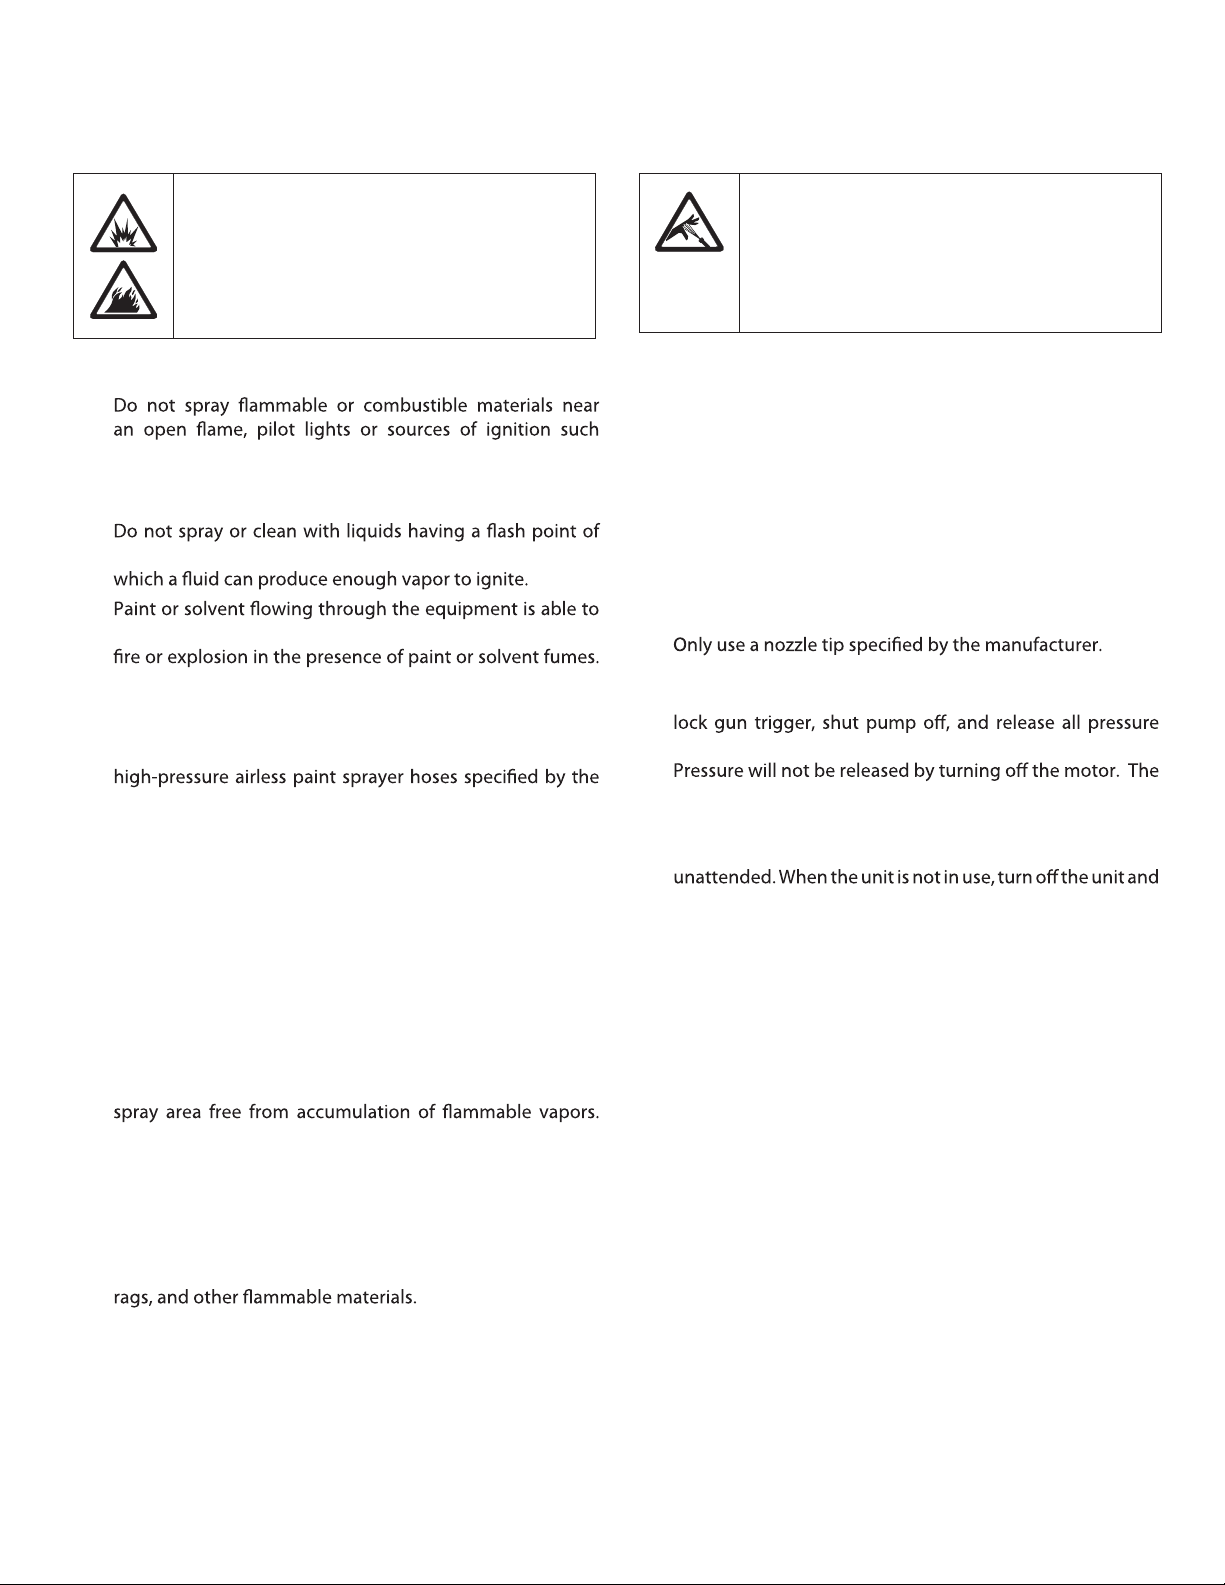
WARNING: INJECTION INJURY
A high pressure paint stream produced by this
equipment can pierce the skin and underlying
tissues, leading to serious injury and possible
amputation. See a physician immediately.
PREVENTION:
•
as hot objects, cigarettes, motors, electrical equipment
and electrical appliances. Avoid creating sparks from
connecting and disconnecting power cords.
•
less than 38ºC (100ºF). Flash point is the temperature at
•
result in static electricity. Static electricity creates a risk of
All parts of the spray system, including the pump, hose
assembly, spray gun and objects in and around the spray
area shall be properly grounded to protect against static
discharge and sparks. Use only conductive or grounded
manufacturer.
• Verify that all containers and collection systems are
grounded to prevent static discharge.
• Connect to a grounded outlet and use grounded extension
cords (electric models only). Do not use a 3 to 2 adapter.
• Do not use a paint or solvent containing halogenated
hydrocarbons. Such as chlorine, bleach mildewcide,
methylene chloride and trichloroethane. They are not
compatible with aluminum. Contact the coating supplier
about compatibility of material with aluminum.
• Keep spray area well ventilated. Keep a good supply of
fresh air moving through the area to keep the air within the
Keep pump assembly in well ventilated area. Do not spray
pump assembly.
• Do not smoke in the spray area.
• Do not operate light switches, engines, or similar spark
producing products in the spray area.
• Keep area clean and free of paint or solvent containers,
• Know the contents of the paint and solvents being sprayed.
Read all material Safety Data Sheets (SDS) and container
labels provided with the paints and solvents. Follow the
paint and solvent manufacture’s safety instructions.
• Place pump at least 20 feet (6 meters) from the spray object
in a well ventilated area (add more hose if necessary).
PREVENTION:
• Do not aim the gun at, or spray any person or animal.
• Keep hands and other body parts away from the discharge.
For example, do not try to stop leaks with any part of the
body.
• NEVER put your hand in front of the gun. Gloves will not
provide protection against an injection injury.
• ALWAYS keep the tip guard in place while spraying. The tip
guard provides some protection but is mainly a warning
device.
•
• Use caution when cleaning and changing nozzle tips. In
the case where the nozzle tip clogs while spraying, ALWAYS
.pitgnignahcro,draugropitgninaelc,gnicivreserofeb
PRIME/SPRAY valve or pressure bleed valve must be turned
to their appropriate positions to relieve system pressure.
• Do not leave the unit energized or under pressure while
relieve the pressure in accordance with the manufacturer’s
instructions.
• High-pressure spray is able to inject toxins into the body
and cause serious bodily injury. In the event that injection
occurs, seek medical attention immediately.
• Check hoses and parts for signs of damage, a leak can inject
material into the skin. Inspect hose before each use. Replace
any damaged hoses or parts.
WARNING: EXPLOSION OR FIRE
.etingiroedolpxenacsemuftniapdnatnevloS
Severe injury and/or property damage can occur.

Page 4
Paint Sprayer Safety Warnings
1. INJECTION HAZARD!
Although this paint gun is airless,
it still puts out paint at a very high
pressure. Through improper use, paint
can be injected through a person’s skin,
leading to serious injury, possibly amputation.
If paint is accidentally injected into someone’s skin,
contact a doctor immediately. Do not treat an injection
injury as a simple cut. Injection can lead to amputation
and requires immediate surgical treatment.
2. Do not point your sprayer at anyone, including
yourself. Do not place your hand in front of
tniaptcelfedottpmettaroelzzons’nuGyarpS
spray with your hand during use.
Gloves and clothing don’t offer adequate protection
from toxic paints, sealers, water-proofers, or stains.
3. Do not come into contact with a fluid stream
created by a leak in the paint hose.
4. Engage the Spray Gun’s trigger
lock when not spraying.
5. dezirusserpreyarpStniaPevaeltonoD
while unattended.
6. Do not clean Spray Gun tip while it is
still connected to paint hose.
7. Keep the trigger and the electrical
cord plug clean and paint-free.
8. Do not run Paint Sprayer while empty.
9. Do not use Paint Sprayer to spray
,sezalg,stniapcillatem,sotsebsa
red lead, cement, ground chalk,
abrasive grainy paints containing lime, or bleach.
These will damage the spray gun and void the warranty.
10. Do not spray flammable materials in vicinity
of open flame or near ignition sources. Motors,
electrical equipment, and controls can cause electrical
arcs that will ignite a flammable gas or vapor. Do not
store flammable liquids or gases in vicinity of this unit.
11. Keep fire-extinguishing equipment
present and in good-working order.
12. Keep pump away from spray area to avoid
contact with solvents and paint fumes.
13. Use Paint Sprayer with water-based or
mineral spirit-type materials only.
14. Do NOT use bleach, low-flash naphthalene,
acetone alcohol or toluene when cleaning
Paint Sprayer equipment.
15. Do NOT use solvents with flash points less than
70° F (21° C) to clean equipment. These may
cause an explosion. Examples of acceptable
cleaning solvents are water, mineral spirits and
lacquer thinner. Note that some of these solvents
may be inappropriate for certain kinds of paint;
follow the paint supplier’s recommendations.
16. Follow the material and solvent manufacturer’s
safety precautions and warnings.
17. Keep paint hose away from sharp objects.
Bursting hoses may cause injury.
Examine hoses regularly and replace if damaged.
18. When flushing Paint Sprayer system,
use lowest possible pressure setting.
19. All hoses and spray gun accessories used with Paint
Sprayer must be pressure rated at or above 3000 PSI.
20. The Paint Sprayer must be plugged into
an outlet that is grounded in accordance
with all local codes and ordinances.
21. Use caution while spraying on windy days.
22. Do not use Paint Sprayer without the
Spray Gun’s nozzle guard in place.
ITEM # APS517 Airless Paint Sprayer Operating Instructions
WARNING: HAZARDOUS VAPORS
Paints, solvents, insecticides, and other materials
can be harmful if inhaled or come in contact
with the body. Vapors can cause severe nausea,
fainting, or poisoning.
PREVENTION
• Use a respirator or mask if vapors can be inhaled. Read
all instructions supplied with the mask to be sure it will
provide the necessary protection.
• Wear protective eyewear.

23. Paint Sprayer’s housing may become hot during use.
Do not touch housing until it has completely cooled.
24. Remove Spray Tip or turn to cleaning position
BEFORE cleaning or flushing Paint Sprayer system.
25. Do not use pliers to tighten or loosen
high pressure connections.
26. Sparks from improper grounding
can ignite fumes!
Follow all local regulations regarding the
use of fluid supply containers and solvent
pails used with flushing the Paint Sprayer.
Use only conductive metal pails placed on a grounded
(concrete) surface. Do not place pails on
nonconductive surfaces (such as cardboard or paper).
Ground all metal pails by clamping one end of a ground
wire to the pail and the other end to a
grounded structure (such as a nearby pipe).
Maintain grounding, even when flushing or relieving
pressure from Paint Sprayer into metal pail.
The force of the spray can knock a metal pail over,
so hold down the metal pail and keep the metal part of
the spray gun set against the grounded metal pail when
pressing the spray gun trigger.
27. Maintain labels and nameplates on the sprayer.
These carry important safety information.
28. Avoid unintentional starting. Prepare to begin work
before turning on the sprayer.
29. This product is not a toy.
Keep it out of reach of children.
30. People with pacemakers should consult their
physician(s) before use. Electromagnetic fields in
close proximity to heart pacemaker could cause
pacemaker interference or pacemaker failure.
31. WARNING: Some dust created by power
sanding, sawing, grinding, drilling, and other
construction activities, contains chemicals known
[to the State of California] to cause cancer,
birth defects or other reproductive harm.
Some examples of these chemicals are:
• Lead from lead-based paints
• Crystalline silica from bricks and cement or
other masonry products
• Arsenic and chromium from chemically treated lumber
Your risk from these exposures varies,
depending on how often you do this type of work.
To reduce your exposure to these chemicals:
work in a well ventilated area, and work with approved
safety equipment, such as those dust masks that are
specially designed to filter out microscopic particles.
(California Health & Safety Code § 25249.5, et seq.)
Page 5
ITEM # APS517 Airless Paint Sprayer Operating Instructions
SAVE THESE INSTRUCTIONS.
Grounding
TO PREVENT ELECTRIC SHOCK AND
DEATH FROM INCORRECT
GROUNDING WIRE CONNECTION:
Check with a qualified electrician if you are
in doubt as to whether the outlet is properly grounded.
Do not modify the power cord plug provided with the
sprayer. Never remove the grounding prong from the
plug. Do not use the sprayer if the power cord or plug
is damaged. If damaged, have it repaired by a service
facility before use. If the plug will not fit the outlet,
have a proper outlet installed by a qualified electrician.
Grounded Sprayers:
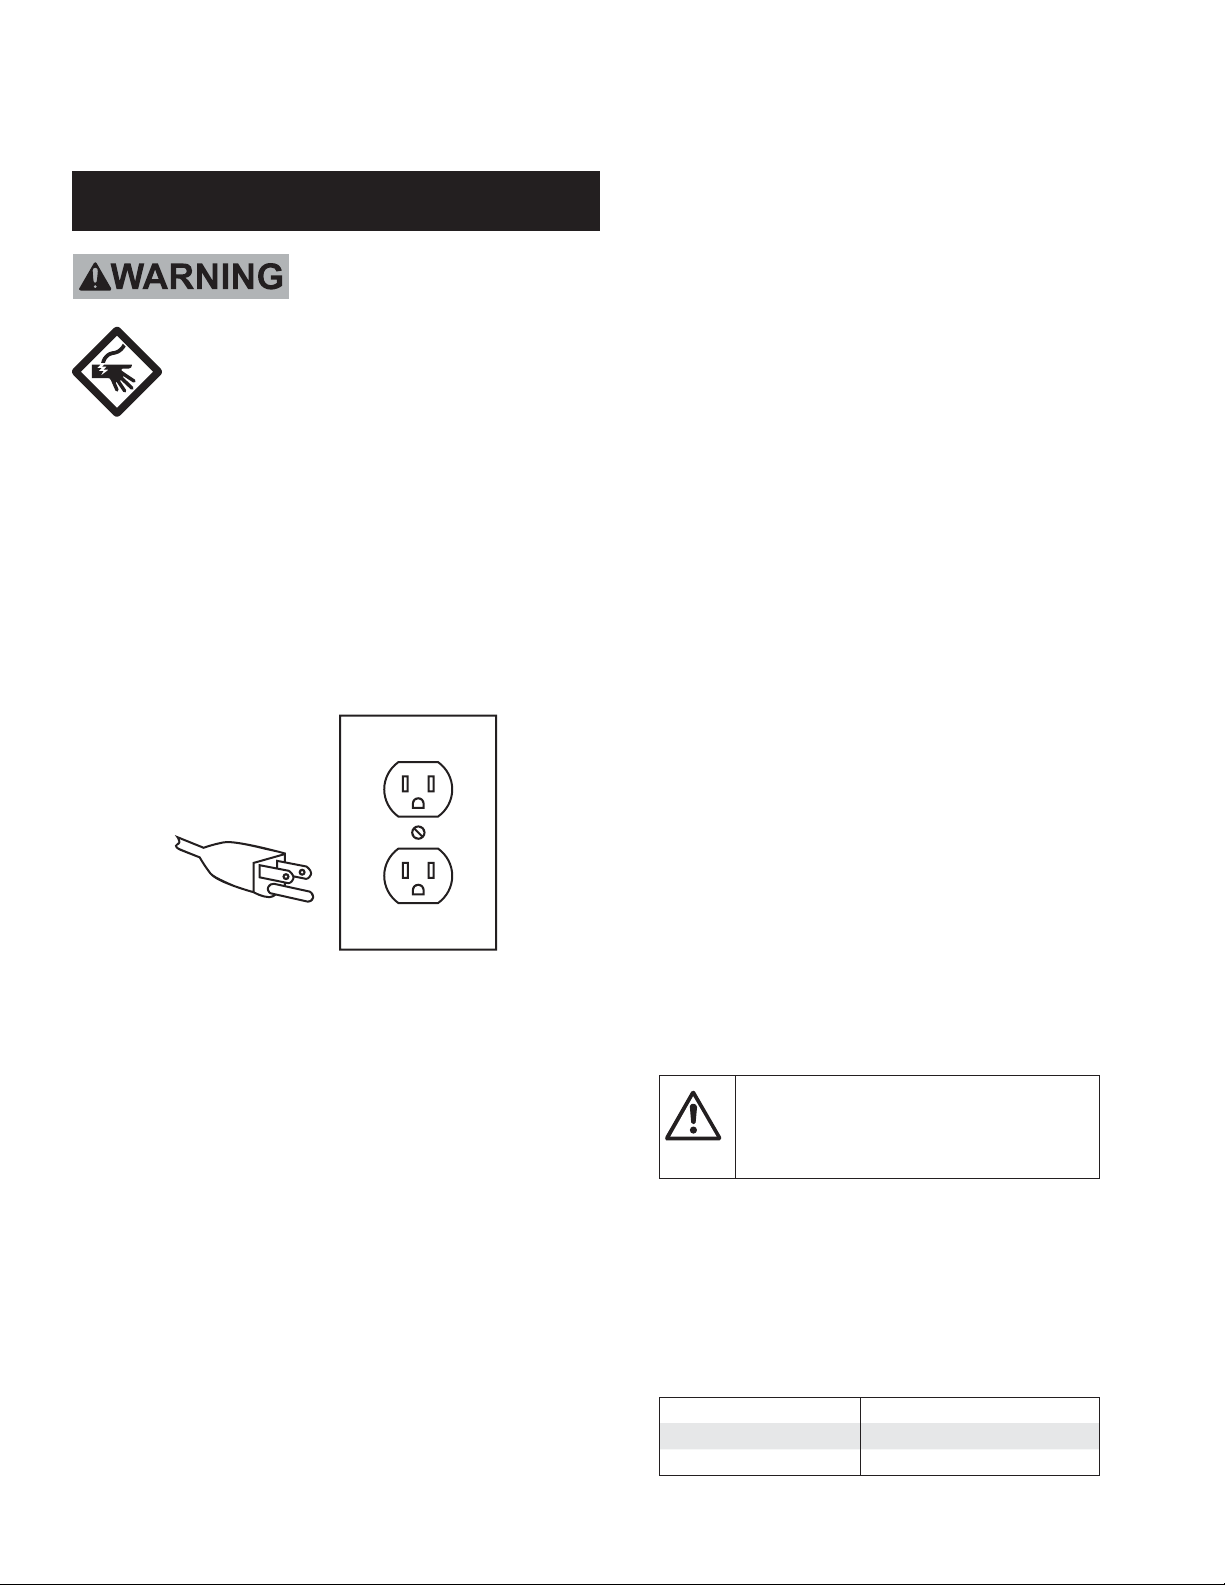
Sprayers With Three Prong Plugs
3-Prong Plug and Outlet
1. Sprayers marked with “Grounding Required” have a
three wire cord and three prong grounding plug. The
plug must be connected to a properly grounded outlet.
If the sprayer should electrically malfunction or break
down, grounding provides a low resistance path to
carry electricity away from the user, reducing the risk
of electric shock.
2. The grounding prong in the plug is connected through
the green wire inside the cord to the grounding system
in the sprayer. The green wire in the cord must be
the only wire connected to the sprayer’s grounding
system and must never be attached to an electrically
“live” terminal.
3. The sprayer must be plugged into an appropriate
outlet, properly installed and grounded in accordance
with all codes and ordinances. The plug and
outlet should look like those in the preceding
illustration.
Extension Cords
1. Grounded sprayers require a three
wire extension cord. Double Insulated sprayers
can use either a two or three wire extension cord.
2. As the distance from the supply outlet increases, you
must use a heavier gauge extension cord. Using
extension cords with inadequately sized wire causes
a serious drop in voltage, resulting in loss of power
and possible sprayer damage.
3. The smaller the gauge number of the wire, the
greater the capacity of the cord. For example,
a 14 gauge cord can carry a higher current
than a 16 gauge cord.
4. When using more than one extension cord to make
up the total length, make sure each cord contains at
least the minimum wire size required.
5. If you are using one extension cord for more
than one sprayer, add the nameplate amperes
and use the sum to determine the required
minimum cord size.
6. If you are using an extension cord outdoors, make
sure it is marked with the suffix “W-A”
to indicate it is acceptable for outdoor use.
7. Make sure the extension cord is properly wired
and in good electrical condition. Always replace
a damaged extension cord or have it repaired
by a qualified electrician before using it.
8. Protect the extension cords from sharp objects,
excessive heat, and damp or wet areas.
Page 6 ITEM # APS517 Airless Paint Sprayer Operating Instructions
NOTE: ALWAYS clean sprayer immediately to prevent permanent damage.
IMPORTANT ELECTRICAL INFORMATION
A
ttention
Use only a 3-wire extension cord that has a
3-blade grounding plug and a 3-slot receptacle
that will accept the plug on the product.
Make sure your extension cord is in good condition. When
using an extension cord, be sure to use one heavy enough to
carry the current your product will draw. An undersized cord
will cause a drop in line voltage resulting in loss of power and
overheating.
A 14 or 12 gauge cord is recommended (see chart). If an
extension cord is to be used outdoors, it must be marked with
“SJW” or “SJTW”. For example, a designation of SJTW would
indicate that the cord would be appropriate for outdoor use.
Cord gauge Maximum cord length
12 150 feet
14 100 feet
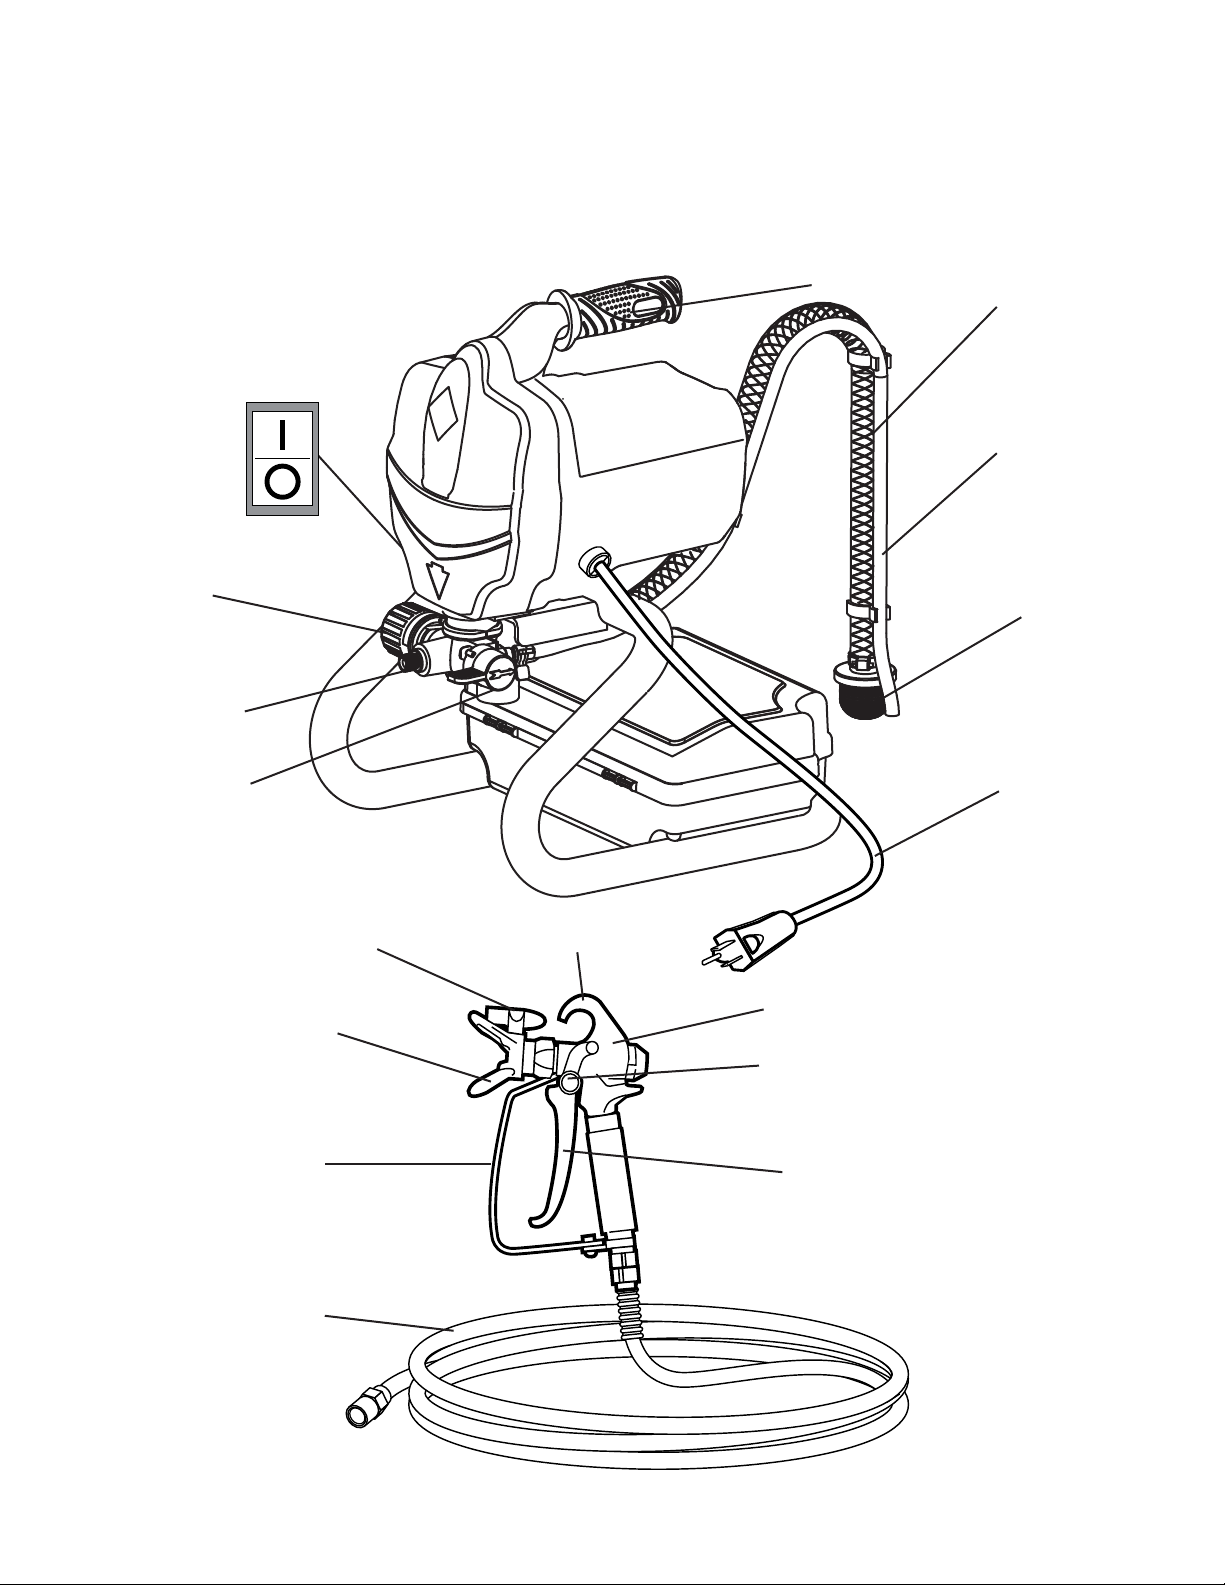
PARTS DIAGRAM
Familiarize yourself with the Paint Sprayer and its functions.
Trigger Lock
Spray Tip Guard
Trigger
Trigger Guard
Paint Hose
Spray Gun
Spray Tip
Prime/Spray Switch Power Cord
Handle Suction Tube
Paint Hose Outlet
Pressure
Control
Knob
ON/OFF
Switch
(Not Shown)
Priming Tube
Hanging Hook
Filter
Page 7
ITEM # APS517 Airless Paint Sprayer Operating Instructions

Trigger Lock
When engaged, this mechanism
prevents the trigger from
being pulled accidentally such
as if the gun is dropped.
Lock whenever not in use.
Locked Unlocked
Prime/Spray Switch
This switch toggles the unit between
priming mode and spraying mode. Prime
Spray
Pressure Control Knob
The Pressure Control Knob can be adjusted for High Pressure Spraying,
Low Pressure Spraying, Priming/Cleaning, or Rolling. Align the Pressure
Control Knob with indicator on the Sprayer Housing to set the function.
Hi SprayLow SprayPrime/CleanRoll
High Pressure Spray Prime/Clean
Low Pressure Spray Rolling
Nozzle
The nozzle is reversible and
removable to make cleaning
and unclogging easier.
Turn to Spray ( ) position
to use the spray gun.
Turn to Clean (Eject) position
to clean the nozzle.
Spray / Clean / Eject
Page 8 ITEM # APS517 Airless Paint Sprayer Operating Instructions

Note: Remove or cover objects that you want
to protect from overspray (paint mist).
1. Attach Paint Hose to Paint Hose Outlet
and tighten with wrench.
2. Attach Paint Hose to Paint Gun and
tighten with two wrenches.
3. Turn Pressure Control Knob to
Low Pressure Spray setting.
Page 9
ITEM # APS517 Airless Paint Sprayer Operating Instructions
NOTE: ALWAYS clean sprayer immediately to prevent permanent damage.
Setup
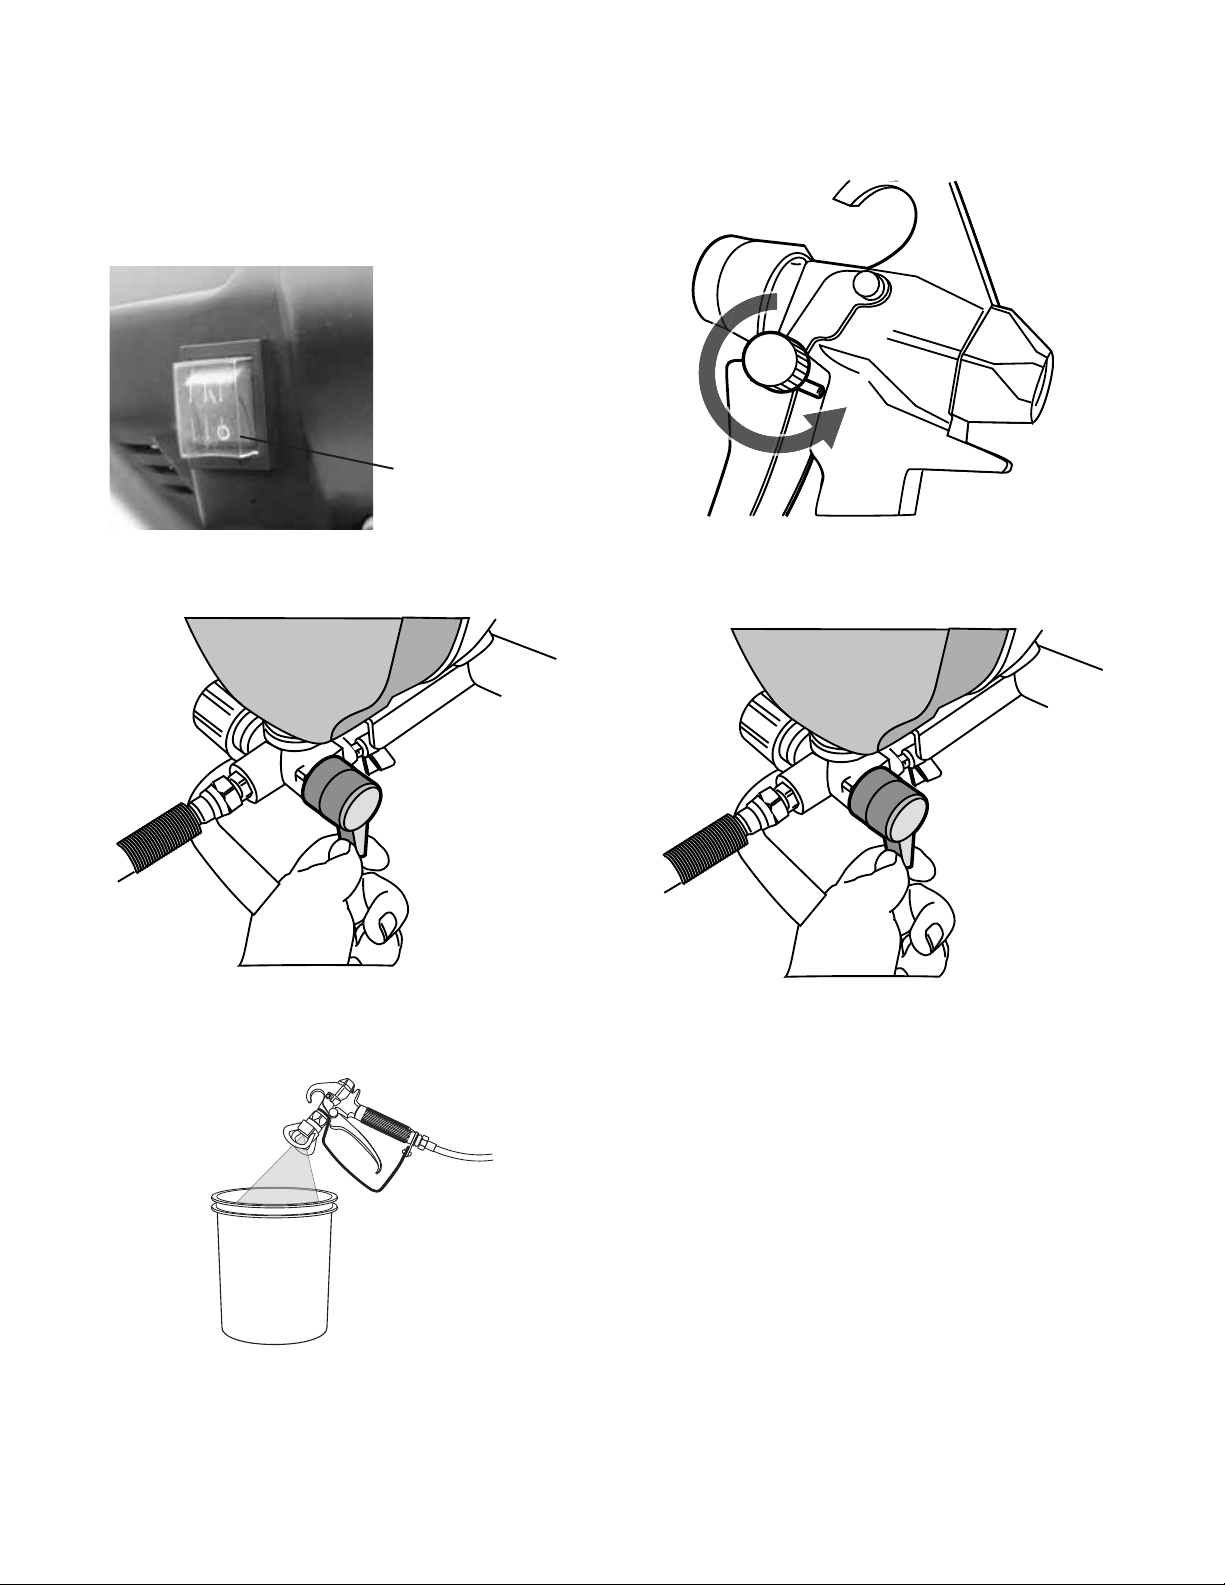
1. Turn Power Switch off and unplug unit from outlet.
2. Switch Prime/Spray switch to Prime mode.
3. Point gun into paint pail and activate
Sprayer Trigger to relieve pressure.
4. Turn Trigger Lock Knob to Locking position.
Note: Always set to Prime mode between uses.
NOTE: ALWAYS clean sprayer immediately to prevent permanent damage.
Page 10 ITEM # APS517 Airless Paint Sprayer Operating Instructions
To Relieve Sprayer Pressure
OFF O
Table des matières
Autres manuels Buffalo Tools Pistolet à peinture


