Brigade EDR-101 Manuel utilisateur

EDR-101 Event Data Recorder
Instruction manual
Part 4515

2
CONTENTS
1. General instructions ..............................................................................3
2. Features & box contents ......................................................................4
3. Components and functions .................................................................5
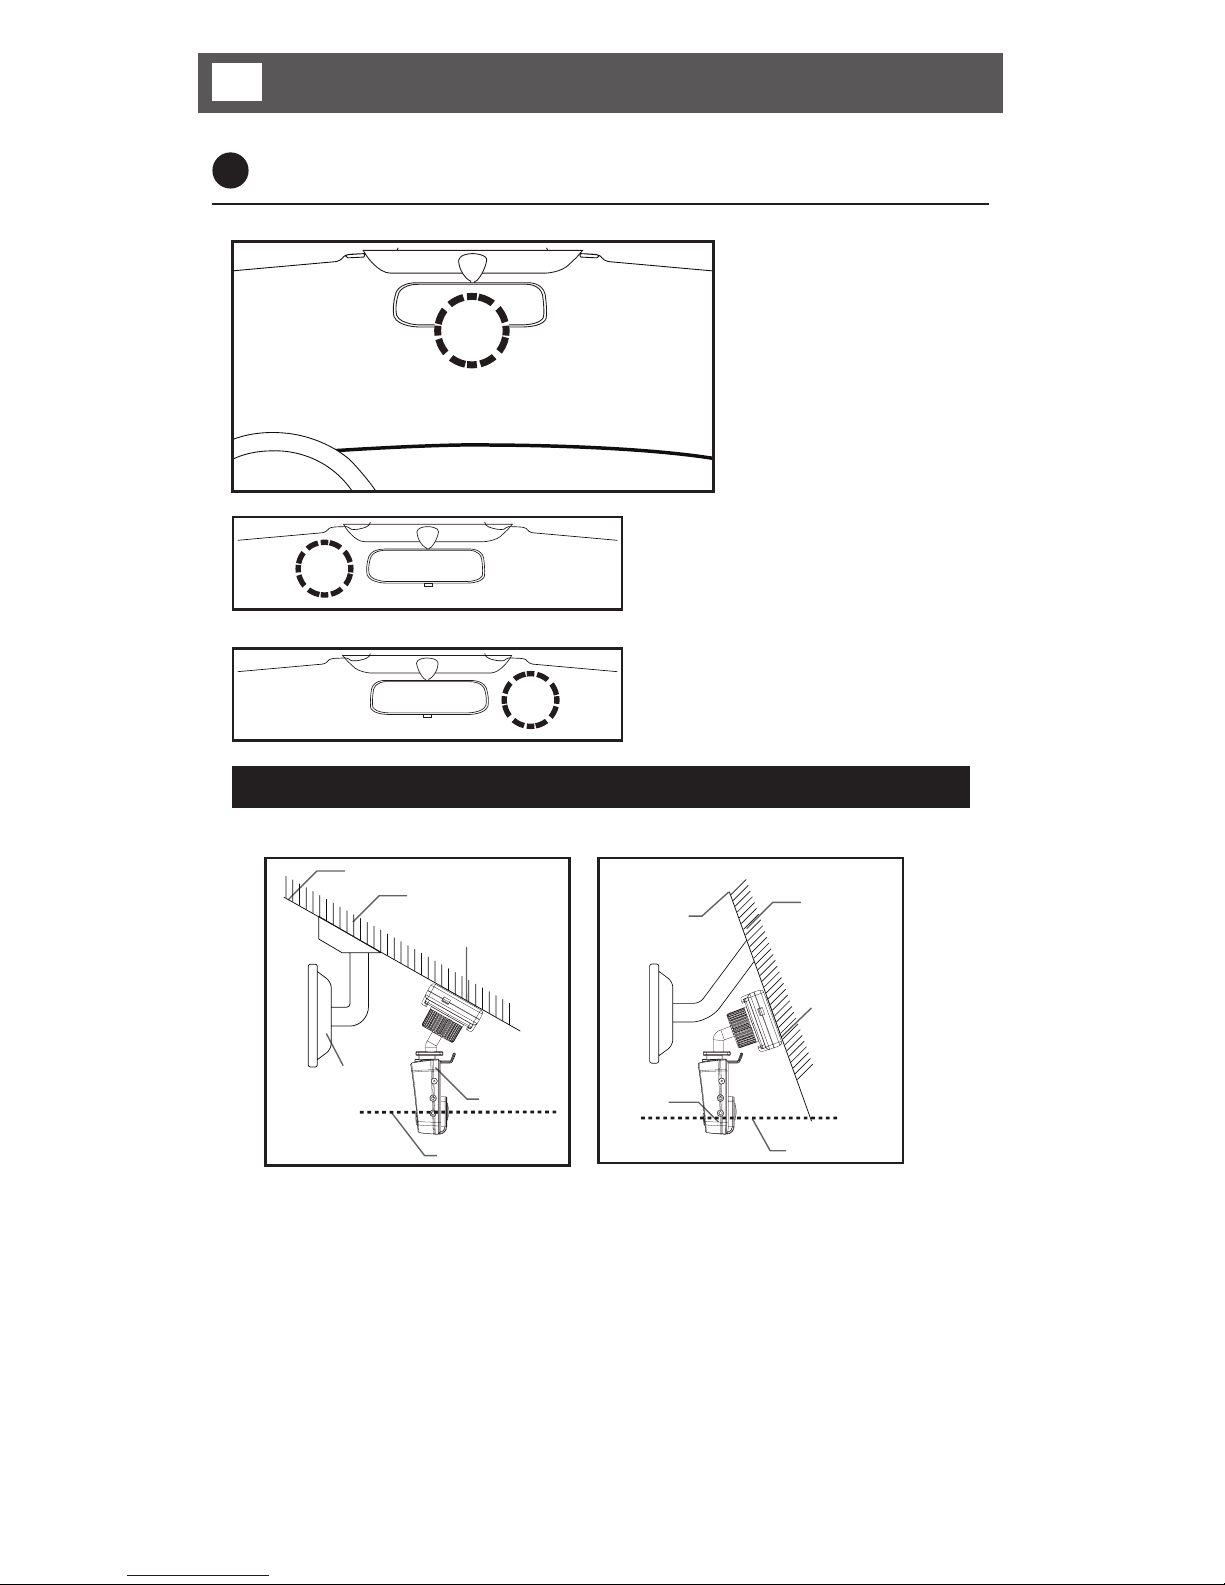
4. Installing the recorder in your vehicle ..............................................6
1) Recommended installation location ....................................................6
2) Mounting the GPS antenna ..................................................................7
3) Mounting the recorder ............................................................................7
5. Preparations for operation ..................................................................8
1) Inserting the micro SD card ..................................................................8
2) Removing the micro SD card ................................................................8
6. Operation - System active ...................................................................9
1) Power ON/OFF .......................................................................................9
2) Checking GPS .........................................................................................9
6. Operation - Recording modes ........................................................... 10
1) Video recording ..................................................................................... 10
2) Infinite recording ................................................................................... 10
3) Event recording ..................................................................................... 10
4) Emergency recording........................................................................... 11
5) Parking mode ......................................................................................... 11
6) Audio recording ON/OFF................................................................... 11
6. Operation - Auxiliary display .............................................................. 12
1) Real-time displaying ............................................................................. 12
2) System restart ....................................................................................... 12
7. PC Viewer Manager ............................................................................ 13
1) How to install & use PC Viewer Manager ....................................... 13
2) Configuration settings ......................................................................... 17
3) Memory info............................................................................................ 18
4) Version info ............................................................................................. 18
8. Firmware Update ................................................................................. 19
9. Micro SD Card data ............................................................................ 19
10. Specifications ....................................................................................... 20
• Built-in camera ......................................................................................... 20
• G-Sensor values...................................................................................... 20
• Micro SD Card capacities .................................................................... 21
• External camera specification ............................................................... 22
11. Disclaimer ...................................................................................................... 23
PAGE

3
General instructions 1
CAUTION
Thoroughly read and understand the information in this manual before installing or
operating the product.
This product should be installed by a qualified professional installer.
Do not shock the product, this may cause malfunctions.
Do not expose the product to high temperatures or humidity.
- It may cause electric shock or malfunctions.
The windscreen and camera lens should be kept clean, if it is dirty the recording
image quality could be poor.
GPS
It may take up to 10 minutes after power is connected to get GPS reception. It
may take longer to locate your position when the vehicle is moving compared to
when the vehicle is stationary.
GPS reception may be reduced:
• If there is metallic tinting on the windscreen.
• If objects are positioned around the GPS antenna.
• If magnetic devices are positioned close to the GPS antenna.
• On heavily overcast or cloudy days.
• In built-up areas.
During changing levels of brightness such as entering/exiting a tunnel the image
quality can be poor until the recorder adjusts to the new ambient light level.
WARNING
Always check that data saves on the micro SD card correctly.
Brigade does not take any responsibility for data loss.
Ensure the micro SD Card is fully inserted.
Before ejecting the micro SD Card, please ensure the power is off. If you eject the
micro SD Card while powered, it may cause malfunction or data loss.
There are no user-serviceable parts inside. Disassembly may cause permanent
damage.
If you find any data loss, please replace the micro SD Card.
Please check the capability of the micro SD Card when you purchase spare micro
SD Cards. The SD card must be a minimum of Class 10.
The built-in battery is to ensure the last recording is saved to the Micro SD card
when the power is removed. The main power supply is used for normal recording.
The built-in battery has a limited lifespan, so the recording time may reduce over
time. (The life time is different depending on usage conditions).
If you find that the last recording is not saved, the battery may have reached the
end of its life.

4
EDR-101
Direct power cable
Cigar cable
(Optional)
Instruction manual
V-Out cable
(Optional)
PC Viewer CD
Micro SD Card
lock M142B External
camera
GPS Unit Mounting bracket
Micro SD card
(includes SD card
adaptor)
Self-adhesive pads x 5Self-adhesive pad
• Pictures of the products may differ from the actual product. Some
parts may change without notification. Contact Brigade for details.
2 Optional parts
2Features
• Records accidents
• Parking mode function
• Wide angle of view of 120° built-in 2.0M Pixel CMOS CAMERA
• Audio recording
• Audible alerts
• GPS
• Built-in G-SENSOR (Front/Rear, Left/Right, Up/Down shock sensing)
• Micro SD Card (Max 32GB)
- If the recording exceeds the micro SD Card capacity, it deletes
recordings starting with the oldest file and records continuously.
• Built-in battery back-up
• 12V~24Vdc
• Supports External Camera (see page 22)
1 Box contents

5
Components and functions 3
1. Camera
8. micro SD slot
12. GPS antenna
11. External GPS input
2. V-Out
4. DC in
3. External camera input
13. Mounting Bracket
7. Speaker
6. Microphone
5. Status LED
10. Reset button
9. Function button
1 Power connections
*Connect the red wire to a 12-24V supply (ensure supply circuit is fused).
Connect the black wire to a suitable vehicle ground.
Connect the DC Jack to the DC connection of the recorder.
There is an optional cigar lighter power cable available to power the recorder from
a vehicle cigar lighter socket.
* If you connect to a permanent supply be aware that the vehicle battery may
become discharged over time.
1. Camera 2.0M Pixel CMOS CAMERA
2. V-OUT Video output connection
3. CAM (Input) External Camera input connection
4. DC IN (Power Input) Connects the power cable (DC 12V~24V)
5. Status LED Power & GPS/Recording/Audio Status indication
6. Microphone Audio recording microphone
7. Speaker Output speaker for audible warnings
8. Micro SD Card Slot A slot for inserting the micro SD Card
9. Function Button Emergency recording, Audio recording ON/OFF
10. Reset Button System reset button
11. GPS Input GPS signal input connection
12. GPS antenna
13. Mounting Bracket

6
Windscreen
Interior mirror
DVR
Keep horizontal
Tinted section
Outside
Interior
Double-sided
Adhesive tape
Windscreen
Tinted section
Double-sided
Adhesive tape
Interior mirror
DVR
Keep horizontal
Outside
Interior
Car Commercial vehicle
• Position the recorder so it does not obstruct the driver’s view and that there are
no obstructions in the camera view, including any windscreen tint.
• Position the recorder with the camera vertical, ie; looking directly forward
through the windscreen.
1 Recommended installation location
Please ensure all regulations/legislation are adhered to when installing the product.
The optimum position
for the recorder is
in the centre of the
windscreen.
If it is difficult to position the
recorder in the centre of the
windscreen, the recorder may be
positioned to one side but this
will compromise the recorded
view. Make a test recording to
help optimise the position.
4Installing the recorder in your vehicle

7
Installing the recorder in your vehicle 4
Always refer to the vehicle manufacturer’s guidelines for installation and
connections to the vehicle.
• Disconnect the vehicle battery.
• Follow safe working practices.
Ensure the product is attached to the windscreen properly.
- Clean the windscreen and adhere the product firmly, otherwise it may become
detached due to temperature/humidity/dust/shock/vibration.
2 Mounting the GPS antenna
1. Clean the windscreen.
2. Stick the GPS to the screen (using supplied self-adhesive pad).
3 Mounting the recorder
1 Slide the mounting bracket into the
front of the receiving channel until
the retaining lug latches in.
2 Slide the mounting bracket into the
retainers on the rear of the GPS
antenna.
3 Loosen the locking wheel.
4 Adjust the angle of the recorder.
5 Tighten the locking wheel to lock
the angle of the bracket.
To remove the recorder from the
mounting bracket:
1 Apply light pressure to the release
tab until the retaining lug un-
latches.
2 Slide the recorder off the bracket.
1
1
2
3
2

8
Be sure that the micro SD Card inserts into the micro SD Card slot correctly. If
not this will cause an error and could damage the micro SD Card or recorder.
5Preparations for operation
To remove the micro SD Card, first turn off the power and check the Power &
GPS LED is off (no more than 20 sec. required). Then, remove the micro SD
Card. If you remove the micro SD Card with the power on, a warning chime
sounds and no recordings will be saved. (It may also cause loss of data and
damage to micro SD Card).
1 Inserting the micro SD Card
Open the card slot and
insert the micro SD Card. Push in the micro SD Card
fully until it latches in.
Once the card has been
completely inserted, close
the slot cover.
2 Removing the micro SD Card
Open the slot cover, and
gently press the micro SD
Card. Then it will slide out. Pull out the micro SD Card.
After removing the micro
SD Card, close the slot
cover.

9
Operation - System active 6
Do not operate whilst driving.
1 Power ON / OFF
To power on, turn the vehicle ignition on with the power cable connected, the
3 LEDs will illuminate. When the recorder has finished starting up, a chime will
sound and the Power/GPS LEDs will illuminate red.
2. If the vehicle ignition is turned off, the recorder will remain on for up to 10
seconds in order to save the last recording file and then turn off with a chime
sounding.
The product does not power off by itself after the vehicle ignition is switched off
when it is connected to permanent power supply. If you want to power off, please
disconnect the power cable from product.
The GPS function can be used to
estimate the driving route and speed.
• With the GPS reception: Green LED
• Without the GPS reception: Red LED
• Power ON: RED LED
• Power OFF: LED off
2 Checking GPS
When the recorder is powered up it will start searching for GPS signals When the
recorder has located its position the Power & GPS LED will illuminate green and
a chime will sound.

10
2 Infinite recording
When there are no events, it continues recording at intervals of 1 min.
1 min. 1 min. 1 min. 1 min. 1 min. Continued…
3 Event recording
It performs recording 10 seconds before and 10 seconds after an event (20
seconds in total).
10 sec. before an event EVENT 10 sec. after an event
• When the recorder is configured to Infinite and Event mode, any event
(impact) that is detected during normal recording, normal recording will stop and
event recording will start. After event recording, normal recording will resume.
Example: If an event happens 1 minute and 50 seconds after starting recording:
1 min. 40 sec. 10 sec. EVENT 10 sec. 1 min. 1 min.
Event recording
Normal recording
The portion up to 10 seconds before the event
from 1 minute to 1 minute and 40 seconds will be
saved as a file of normal recording (40 seconds).
Save as
a normal
recording
file. (1 min).
• ‘Event’ is when any shock or impact is detected. The higher the sensitivity, the
finer the shock or impact will be detected. The lower the sensitivity, the stronger
the shock or impact will be detected. It is possible to adjust the sensitivity of the
detection in the PC VIEWER MANAGER (refer to page 13).
When the recorder is set to Infinite and Event recording, the micro SD card
separates the storage space approximately 60% for Infinite 40% for Event.
When the recording is over the micro SD Card capacity, it overwrites the
recordings starting with the oldest one first.
6Operation - Recording modes
1 Video recording
Once the installation is complete, turn on the vehicle ignition. The recording will
start when the recorder has finished starting up.
LED operation.
Infinite recording: Blue LED flashes at
intervals of 2.5 seconds.
Event recording: Blue LED flashes at
intervals of 0.5 second.
Table des matières
Autres manuels Brigade Caméra embarquée

Brigade
Brigade BE-800C-NIR Manuel d'instructions

Brigade
Brigade DC-204-AI Mode d'emploi

Brigade
Brigade BE-810XC Manuel d'instructions

Brigade
Brigade Backeye 360 Select Manuel d'instructions

Brigade
Brigade DC-204-AI Manuel utilisateur

Brigade
Brigade DC-102 Manuel utilisateur

Brigade
Brigade VBV-670-000 Manuel utilisateur

Brigade
Brigade DC-101 Manuel utilisateur

Brigade
Brigade DC-101 Manuel utilisateur


