BorMann Elite BHA1950 Manuel utilisateur

WWW.BORMANNTOOLS.COM
en
el
v2.1
BHA1950
034612
030430

WWW.BORMANNTOOLS.COM
2
* The above diagram may illustrate components related to other models in the product line and which may not included in the original packaging.
* Το παραπάνω διάγραμμα μπορεί να απεικονίζει εξαρτήματα που σχετίζονται με άλλα μοντέλα στη σειρά προϊόντων και τα οποία ενδέχεται να
μην περιλαμβάνονται στην αρχική συσκευασία.
A

EN
WWW.BORMANNTOOLS.COM
3
Safety instrucons
When using electrical appliance, basic precauons should always be followed including the following:
Read all instrucons.
To protect against risk of electrical shock do not put the appliance unit cord or plug in water or other liquid.
Close supervision is necessary when a appliance is used by or near children.
Unplug the appliance when not in use, changing accessory and before cleaning.
Avoid contacng moving parts.
If the supply cord is damaged, it must be replaced by manufacturer or its service agent or a similarly qualied person in order to avoid a hazard.
The use of aachments not recommended or sold by the manufacturer may cause re, electrical shock or injury.
Do not use outdoors.
Do not let cord to hang over edge of table or counter.
Keep hands and utensils away from moving blades or discs while processing food to reduce risk of severe injury to person or damage to the food mixer.
Blades are sharp, handle carefully.
To reduce the risk of injury, never place cung blades or discs on base.
Be certain is securely locked in place before operang the appliance.
Never feed food by hand, always use food pusher.
Do not aempt to defeat the lid interlock mechanism.
Always operate blender with cap is placed.
When blending not liquid, remove center piece of two-piece cap.
Turn o the machine before replace aachment.
Use the product and assembly the accessory as menoned on user manual only.
Switch o the appliance before changing accessories or approaching parts which move in use.
This appliance is not intended for use by children or other persons without assistance or supervision if their physical, sensory or mental capabilies prevent
them from using it safely. Children should be supervised to ensure that they do not play with the appliance.
Children should be supervised to ensure that they do not play with the appliance.
For Europe countries: This appliance shall not be used by children. Keep the appliance and its cord out of reach of children.
Appliances can be used by persons with reduced physical, sensory or mental capabilies or lack of experience and knowledge if they have been given su-
pervision or instrucon concerning use of the appliance in a safe way and if they understand the hazards involved. Children shall not play with the appliance.
Always disconnect the appliance from the supply if it is le unaended and before assembling, disassembling or cleaning.
Save these Instrucons!
0: Stop
Seng 1-6: Operang speed
Seng 1: Minimum speed (slow)
Seng 6: Maximum speed (fast)
Seng P: Highest speed
Control Panel Speed Seng
Operang Instrucons
Descripon of main parts (Diag.A)
1. Ring nut 2. Fine mincing disk
3. Medium mincing disk 4. Coarse mincing disk
5. Cuer 6. Silicon coupling
7. Scroll 8. Meat grinder body
9. Meat tray 10. Tamper
11. Protecve cover 12. Accessory socket
13. Swivel arm 14. Blender protecve cover
15. Upper coupler 16. Safe micro-switch
17. Release buon 18. Speed control knob
19. Motor house 20. Foot pad
21. Motor spindle 22. Lid
23. Bowl cover 24. Whisk
25. Flat beater 26. Kneading hook
27. Mixing bowl 28. Spatula
29. Middle cap 30. Blender lid
31. Jar 32. Cung blade
33. Cup base

EN
WWW.BORMANNTOOLS.COM
4
Seng Speed
Accessories Picture Speed Seng Time Capacity
Kneading Hook 1, 2
30s at speed1
and 3-5 min at
speed2
2000 g our and
1200 ml water
Flat beater 2-4 5-7min
Whisk 65-7min
At least egg
white of 3 eggs
No more than 21
eggs
Meat grinder 5-6 5 -7 min
Blender 5-6,P 1 min 1.5 L max
Operang posions
Warning!
Operate the appliance only when the accessory/tool is aached according to this table and is in the operang posion.
Risk of injury from the rotang tools!
While the appliance is operang, keep ngers clear of the mixing bowl.
Do not change tools unl the appliance is at a standsll and have been unplugged. When switch o, the drive connues running briey.
Item Posion Accessory
1.
2. Set up kneang hook, mixing hook, wisk, according to your desire
3.

EN
WWW.BORMANNTOOLS.COM
5
How to use Kneading Hook, Flat Beater & Whisk
4.
Set up Kneading Hook,Mixing Hook, Wisk,according to your desire.
1. Place the appliance on a at surface, e.g. a kitchen counter,
and make sure it is standing rmly.
2. Ensure that the protecve cover (11) is ed to the Accessory
socket (12)
3. Place the blender protecve cover (14) into the upper coupler
of swivel arm (15) (see illustraon).
Turn the arm release buon (17) clockwise at the same me li
the swivel arm (13) with hand so that it locks into place with a
click, the swivel arm lts up.
Fit the bowl cover (23) onto the swivel arm(13) and turn it slightly
clockwise, so that it locks into posion securely.
1
2
3

EN
WWW.BORMANNTOOLS.COM
6
1. Place the food in the mixing bowl(27).
2. Fit the mixing bowl in the recess on the motor house(19).
3. Turn the mixing bowl slightly clockwise, so it locks into po-
sion.
1. Put the splashguard to swivel arm,as shown picture and en-
sure it x well.
2. Fit the required accessory (25 with 24, 23or 26) onto the
motor spindle (21) on the underside of the swivel arm(13).
3. A. The kneading hook (26) is used for heavy dough,minced
meat or other demanding kneading jobs.
B. The at beater (25) is used to mix lighter types of dough.
C. The whisk (24) is used for whisking cream, egg whites, etc.
4. Turn the accessory, so the pins on the spindle are aligned
with the depressions on the accessory top edge. Press the ac-
cessory against the swivel arm and turn it an-clockwise at the
same me unl the pins engage and the accessory locks into
posion securely. The accessory must not be loose nor should
you be able to pull it free.
1. Lower the swivel arm so that it locks into place with a click.
The lid (23) must t ghtly with the mixing bowl (27), other-
wise it is ed incorrectly. The appliance is now ready for use.
2. Plug the power cord into main power outlet and switches it
ON. Turn Speed control knob to speed1(or any speed seng)
indicator light on the control panel will now be illuminated.
3. Select the speed you want using Speed buon 1 is the slow-
est and speed buon 6 is the fastest speed. Recommended
speeds, me and capacity are shown in the table above.
4. If you need to scrape inside the mixing bowl, wait unl the
accessory has stopped completely. Use the spatula, never
your ngers.
1. Switch o the appliance by pressing the OFF buon when
you have nished mixing. Switch o the appliance at the
switch and unplug it before you change the accessories, or
before you take the appliance apart or when not in use.
2. Turn the swivel arm release buon (17) clockwise. at the
same me li the swivel arm with hand so that it locks into
place with a click. The swivel arm(13) lts up.
4
5
6
7

EN
WWW.BORMANNTOOLS.COM
7
1. Detach the accessory by turning it clockwise.
2. Remove mixing bowl with prepared food an-clockwise.
IMPORTANT!
The temperature of water which will be added into dough at 40 +/- 5 o C when preparing for dough is on progress.
Meat grinder
1. Place the appliance on a at surface, e.g. a kitchen counter, and
make sure it is standing rmly.
2. Ensure that the protecve cover (11) is ed to the Accessory
socket (12)
3. Place the blender protecve cover (14) into the swivel arm (13).
(see illustraon)
1. Fit the scroll(7) into the meat grinder body(8).
2. Fit the silicon coupling (6) onto the scroll connecon (see illus-
traon).
3. Fit the cuer(5) onto the scroll connecon (see illustraon). The
sharp edges of the cuer should point towards the mincing disk.
4. Fit one of the three mincing disk(2,3,4) on top of the cuer (see
illustraon). Turn the mincing disk so that two indentaons are
aligned with the pins on the meat grinder body. Select the mincing
disk for the required consistency. You can choose ne, medium and
coarse.
5. Fit the ring nut (1) over the mincing disk on the meat grinder body
(see illustraon). Turn clockwise to lock. The ring nut must hold the
mincing disk securely in place. But do not over ghten.
8
1
2
2.1
8.1 8.2

EN
WWW.BORMANNTOOLS.COM
8
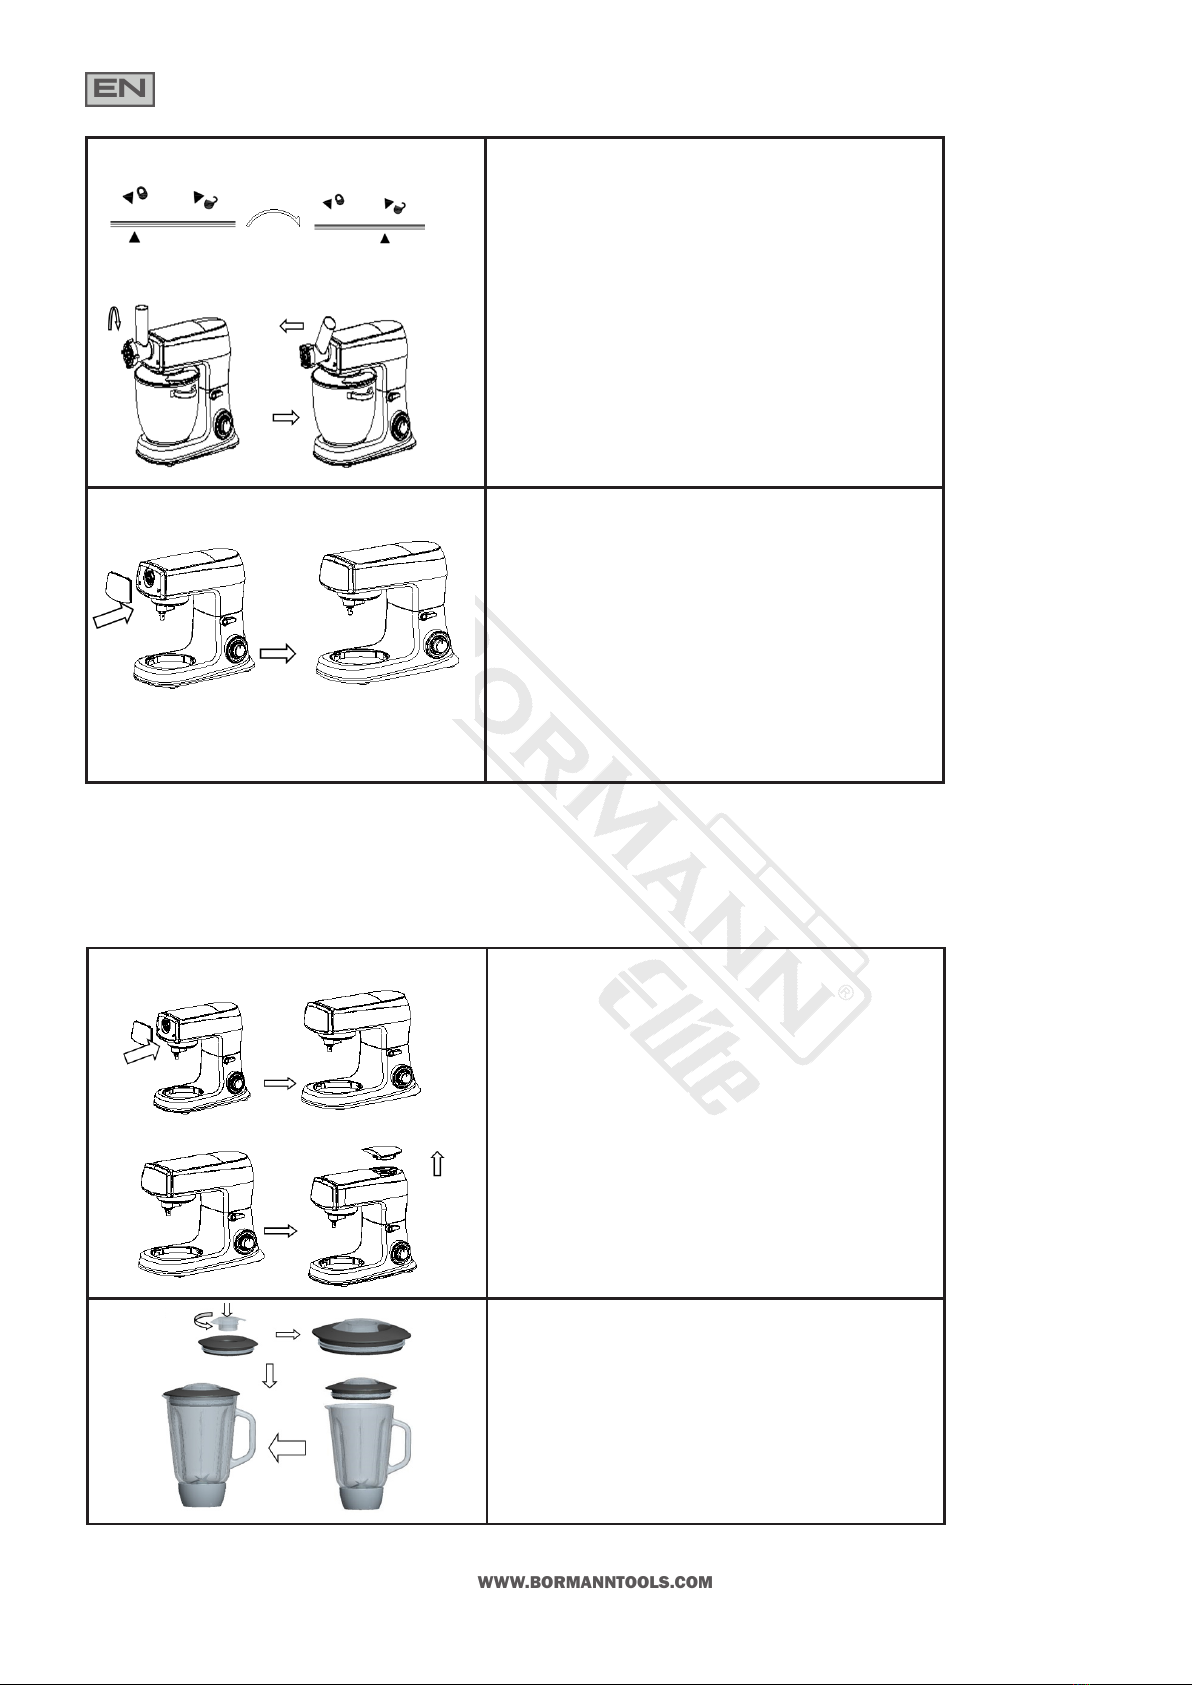
If the meat grinder body (8) in the accessory socket (12),so that the
arrow is aligned with the circle. Turn it to the vercal posion, so
the arrow is aligned with the arrow.
1. Fit the meat tray (9) onto the meat grinder body(8) so that the
wide part is posioned over the motor house of the appliance.
2. Place the mixing bowl(27) or similar under the meat grinder body
opening.
3. The appliance is now ready for use.
1. Plug the power cord into main power outlet and switches it ON.
2. Plug the power cord into main power outlet and switches it ON.
Turn Speed control knob to speed1(or any speed seng) indicator
light on the control panel will now be illuminated.
2.Cut your meat into smaller pieces, so the pieces t into the feeding
tube. Dice or cut into strips with a width of approx. 2.5 cm.
2. Put the pieces onto the tray(9).
3. Select the speed you want using the selector. Recommended
speeds are shown in the table above.
5.The meat pieces travel down the feeding tube. Push down careful-
ly with the tamper (10).
Do not press too hard, otherwise you may damage the appliance.
1. Switch o the appliance by pressing the OFF buon when you
have nished grinding the meat. Switch o the appliance at the
switch and unplug it before you change the accessories, or before
you take the appliance apart or when not in use.
2. Remove pusher and meat tray.
3
4
5
6
EN
WWW.BORMANNTOOLS.COM
9
To detach the meat grinder, turn the body so the arrow is aligned
with the circle and then remove.
Fit the protecve cover over the accessory socket again.
1. Place the motor secon on a at surface, e.g. a kitchen counter,
and make sure it is standing rmly.
2. Ensure that the protecve cover (11) is ed to the accessory
socket (12).
2. Remove the blender protecve cover(14) from the swivel arm(-
see illustraon).
1. Place the foodstu you wish to process into the jar(31).
2. Put the blender lid(30) into the jar and ensure it cover well.
3. Place the middle cap(29) into the hole in the blender lid.
Safety instrucons:
Always remove bone,gristle, tendons, and rind before grinding the meat.
Frozen food must be thoroughly defrosted before grinding.
The meat grinder must only be used to grind meat. Avoid grinding pasty foods, e.g. food containing breadcrumbs, as this could damage the appliance.
Never run the meat grinder connuously for more than 7 minutes. Running the meat grinder connuously for too long without a break may reduce the life span
of the appliance. Aer having used the appliance for 7 minutes, take a break and wait at least 30 minutes before using it again.
Blender
7
8
1
2

EN
WWW.BORMANNTOOLS.COM
10
1. Place the jar assembly in the motor house,so that the arrow is
aligned with the circle. Turn it clockwise, so the arrow is aligned
with the arrow.
2. Plug the power cord into main power outlet and switches it ON.
2. Turn Speed control knob to speed1(or any speed seng) indica-
tor light on the control panel will now be illuminated.
3. Select the speed you want using the selector. Recommended
speeds are shown in the table above.
1. Switch o the appliance by pressing the OFF buon aer use.
Switch o the appliance at the switch and unplug it before you
change the accessories, or before you take the appliance apart or
when not in use.
2. To detach the jar assembly, turn the jar so the arrow is aligned
with the circle and then remove.
3. Remove blender lid then you may put processed food out.
Fit the blender protecve cover to the swivel arm again.
Technical Data
Power: 1500W
Bowl capacity: 7,5L
Important ps and precauons
1. To achieve the best results when pureeing solid ingredients, place small porons into the jar one by one instead of placing a large quanty all at once.
2. If you are processing solid ingredients, cut them into small pieces (2-3cm) rst.
3. When mixing solid ingredients start o rst with a small amount of liquid. Gradually add more and more liquid through the opening in the lid.
4. Always place your hand on top of the blender when you are operang the device.
5. For srring solid or very thick liquid ingredients we recommend that you use the blender in impulse mode to prevent the blades from becoming stuck.
6. NB: Operate the motor for a maximum of 1 minutes to prevent overheang or consequent damage.
7. It is advisable to wash appliance before using it for the rst me.
8. Clean the appliance aer each use, thereby avoiding liquid incrustaons.
9. The switch does not permanently engage in the ‘P’ seng. You have to hold the switch in the ‘P’ seng
3
4
5
Ce manuel convient aux modèles suivants
1
Table des matières
Langues :
Autres manuels BorMann Mixer


