Blueskysea DV688 Manuel utilisateur
Blueskysea DV688 Motorcycle Camera
User Manual
Thank you for you choosing Blueskysea DV688 Motorcycle camera,please
read this user manual carefully before use it, and keep it for future reference.
If you need any assistance,please feel free to contact our customer support
team by email [email protected]
Blueskysea®

Main features:
1.This DV688 Motorcycle camera comes with 2 (two) full HD 1080p cameras.
Both the front and rear cameras record high quality video 1080P at 30fps.
2.The camera starts recording automatically when the ignition is switched on
and stops recording automatically when the ignition is switched off after a
brief shutdown sequence.
3.130° degree wide angle lens, equipped with 2 low light sensor
(Sony IMX323 Sensor), enhanced video quality at night.
4.The main DVR unit and cameras are rainproof (IP67 rated), it is absolutely
fine to use it on a rainy day.
5.This product has a 960x480 DPI (dot per inch) display which is considerably
brighter than comparable competitors displays. It has excellent visibility,
day or night.
6.This product uses 3rd generation toughened glass for excellent light
transmission for clarity, and exceptional resistance to scratches.
2
RESET TF-card
1
34567
8
9
11
10
12
13
14
15
17
16 18
22
19
20 21
23 24
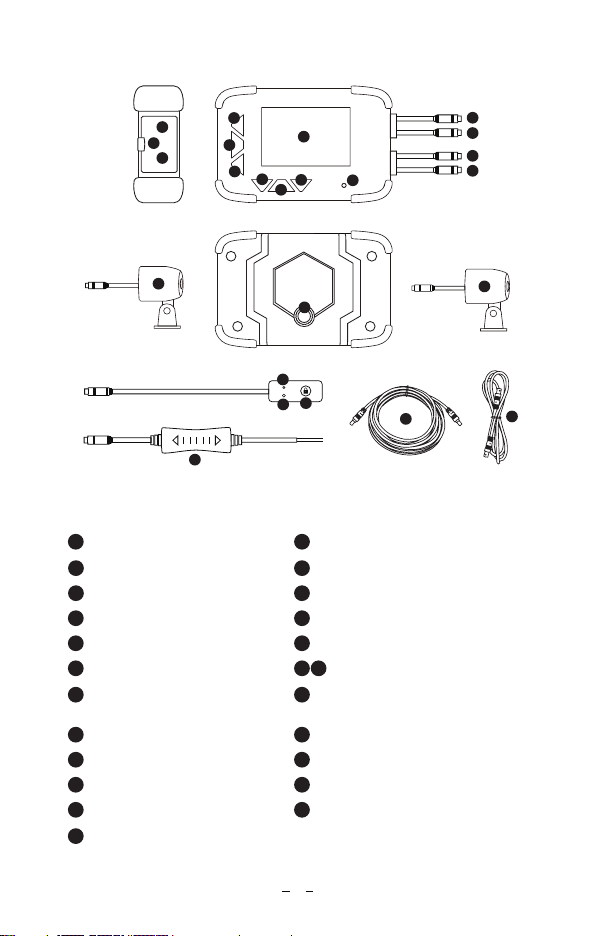
1Menu Setting button
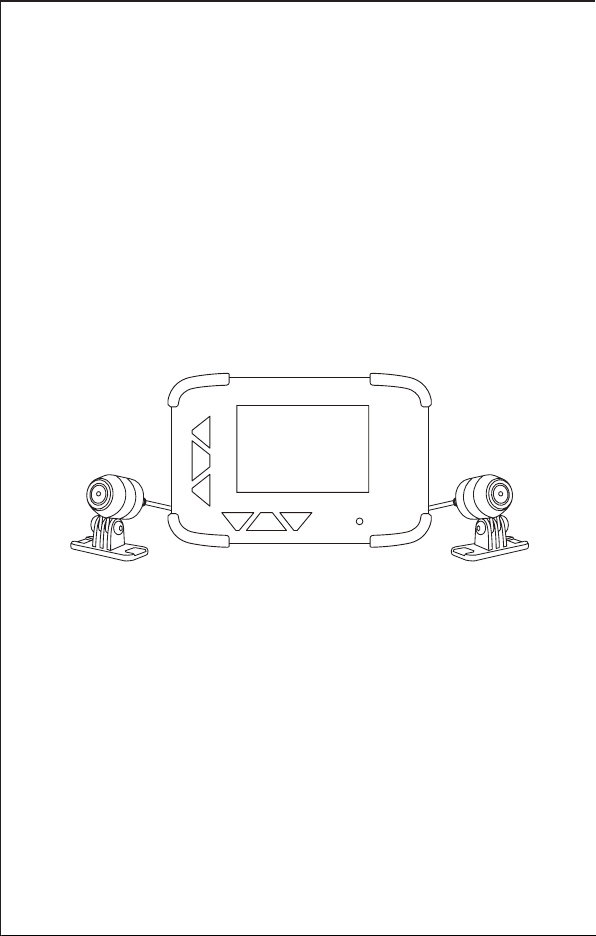
Structure diagram:
2Power button
3Mode Switch 4Up
5OK button 6Down
7Led Indicator 8Screen
9Reset Hole 10 Micro SD Card Slot
11 Battery
14 Power Connector
(Red Cable)
12 Camera Connector
13
15 Wired Controller Connector
(Yellow Cable)
16 Camera A 17 Mount hole
18 Camera B 19 Mic
20 Led indicator 21 Photo Snapshot/File Locked button
22 Power Adapter 23 3 Meters Connection Cable
24 1 Meter Connection Cable
3
Blueskysea®
2
4
G-MOUSE
Blueskysea®
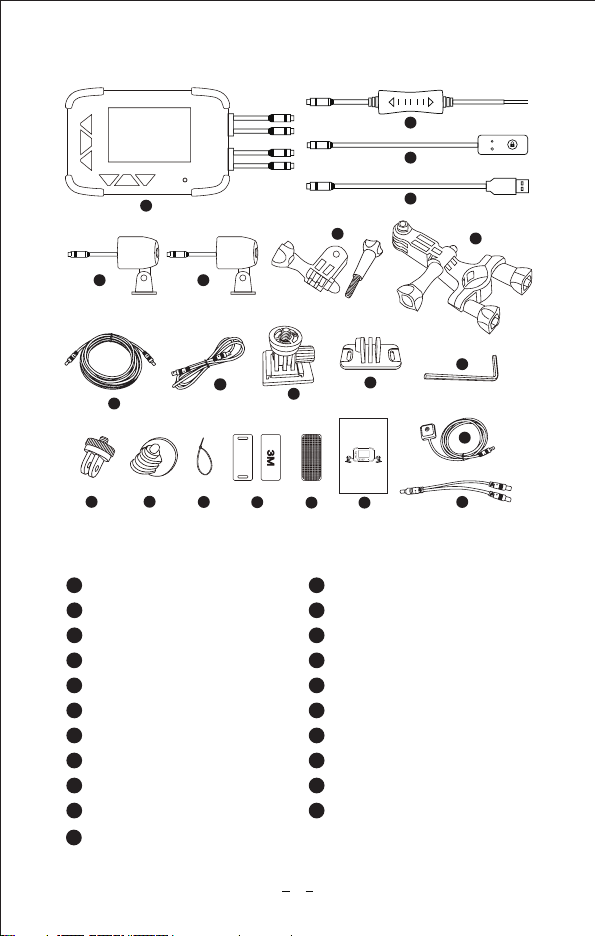
Package contents:
1x DV688 2CH Camera
1x Wired Controller
1x Power Adapter
1x USB Charger Cable
2x 1m connection cable1x 3m connection cable
1x Handlebar Bracket kit
1x Adapter
1
3
5
7
9
11
14
16
18
20
1
2
4
6
8
10
12
13
15
17
19
21
2
3
4
5 6
78
21
13
10 11
12
14 15
20
16 17 18
1x Camera A 1x Camera B
1x Adhesive mount 2x Backup mount for camera
1x Fixed base
6x 3M adhesive tapes
1x Switch mount
1x User manual
Blueskysea DV688 Motorcycle Camera
User Manual
Thank you for you choosing Blueskysea DV688 Motorcycle camera,please
read this user manual carefully before use it, and keep it for future reference.
If you need any assistance,please feel free to contact our customer support
team by email [email protected]
Blueskysea®
9
1x Y Shaped connector power cable (optional)
1x L Shaped Hex Screwdriver
6x Bandages
1x GPS module (optional)
2x Velcro
19
Button Function & LED Indicator
Power Button Long press to Power On/Off; Short press to switch
Screen On/Off.
Menu Button Menu Setting Function,Such as Resolution,
Language,etc
Mode Button Short press to switch Preview Mode/Playback Mode.
OK Button Start recording,Stop recording, and selection
confirmation
UP Button
In Preview mode and Recording mode: Short press
to switch PIP Layout, long press to switch on/off
audio recording.
In Menu setting mode and Playback mode: Short
press to change option selection.
Down Button
In Preview mode and Recording mode: Short press
to take a photo.
In Recording mode: Long press to lock current
video file.
In Menu setting mode and Playback mode: Short
press to change option selection.
Lock Button
on wired Controller
In Preview mode and Recording mode: Short press
to take a photo.
In Recording mode: Long press to lock current
recording file.
Led Indicator
Red light blinking: Battery is charging.
Red light on solid: Battery is fully charged.
Blue light blinking: Camera in Recording mode.
Blue light on solid: Camera in Preview mode.
*The unit will “Beep” an alert if there is a SD memory
card or camera installation error. Please check the
SD card and camera connection cable if an alert
sound is heard!
5
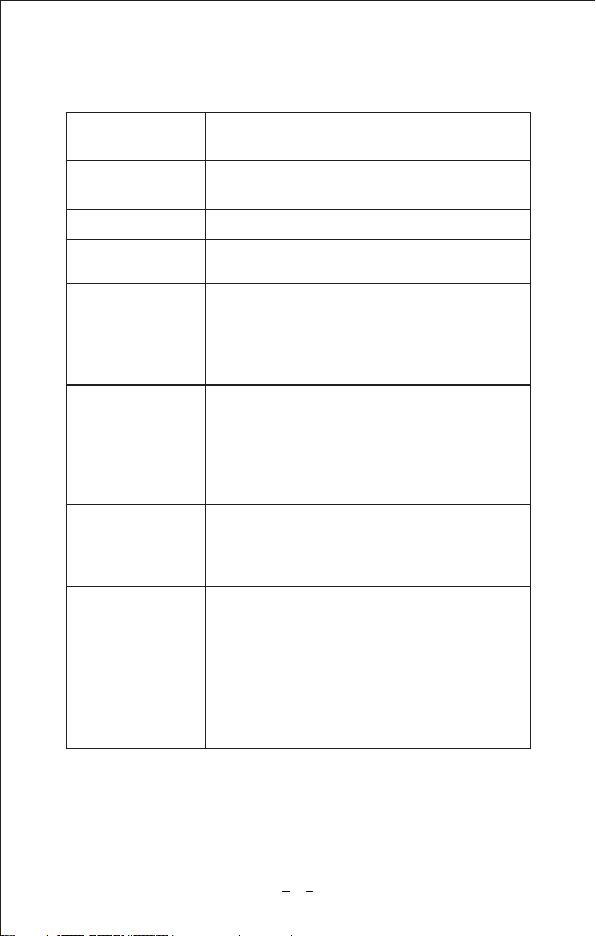
Specification:
Processor
CMOS Sensor
Lens Optical Parameters
Lens Angle
Video resolution
Video Codec/Format
Photo Resolution
Photo Format
Audio
Memory card capacity
Loop Recording
G-sensor
Emergency lock
GPS Logger
Language
Rain Waterproof
Screen Size
DVR Size
Camera Size
Camera Extension Cable Length
Wired Controller Length
Unit weight
Power Input
Power Adapter Output
Removable lithium battery
Storage Temperature
Working Temperature
Allwinner V3
2MP Sony IMX323
7G (6G+IR), F1.8, f2.8mm
130 degree
1920x1080P 30fps; 1280x720P 30fps
H.264 / Mp4
1/2/5/8MP
JPG
Mic on wired controller/Speaker on DVR
Up to 128Gb Max.(not includes in package)
1/3/5/10 minutes
Off/Low/Middle/High
Support
Optional
English/ Chinese/ Japanese/ Korean
IP67 Rated
2.4 inch, 960x480 dots
102x67x25 mm/ 4x2.7x1 in
28x28x33 mm/1.1x1.1x1.3 in (without mount)
5 m/ 16 ft (in total)
2.8 m/ 9 ft
523g/ 18.5oz
12-24V
5V, 2A
3.7V, 500mAh
-4F~+176F (-20°C ~ +80°C)
14F~+104F (-10°C~ + 40°C)
Blueskysea Dv688
6

Basic operation:
1. Insert one micro SD card (Class 10, 16GB or larger) into camera and push
until it locks into place.
2. To remove the micro SD card, press the end of micro SD card until it clicks
and releases from the slot, and then pull out the SD card.
Insert/remove Micro SD card:
Camera will take recording automatically when ignition is switched on. no
need extra operation. Its blue led indicator light flashes during video recording.
Take recording:
1. Camera will stop recording automatically when the ignition is switched off.
2. Short press OK button to stop recording manually.
Stop recording:
1. In Preview mode and in recording mode: Short press the “Lock” button on
the wired controller to take a photo.
2. In Preview mode and in recording mode: Short press “Down” button on
DVR to take a photo.
Take a photo:
1. Long press “lock” button on wired controller to lock video clips manually;
This will lock the currently recording video clip.
2. Long press “Down” button on DVR to lock video clips manually;This will
lock the currently recording video clip.
3. Video clips will be Locked automatically when G-sensor triggered.The
sensitivity of the G-Sensor can be adjusted in the settings by pressing
the “Menu” button.
Lock video clip:
7

Video playback
Short press MODE button to enter Playback mode.
Short press UP or DOWN button to select, and then press OK button to
playback the video or the photo you choose.
Playback on DVR
1. Remove the Micro SD card and Connect to the computer USB socket via
a micro SD card reader. Once connected, open a file browser and navigate
to the SD card.
2. You will find a photo folder when you access the memory card on the computer.
3. You will find Video A, Video B and a SOS video folder. There will be three
file folders when you access the memory card on the computer.
Playback on PC
You can obtain information from the video file name, for example:
The GPS signal will be saved in the video file if you connected a GPS module
with the DVR and receiving GPS signal successfully.
GPS logger Playback(Only works if camera comes with extra GPS module)
20170101_020339A.mp4 20170101_020339B.mp4
20170101_021521A_SOS.mp4
20170101_020339” indicates Date/Time;
“A”, “B” is for camera A/ camera B video files;
“SOS”file folder indicates files was locked;
“mp4” is the video file format;
GPS module is not a standard accessory for this camera, you need to buy it
separately
8
To connect the GPS unit to the DVR:
Locate the “Y” cable and connect the GPS antenna and the “power adapter”
to the “Y” cable on the side that has 2 connections. Connect the end that
has only 1 connection to the “power adapter” cable on the DVR. The GPS
route will be displayed on Google maps when you playback the video in
GPS Player.
To play back, open GPS Player (Please download GPS Player software
at.www.blueskysea-inc.com)
HZ Light frequency 60Hz
>
shut down
>
3seconds
>
midle
>
Screen switch
Delayed shutdown
Vibration lock sensitivity
GPS function
System exception alarm
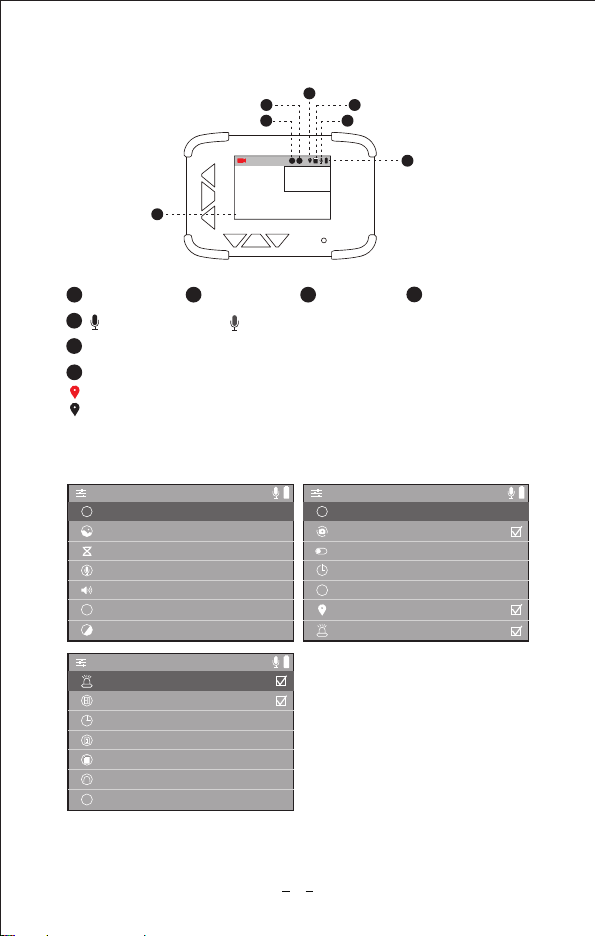
G
Screen image
2Camera A 3Camera B
GPS (optional)
GPS icon in red color indicates GPS located;
GPS icon in gray color indicates GPS location failed;
Date/Time
Audio recording on/
9
A B
2018-06-26 17:24:41
Blueskysea®
1
6
2
3
5
4
7
/Audio recording off
1
Battery capacity icon
6
7
Micro SD Card
4
5
HD Video resolution 1080P
>
5M
>
5Minutes
>
High
>
High
>
English
>
0
>
Photographic resolution
Loop video
Microphone volume
Speaker volume
Language
EV value setting
A
+-
i
>
0.0/0.0G
>
Date/Time setup
Memory card capacity
Format memory card
Restore factory settings
Version
Power on video
System exception alarm
>
YZ-688-20180605
Main Menu setting:

There are three options for playback speaker volume: High/Middle/Low
Default speaker level is high.
Speaker volume:
There are 8 language options available: English/Chinese/Japanese/Korean/
Spain/etc.
Default language is English.
Language:
There are seven available settings for EV: -3/-2/-1/0/1/2/3
Default value is 0.
EV value setting:
There are two options available: 50Hz/60Hz
This option should be set according to the power supply specifications used
in your country or geographical region. For example, US users should select
60HZ value.
Light frequency:
10
The DVR has four options for microphone recording level: High/Middle/Low/
Shutdown.
Default audio level is low. You have the option to record audio with video,
or turn off microphone so that all recorded videos will be muted.
Microphone volume:
1M/2M/5M/8M are the available options for still picture resolution.
Default resolution is 5MP.
Photographic resolution:
Loop recording mode cannot be switched off.
The camera will continuously erase the oldest video as it records a new video.
However, any locked video files on memory card will not be overwritten as
they are protected.
Press “video partition” and choose 1/3/5/10 minutes to select the video loop
duration. This is the length of each video loop.
Loop video:
(1920x1080p) 30fps / (1080x720p) 30fps are the two available video resolution
options.
Default resolution is 1080x720p.
Video resolution:
Table des matières
Autres manuels Blueskysea Caméra embarquée


