BlazeVideo A390G Manuel utilisateur
CELLULAR
TRAIL CAMERA
A390G
INSTRUCTION MANUAL
Model# A390G-DEU Doc V2.0

TABLE OF CONTENT (English)
1. IN THE BOX.................................................................................... 1
2. IMPORTANT NOTE........................................................................1
2.1. About Batteries.................................................................... 1
2.2. About SD Card.....................................................................1
2.3. About SIM Card...................................................................2
3. INTRODUCTION.............................................................................2
4. PARTS AND CONTROLS...............................................................3
5. INSTALLING THE BATTERIES AND SD CARD........................6
6. THE OFF, ON, AND SURVEILLANCE MODES.......................... 8
7. CELLULAR CONNECTION......................................................... 10
7.1. Download TrailCam Mobile App...................................... 11
7.2. Add Your Camera.............................................................. 11
7.3. Select Camera Type........................................................... 11
7.4. Login Your Account........................................................... 11
7.5. Activate Camera................................................................ 12
7.6. App Navigation.................................................................. 15
7.7. Get the First Picture.......................................................... 16
7.8. View Photo or Video..........................................................16
8. ADVANCED SETTINGS...............................................................16
9. MOUNTING AND POSITIONING............................................... 22
9.1. Mounting............................................................................22
9.2. Sensing Angle and Distance Test.......................................23
9.3. Starting.............................................................................. 25
10. REVIEW PHOTOS OR VIDEOS.................................................25
11. TECHNICAL SPECIFICATIONS............................................... 26
12. TROUBLESHOOTING................................................................ 28
13. WARRANTY................................................................................28

INHALTSVERZEICHNIS (Deutsche)
1. INHALT DER BOX........................................................................30
2. WICHTIGE ANMERKUNG.......................................................... 30
2.1. Über Batterien................................................................... 30
2.2. Über SD-Karte...................................................................30
2.3. Über SIM Karte................................................................. 31
3. EINFÜHRUNG...............................................................................31
4. KOMPONENTEN UND KONTROLLEN.....................................32
5. BATTERIEN UND SD-KARTE EINLEGEN............................... 36
6. ON-, OFF- UND ÜBERWACHUNGS-Modus.............................. 38
7. Mobilfunk Verbindung....................................................................41
7.1. Laden Sie die App "TrailCam Mobile" herunter...............41
7.2. Ihre Kamera hinzufügen.................................................... 41
7.3. Kameratyp Auswählen.......................................................41
7.4. Melden Sie sich bei Ihrem Konto an..................................41
7.5. Kamera aktivieren............................................................. 43
7.6. APP Navigation................................................................. 45
7.7. Holen Sie sich das erste Bild............................................. 46
7.8. Foto oder Video ansehen...................................................47
8. ERWEITERTE EINSTELLUNGEN.............................................. 47
9. MONTAGE UND POSITIONIERUNG.........................................55
9.1. Montage............................................................................. 55
9.2. Test Von Abtastwinkel Und Abstand................................. 56
9.3. Umschalten Von Funktionen Der Kamera........................ 58
10. FOTOS ODER VIDEOS ANSEHEN........................................... 58
11. DIE TECHNISCHEN DATEN.....................................................59
12. FEHLERBESEITIGUNG............................................................. 62
13. GARANTIE.................................................................................. 63

1
1. IN THE BOX
1xCamera,1xMountingStrap,1xAntenna,1xSIMcard,
1 x Instruction Manual, 1 x Mini USB Cord
Note: Memory card and batteries are not included (user supplied).
This camera is only applicable in the UK, Germany, France,
Italy and Spain.
2. IMPORTANT NOTE
2.1. About Batteries
Require eight (8) 1.5V AA Alkaline or Lithium batteries. We
recommend the use of Energizer AA Lithium batteries in this
camera to obtain maximum battery life.
Do not mix old and new batteries. Do not mix battery type.
Rechargeable NiMH AA batteries can be used, but are NOT
recommended as the lower voltage (generally 1.2V) they
produce may cause night recording issues, and you may have
to replace them frequently.
Remove batteries when the camera is NOT in use.
2.2. About SD Card
Require a standard-size SDHC/SDXC memory card (max
capacity 512GB, Class 10). Recommend using SanDisk 32GB
SDHC/Class10 memory cards in the camera to obtain the best
cost-performance.
Before use, please format your SD card in the camera.

2
2.3. About SIM Card
Your camera comes with a SIM card that only works with
T-Mobile, Telefonica and Vodafone cellular network in
Germany. Pleasemakesurethecellularsignalisgoodwhere
your camera is installed. Please don’t remove the SIM card. If
you have multiple cameras, please don’t exchange SIM cards
among them.
3. INTRODUCTION
3.1. About the Camera
The A390G is a new generation of 4G LTE cellular trail
camera. The camera has a built-in cellular module, allows you
remotely connect and operate the camera through a dedicated
App (“TrailCam Mobile”). The camera will send pictures to
cell phone according to the Transfer Schedule specified in the
App. The camera also features the all-new innovative and
ultra-clear imaging technology, encompasses smart night
vision, blur reduction, and noise reduction technology to
deliver high resolution image quality.
3.2. Main Features
Works with T-Mobile, Telefonica and Vodafone in Germany
(SIM card included)
Quick activation by App
Offers affordable and flexible data plan
Program your camera via App
Send pictures to cell phone
High quality pictures (32MP still photos), 1296P 20fps or
1080P 30fps H.264 video clips with audio
Clear night vision, flash range 100ft, equipped with 36pcs high

3
performance infrared no glow 940nm LEDs that function as a
flash (invisible to eyes)
Wide view angle - 70°
Easy to use/program with well-designed operation buttons and
built-in 2.4-inch color screen, easy to program, review pictures
and videos on the screen
Two working modes - Motion detection and Time lapse
Fast trigger time approx. 0.1~0.6 second (pre-activated
technology with 3 PIR sensors designed), Fast recovery time of
less than 0.5 second, Long trigger distance up to 75ft
Info strip on each capture: Date, Time, Temperature & Moon
phase
Operation Hours, Loop Recording, Time Lapse, Password
Protected
Built for any climate - IP66, Operation Temperature: -4~140°F
Support SD/SDHC/SDXC memory card, max capacity 512GB
(user supplied)
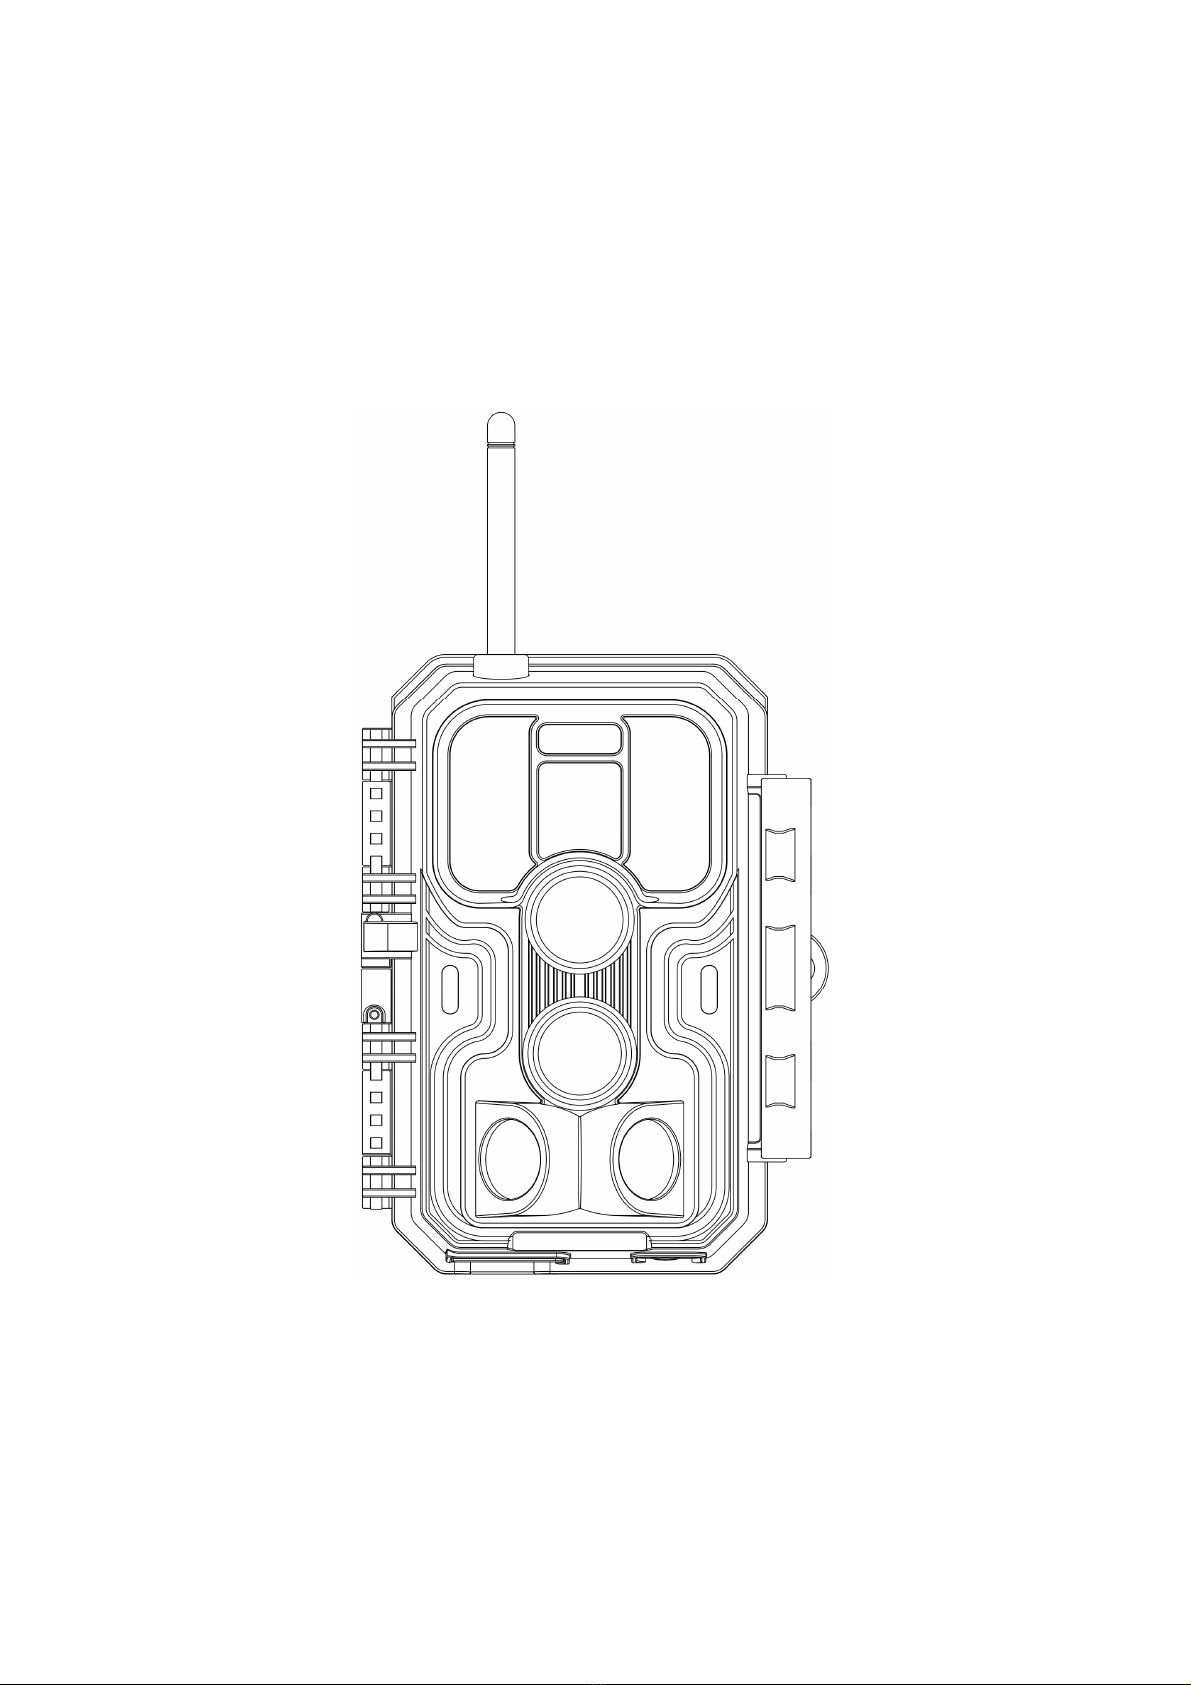
4. PARTS AND CONTROLS
The camera is equipped with an antenna, 36pcs infrared LEDs,
Indicator, Light Sensor, Optical Lens, PIR Sensors, Lock Holes
in front view (Figure 1).
TIP: During use, the black PIR Lens may be dirty or have
scratches, however it does not affect the performance due to
the reliability design. If you must clean it, please try to blow it
off or pick out the dirt very lightly. Please do not try to wipe it,
which may cause more scratches.

4
Figure 1: Front View
Install the antenna: The antenna is placed in the accessory
slot of the package box. Please screw the antenna into the
mounting base on the top of the camera and securely tighten it
(Figure 1).
The camera provides the following connections for external
devices:MiniUSBportandSDcardslotetc.(Figure 2).
IR LEDs
Lock
Hole
Optics
Lens
Central
PIR Lens
Light
Sensor Indicator
Lock
Buckle
Antenna
Side
PIR Lens
Side
PIR Lens

5
Figure 2: Bottom View
The camera has one security cable hole and two strap holes on
the back. The strap can be put through the strap holes and
fastened securely around a tree trunk by pulling the end of the
strap firmly (Figure 3).
Figure 3: Right / Back View
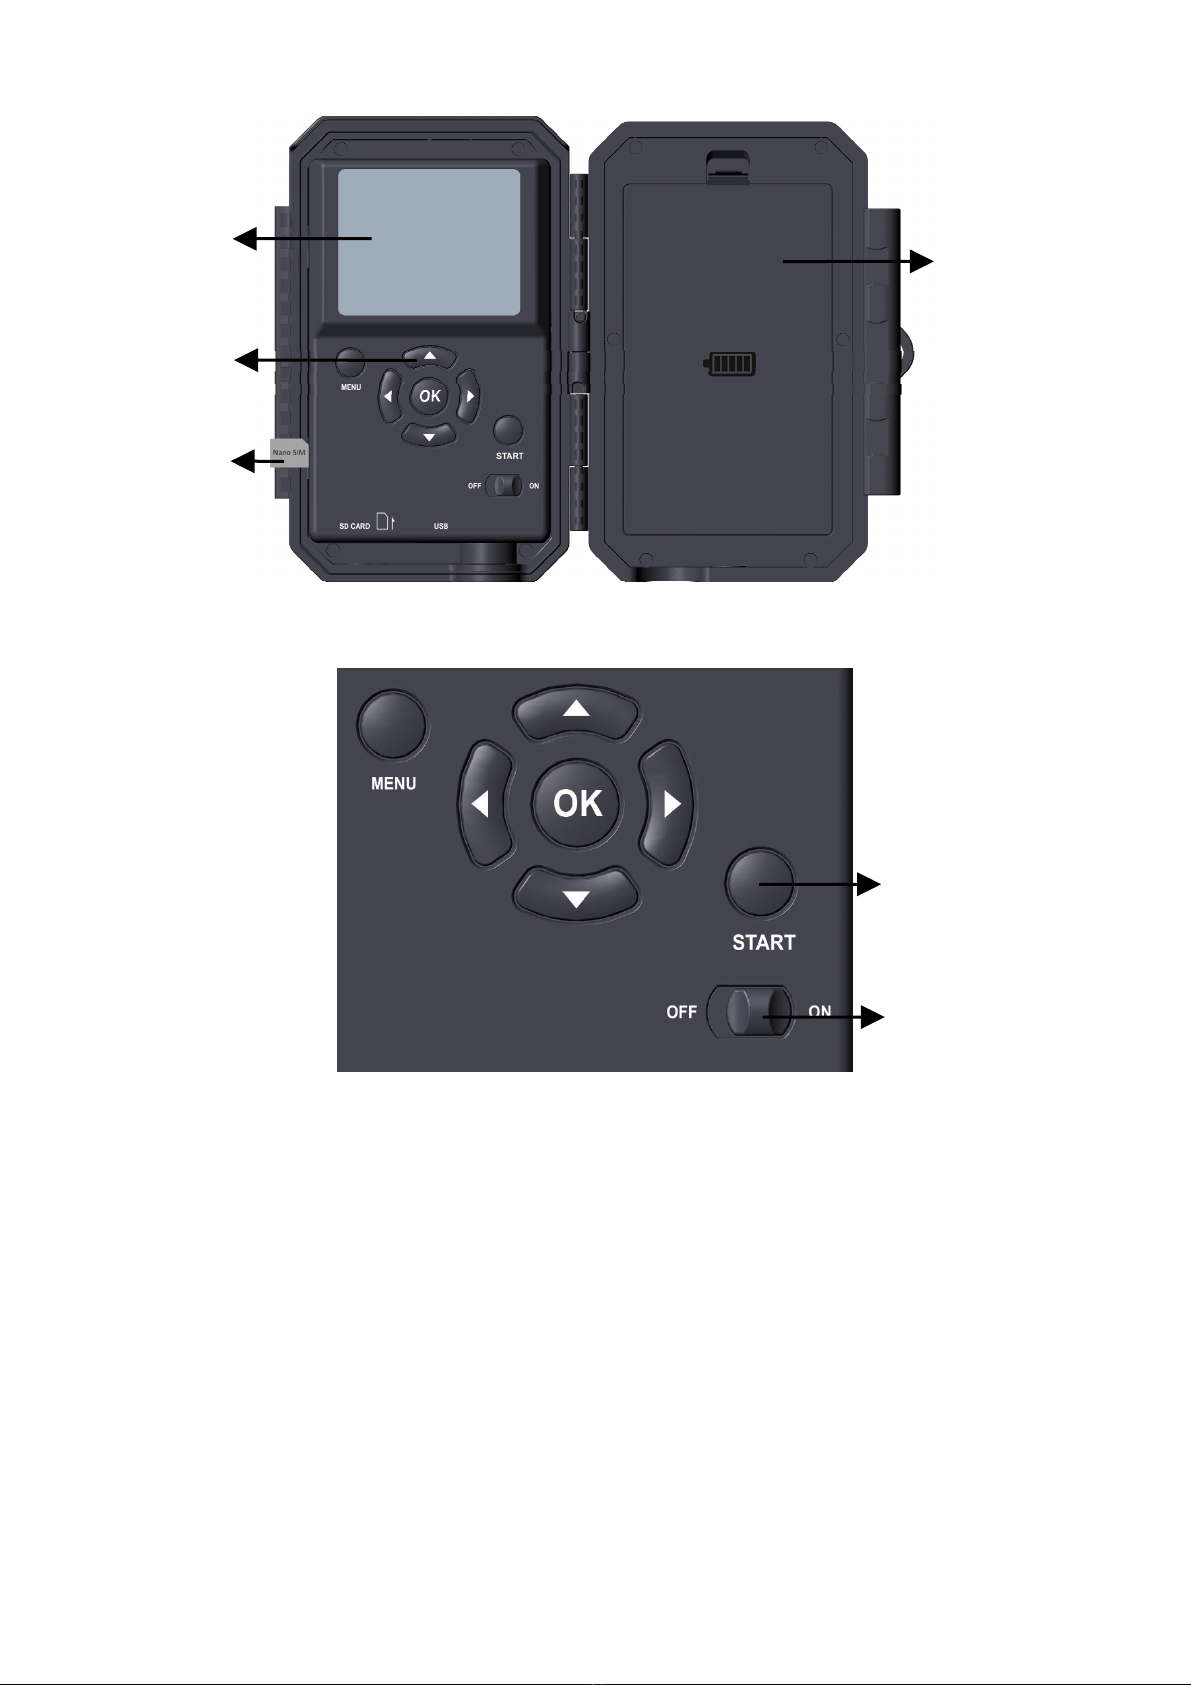
The camera has a 2.4-inch built-in LCD screen, which can be
used for reviewing pictures or videos and menu displaying, and
exclusive keypad design for easy program and operation, 8 AA
batteries slot supported (Figure 4).
Tripod Base
1/4" - 20
SD Card
Holder
DC 12V/1A
Plug 5.5x2.1mm
Strap
Hole
Lock
Buckle
Mini USB Port
Microphone
Security
Cable Hole
6
Figure 4: Inside View and Preinstalled SIM card
Figure 5: Operation Buttons
A power switch is used to power on (ON mode) or off the
camera (OFF mode). A START button is used to quickly
make the camera into the surveillance mode (motion detection)
or time lapse per your settings (Figure 5). When the camera is
in the surveillance mode, press the START button to wake up
the camera.
5. INSTALLING THE BATTERIES AND SD CARD
The Nano-SIM card is preinstalled, please don’t remove it.
Power
Switch
Color
Screen
Battery
Compartment
and Cover
Operation
Buttons
Surveillance
Mode
Nano-SIM
Card

7
Before you begin learning how to use your camera, you will
first need to install 8 AA batteries and insert an SD card.
Although that may only take you a minute, there are some
important notes about batteries and SD cards you should be
aware of, so please take the time to read the following
directions and cautions:
5.1. Loading Batteries
After opening the cover of the battery compartment, you will
see that the camera has eight battery slots (Figure 6). A full
eight batteries must be installed for the camera to operate. Be
sure to insert each battery with correct polarity (negative or
"flat" end against the long spring of each battery slot).
In ON mode when battery power level gets low, the message
"Low Battery" will show on the screen, please replace the
batteries. If the battery indicator shows in RED, this does mean
the batteries are not able to drive IR LEDs flash at night,
however the batteries stillworkatdaytimeuntil"Low
Battery". If you want to continue night vision, please replace
the batteries.
Figure 6: Loading the Batteries
Ce manuel convient aux modèles suivants
1
Table des matières
Langues :
Autres manuels BlazeVideo Caméra de repérage

BlazeVideo
BlazeVideo A252 Manuel utilisateur

BlazeVideo
BlazeVideo A323 Manuel utilisateur

BlazeVideo
BlazeVideo A323 Manuel utilisateur

BlazeVideo
BlazeVideo A280W Manuel utilisateur

BlazeVideo
BlazeVideo A262 Manuel utilisateur

BlazeVideo
BlazeVideo T326 Manuel utilisateur

BlazeVideo
BlazeVideo A350W Manuel utilisateur

BlazeVideo
BlazeVideo A350 Manuel utilisateur

BlazeVideo
BlazeVideo A252 Manuel utilisateur

BlazeVideo
BlazeVideo A323 Manuel utilisateur


