BEMOOV M14 Manuel utilisateur

USER’S MANUAL
Bemoov M14
www.bemoov-bikes.be

2
TABLE OF CONTENTS
Your BEMOOV and its components ................................................................................................................................................................................ 03
Assembly instructions ............................................................................................................................................................................................................... 04 - 10
A. Unpacking ................................................................................................................................................................................................................. 04
B. Adjusting the handlebars .............................................................................................................................................................................. 05 - 06
C. Putting on the pedals ..................................................................................................................................................................................... 07
D. Adjusting the saddle height ........................................................................................................................................................................ 08
E.Positioningofreectors.................................................................................................................................................................................. 09-10
F. Tire pressure ............................................................................................................................................................................................................ 10
Safety instructions and guidelines for use .............................................................................................................................................................. 11 - 12
Servicing and maintenance .................................................................................................................................................................................................. 13 - 16
A. General ....................................................................................................................................................................................................................... 13
B. Frame ............................................................................................................................................................................................................................ 13
C. Brakes .......................................................................................................................................................................................................................... 14
D. Wheels ........................................................................................................................................................................................................................ 15
E. Drivetrain .................................................................................................................................................................................................................... 16
Adjustments and repairs ......................................................................................................................................................................................................... 17
Important technical data ........................................................................................................................................................................................................ 17
Environment ...................................................................................................................................................................................................................................... 17
Limits of liability ............................................................................................................................................................................................................................. 18
Warranty ............................................................................................................................................................................................................................................... 18
This manual contains important instructions regarding the assembly, safety, use and maintenance of your
bicycle.
Before using your bike, we recommend that you read this detailed information as well as view the explana-
tory videos when you visit our website www.bemoov-bikes.be.
If you still have questions or concerns when assembling or using your Bemoov, you can also consult our
FAQs, and if you cannot nd the answer to your question, you can contact our support team via the website
www.bemoov-bikes.be
IMPORTANT
!

3
1 8 16
2 9 17
3 10 18
4 11 19
21
23
5 12 20
22
6 13
7 14
15
Handlebar Steering angle limiter Saddle
Brake lever Brake pad Seatpost
Stem Fork Seat clamp
Headset Frame Rims
Freewheel
Tire
Stem spacer Double chain cover Spokes
Chain
Stem clamping bolt Bottom bracket
Stem cap Crank arm
Pedals
YOUR BEMOOV AND ITS COMPONENT
14 15
1
2
3
4
9
8
10
11
12 13
21
20
19
23
22
16
17
18
7
6
5

4
When the bike is out of the box, carefully remove the pro-
tective coverings and take out the tool box which contains:
- 1 Allen key M5 (5mm)
- 1 Allen key M4 (4 mm)
- 1 open-end wrench (15mm)
- 1 white front reector + oset clamp
- 1 red rear reector + right clamp
- 4 orange wheel reectors
- 1 pair of pedals
- 1 user manual
The removal of the protective coverings is
very simple. Most detach manually. If you
must use scissors or pliers, avoid scratching
the paints.
ATTENTION !
!
ASSEMBLY INSTRUCTIONS
Your Bemoov bike is delivered to you partially assembled. It is essential that you follow the assembly instructions in this ma-
nual extremely carefully.
A. UNPACKING
5
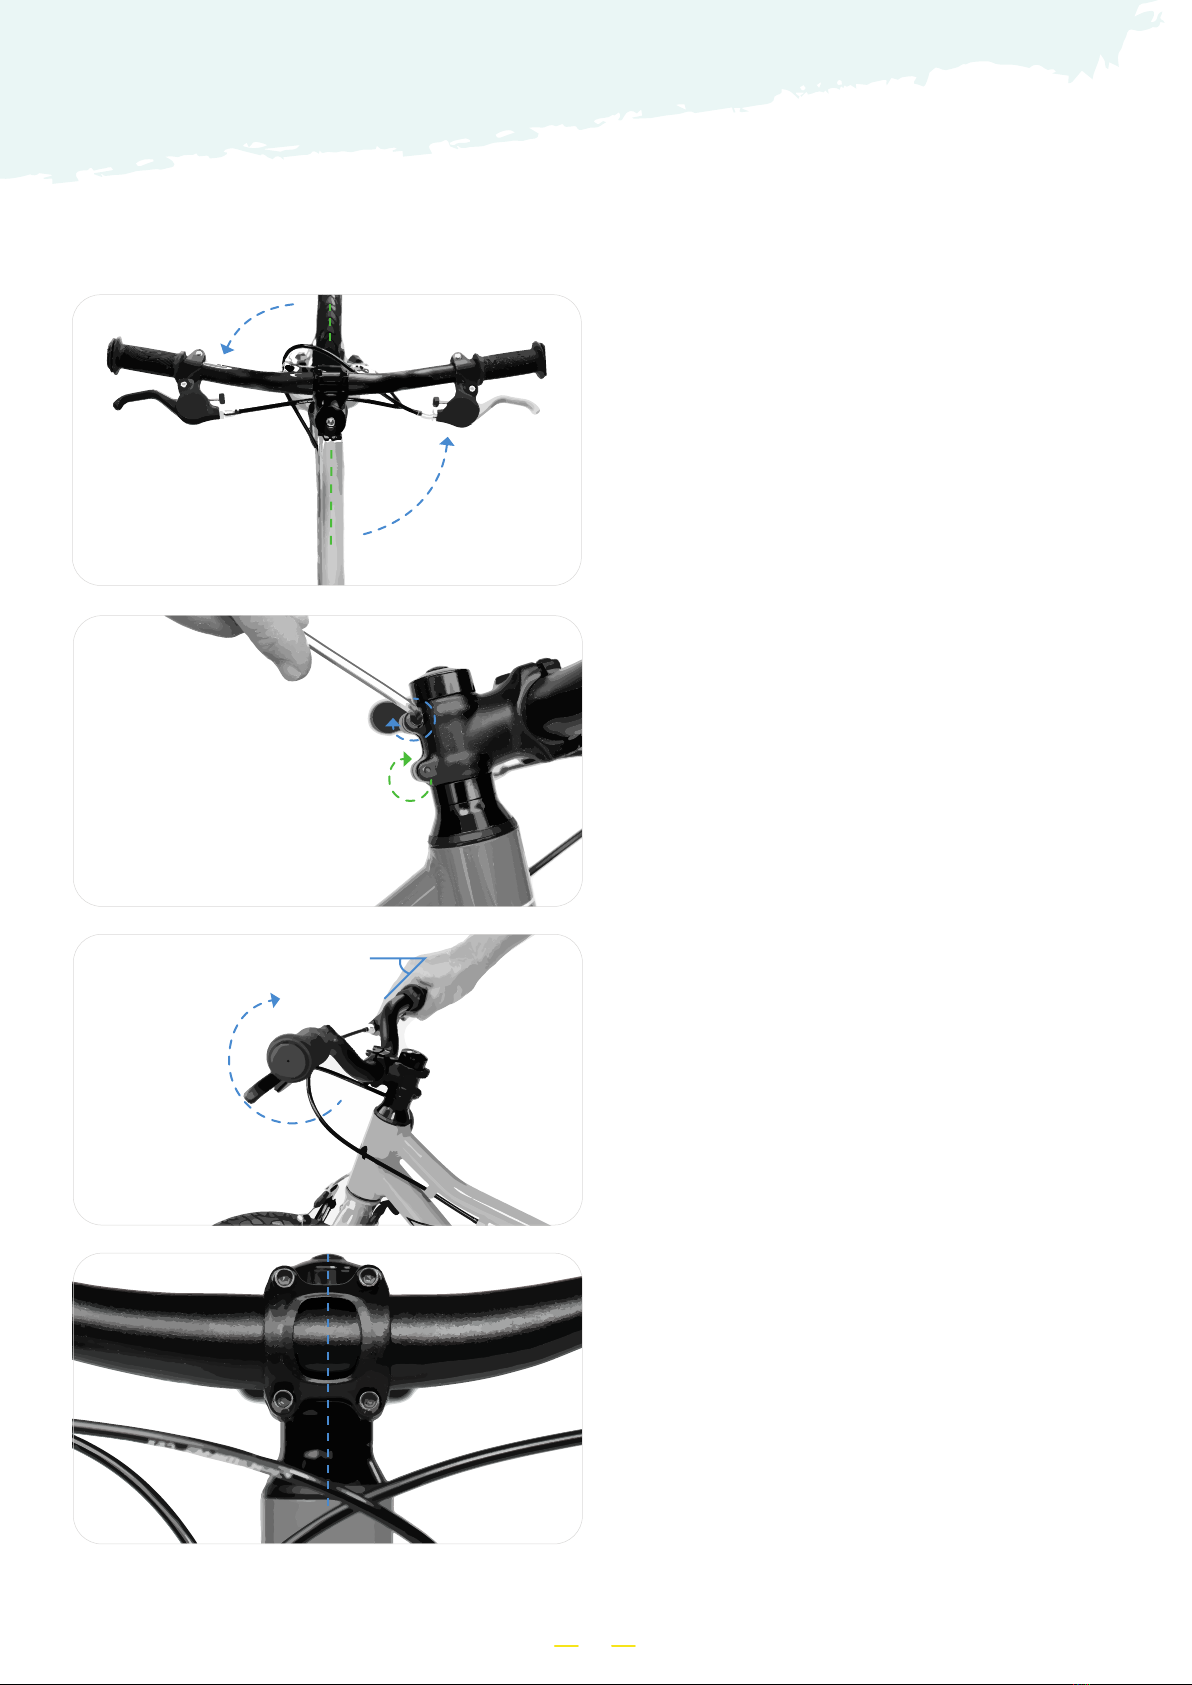
STEP 1 :
Turn the handlebar counterclockwise and align it with the
front wheel
STEP 2 :
Tighten the two stem clamping bolts clockwise until you feel
sucientresistanceforthestemtobeproperlyxed(maxi-
mum tightening torque: 6 Nm*)
*Newton meter
STEP 3 :
Rotate the handlebar forwards and upwards to position the
brake lever at 35°.
ETAPE 4 :
Check the centering of the handlebar in relation to the stem
by referring to the lines engraved on it.
B. ADJUSTING THE HANDLEBARS
35°

6
Failure to tighten the various stem bolts correctly can lead to serious accidents. To check that the handlebar is
rmly xed, take hold of the handlebar grips with both hands:
- Check by rotating up or down that the handlebar is rmly attached to the stem. Blocking the front
- wheel between your 2 legs, check by turning left and right that the stem is rmly xed on the fork
crown.
No movement should be observed. If there is still movement, tighten the various bolts to reach the maximum
tightening torque of 6 Nm. If in doubt, check the technical information or contact our support team via our
website www.bemoov-bikes.be
ATTENTION !
!
STEP 5 :
Tighten the 4 bolts of the stem cover crosswise in a clo-
ckwise direction, following the diagram above. Tighten each
bolt equally, so that the space between the cover and the
stembodyisuniformforthe4bolts.(maximumtightening
torque: 6 Nm*). Do not tighten the stem cap. *Newton meter
1 4
2
3

7
STEP 1 :
Position the right pedal in front of the right crank arm, the red
R sticker on the crank arm and the one on the pedal must
be identical. Then insert the pedal in the thread and tighten
clockwise until it locks.
STEP 2 :
Position the left pedal in front of the left crank arm, the green
L sticker on the crank arm and the one on the pedal must
be identical. Then insert the pedal in the thread and tighten
counterclockwise until it locks.
C. INSTALLING THE PEDALS
Sticker R red Sricker L green
Make sure you have clearly identied the R and L pedals before screwing them in, otherwise the bolt threads
will be permanently damaged. For best results, we advise you to put a little grease on the thread.
ATTENTION !
!

8
Never mount the seat post above its maximum allowable height, indicated by an engraving on the seat
post, since this could break the seat post or the seat tube
ATTENTION !
!
D. ADJUSTING THE SADDLE HEIGHT
STEP 1 :
Slightly loosen the seat tube clamp.
STEP 2 :
Adjust the saddle height so that your child can have his/her
feet on the ground when sitting on the saddle.
STEP 3 :
Tightentheclampuntilyoufeelsucientresistanceand
make sure that the seatpost can no longer turn or slide down.
Limit

9
E. ADJUSTING THE REFLECTORS
STEP 1 :
Placethewhitereectoratthefrontonthehandlebarwith
theosetclamp
STEP 2 :
Placetheredreectoratthebackontheseatpostwiththe
right clamp

10
STEP 3 :
Installtheorangereectorsforthewheels(2Xfrontwheel,2
Xrearwheel)
STEP 4 :
Fitthegrooveinthecenterofthereectorononeofthe
spokesandlettheleftandrightspokesholdthereector.
For safety: We recommend that you install all the reectors. These are mandatory according to the trac
laws of many countries. Riding with reectors increases the cyclist’s visibility to other road users. Reectors
are designed to capture and reect car lights and headlights as a way to make the bike more visible, but
they do not replace lights. If your child rides at night, the bike must be equipped with lights, as provided for
in the Highway Code. Please check the relevant national legal requirements.
ATTENTION !
!
STEP 5 :
Placethexingnutinthecenterholeofthereector.Screw
it.Atthisstage,thereectorissecure.Itmaystillmove
slightlyupanddownaftertighteningthexingnut.
F. TIRE PRESSURE
It is possible that during transport the tire pressure will go down. If necessary, refer to the BAR/PSI pressure indicated on the
sidewall of the tires to adjust this pressure using a bicycle pump.
Ce manuel convient aux modèles suivants
1
Table des matières
Manuels Scooter populaires d'autres marques


First Choice Mobility
First Choice Mobility Roma Medical Corella S741 Manuel utilisateur

Carrera
Carrera impel Manuel utilisateur

Afikim
Afikim Superlight SL-3 Manuel utilisateur

CareCo
CareCo ZOOM Manuel utilisateur

Douglas
Douglas Vespa G.S. Manuel utilisateur

Gazelle
Gazelle with BOSCH System Manuel utilisateur