bem wireless kickstand mini Manuel utilisateur

®kickstand mini
USER

2

3
Thanks for purchasing the bem Kickstand MINI Projector! This extra-compact
projector combines the convenience and performance of the Kickstand WR1
with even greater portability, making it ideal for use in the ofce, at home,
or in the classroom. To make sure you get the best possible results from
your new Kickstand MINI, please thor-oughly read and carefully follow all
instructions in this User Guide. This short guide explains everything you need
to know to get started using your Kickstand MINI Projector.
Table of Contents
English
Françis
Español
4
21
41

4
Product Overview
The bem wireless Kickstand MINI Projector (Kickstand MINI) is a high performance, extra portable projector
with a built-in Android operating system. It’s small enough to t into your briefcase or purse for easy transport
and setup is a breeze – kick out the leg, stand it up, and turn it on! But we didn’t compromise quality in favor of
portability or ease of use. This little technological wonder has a sleek nish with amazing performance specs to
match.
Package Contents
Your bēm Kickstand Mini should have included all of the following:
Kickstand MINI x 1
Remote Control x 1
Power Adapter x 1
HDMI Cable x 1
AV Cable x 1
Aux Cable x 1
User Guide x 1
If any items are missing or damaged, please call bem wireless customer support at 1-855-839-8616 or email

5
1 32
7
10
8
9
11
64
5
Product Interface
1. Power Button
2. Mute Button
3. Source Button
4. Lens
5. Infrared Sensor
6. Air Vent
7. Focus Knob: Rotate to adjust focus.
8. Stereo Speakers
9. Handle and Stand
10. Connection Panels
(see “Connection” page 10 for additional details)
11. Reset: Push this button with a small tool (toothpick, paperclip, etc.)
to turn the Kickstand MINI off if it becomes unresponsive. NOTE: Files
and setting will be unaffected.
Meet Your New Kickstand MINI Projector
Before operating your Kickstand MINI, take a moment to look it over and
familiarize yourself with the device. And yes, it’s okay to stare.
6
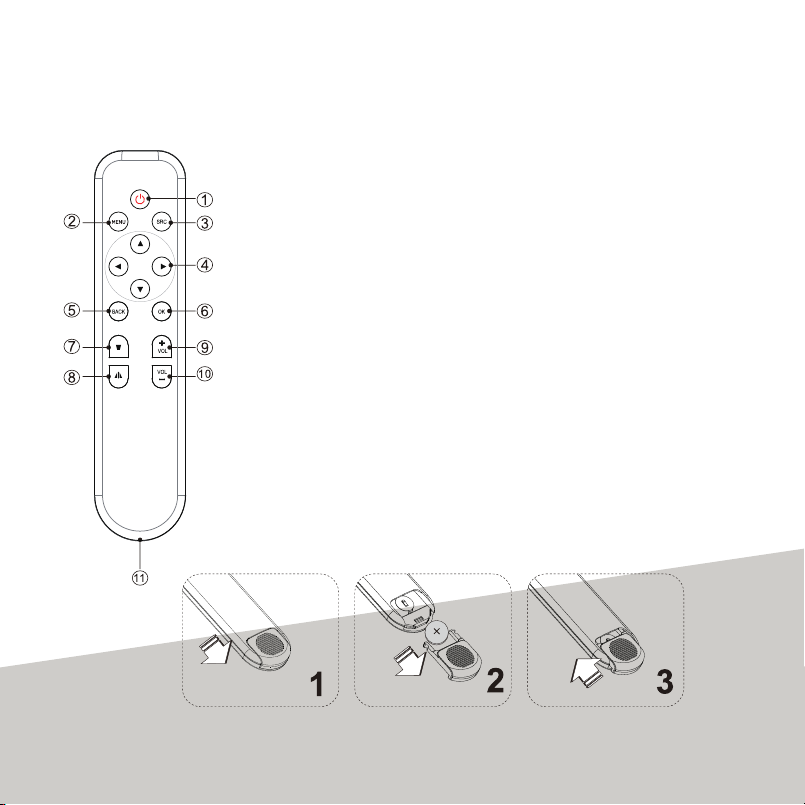
Don’t Forget the Remote
Your Kickstand MINI comes with a handy remote. Whether you’re showing a video, presenting a slide show, or shar-
ing photos with family and friends, you need quick and easy controls and with the Kickstand MINI’s remote, you have
all the controls you need.
NOTE: Remove the plastic insert in the battery
compartment before using the remote control.
1. Power
2. Menu
3. Source (“SRC”)
4. Direction Pad
5. Back
6. OK
7. Keystone Adjustment
8. Screen Adjustment
9. Volume up
10. Volume down
11. Battery Compartment
2. Slide a CR2025 battery
into the battery compartment
3. Slide the battery cover
toward the remote to close
1. Slide the battery cover away
from the remote to open

7
Your Kickstand MINI must be charged before its rst use or if it has not been used for at least 7 days. To charge your
Kickstand MINI, carefully plug the supplied power adapter into a standard wall outlet. Then, carefully plug the power
adaptor into the “DC 12V” port on the back of the projector. The indicator light on the power button will light red
when charging. The light will dim when the projector is fully charged.
When preparing to use your Kickstand MINI, you can place it on just about any at surface. Just make sure you keep
the following things in mind:
• Make sure the surface is sturdy and secure
• Make sure the surface is even and level for optimal viewing
• Make sure a wall outlet or other power supply is available
NOTE: If using an extension cord, be sure it is properly grounded and does not present a tripping hazard.
IMPORTANT: Do not look into the lens while the projector is running.
Choosing a “Screen”
While you can use your Kickstand MINI to project an image on any surface – go ahead, hang up a bed sheet in your
back yard – here are a few tips to ensure your presentation, video, or otherwise looks as good as possible:
• Ideally, use a dedicated video projection surface (like a movie screen)
• If projecting onto a wall or similar surface, select one with a light color - preferably white and has a at sur-
face. Remember, the color of the surface will alter the color of the images you project on it.
• Avoid projecting onto a glossy or reective surface (ex: a dry erase board, a glossy wall)
But remember, the “screen” you choose is a matter of preference. Try projecting an image on several surfaces to de-
termine what works best for your needs.
Setting Up Your Kickstand MINI
QUICK TIP BEFORE YOU GET STARTED
A mouse and keyboard can simplify control. Connect your USB mouse (wired or wireless) and / or USB
keyboard (wired or wireless) to the USB port on the projector.
Features Benets
Built-in Android 4.2 Compatible with all Android OS apps
Patented Kickstand Design Easy setup, perfect for play and carry.
WiFi and RJ45 wired connection Dual mode helps you stay connected
DLNA and Miracast function Projects your small screen on a big surface
Supports Streaming Wirelessly stream your favorite movies and music
Bluetooth Enabled Instantly connect to speakers, controllers, or other Bluetooth devices
HDMI Input Connect to any HDMI device, including Blu-ray players,
game consoles, PCs, and laptops
Built In Rechargeable Battery Up to two hours of wireless viewing
Built-in stereo speaker Quality sound without the need for external speakers
Auto and Manual keystone adjustments Helps compensate for awkward projector positioning
LED light source Vibrant 350 lumens for up to 20,000 hours of lifetime use
Peripheral Connectivity Easily connect to your mouse, keyboard, hard drive disk (HDD),
USB Disk, and more
1. Power
2. Menu
3. Source (“SRC”)
4. Direction Pad
5. Back
6. OK
7. Keystone Adjustment
8. Screen Adjustment
9. Volume up
10. Volume down
11. Battery Compartment

8
Operation Details
Now that you and your Kickstand MINI are better aquatinted, it’s time to learn how quick and easy it is to set up and
use. Follow these simple step-by-step instructions and you’ll be up and running (and projecting) in no time!
Connect the Power Adaptor
Carefully plug the supplied power adapter into a standard wall outlet. Then, carefully plug the power adaptor into the
“DC 12V” port on the back of the projector.
NOTE: Your Kickstand MINI can run on its internal battery for up to 2 hours
Power On
Press and hold the POWER button on your Kickstand MINI to turn it on (you must
press the power button on the pro-jector, not the remote, to turn it on). The LED
indicator will turn blue* when on and a bem wireless startup screen will appear.
After a few moments, the projector will show the main Android media screen
(shown here).
*The LED indicator will turn purple if your
Kickstand MINI is charging while in use.
Power Off
When you’re nished using your Kickstand MINI, press and hold the POWER button
on either the projector or the re-mote to turn it off.
NOTE: After the projector is unpacked and turned on for the rst time, a slight
odor may be emitted from the air vent. This is a normal result of the manufacturing
process. The odor is nontoxic and will soon disappear with use.
Projection Size
Adjusting the overall size of the projected image is easy! Move the Kickstand MINI farther from the target surface
to get a larger picture or closer to get a smaller picture. The optimal range and projection size is generally 32” (at 1
yard) to 96” (at 3 yards). Under ideal viewing conditions, good results may be obtained at even greater distances
Adjust the Focus
If the projected image is blurry, simply rotate the FOCUS knob left or right until it becomes clear. If you aren’t able to
obtain a good image by adjusting the focus, the lens may need cleaning (see Maintenance).
Keystoning
Your Kickstand MINI should be positioned so it is pointed directly at the target screen. If the projector is tilted up or
down, the top and bottom of the image will not be the same size. This distortion is called “keystoning.” In most cases,
you can eliminate keystoning by ensuring that the projector is properly aligned with the screen; however, key-stone
adjustments can also be made using the remote control.
Press the KEYSTONE ADJUSTMENT button to turn keystone auto adjust on / off. Manual keystone adjustments
can be made by accessing “Settings, Keystone, Man Keystone” from the main Android media screen. With man-ual
adjustments, you can adjust the keystone by ±30 degrees.

9
Volume Control
Press and hold the POWER button on your Kickstand MINI to turn it on (you must press the power button on the pro-
jector, not the remote, to turn it on). The LED indicator will turn blue* when on and a bem wireless startup screen will
appear. After a few moments, the projector will show the main Android media screen (shown here).
Select Input Source
Your Kickstand MINI can display media from a number of external sources. Press the SOURCE button on either
the projector or the remote to switch between HDMI and the Android media screen. Media from other devices can
typically be accessed from the appropriate icon on the Android media screen.
Supported File Formats
Your Kickstand MINI can display a wide range of le types. For a complete list of compatible les, please review the
“Technical Specications” section.
Projector Settings
It’s easy to customize your Kickstand MINI! A few simple adjustments will have everything nely tuned to meet your
needs. From the main Android media screen, highlight the “Settings” option and press OK on the remote to enter the
“Settings” screen. Use the UP and DOWN buttons on the DIRECTIONAL PAD to select the item you want to adjust,
then press OK to conrm your selection. Because your Kickstand MINI is built on an Android platform, not all options
will directly involve the projector component of your Kickstand MINI, but taking time to familiarize yourself with your
customization options can help enhance your experience. Categories available for adjustment are as follows:
Projector Settings
• Refer to the “Connections and Playing” section.
Device
• USB – Refer to the “Connection and Playing” section.
• Sound – Adjust the default volume and default notication sounds.
• Display – Adjust screen scale, brightness, and font size.
• Keystone – Auto and Manual (MAN) adjustment options. Refer to the “Setting Up Your Kickstand MINI.”
• Screenshot Setting - Options for capturing and storing screen shots
• Storage – Get an overview of the internal storage on your device.
• Apps – View app information and settings for all apps downloaded to your Kickstand MINI. This area will be
empty if no apps have been downloaded.
• Refer to the “Connections and Playing” section.
Personal:
• Location – Some apps use location to improve / personalize functionality. You do not need to turn location
services on to enjoy your Kickstand MINI.
• Security: Various administrative options.
• Language / Input – Select your preferred language
• Backup / Reset Information and Settings – Settings and instructions for backing up and / or resetting your
de-vice.
Accounts:
• Add / Modify Accounts – Create and / or modify user accounts in the Android operating system.de-vice.
Operation Details (continued)

10
System:
• Date / Time – Set date / time information manually or automatically (if the device is connected to the Internet)
• Accessibility – Can be used to enlarge on-screen text and activate TalkBack responsiveness.
• Printing - Not used
• Developer Options – Options for those who choose to do development work on the Android platform
• About Device – Specic device information, including model number and Android version number.
Video Controls
When viewing video on your Kickstand MINI, a separate set of controls becomes available. Simply press any button
on the direction pad to reveal a list of options along the bottom of the screen. You will nd traditional video media
options – play, pause, etc. – as well as a picture-in-picture feature and the ability to optimize the image based on the
format of your presentation.Sound – Adjust the default volume and default notication sounds.
• 4:3 – This is the standard format for most computer monitors and video systems.
• 16:9 – This is the standard format for most widescreen computer monitors and video systems.
• Zoom 1 – Enlarge the screen from the center 1x
• Zoom 2 – Enlarge the screen from the center 2x
NOTE: You can only access these features while an image / video is being projected.
Your Kickstand MINI can display a wide variety of media for your viewing pleasure.
Connecting Devices
We recommend turning off all related devices before connecting to your Kickstand MINI. If you connect while devices
are on, you may need to restart the device to establish a proper connection. Please follow the above image to con-
nect audio / video components to your Kickstand MINI.
Connect to External Audio/Visual Components
In addition to the internal speakers, your Kickstand MINI can be connected to external audio / visual components al-
lowing HDMI or Auxiliary (AUX) connections.
• Audio: Connect the AUX OUT port on the back of your Kickstand MINI to any external speaker system by us-
ing the included standard 3.5mm audio cable. You can also connect head / earphones with a standard 3.5mm
audio jack.
• Video: Connect your HDMI component to the HDMI on the back of the unit (shown above). After connecting,
turn on the projector. The main Android media system screen will be displayed. Press SOURCE on the projector
or the remote to switch between the HDMI and the Android media screen. Additional instructions, if applicable,
can be found under “Connect to USB Control Devices,” “Con-nect to Storage Devices,” or “Connect to PC /
Laptop as a USB Device” section below.
• Photo/Video: Slide your TF card into the TF Slot
Operation Details (continued)
Connection and Playing
USB Ports
TF Card Slot OTG
DC 12V 3.5mm Port
HDMI Port
Table des matières
Langues :
Autres manuels bem wireless Projecteur


Manuels Projecteur populaires d'autres marques


Panasonic
Panasonic PTL735NTU - LCD PROJECTOR-NETWORK IB Manuel utilisateur

NEC
NEC NP600S EDU Manuel utilisateur

BenQ
BenQ SH753P Manuel utilisateur

Eiki
Eiki EK-623U series Manuel utilisateur

Epson
Epson PowerLite Pro Cinema 6020UB Manuel utilisateur

Epson
Epson PowerLite Home Cinema 705HD Manuel utilisateur


