Barracuda Networks CudaCam Manuel utilisateur

Dome IP Camera
Quick Start Guide
CAMCudaCam

Dear Barracuda Networks Customer,
Thank you for choosing the CudaCam Dome IP Camera. Barracuda Networks
oers a complimentary telephone installation appointment with this
purchase to help you plan your installation, congure your system, and verify
the operation of your CudaCam Dome IP Camera following installation.
Please contact our Technical Support team to schedule your complimentary
telephone installation appointment.
Of course, this complimentary telephone installation appointment is not
designed to replace the local support you may receive from your Barracuda
Networks reseller. If you prefer, please do not hesitate to contact your
Barracuda Networks reseller, whom we will be happy to coordinate with in
order to provide additional deployment support.
Thank you again for choosing the CudaCam Dome IP Camera. We encourage
you to contact your reseller or our Technical Support team that is available
around the clock to assist with technical questions or concerns. We look
forward to helping you with your current and future needs in the areas of
security, networking, and data protection.
Sincerely,
BJ Jenkins
CEO

Table of Contents
Setup
1. Create Your CudaCam Account
2. Wi-Fi Settings (Wi-Fi Users Only)
3. Determine How and Where to Mount Camera
4. Mount the Camera
5. Connect Ethernet Cable and Ensure Power
6. Aim and Focus the Camera
7. Prepare and Seal the Camera
Support
1
1
2
3
4
5
6
7

1
2Wi-Fi Settings (Wi-Fi Users Only)
1Create Your CudaCam Account
Setup
If you are a rst time CudaCam user, create your CudaCam account. In a web
browser, navigate to: http://www.cudacam.com
Click the Camera Login button and then click I am a new user and complete
the web form to create your account. The account you create is the rst user. You
can add more users and cameras after creating this account.
Before installing your cameras, connect one to a Power over Ethernet (PoE)
enabled network connection and familiarize yourself with the camera set up,
conguration, and web interface.
Plug the camera into an Internet enabled PoE cable. Congure the wireless
settings as described on the Barracuda Networks website. If possible, congure
the Wi-Fi settings within range of the Wi-Fi network you will use.
Move the camera to the install site with the Wi-Fi ready to go. For detailed
instructions or complex congurations, please visit the Barracuda Networks
website or contact Technical Support.

2
You must install the camera as a sealed unit, with no path for moisture to enter. If
not sealed, condensation can form inside the dome, blurring the camera view.
Mounting options: The falcon dome camera can be surface mounted to a
wall or ceiling, or it can be mounted recessed into a ceiling using a recessed
mounting kit.
Three screws or bolts are threaded through the holes in the camera base to
support the camera. A mounting template is included if holes need to be
predrilled.
The camera has two entry points for an Ethernet cable, a ½ inch NPT tting on
the side, and a ¾ inch NPT tting on the bottom.
All entry points provide possible entry paths for moisture. The camera comes
with sealing plugs for the NPT ttings, and with a cable gland for the ½ inch
tting. The cable gland seals around cables varying from .125 to .350 inches in
diameter. Most Ethernet cable is about 0.25 inches in diameter. Tighten the cable
gland to achieve a good seal.
3Determine How and Where to Mount Camera
Setup

3
4Mount the Camera
Avoid Moisture
The camera interior must remain dry. Any moisture in the camera can result in
fogging and poor camera performance.
Remove the Cover
Using the supplied security screwdriver, release the four screws holding the clear
dome assembly in place and remove the dome assembly.
Physically Mount Camera
If using conduit, seal the entry point carefully. If installing the unit outdoors, be
sure to create an airtight seal.
If you use the supplied screws with rubber seals, screw the camera to the
mounting surface. If you use other mounting hardware; apply silicone sealant
around the inside of the three mounting holes to prevent leakage. Verify that the
screws are inserted straight so the rubber seals mate with the surfaces properly.
It is recommended to terminate (attach) the end of the Ethernet cable after
threading it into the camera. If you use a cable gland, you may need to terminate
the Ethernet cable after threading it through the gland.
Setup

4
5Connect Ethernet Cable and Ensure Power
Attach the Ethernet Cable. It is a very tight t which may require some patience.
The camera is powered by its PoE cable. You must use a 48 Volt Ethernet power
injector or a PoE switch to provide power.
If the LED does not light within 30 seconds after inserting the Ethernet jack,
check the power source, cabling and connections.
The cable should run from the OUT port of the PoE injector to the camera.
Setup
PoE Injector PoE Switch
5 Setup
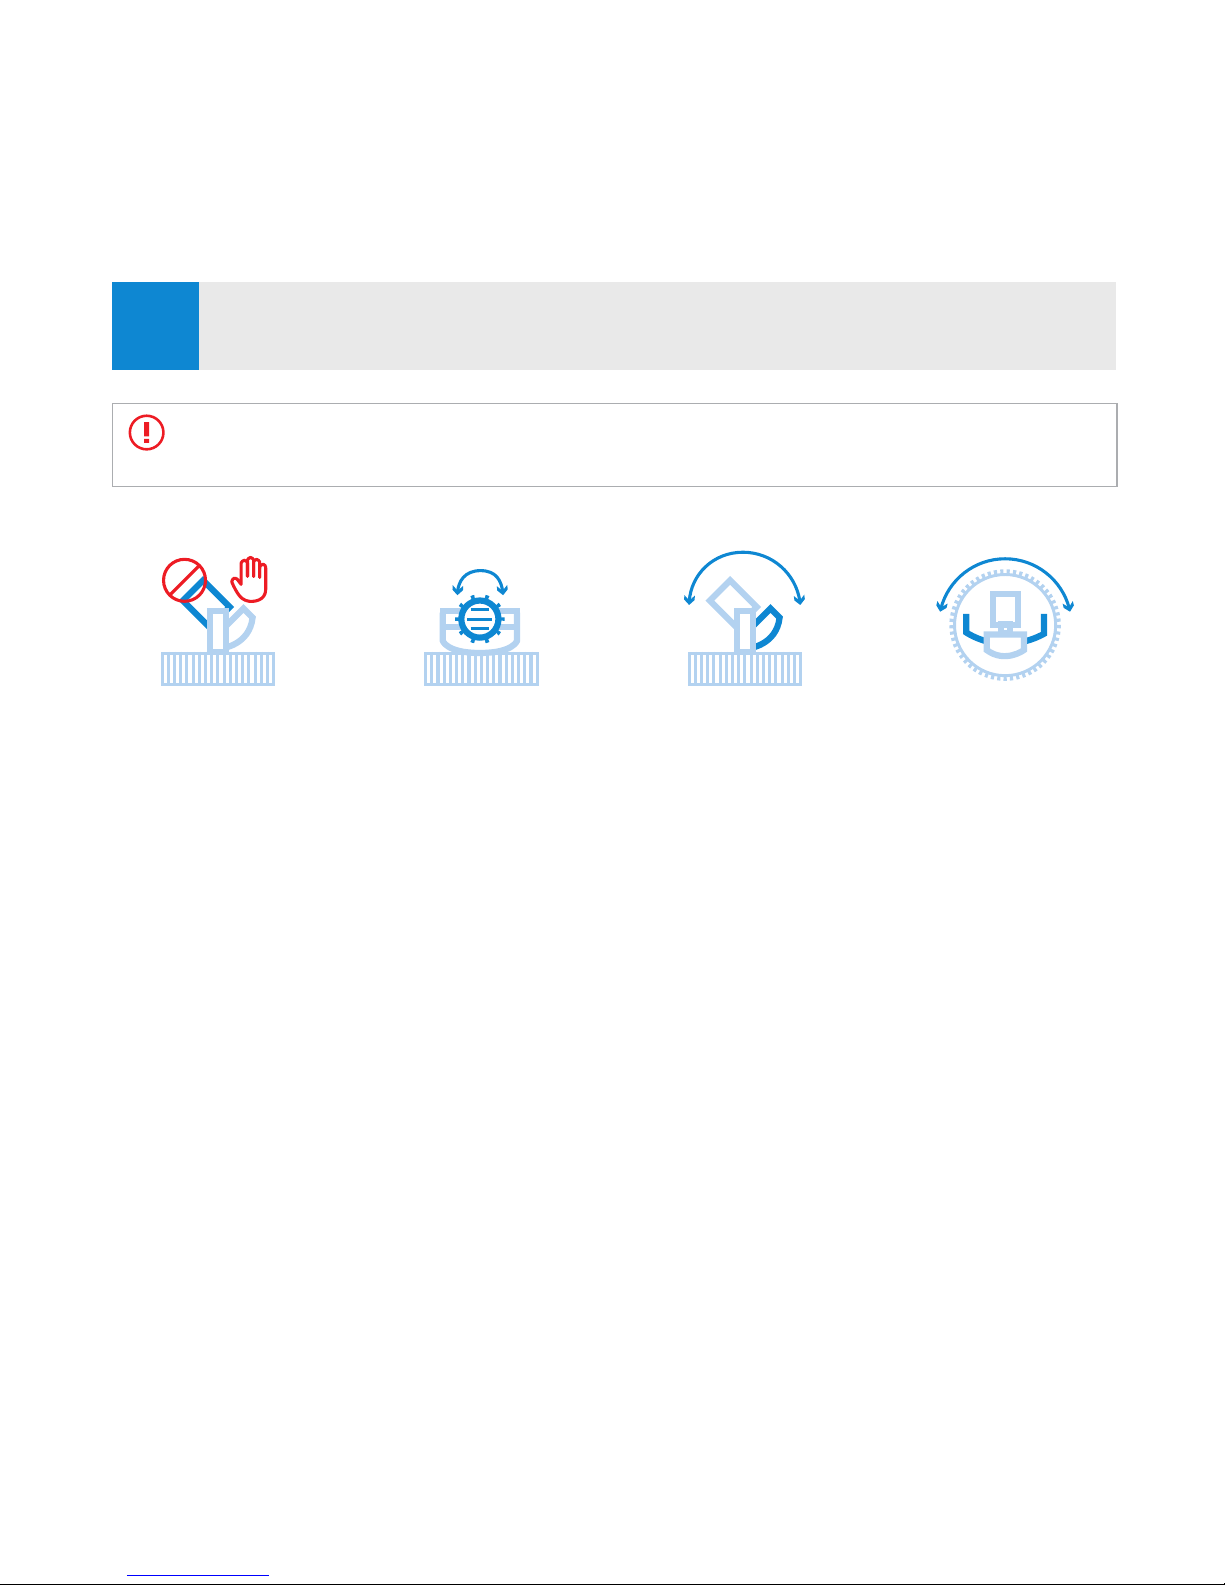
6Aim and Focus the Camera
Check the eld of view using a web browser or mobile device. The camera
automatically focuses after applying the desired zoom setting.
Using a web browser, navigate to the camera settings page and adjust
the zoom settings.
Caution! Adjust the camera view only from the knurled base and camera mount
assembly. Twisting the lens damages the camera.
Horizontal Adjust
with Lens Frame
DO NOT Handle
or Twist Lens
Vertical Adjust
with Knurled Base
Rotate Lens
with Knurled Base

6Setup
1. Inspect the three screw mount locations to ensure that the screws are snug
and the rubber seals are compressed. Do not over tighten the screws or the
seals will be pushed out of place.
2. Ensure that the supplied sealing plug is fully inserted in any unused cable
entry point.
3. Inspect the cable entry point you are using. Be sure cable gland or conduit
is properly tightened, achieving a good seal. Conduit or cable entry should
be positioned so water does not ow toward the camera. Use a drip loop
with cables.
4. Place the supplied packet of moisture absorbent (desiccant) in the camera
well where the cable is located.
5. Put the dome in place and tighten the four supplied screws.
6. OPTIONAL If installing in locations with high humidity, with the dome
loosely installed, use a dry air source (such as Radio Shack Dust Remover
Catalog #: 64-104) to purge humidity from the camera.
7. Insert the red tube from the dust remover about a half inch into the gap
between the dome and base. Blow the dry air from the can into the dome to
purge all humid air from the dome, replacing it with dry air from the can. Use
plenty of dry air. Pull the tube out, press the dome closed, and tighten the
four screws which hold it in place.
7Prepare and Seal the Camera
Critical! To avoid fogging on the inside of the camera due to trapped moisture, the air in
the camera must be completely dry.

7
Online Support
• For additional product information, conguration instructions or supporting materials,
visit www.cudacam.com.
• Please email support@barracuda.com
Telephone Support
• For urgent matters, please call Technical Support at +1 408.342.5300. Phone lines are
open 24 hours a day, 7 days a week.
Support
Autres manuels pour CudaCam
1
Table des matières
Autres manuels Barracuda Networks Caméra de sécurité


