Balt 27534 Manuel utilisateur

1
1234567890123456789012345678901212345678901234567890123456789012123456789012
1234567890123456789012345678901212345678901234567890123456789012123456789012
1234567890123456789012345678901212345678901234567890123456789012123456789012
1234567890123456789012345678901212345678901234567890123456789012123456789012
1234567890123456789012345678901212345678901234567890123456789012123456789012
1234567890123456789012345678901212345678901234567890123456789012123456789012
1234567890123456789012345678901212345678901234567890123456789012123456789012
1234567890123456789012345678901212345678901234567890123456789012123456789012
1234567890123456789012345678901212345678901234567890123456789012123456789012
1234567890123456789012345678901212345678901234567890123456789012123456789012
1234567890123456789012345678901212345678901234567890123456789012123456789012
1234567890123456789012345678901212345678901234567890123456789012123456789012
1234567890123456789012345678901212345678901234567890123456789012123456789012
1234567890123456789012345678901212345678901234567890123456789012123456789012
1234567890123456789012345678901212345678901234567890123456789012123456789012
1234567890123456789012345678901212345678901234567890123456789012123456789012
1234567890123456789012345678901212345678901234567890123456789012123456789012
1234567890123456789012345678901212345678901234567890123456789012123456789012
1234567890123456789012345678901212345678901234567890123456789012123456789012
1234567890123456789012345678901212345678901234567890123456789012123456789012
1234567890123456789012345678901212345678901234567890123456789012123456789012
1234567890123456789012345678901212345678901234567890123456789012123456789012
1234567890123456789012345678901212345678901234567890123456789012123456789012
1234567890123456789012345678901212345678901234567890123456789012123456789012
1234567890123456789012345678901212345678901234567890123456789012123456789012
1234567890123456789012345678901212345678901234567890123456789012123456789012
1234567890123456789012345678901212345678901234567890123456789012123456789012
1234567890123456789012345678901212345678901234567890123456789012123456789012
1234567890123456789012345678901212345678901234567890123456789012123456789012
1234567890123456789012345678901212345678901234567890123456789012123456789012
1234567890123456789012345678901212345678901234567890123456789012123456789012
1234567890123456789012345678901212345678901234567890123456789012123456789012
1234567890123456789012345678901212345678901234567890123456789012123456789012
1234567890123456789012345678901212345678901234567890123456789012123456789012
1234567890123456789012345678901212345678901234567890123456789012123456789012
1234567890123456789012345678901212345678901234567890123456789012123456789012
1234567890123456789012345678901212345678901234567890123456789012123456789012
1234567890123456789012345678901212345678901234567890123456789012123456789012
1234567890123456789012345678901212345678901234567890123456789012123456789012
1234567890123456789012345678901212345678901234567890123456789012123456789012
1234567890123456789012345678901212345678901234567890123456789012123456789012
1234567890123456789012345678901212345678901234567890123456789012123456789012
1234567890123456789012345678901212345678901234567890123456789012123456789012
1234567890123456789012345678901212345678901234567890123456789012123456789012
1234567890123456789012345678901212345678901234567890123456789012123456789012
1234567890123456789012345678901212345678901234567890123456789012123456789012
1234567890123456789012345678901212345678901234567890123456789012123456789012
1234567890123456789012345678901212345678901234567890123456789012123456789012
1234567890123456789012345678901212345678901234567890123456789012123456789012
1234567890123456789012345678901212345678901234567890123456789012123456789012
1234567890123456789012345678901212345678901234567890123456789012123456789012
1234567890123456789012345678901212345678901234567890123456789012123456789012
1234567890123456789012345678901212345678901234567890123456789012123456789012
1234567890123456789012345678901212345678901234567890123456789012123456789012
1234567890123456789012345678901212345678901234567890123456789012123456789012
1234567890123456789012345678901212345678901234567890123456789012123456789012
1234567890123456789012345678901212345678901234567890123456789012123456789012
1234567890123456789012345678901212345678901234567890123456789012123456789012
1234567890123456789012345678901212345678901234567890123456789012123456789012
1234567890123456789012345678901212345678901234567890123456789012123456789012
1234567890123456789012345678901212345678901234567890123456789012123456789012
1234567890123456789012345678901212345678901234567890123456789012123456789012
1234567890123456789012345678901212345678901234567890123456789012123456789012
1234567890123456789012345678901212345678901234567890123456789012123456789012
1234567890123456789012345678901212345678901234567890123456789012123456789012
1234567890123456789012345678901212345678901234567890123456789012123456789012
1234567890123456789012345678901212345678901234567890123456789012123456789012
1234567890123456789012345678901212345678901234567890123456789012123456789012
1234567890123456789012345678901212345678901234567890123456789012123456789012
1234567890123456789012345678901212345678901234567890123456789012123456789012
1234567890123456789012345678901212345678901234567890123456789012123456789012
1234567890123456789012345678901212345678901234567890123456789012123456789012
1234567890123456789012345678901212345678901234567890123456789012123456789012
1234567890123456789012345678901212345678901234567890123456789012123456789012
1234567890123456789012345678901212345678901234567890123456789012123456789012
1234567890123456789012345678901212345678901234567890123456789012123456789012
1234567890123456789012345678901212345678901234567890123456789012123456789012
1234567890123456789012345678901212345678901234567890123456789012123456789012
1234567890123456789012345678901212345678901234567890123456789012123456789012
1234567890123456789012345678901212345678901234567890123456789012123456789012
1234567890123456789012345678901212345678901234567890123456789012123456789012
1234567890123456789012345678901212345678901234567890123456789012123456789012
1234567890123456789012345678901212345678901234567890123456789012123456789012
1234567890123456789012345678901212345678901234567890123456789012123456789012
1234567890123456789012345678901212345678901234567890123456789012123456789012
1234567890123456789012345678901212345678901234567890123456789012123456789012
1234567890123456789012345678901212345678901234567890123456789012123456789012
1234567890123456789012345678901212345678901234567890123456789012123456789012
1234567890123456789012345678901212345678901234567890123456789012123456789012
1234567890123456789012345678901212345678901234567890123456789012123456789012
1234567890123456789012345678901212345678901234567890123456789012123456789012
1234567890123456789012345678901212345678901234567890123456789012123456789012
1234567890123456789012345678901212345678901234567890123456789012123456789012
1234567890123456789012345678901212345678901234567890123456789012123456789012
1234567890123456789012345678901212345678901234567890123456789012123456789012
1234567890123456789012345678901212345678901234567890123456789012123456789012
1234567890123456789012345678901212345678901234567890123456789012123456789012
1234567890123456789012345678901212345678901234567890123456789012123456789012
1234567890123456789012345678901212345678901234567890123456789012123456789012
1234567890123456789012345678901212345678901234567890123456789012123456789012
1234567890123456789012345678901212345678901234567890123456789012123456789012
1234567890123456789012345678901212345678901234567890123456789012123456789012
1234567890123456789012345678901212345678901234567890123456789012123456789012
1234567890123456789012345678901212345678901234567890123456789012123456789012
1234567890123456789012345678901212345678901234567890123456789012123456789012
1234567890123456789012345678901212345678901234567890123456789012123456789012
1234567890123456789012345678901212345678901234567890123456789012123456789012
1234567890123456789012345678901212345678901234567890123456789012123456789012
1234567890123456789012345678901212345678901234567890123456789012123456789012
1234567890123456789012345678901212345678901234567890123456789012123456789012
1234567890123456789012345678901212345678901234567890123456789012123456789012
1234567890123456789012345678901212345678901234567890123456789012123456789012
1234567890123456789012345678901212345678901234567890123456789012123456789012
1234567890123456789012345678901212345678901234567890123456789012123456789012
1234567890123456789012345678901212345678901234567890123456789012123456789012
1234567890123456789012345678901212345678901234567890123456789012123456789012
1234567890123456789012345678901212345678901234567890123456789012123456789012
1234567890123456789012345678901212345678901234567890123456789012123456789012
1234567890123456789012345678901212345678901234567890123456789012123456789012
1234567890123456789012345678901212345678901234567890123456789012123456789012
1234567890123456789012345678901212345678901234567890123456789012123456789012
1234567890123456789012345678901212345678901234567890123456789012123456789012
1234567890123456789012345678901212345678901234567890123456789012123456789012
1234567890123456789012345678901212345678901234567890123456789012123456789012
1234567890123456789012345678901212345678901234567890123456789012123456789012
1234567890123456789012345678901212345678901234567890123456789012123456789012
1234567890123456789012345678901212345678901234567890123456789012123456789012
1234567890123456789012345678901212345678901234567890123456789012123456789012
1234567890123456789012345678901212345678901234567890123456789012123456789012
Adjustable Height Sound Powered Lectern
#27534
Assembly Instructions
2
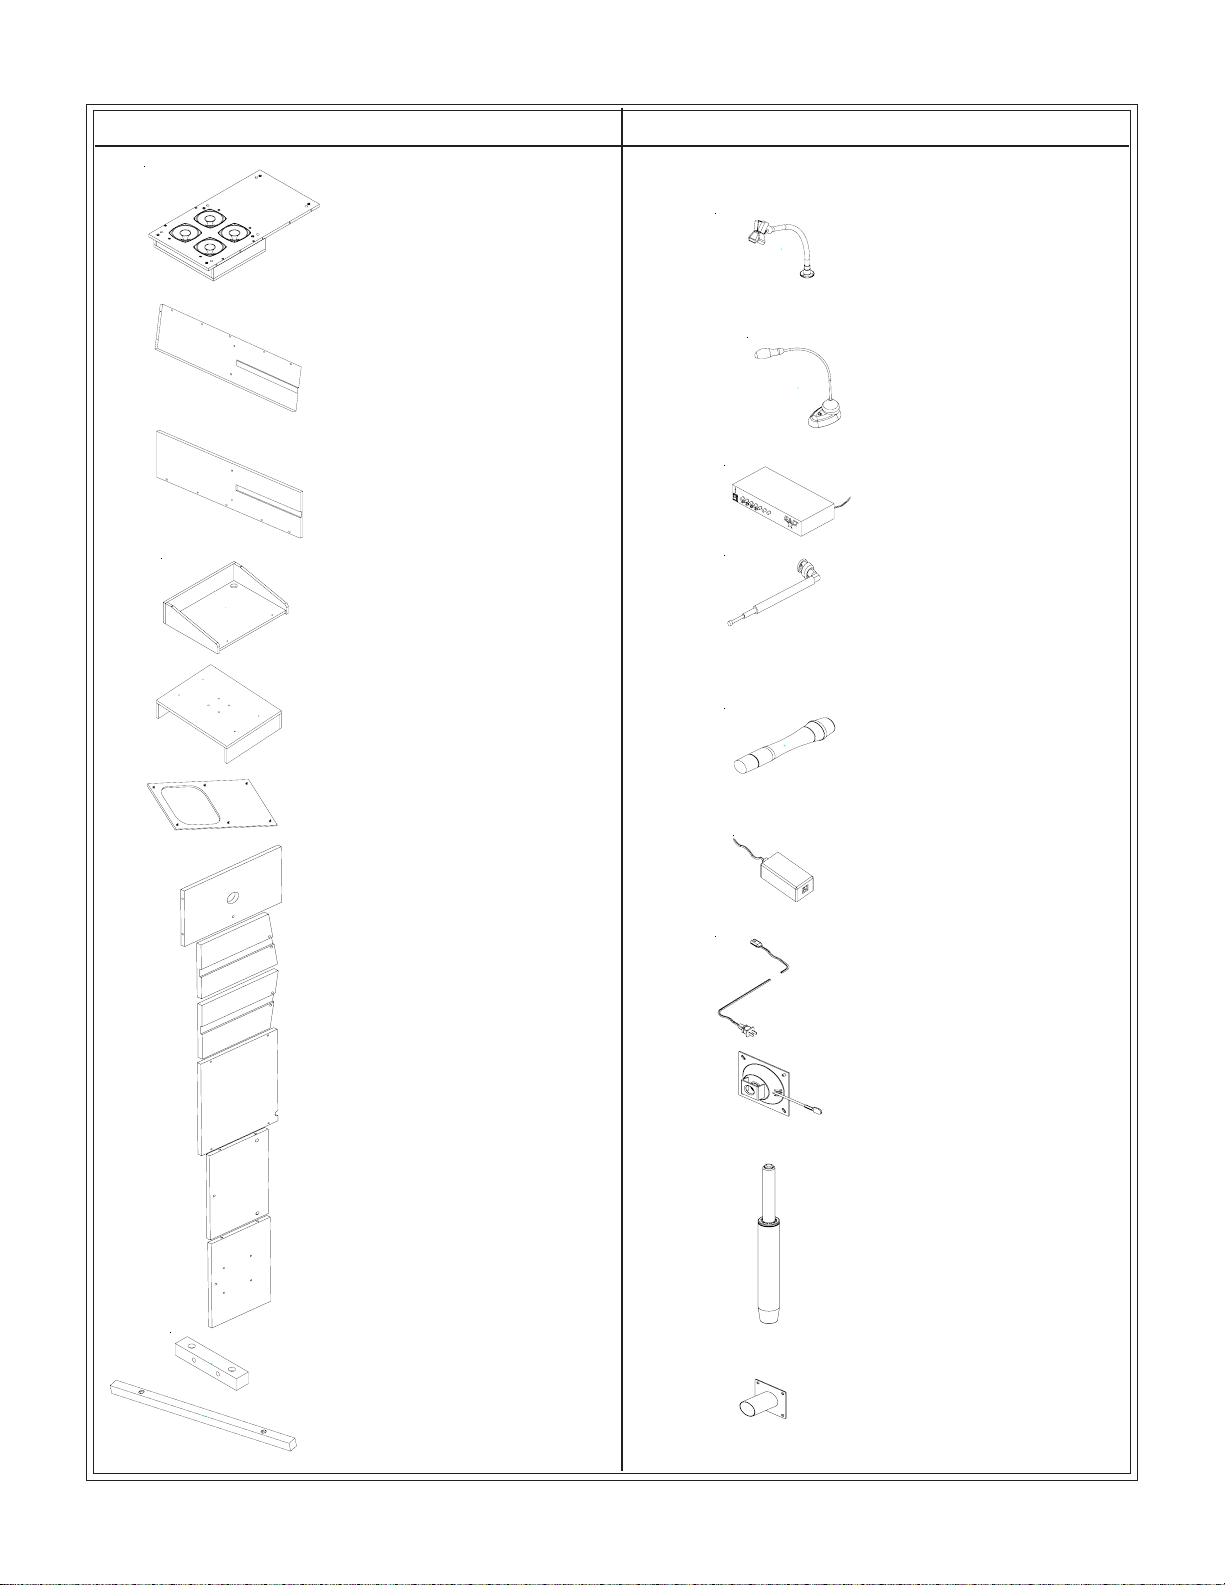
Part Drawing Description Qty Part Drawing Description Qty
#27534 Parts List
P-14 Microphone Stand 1 EA
P-15 Lamp 1 EA
P-16 Amplifier 1 EA
P-17 Antennae 1 EA
P-18 Cordless Microphone 1 EA
P-19 Battery Charger 1 EA
P-20 Electric Cord 1 EA
PP-21
PP-22
PP-23
Top Cylinder Control 1 EA
1 EA
1 EA
Cylinder
Cylinder Base
P-11B Top Bottom Shelf 1EA
P-11A Top Middle Shelf 1EA
P-12 Top Insert Block 2 EA
P-13 Book Stop 1EA
P-10 Top Insert -Front 1EA
P-9 Top Insert-Left 1EA
P-8 Top Insert-Right 1EA
P-7 Shelf 1EA
P-6 Front Speaker Cover 1 EA
P-5 Lectern Base 1 EA
P-1 Speaker Panel 1 EA
P-2 Right Side Panel 1 EA
P-3 Left Side Panel 1 EA
P-4 Lectern Top 1EA

3
Part Drawing Description Qty
Do not use unless all screws are tight. At least every six months, check all screws to be sure
they are tight. If parts are missing, broken, damaged, or worn, stop use of the product until
repairs are made by your dealer using factory authorized parts.
#27534
Velcor
G Velcro Hook 5 EA
H Velcro Loop 5 EA
Hardware List
A Phil Pan Screw M6X25mm 10 EA
A1 Phil Screw M4X12mm 16 EA
A2 Wood Screw M4x58mm 4 EA
A3 CS Wood Screw M4x16mm 3 EA
B Cam Lock 18 EA
B1 Cam Post 1” 8 EA
B2 Cam Post 1-1/4 10 EA
C Wood Dowel 12 EA
D 3” Locking Caster 2 EA
E 3” Inline Caster 2 EA
F Grommet 1 EA
Part Drawing Description Qty
5 EA
5 EA
J
K
L
M
N
O
Cylinder Base Bolt
Cylinder Base Washer
UppUpper Slide
Upper Slide Screw-Large
Upper Slide Screw-Small
Allen Wrench
8 EA
4 EA
2 EA
4 EA
12 EA
1 EA
P
QShelf Bracket Screw-Black 8 EA
Shelf Bracket 2 EA

4
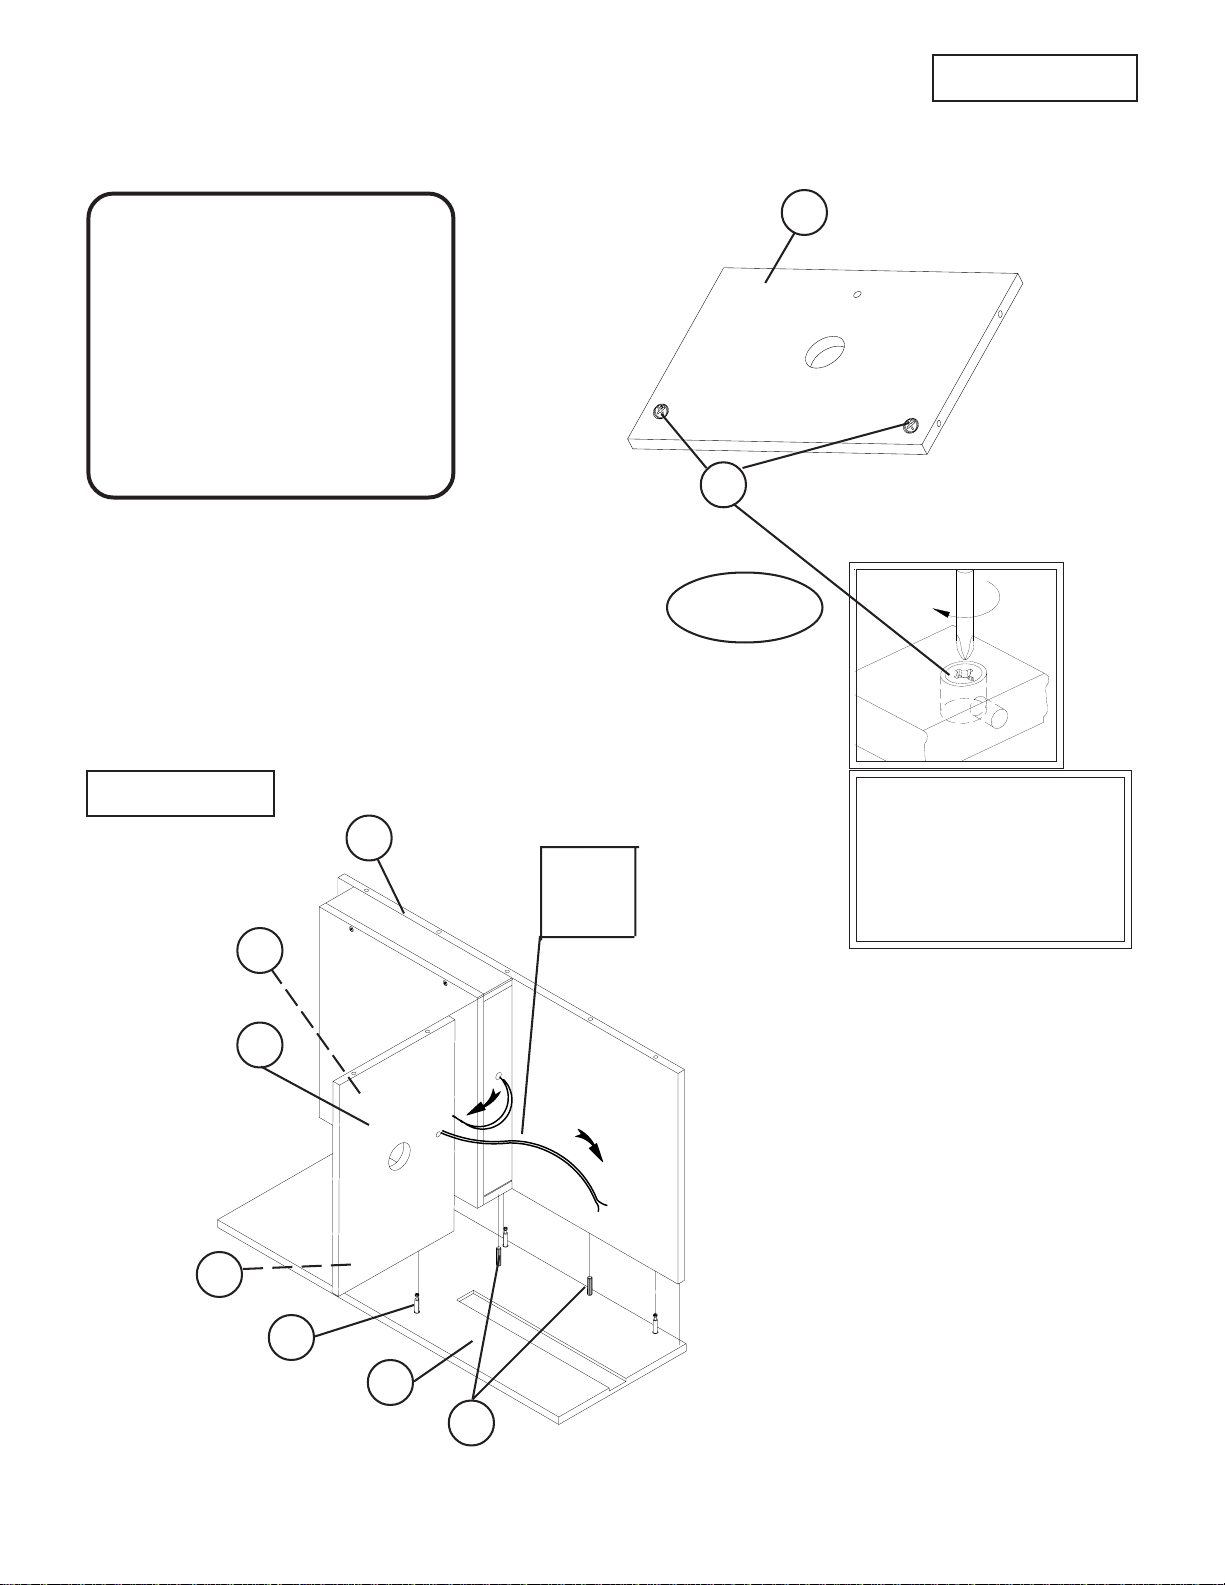
To Assemble:
Identify and Separate all the Parts and Hardware.
Remove Front Cover (P-6) from the Speaker Panel (P-1)
and install 6 Cam Locks (B) in the 6 large holes as shown
in illustrations #1A & 1B.
Illustration # 1A
B
1.
2.
3.
P-1
#27534 Adjustable Height Sound Powered Lectern
Assembly Diagram
P-6
Be sure that arrow on
top of Camlock (B1)
aligns with centerline
of Edge Drilled hole.
Phillips
Screwdriver
Centerline
of Edge
Drilled hole.
Arrow
Illustration # 2
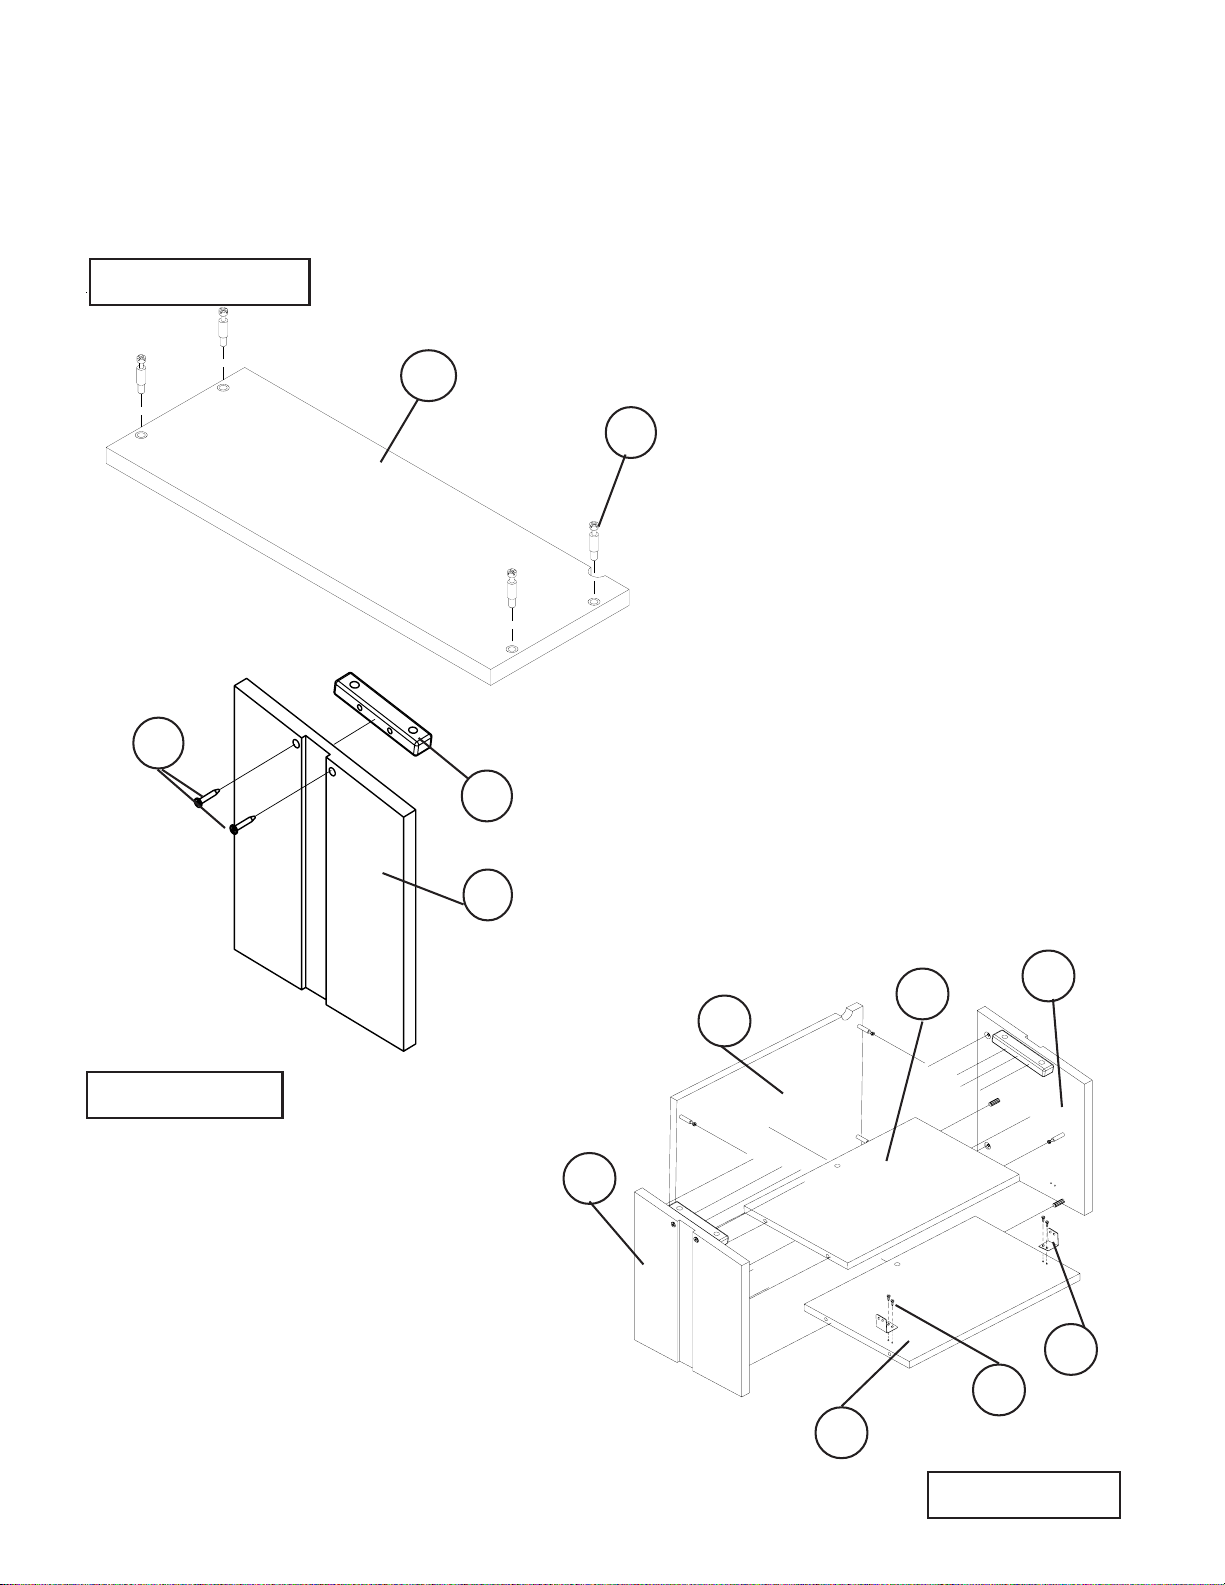
Install 4 Cam Posts (B2) in the 4 threaded insert nuts in the Right
Side Panel (P-2) as shown in illustration #2.
Install 4 Cam Posts (B2) in the 4 threaded insert nuts in the Left
Side Panel (P-3).
Install 3 each Wood Dowels (C) in the 3 Holes in the Right Side Panel
(P-2) as shown in illustration #2.
Install 3 each Wood Dowels (C) in the 3 Holes in the Left Side Panel
(P-3).
4.
Illustration # 1B P-1
5.
6.
B2
P-2
C
P-3
C
5
Attach Speaker Panel (P-1) to the Right
Side Panel (P-2) as shown in illustration
#4. Secure by turning the Cam Locks
(B) 1/4 Turn until they lock.
Illustration # 3
Illustration # 4 To Secure Cam Locks,
InsertLargePhillips
HeadScrewdriverand
turnCamLock1/4turn
(90 degrees) clockwise.
P-1
P-7
P-2
P-7
8.
7.Install 2 Cam Locks (B) into the 2 large holes in the
Shelf (P-7) as shown in illustration #3.
Should you require assistance
during assembly,
please call our
Customer Service Department
Monday - Friday 8 a.m. - 5 p.m.
Central Standard Time
Toll-Free Customer Service
1-800-749-2258 B
Take the Speaker Wires coming from
Speaker Panel (P-1) and insert them
up and through Shelf (P-7). Place
Shelf (P-7) on Campost (B-2) and
Wood Dowel (C) located on Right
Side Panel (P-2). Turn Camlocks (B)
in the bottom of Shelf (P-7) to lock in
place.
9.
Cam Lock
Detail
B
B-2
C
B
Speaker
Wires to
Amp
6
Illustration # 6
11. Attach Left Side (P-3) to
the Speaker Panel (P-1)
and Shelf (P-7) as shown
in illustration #5. Secure by
turning the Cam Locks (B)
1/4 Turn until they lock.
P-7
P-3
P-1
P-2
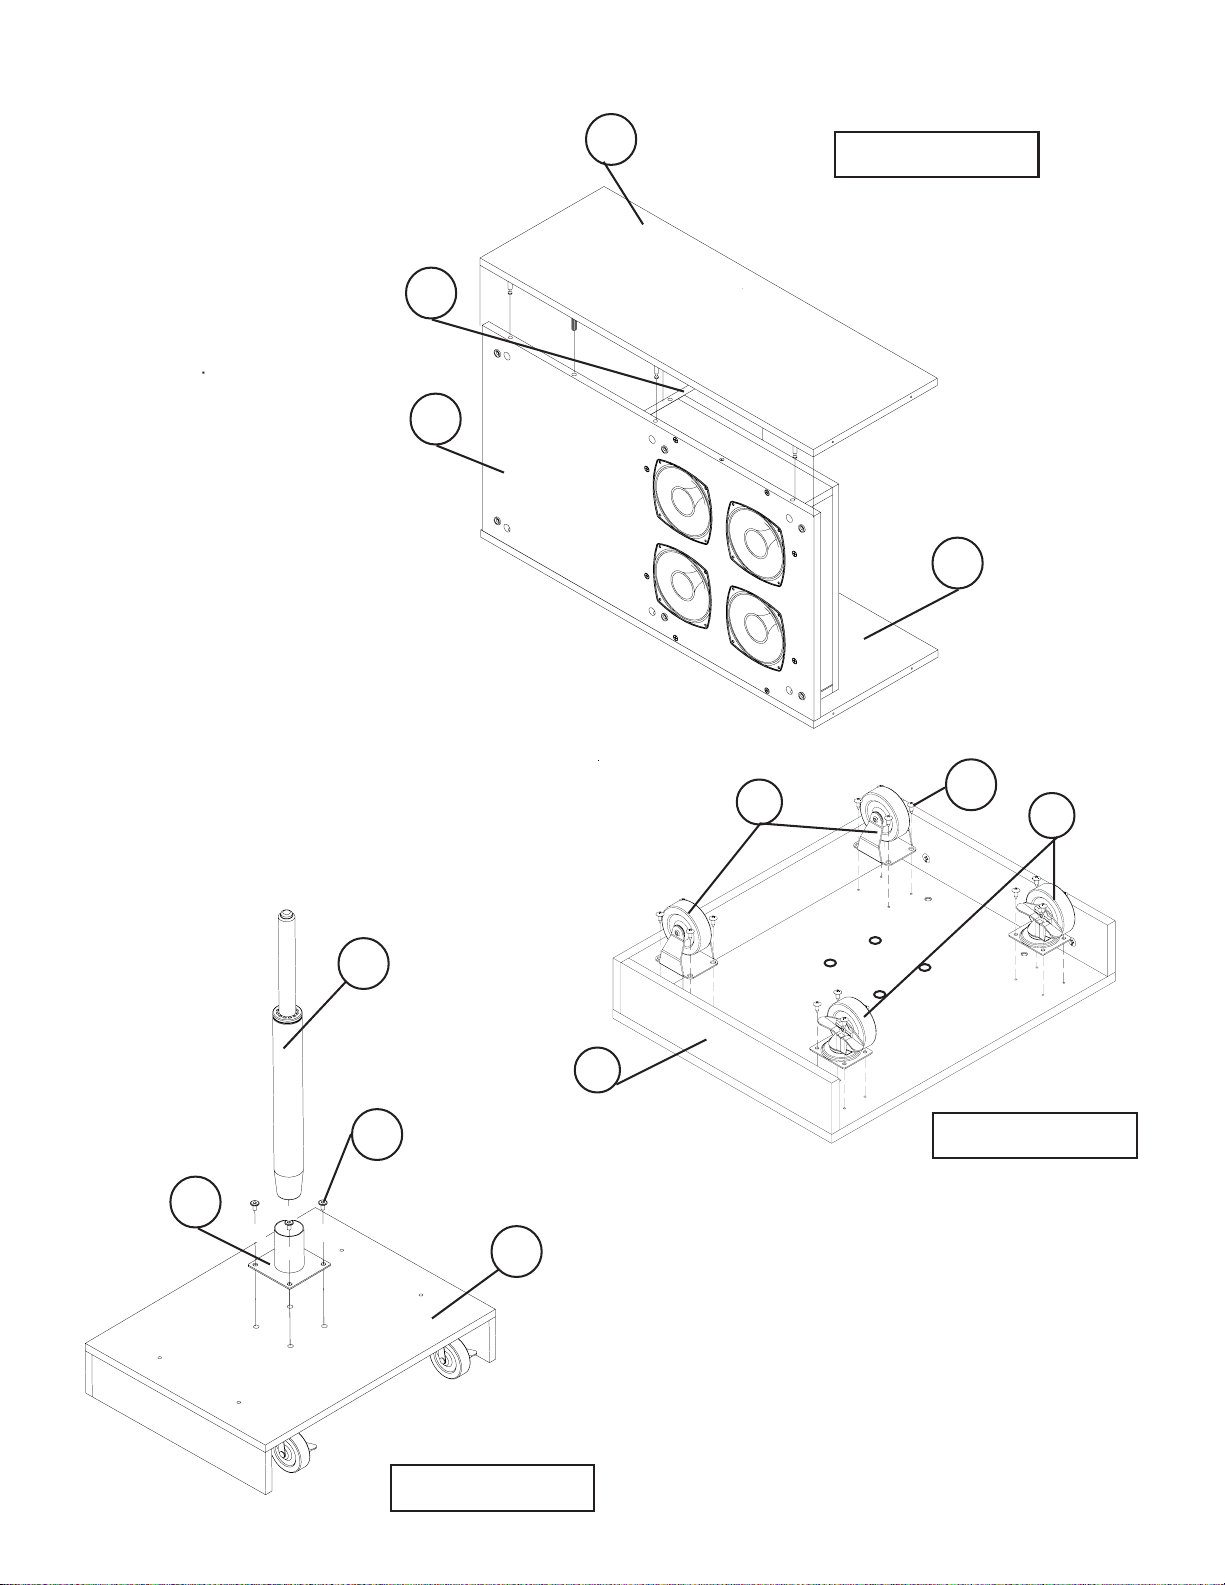
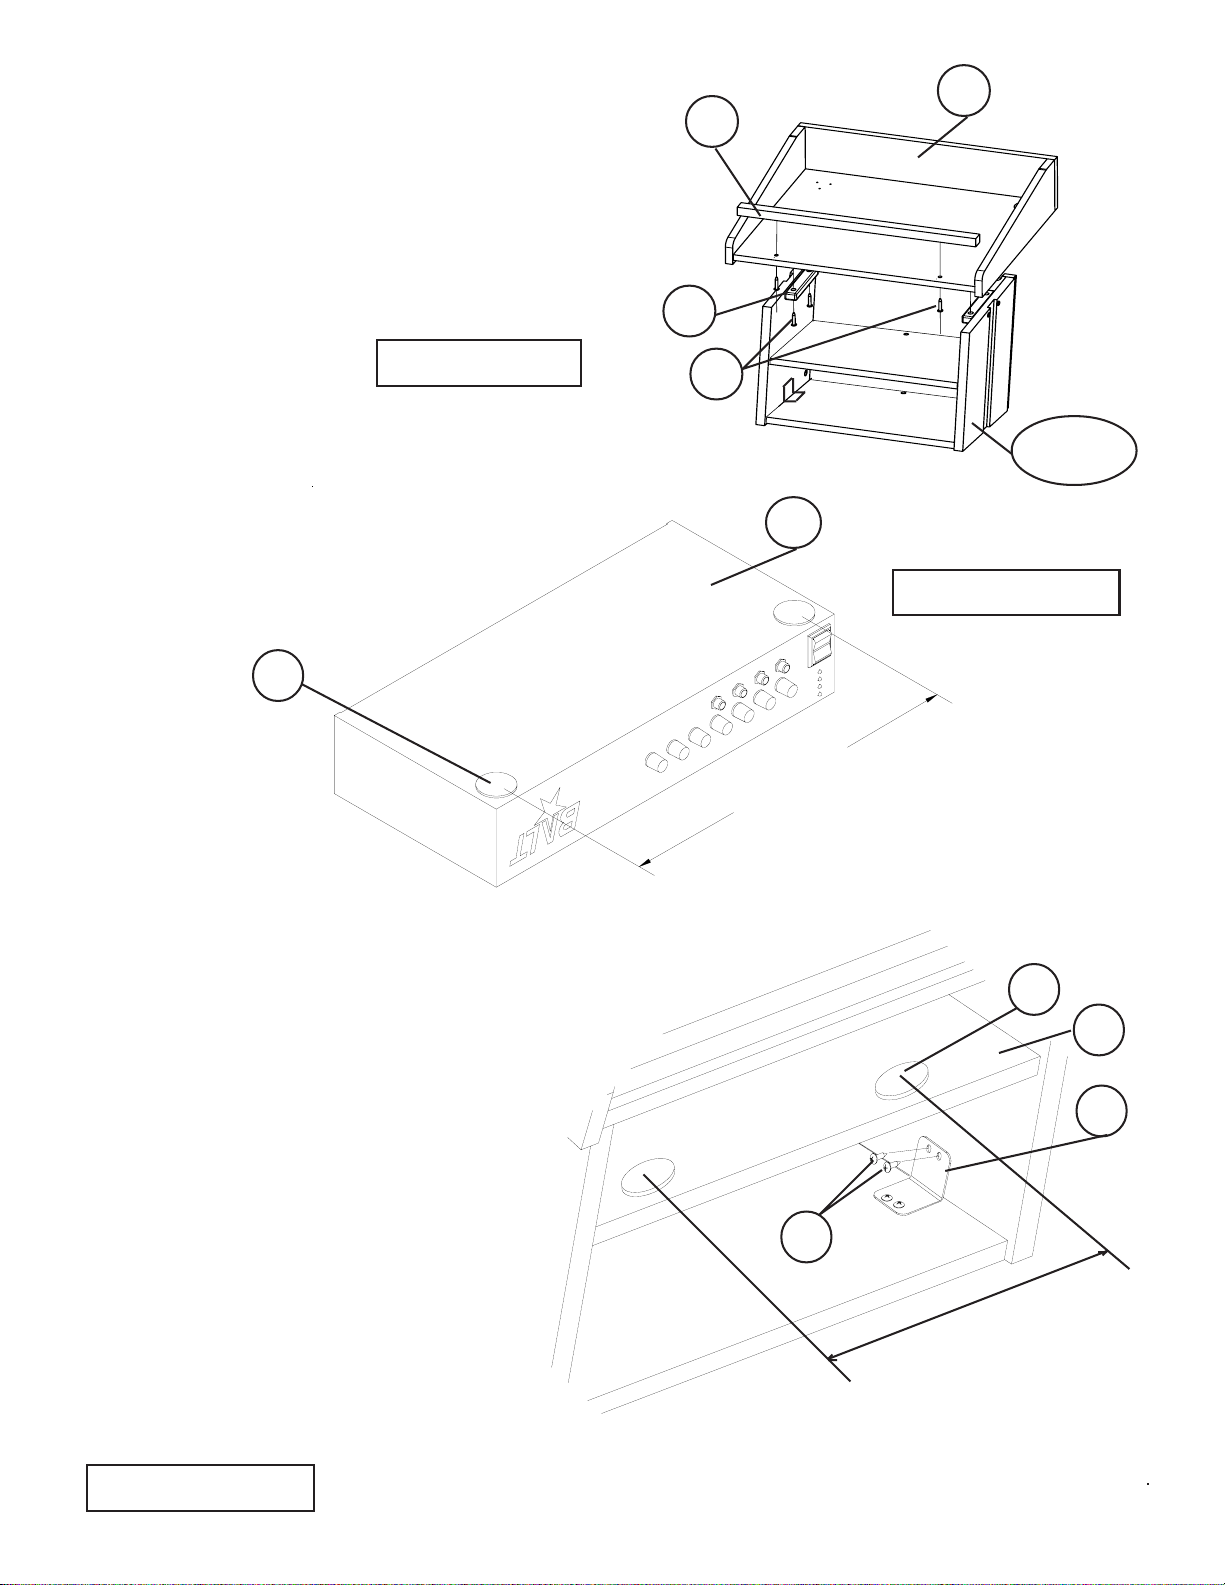
Attach 2 Locking Casters (D) to the front of
Lectern Base (P-5) using 8 Screws (A1) as
shown in illustration #6. Attach 2 Inline
Casters (E) to the back of Lectern Base
(P5) using 8 Screws (A1). D
EA1
P-5
12.
Illustration # 5
13.
Illustration # 7
P-22
J
P-23
P-5 Install Cylinder Base (P-23) to Lectern
Base (P-5) using four Allen Bolts (J). Use
Allen Wrench (O) to tighten Allen Bolts into
threaded inserts in Lectern Base (P-5). Insert
Cylinder (P-22) into Cylinder Base (P-23).
7
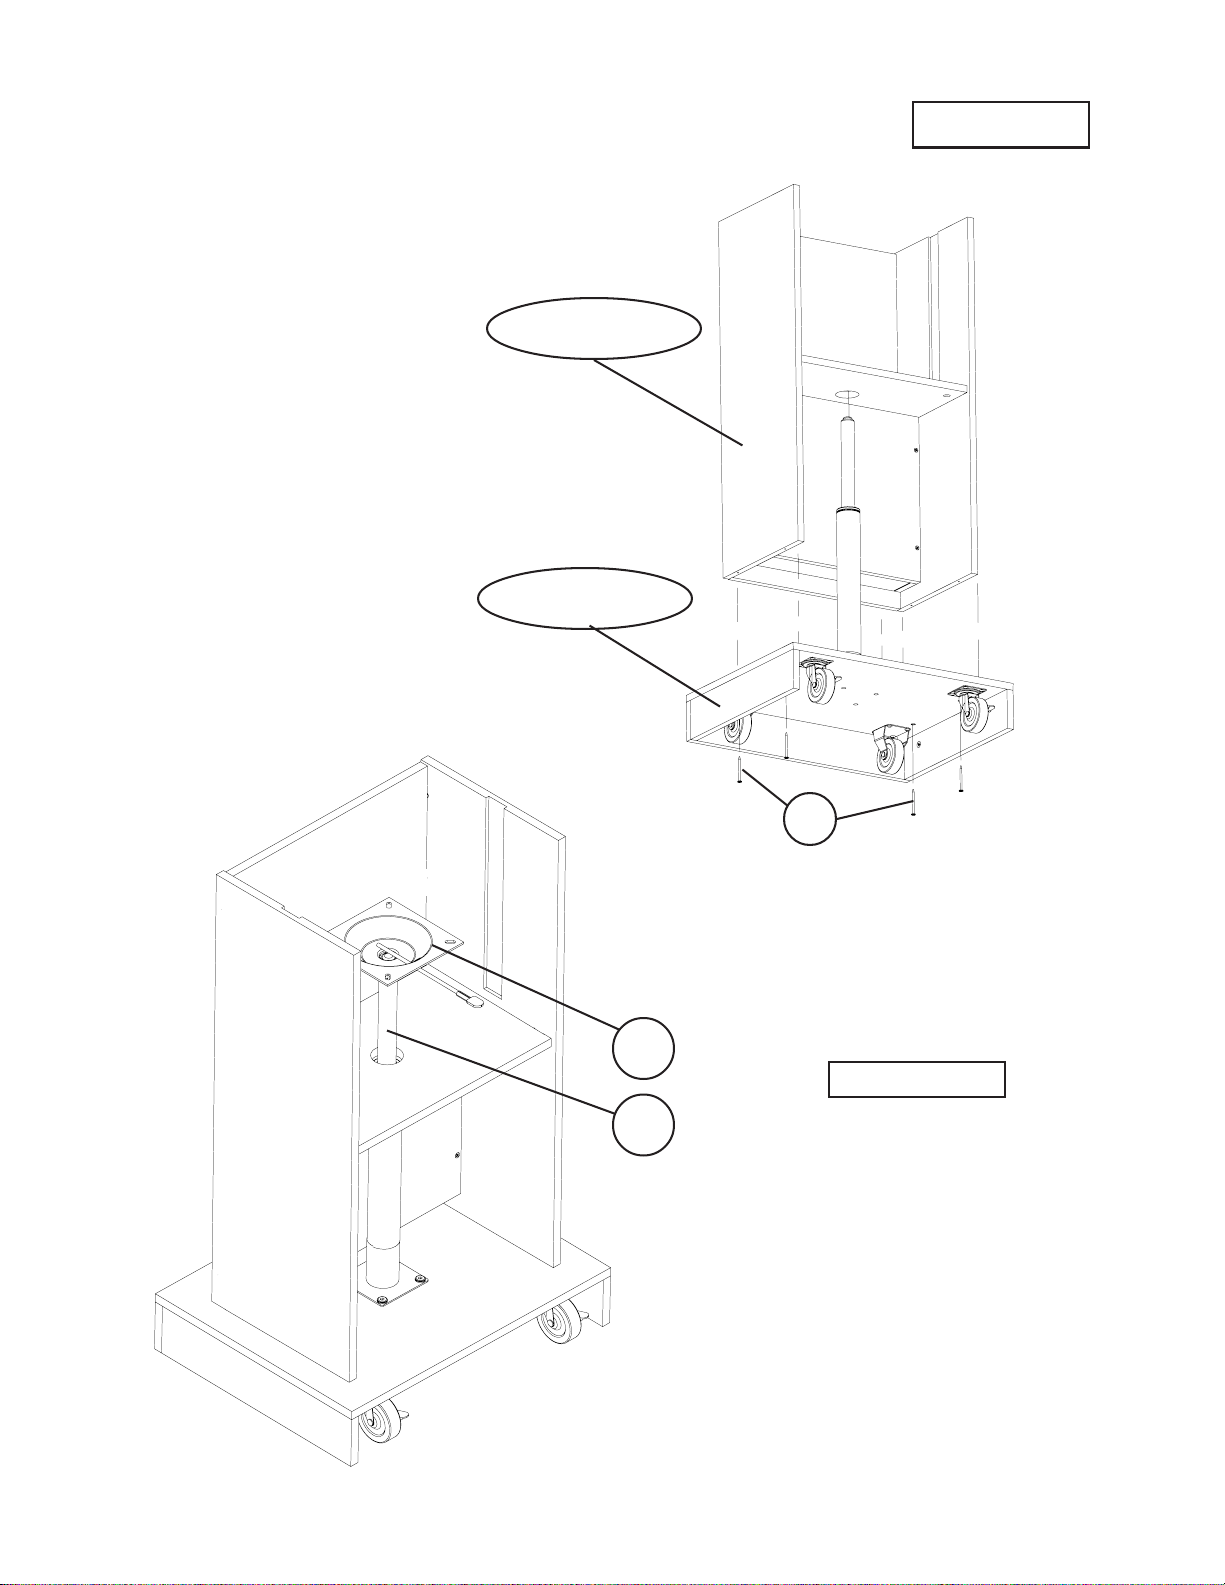
14.
A-2
Upper Assembly
Base Assembly
Attach the Upper Assembly to the
Base Assembly by lining up the
holes in each and attching with
four Wood Screws (A-2).
Illustration #9
#2# 27534
Place the Top Cylinder Control (P-21)
on top of the Cylinder (P-22) and orient
the handle as shown in Illustration # 9.
15.
PP-21
P-22
Illustration #8
8
Illustration # 10
Illustration # 11
15.
16B. Attach two Shelf Brackets (P) to Top
Bottom Shelf(P-11B) using four Shelf
Bracket Screws (Q).
Attach Top Insert - Front (P-10), Top
Middle Shelf (P-11A) and Top Bottom
Shelf (P-11B) to the Top Insert-Right
(P-8) and Top Insert-Left (P-9) as
shown in illustration #12. Secure by
turning the Cam Locks (B1) 1/4 Turn
until they lock.
Install 4 Cam Posts (B1) in the 4
threaded insert nuts in the Top
insert - Front (P-10) as shown in
illustration #10.
B1
P-10
P-12
A
P-9
16A. Attach one Top Insert Block (P-12) to each
Top Insert-Right (P-8) and Top Insert-Left (P-9)
using two Phil Pan Screws (A) as shown in
Illustration # 11.
Illustration # 12
P-11 P-8
P-9
P-10
P-11
A
B
#2# 27534
Q
P
9
17. Attach the Lectern Top (P-4) to the Upper
Assembly from Step 16B using four Phillips
Pan Screws (A). Line up the mount holes in
(P-4) with the mount holes in the two Top
Insert Blocks (P-12). Insert and tighten
screws (A) as shown in Illustration # 13.
Attach Book Stop (P-13) to Lectern
Top (P-4) using two Phillips Pan Screws (A).
P-4
P-12
18.
P-13
A
Upper
Assembly
Illustration # 14
Illustration # 13
14”
Peel 2 Velcro Loops (H) off the paper
and attach to the bottom of the
Amplifier (P-16) in the front 2 corners
as shown in illustration #14.
P-16
H
P-4
Peel 2 Velcro Hooks (G) off
the paper and attach to the
Top Middle Shelf (P-11A)
as shown in illustration #15.
Attach the Shelf Bracket (P)
to the Side Panels using two
Shelf Bracket Screws (Q).
Illustration # 15
19.
G
P-11
A
P
14”
Q
...
...

10
Peel 3 Velcro Loops (H) off the paper and
attach to the bottom of the Lamp (P-15) as
shown in illustration #16.
20.
G
Illustration # 17
21.
22.
P-15
P-4
Insert Grommet (F) in Lectern Top (P-4) as shown in illustration #17.
Route Lamp cord through Grommet (F) in Lectern Top (P-4).
Peel 3 Velcro Hooks (G) off the paper and attach to
the Lectern Top (P-4) as shown in illustration #17.
Attach Lamp (P-15) to Lectern Top
(P-4) as shown in illustration #17.
23.
Illustration # 16
24.
F
P-15
H
Illustration # 18
Route Lamp cord through cut-out in Top
insert Front (P-10) as shown
in illustration #18.
25. P-10
Table des matières
Autres manuels Balt Support et étagère

Balt
Balt 27542 Manuel utilisateur

Balt
Balt Lumina Flat Panel Stand Manuel utilisateur

Balt
Balt 33550 Manuel utilisateur

Balt
Balt JPM-1 Manuel utilisateur

Balt
Balt 34429 Manuel utilisateur

Balt
Balt 27624 Manuel utilisateur

Balt
Balt PBL Manuel utilisateur

Balt
Balt 90377 Manuel utilisateur

Balt
Balt iTeach 2 Manuel utilisateur

Balt
Balt BLT-23701 Manuel utilisateur
Manuels Support et étagère populaires d'autres marques

Salamander
Salamander Acadia AC/W/L400/WH Manuel utilisateur

Fohhn
Fohhn VAT-09 Guide de l'utilisateur

ricoo
ricoo FS0522 Manuel utilisateur

AMSOIL
AMSOIL BMK-22 Guide rapide

Kargo Master
Kargo Master 48220 Manuel utilisateur

Milestone AV Technologies
Milestone AV Technologies SIMPLICITY SLF2 Manuel utilisateur


