Avanti AV-HVLP-5S Instructions de montage

!"#"$%&'(%)*+#"$*%,$-%.$$/-00)))1.,(+&(2(*"3.$14&5
65,"7%&'(%$*4.8"4,7%#'//&($%,$-%/(&9'4$#'//&($:.,(+&(2(*"3.$14&5
Owner’s Manual & Safety Instructions
Save This Manual Keep this manual for the safety warnings and precautions, assembly,
operating, inspection, maintenance and cleaning procedures. Write the product’s serial number in the
back of the manual near the assembly diagram (or month and year of purchase if product has no number).
Keep this manual and the receipt in a safe and dry place for future reference. 20l
When unpacking, make sure that the product is intact
and undamaged. If any parts are missing or broken,
please call 1-888-866-5797 as soon as possible.
Copyright© 2020 by Harbor Freight Tools®. All rights reserved.
No portion of this manual or any artwork contained herein may be reproduced in
any shape or form without the express written consent of Harbor Freight Tools.
Diagrams within this manual may not be drawn proportionally. Due to continuing
improvements, actual product may differ slightly from the product described herein.
Tools required for assembly an d se rv ic e may n ot b e in cl uded.
Read this material before using this product.
Failure to do so can result in serious injury.
SAVE THIS MANUAL.
NOTICE
;<6=>%?@@6A?=B6<C
;7*,8%$.*%D/(,E%F'8%
?@@6A?=B6<C%,2$*(%6!6GC%
'#*%,89%).*8%"$%)"77%+*%"97*%
2&(%5&(*%$.,8%HI%5"8'$*#1
A*7,E*9%&(%"8,9*J',$*%
47*,8"83%)"77%/*(5,8*8$7E%
47&3%$.*%D/(,E%F'81
Page 2 K&(%$*4.8"4,7%J'*#$"&8#L%/7*,#*%4,77%MNOOONOPPNQRSR1 Item 58479 58149
NOTICE
;7*,8%$.*%D/(,E%F'8%T&9E%,89%;'/%?@@6A?=B6<C%,2$*(%6!6GC%'#*%,89%).*8%"$%)"77%+*%"97*%2&(%
5&(*%$.,8%HI%5"8'$*#1%%A*7,E*9%&(%"8,9*J',$*%47*,8"83%)"77%/*(5,8*8$7E%47&3%$.*%D/(,E%F'81%
U,"8$%.,(9*8#%J'"4V7E%,89%/*(5,8*8$7E%"8#"9*%D/(,E%F'81
D=K6BC WU6G=B?W> @=?>B6>=>;6D6BXU
B,+7*%&2%;&8$*8$#
Safety .......................................................................2
Specifications ...........................................................7
Setup ........................................................................8
Operation .................................................................10
Maintenance ............................................................16
Parts Lists and Diagrams ........................................22
Warranty ..................................................................24
Y=G>?>F%DC@TW<D%=>A%A6K?>?B?W>D
This is the safety alert symbol. It is used to alert you to potential
personal injury hazards. Obey all safety messages that
follow this symbol to avoid possible injury or death.
Indicates a hazardous situation which, if not avoided,
will result in death or serious injury.
Indicates a hazardous situation which, if not avoided,
could result in death or serious injury.
Indicates a hazardous situation which, if not avoided,
could result in minor or moderate injury.
Addresses practices not related to personal injury.
?@UWGB=>B%D=K6BC%?>DBGX;B?W>D
U*(#&8,7%D,2*$E
1. D$,E%,7*($1%%Y,$4.%).,$%E&'%,(*%9&"83%,89%
'#*%4&55&8%#*8#*%).*8%&/*(,$"83%$.*%$&&71%%
A&%8&$%'#*%$.*%$&&7%)."7*%$"(*9%&(%'89*(%$.*%
"827'*84*%&2%9('3#L%,74&.&7L%&(%5*9"4,$"&81
A moment of inattention while operating the
tool increases the risk of injury to persons.
2. A(*##%/(&/*(7E1%%A&%8&$%)*,(%7&&#*%47&$."83%
&(%Z*)*7(E1%%;&8$,"8%7&83%.,"(1%%[**/%.,"(L%
47&$."83L%,89%37&\*#%,),E%2(&5%5&\"83%/,($#1
Loose clothes, jewelry, or long hair increases
the risk of injury to persons as a result
of being caught in moving parts.
3. A&%8&$%&\*((*,4.1%%[**/%/(&/*(%
2&&$"83%,89%+,7,84*%,$%,77%$"5*#1
Proper footing and balance enables better
control of the tool in unexpected situations.

Page 3K&(%$*4.8"4,7%J'*#$"&8#L%/7*,#*%4,77%MNOOONOPPNQRSR1Item 58479 58149
NOTICE
;7*,8%$.*%D/(,E%F'8%T&9E%,89%;'/%?@@6A?=B6<C%,2$*(%6!6GC%'#*%,89%).*8%"$%)"77%+*%"97*%2&(%
5&(*%$.,8%HI%5"8'$*#1%%A*7,E*9%&(%"8,9*J',$*%47*,8"83%)"77%/*(5,8*8$7E%47&3%$.*%D/(,E%F'81%
U,"8$%.,(9*8#%J'"4V7E%,89%/*(5,8*8$7E%"8#"9*%D/(,E%F'81
D=K6BCWU6G=B?W>@=?>B6>=>;6 D6BXU
4. X#*%#,2*$E%*J'"/5*8$1
Wear protective paint spraying
gloves and a NIOSH-approved
respirator during use.
Non-skid safety shoes and a hard
hat must be used for the applicable conditions.
5. =7),E#%)*,(%*E*%/(&$*4$"&81
Wear ANSI-approved safety goggles.
B&&7%X#*%,89%;,(*
1. A&%8&$%2&(4*%$.*%$&&71 Use the correct tool for the
application. The correct tool will do the job better
and safer at the rate for which the tool is designed.
b. X8/7'3%$.*%$&&7%+*2&(*%5,V"83%,8E%,9Z'#$5*8$#L%
4.,83"83%,44*##&("*#L%&(%#$&("83%$.*%$&&71
Such preventive safety measures reduce the risk of
starting the tool unintentionally. Turn off unplug the
sprayer, safely discharge any residual air pressure,
and release the throttle and/or turn the switch to
its off position before leaving the work area.
c. D$&(*%$.*%$&&7%).*8%"$%"#%"97*%&'$%&2%(*,4.%
&2%4."79(*8%,89%&$.*(%'8$(,"8*9%/*(#&8#1%%
A tool is dangerous in the hands of untrained users.
d. ;.*4V%2&(%5"#,7"385*8$%&(%+"89"83%&2%5&\"83%
/,($#L%+(*,V,3*%&2%/,($#L%,89%,8E%&$.*(%4&89"$"&8%
$.,$%,22*4$#%$.*%$&&7]#%&/*(,$"&81%%If damaged,
have the tool serviced before using. Many accidents
are caused by poorly maintained tools.
There is a risk of bursting if the tool is damaged.
e. X#*%&87E%,44*##&("*#%$.,$%,(*%"9*8$"2"*9%+E%$.*%
5,8'2,4$'(*(%2&(%$.*%#/*4"2"4%$&&7%5&9*71 Use of
an accessory not intended for use with the specific
tool model, increases the risk of injury to persons.
D*(\"4*
a. B&&7%#*(\"4*%5'#$%+*%/*(2&(5*9%&87E%
+E%J',7"2"*9%(*/,"(%/*(#&88*71
b. Y.*8%#*(\"4"83%,%$&&7L%'#*%&87E%"9*8$"4,7%
(*/7,4*5*8$%/,($#1%%X#*%&87E%,'$.&("^*9%/,($#1
D/*4"2"4%D,2*$E%?8#$('4$"&8#
1. B&%(*9'4*%$.*%("#V%&2%*7*4$("4%#.&4VL%%
9&%8&$%*_/&#*%$&%(,"81%%D$&(*%"89&&(#1
2. G"#V%&2%6_/7&#"&8%`%%
A&%8&$%#/(,E%27,55,+7*%7"J'"9#1
3. A&%8&$%#/(,E%&(%47*,8%)"$.%7"J'"9#%.,\"83%
,%27,#.%/&"8$%7*##%$.,8%HOa;%bMIIaKc1
4. Connect to GFCI-protected outlet only.
5. Spray area must be well ventilated. Keep
turbine assembly in a well ventilated area
at least 20 feet (6.1m) from the spraying
area. Do not spray turbine assembly.
6. Follow instructiosn for fluid being sprayed.
7. Do not direct spray at people or animals.
8. Read all of the information concerning
coating products and cleaning solvents.
A&%8&$%'#*%4.7&("8,$*9%#&7\*8$#%
b*131%MNMNM%$("4.7&(&*$.E7*8*%,89%
9"4.7&(&5*$.,8*L%,7#&%V8&)8%,#%
5*$.E7*8*%4.7&("9*c%$&%47*,8%#/(,E%3'8#1%%
@,8E%#/(,E%3'8#%4&8$,"8%,7'5"8'5L%
)."4.%(*,4$#%#$(&837E%$&%4.7&("8,$*9%#&7\*8$#1%%
Contact the solvent or coating manufacturer as
needed regarding potential chemical reactions.
9. Risk of injection – Do not point spray gun at any
person or any part of the body. In case of skin
injection, seek medical attention immediately.
10. Spraying hazardous materials may result in serious
injury or death. Do not spray pesticide, acid,
corrosive material, fertilizer, or toxic chemicals.
11. Paints and solvents may be harmful or fatal if
swallowed or inhaled. Avoid prolonged skin
contact with solvents or paints as they will
irritate skin. After any contact, immediately
wash off exposed area with hot, soapy water.

Page 4 K&(%$*4.8"4,7%J'*#$"&8#L%/7*,#*%4,77%MNOOONOPPNQRSR1 Item 58479 58149
NOTICE
;7*,8%$.*%D/(,E%F'8%T&9E%,89%;'/%?@@6A?=B6<C%,2$*(%6!6GC%'#*%,89%).*8%"$%)"77%+*%"97*%2&(%
5&(*%$.,8%HI%5"8'$*#1%%A*7,E*9%&(%"8,9*J',$*%47*,8"83%)"77%/*(5,8*8$7E%47&3%$.*%D/(,E%F'81%
U,"8$%.,(9*8#%J'"4V7E%,89%/*(5,8*8$7E%"8#"9*%D/(,E%F'81
D=K6BC WU6G=B?W> @=?>B6>=>;6D6BXU
12. B&%(*9'4*%$.*%("#V%&2%*7*4$("4%#.&4V, do
not expose to rain. Store indoors.
13. Attach all accessories properly to the tool
before plugging in the tool. A loose accessory
may detach or break during operation.
14. Maintain labels and nameplates on the tool.
These carry important safety information.
If unreadable or missing, contact
Harbor Freight Tools for a replacement.
15. Avoid unintentional starting. Prepare to
begin work before turning on the tool.
16. Do not leave the tool unattended when it is plugged
into an electrical outlet. Turn off the tool, and
unplug it from its electrical outlet before leaving.
17. This product is not a toy.
Keep it out of reach of children.
18. People with pacemakers should consult their
physician(s) before use. Electromagnetic fields in
close proximity to heart pacemaker could cause
pacemaker interference or pacemaker failure. In
addition, people with pacemakers should:
• Avoid operating alone.
• Do not use with power switch locked on.
• Properly maintain and inspect
to avoid electrical shock.
• Properly ground power cord. Ground Fault Circuit
Interrupter (GFCI) should also be implemented
– it prevents sustained electrical shock.
19. The warnings, precautions, and instructions
discussed in this instruction manual cannot
cover all possible conditions and situations
that may occur. It must be understood by the
operator that common sense and caution are
factors which cannot be built into this product,
but must be supplied by the operator.
%D=!6%Bd6D6%?>DBGX;B?W>D1
Page 5K&(%$*4.8"4,7%J'*#$"&8#L%/7*,#*%4,77%MNOOONOPPNQRSR1Item 58479 58149
NOTICE
;7*,8%$.*%D/(,E%F'8%T&9E%,89%;'/%?@@6A?=B6<C%,2$*(%6!6GC%'#*%,89%).*8%"$%)"77%+*%"97*%2&(%
5&(*%$.,8%HI%5"8'$*#1%%A*7,E*9%&(%"8,9*J',$*%47*,8"83%)"77%/*(5,8*8$7E%47&3%$.*%D/(,E%F'81%
U,"8$%.,(9*8#%J'"4V7E%,89%/*(5,8*8$7E%"8#"9*%D/(,E%F'81
D=K6BCWU6G=B?W>@=?>B6>=>;6 D6BXU
DE5+&7%A*2"8"$"&8#
DE5+&7 U(&/*($E%&(%D$,$*5*8$
!=; Volts Alternating Current
=Amperes
WARNING marking concerning
Risk of Eye Injury.
Wear ANSI-approved eye protection.
WARNING marking concerning
Risk of Respiratory Injury.
Wear NIOSH-approved respirator.
DE5+&7 U(&/*($E%&(%D$,$*5*8$
WARNING marking concerning
Risk of Explosion.
WARNING marking concerning Risk
of Fire.
Do not use solvents improperly.
WARNING marking concerning
Risk of Electric Shock.
Properly connect power cord
to appropriate outlet.
Page 6 K&(%$*4.8"4,7%J'*#$"&8#L%/7*,#*%4,77%MNOOONOPPNQRSR1 Item 58479 58149
NOTICE
;7*,8%$.*%D/(,E%F'8%T&9E%,89%;'/%?@@6A?=B6<C%,2$*(%6!6GC%'#*%,89%).*8%"$%)"77%+*%"97*%2&(%
5&(*%$.,8%HI%5"8'$*#1%%A*7,E*9%&(%"8,9*J',$*%47*,8"83%)"77%/*(5,8*8$7E%47&3%$.*%D/(,E%F'81%
U,"8$%.,(9*8#%J'"4V7E%,89%/*(5,8*8$7E%"8#"9*%D/(,E%F'81
D=K6BC WU6G=B?W> @=?>B6>=>;6D6BXU
FGWX>A?>F%?>DBGX;B?W>D
B."#%/(&9'4$%5'#$%+*%3(&'89*91%?8%$.*%*\*8$%&2%,8%*7*4$("4,7%#.&($%4"(4'"$L%3(&'89"83%(*9'4*#%$.*%("#V%
&2%*7*4$("4%#.&4V%+E%/(&\"9"83%,8%*#4,/*%)"(*%2&(%$.*%*7*4$("4%4'((*8$1%B."#%/(&9'4$%"#%*J'"//*9%)"$.%,%
4&(9%.,\"83%,%3(&'89"83%)"(*%)"$.%,8%,//(&/(",$*%3(&'89"83%/7'31%B.*%/7'3%5'#$%+*%/7'33*9%"8$&%,8%
&'$7*$%$.,$%"#%/(&/*(7E%"8#$,77*9%,89%3(&'89*9%"8%,44&(9,84*%)"$.%,77%7&4,7%4&9*#%,89%&(9"8,84*#1
BW%UG6!6>B%6<6;BG?;%DdW;[%=>A%A6=Bd%KGW@%
?>;WGG6;B%FGWX>A?>F%Y?G6%;W>>6;B?W>-%
?5/(&/*(%"8#$,77,$"&8%&2%$.*%3(&'89"83%/7'3%"#%,+7*%$&%(*#'7$%"8%,%("#V%&2%*7*4$("4%#.&4V1%Y.*8%(*/,"(%
+7,9*%$*(5"8,71%B.*%)"(*%)"$.%"8#'7,$"&8%.,\"83%,8%&'$*(%#'(2,4*%$.,$%"#%3(**8%)"$.%&(%)"$.&'$%E*77&)%#$("/*#%
"#%$.*%3(&'89"83%)"(*1%%
'89*(#$&&9L%&(%).*8%"8%9&'+$%,#%$&%).*$.*(%$.*%/(&9'4$%"#%/(&/*(7E%3(&'89*91%A&%8&$%5&9"2E%$.*%/7'3%
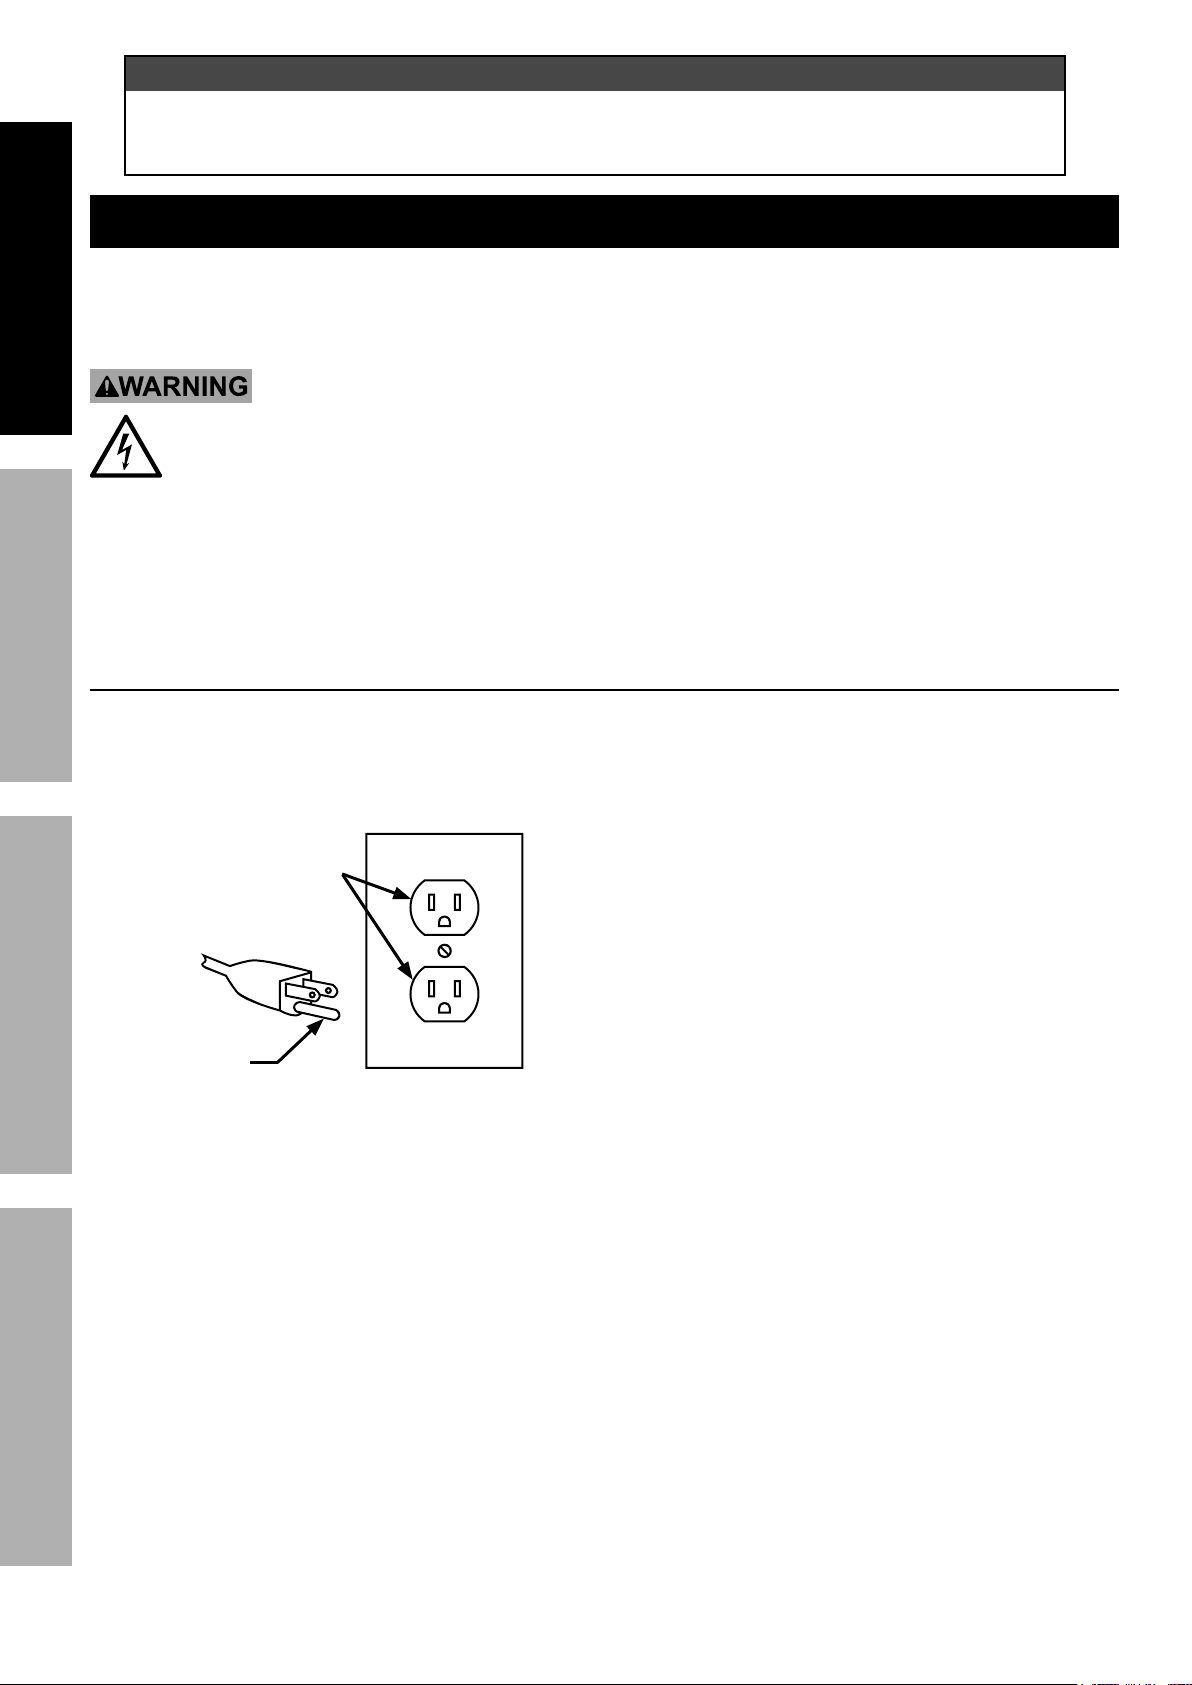
F(&'89*9%B&&7#-%B&&7#%)"$.%B.(**%U(&83%U7'3#
This product is for use on a nominal 120-V circuit and
has a grounding plug similar to the plug illustrated in
HNU(&83%U7'3%,89%W'$7*$1 Only connect the product
to an outlet having the same configuration as the
plug. Do not use an adapter with this product.
FGWX>A6A%
WXB<6B
FGWX>A?>F%
U?>
HNU(&83%U7'3%,89%W'$7*$
1. Tools marked with “Grounding Required” have
a three wire cord and three prong grounding
plug. The plug must be connected to a properly
grounded outlet. If the tool should electrically
malfunction or break down, grounding provides
a low resistance path to carry electricity away
from the user, reducing the risk of electric shock.
bD**%HNU(&83%U7'3%,89%W'$7*$1c
2. The grounding prong in the plug is connected
through the green wire inside the cord to the
grounding system in the tool. The green wire
in the cord must be the only wire connected to
the tool’s grounding system and must never
be attached to an electrically “live” terminal.
bD**%HNU(&83%U7'3%,89%W'$7*$1c
3. The tool must be plugged into an appropriate outlet,
properly installed and grounded in accordance
with all codes and ordinances. The plug and outlet
should look like those in the preceding illustration.
bD**%HNU(&83%U7'3%,89%W'$7*$1c
Page 7K&(%$*4.8"4,7%J'*#$"&8#L%/7*,#*%4,77%MNOOONOPPNQRSR1Item 58479 58149
NOTICE
;7*,8%$.*%D/(,E%F'8%T&9E%,89%;'/%?@@6A?=B6<C%,2$*(%6!6GC%'#*%,89%).*8%"$%)"77%+*%"97*%2&(%
5&(*%$.,8%HI%5"8'$*#1%%A*7,E*9%&(%"8,9*J',$*%47*,8"83%)"77%/*(5,8*8$7E%47&3%$.*%D/(,E%F'81%
U,"8$%.,(9*8#%J'"4V7E%,89%/*(5,8*8$7E%"8#"9*%D/(,E%F'81
D=K6BCWU6G=B?W>@=?>B6>=>;6 D6BXU
6_$*8#"&8%;&(9#
1. Grounded tools require a three wire extension cord.
Double Insulated tools can use either a
two or three wire extension cord.
2. As the distance from the supply outlet increases,
you must use a heavier gauge extension cord.
Using extension cords with inadequately sized wire
causes a serious drop in voltage, resulting in loss of
power and possible tool damage. bD**%B,+7*%=1c
3. The smaller the gauge number of the wire, the
greater the capacity of the cord. For example,
a 14 gauge cord can carry a higher current
than a 16 gauge cord. bD**%B,+7*%=1c
4. When using more than one extension cord to make
up the total length, make sure each cord contains at
least the minimum wire size required. bD**%B,+7*%=1c
5. If you are using one extension cord for more
than one tool, add the nameplate amperes
and use the sum to determine the required
minimum cord size. bD**%B,+7*%=1c
6. If you are using an extension cord outdoors, make
sure it is marked with the suffix “W-A” (“W” in
Canada) to indicate it is acceptable for outdoor use.
7. Make sure the extension cord is properly wired
and in good electrical condition. Always replace
a damaged extension cord or have it repaired
by a qualified electrician before using it.
8. Protect the extension cords from sharp objects,
excessive heat, and damp or wet areas.
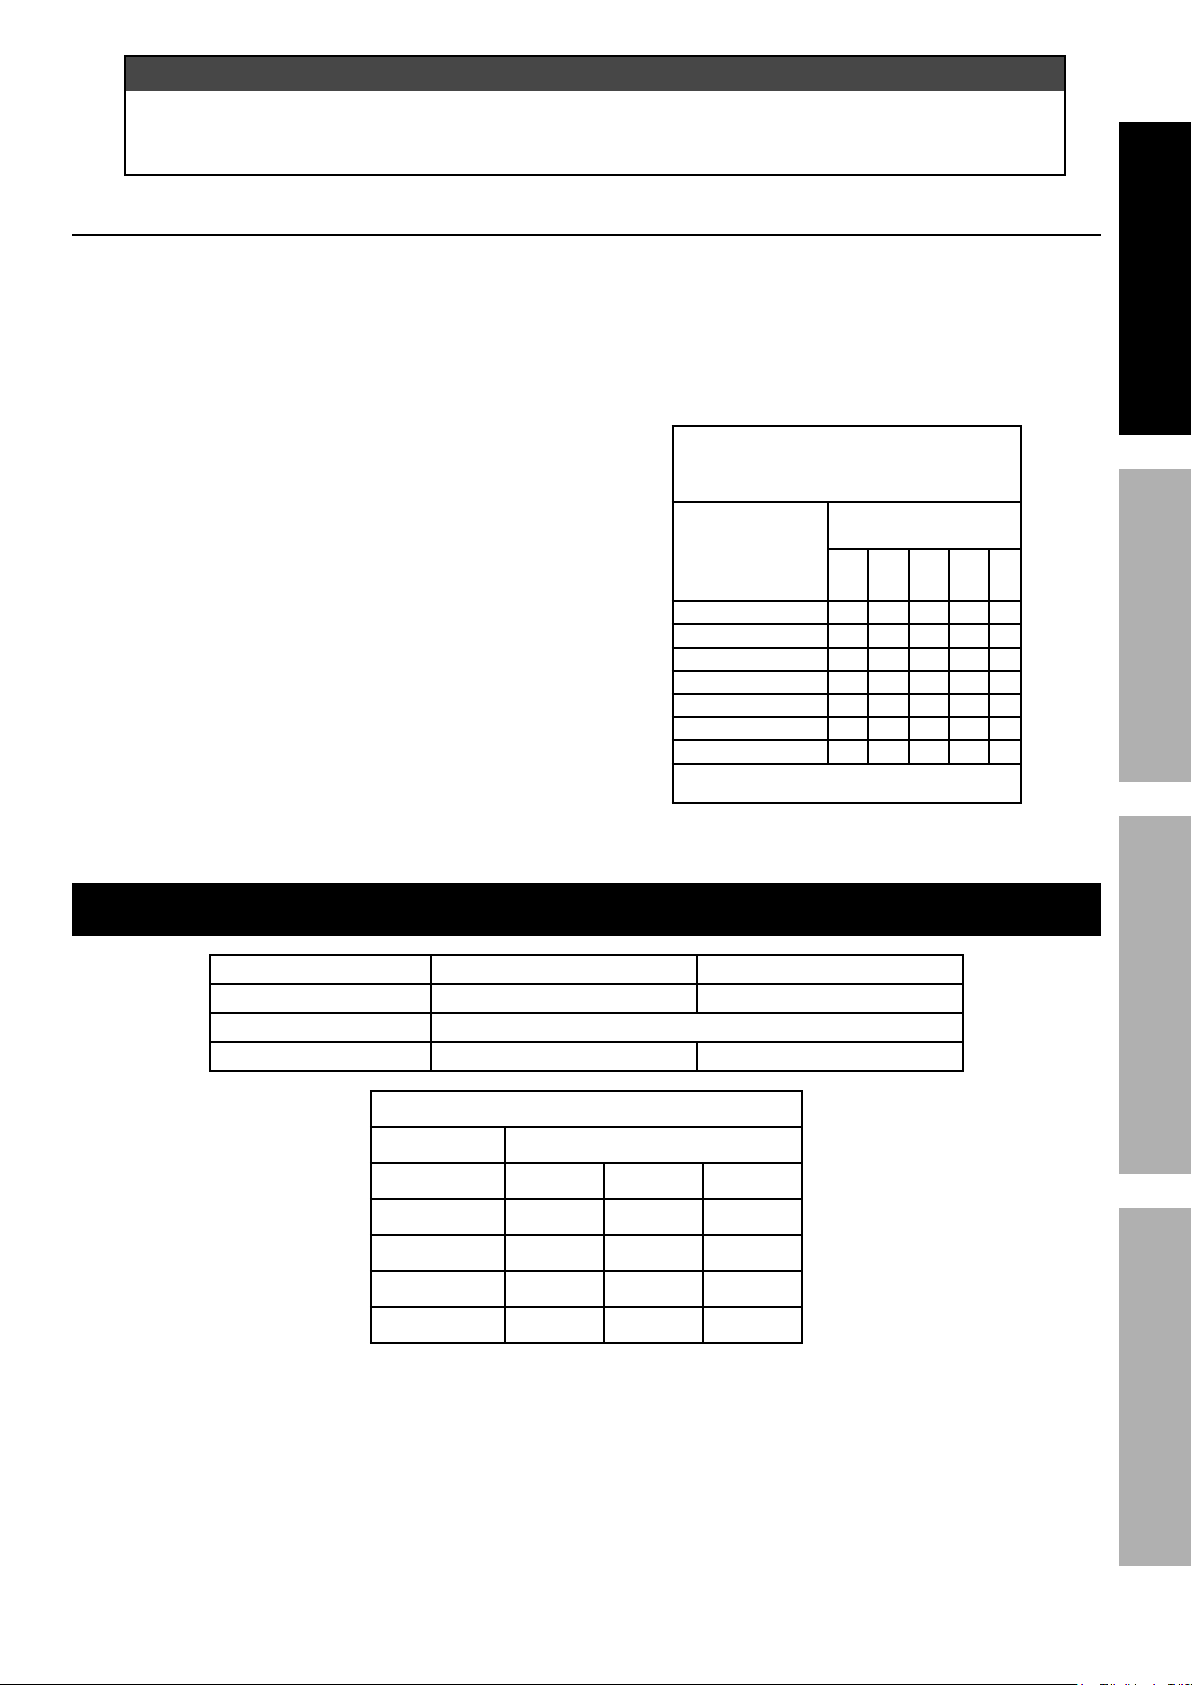
B,+7*%=-%%G*4&55*89*9%
@"8"5'5%Y"(*%F,'3*%
>=@6U<=B6
=@U6G6D
b,$%2'77%7&,9c
6eB6>D?W>%;WGA%
<6>FBd
fQg
QIg
RQg
MIIg
MQIg
0 – 2.0 18 18 18 18 16
2.1 – 3.4 18 18 18 16 14
3.5 – 5.0 18 18 16 14 12
5.1 – 7.0 18 16 14 12 12
7.1 – 12.0 18 14 12 10 -
12.1 – 16.0 14 12 10 - -
16.1 – 20.0 12 10 - - -
h%T,#*9%&8%7"5"$"83%$.*%7"8*%\&7$,3*%9(&/%$&%
2"\*%\&7$#%,$%MQIi%&2%$.*%(,$*9%,5/*(*#1
D/*4"2"4,$"&8#
Electrical Rating
Cup Capacity 32 fl. oz.
Tip Size 1.3mm 1.3mm & 1.8mm
>Wjj<6%;d=GB
Material Thickness
Nozzle Size Thin Medium Thick
0.8 mm X
1.3 mm X
1.8 mm X
2.2 mm X
dWXD6dW<A%XD6%W><C1
Page 8 K&(%$*4.8"4,7%J'*#$"&8#L%/7*,#*%4,77%MNOOONOPPNQRSR1 Item 58479 58149
NOTICE
;7*,8%$.*%D/(,E%F'8%T&9E%,89%;'/%?@@6A?=B6<C%,2$*(%6!6GC%'#*%,89%).*8%"$%)"77%+*%"97*%2&(%
5&(*%$.,8%HI%5"8'$*#1%%A*7,E*9%&(%"8,9*J',$*%47*,8"83%)"77%/*(5,8*8$7E%47&3%$.*%D/(,E%F'81%
U,"8$%.,(9*8#%J'"4V7E%,89%/*(5,8*8$7E%"8#"9*%D/(,E%F'81
D=K6BC WU6G=B?W> @=?>B6>=>;6D6BXU
D*$NX/-%T*2&(*%X#*
G*,9%$.*%6>B?G6%?@UWGB=>B%D=K6BC%?>KWG@=B?W>%#*4$"&8%,$%$.*%+*3"88"83%&2%$."#%5,8',7%
"847'9"83%,77%$*_$%'89*(%#'+.*,9"83#%$.*(*"8%+*2&(*%#*$%'/%&(%'#*%&2%$."#%/(&9'4$1
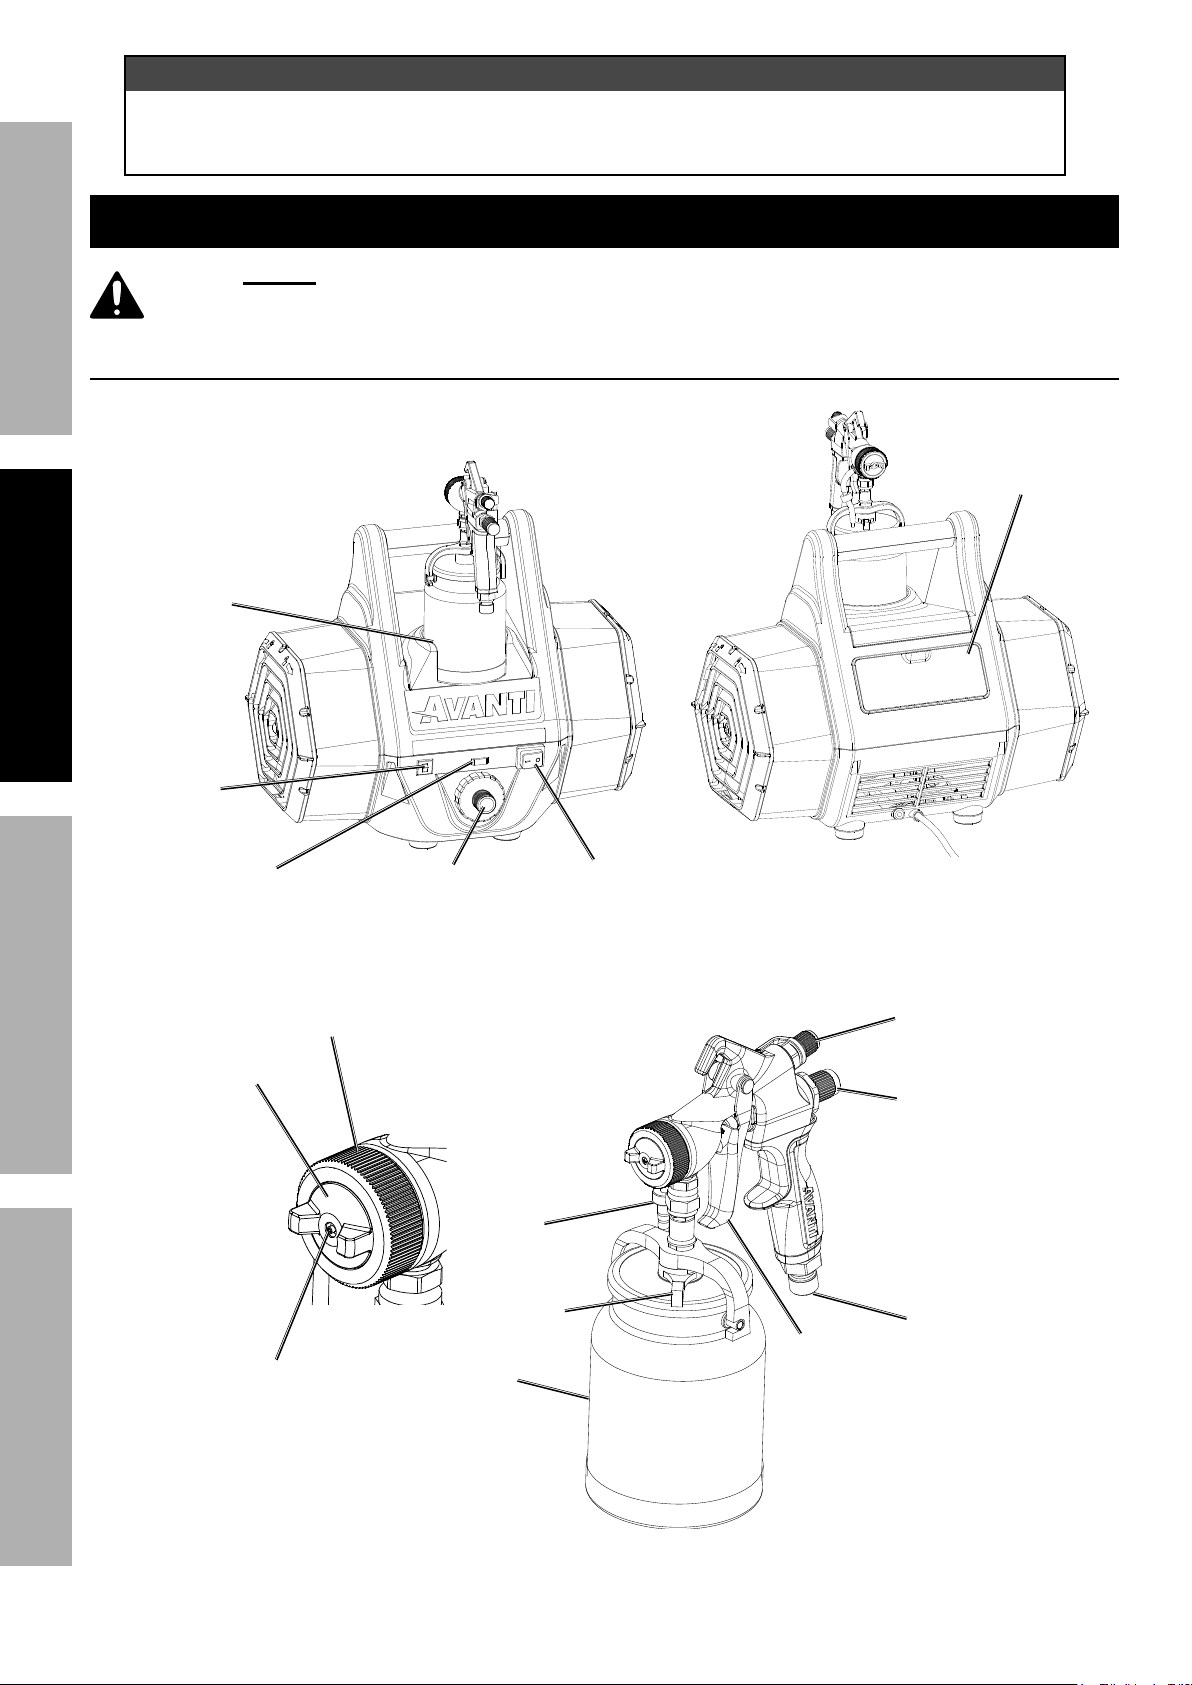
;&5/&8*8$#%,89%;&8$(&7#
D/(,E%
F'8
D$&(,3*
U&)*(%
D)"$4.
="(%K"7$*(%<"3.$%
="(%d&#*%
W'$7*$
B.*(5,7%
W\*(7&,9%
D)"$4.
=44*##&(E%
D$&(,3*
;&5/,($5*8$
="(%
;,/%
<&4V%
G"83
K7'"9%
>&^^7*
B("33*(
="(%
B'+*
<"9%
<&4V
K7'"9%
;&8$(&7%
[8&+
="(%?87*$%
;&'/7*(
="(%
;&8$(&7%
[8&+
;'/
Page 9K&(%$*4.8"4,7%J'*#$"&8#L%/7*,#*%4,77%MNOOONOPPNQRSR1Item 58479 58149
NOTICE
;7*,8%$.*%D/(,E%F'8%T&9E%,89%;'/%?@@6A?=B6<C%,2$*(%6!6GC%'#*%,89%).*8%"$%)"77%+*%"97*%2&(%
5&(*%$.,8%HI%5"8'$*#1%%A*7,E*9%&(%"8,9*J',$*%47*,8"83%)"77%/*(5,8*8$7E%47&3%$.*%D/(,E%F'81%
U,"8$%.,(9*8#%J'"4V7E%,89%/*(5,8*8$7E%"8#"9*%D/(,E%F'81
D=K6BCWU6G=B?W>@=?>B6>=>;6 D6BXU
=##*5+7E
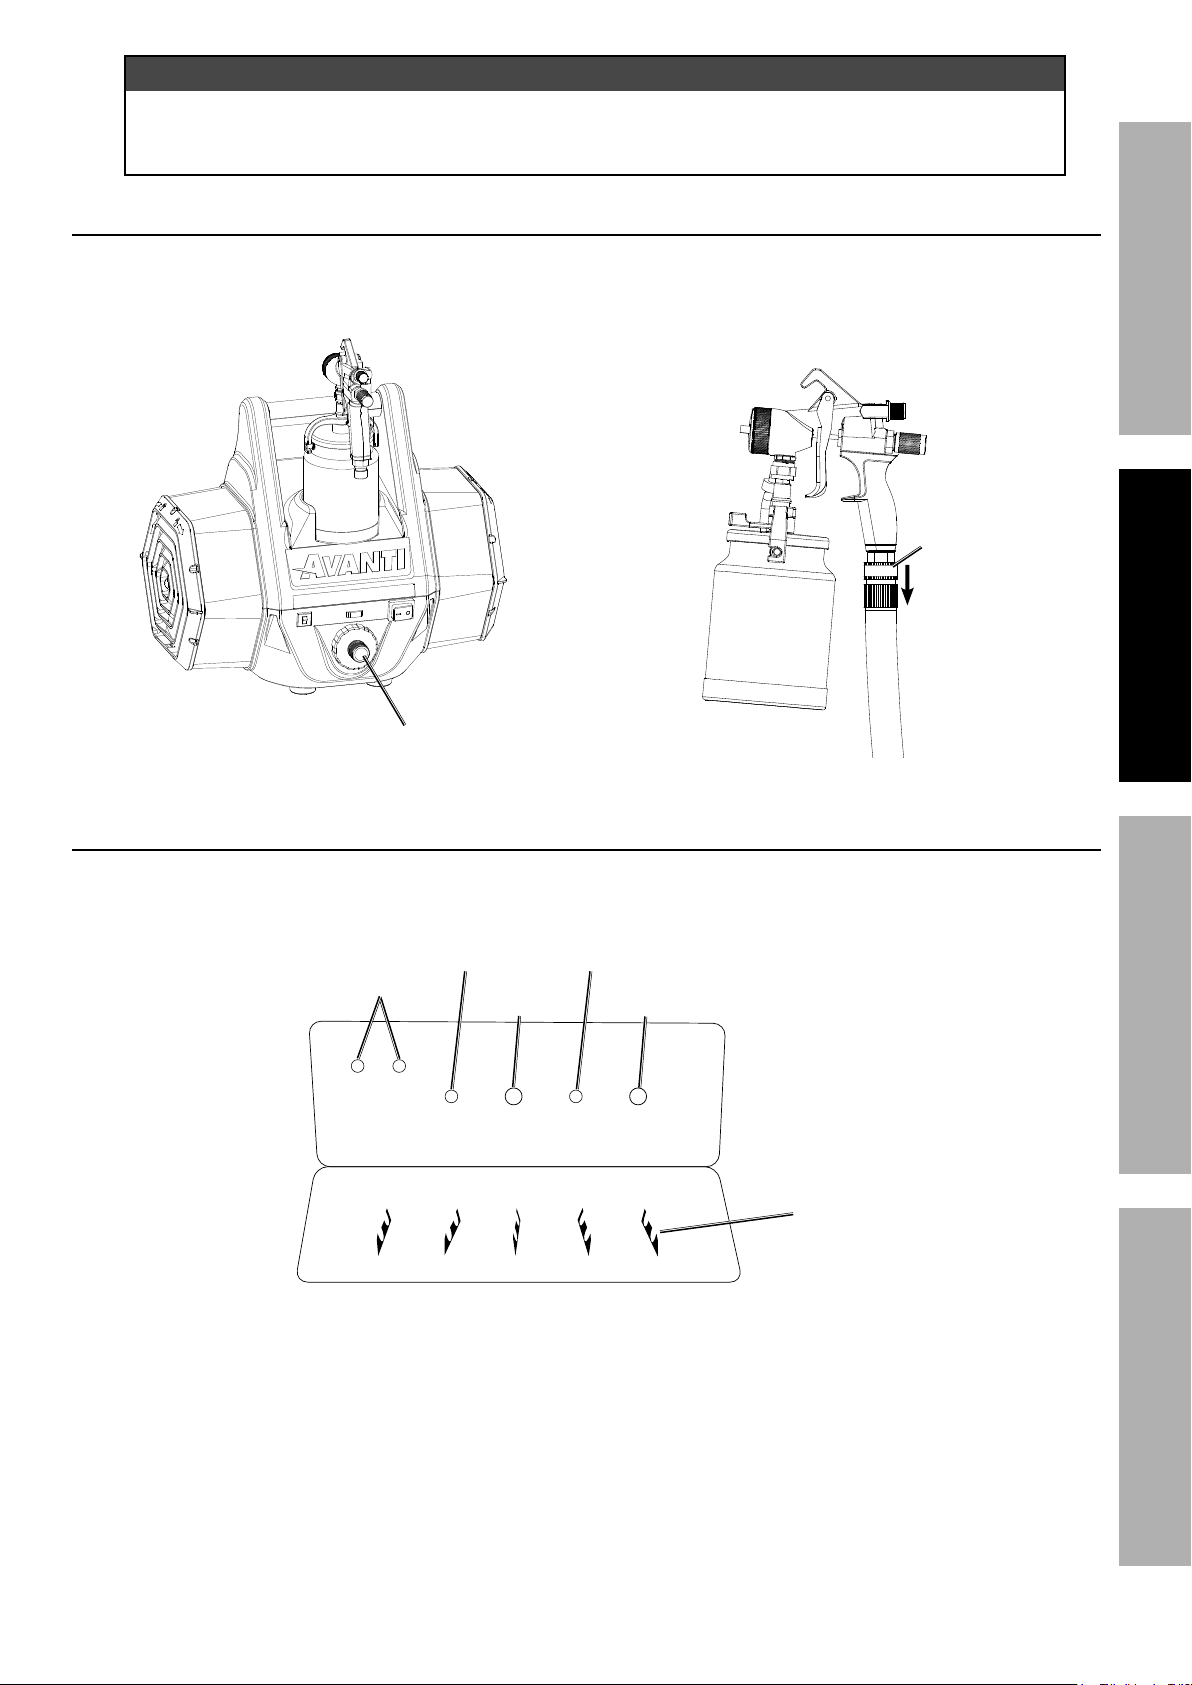
1. Thread Air Hose onto Spray Hose Outlet by
hand until secure. (58149 has additional
Whip Hose attached to end of Air Hose.)
="(%d&#*%
W'$7*$
2. Attach Spray Gun to Air Hose by pulling down
Coupler, inserting Spray Gun Coupler fully into
Air Hose, then releasing Coupler. Pull on Air
Hose to make sure Spray Gun is fully seated.
;&'/7*(
=44*##&(E%D$&(,3*%;&5/,($5*8$
Use compartment on back of Sprayer to store two Nozzle-Needle Sets and Nozzle Wrench.
>**97*#
="(%
;,/
="(%
;,/
>&^^7*
>&^^7*>&^^7*%
Y(*84.

Page 10 K&(%$*4.8"4,7%J'*#$"&8#L%/7*,#*%4,77%MNOOONOPPNQRSR1 Item 58479 58149
NOTICE
;7*,8%$.*%D/(,E%F'8%T&9E%,89%;'/%?@@6A?=B6<C%,2$*(%6!6GC%'#*%,89%).*8%"$%)"77%+*%"97*%2&(%
5&(*%$.,8%HI%5"8'$*#1%%A*7,E*9%&(%"8,9*J',$*%47*,8"83%)"77%/*(5,8*8$7E%47&3%$.*%D/(,E%F'81%
U,"8$%.,(9*8#%J'"4V7E%,89%/*(5,8*8$7E%"8#"9*%D/(,E%F'81
D=K6BC WU6G=B?W> @=?>B6>=>;6D6BXU
W/*(,$"83%?8#$('4$"&8#
G*,9%$.*%6>B?G6%?@UWGB=>B%D=K6BC%?>KWG@=B?W>%#*4$"&8%%
,$%$.*%+*3"88"83%&2%$."#%5,8',7%"847'9"83%,77%$*_$%'89*(%#'+.*,9"83#%$.*(*"8%%
+*2&(*%#*$%'/%&(%'#*%&2%$."#%/(&9'4$1
?8#/*4$%$&&7%+*2&(*%'#*L%7&&V"83%2&(%9,5,3*9L%7&&#*L%,89%5"##"83%/,($#1%%?2%,8E%/(&+7*5#%,(*%2&'89L%
9&%8&$%'#*%$&&7%'8$"7%(*/,"(*91%%A,5,3*9%&(%5"##"83%/,($#%4,8%"84(*,#*%("#V%&2%*7*4$("4%#.&4V1
T*2&(*%K"(#$%X#*%
BW%UG6!6>B%D6G?WXD%?>kXGC-%%A&%8&$%,9Z'#$%&(%$,5/*(%)"$.%,8E%4&8$(&7%&(%
4&5/&8*8$%"8%,%),E%8&$%#/*4"2"4,77E%*_/7,"8*9%)"$."8%$."#%5,8',71%%
?5/(&/*(%,9Z'#$5*8$%4,8%(*#'7$%"8%$&&7%2,"7'(*%&(%&$.*(%#*("&'#%.,^,(9#1
>WB?;6-%%T*2&(*%2"(#$%'#*L%47*,8%$.*%D/(,E%F'8%$.&(&'3.7E1%
?2%8&$%(*5&\*9L%$.*%5,$*(",7%'#*9%2&(%$*#$"83%,89%4&((&#"&8%/(*\*8$"&8%)"77%4&8$,5"8,$*%/,"8$1%
Y&(V/"*4*%,89%Y&(V%=(*,%D*$%X/
1. Designate a work area that is clean and well lit.
The work area must not allow access by children
or pets to prevent distraction and injury.
2. Before spraying, mask nearby objects not being
sprayed and lay cloths (not included) on the floors.
Ce manuel convient aux modèles suivants
2
Table des matières
Autres manuels Avanti Pistolet à peinture

Avanti
Avanti 57568 Instructions de montage

Avanti
Avanti 57042 Manuel utilisateur

Avanti
Avanti 58056 Instructions de montage

Avanti
Avanti 58149 Manuel utilisateur

Avanti
Avanti 64934 Instructions de montage

Avanti
Avanti 57042 Manuel utilisateur

Avanti
Avanti 64933 Manuel utilisateur

Avanti
Avanti 57641 Instructions de montage

Avanti
Avanti 57042 Instructions de montage


