ASPERA R8 Manuel utilisateur

ASPERA R8
USER MANUAL

Contents
Safety Information---------------------------------------------------------------------------------------------3
Appearance and Key Function--------------------------------------------------------------------------6
Call Functions--------------------------------------------------------------------------------------------------9
Notifications Bar----------------------------------------------------------------------------------------------10
Contacts-----------------------------------------------------------------------------------------------11
Messaging-------------------------------------------------------------------------------------------------12
Bluetooth and Wi-Fi-----------------------------------------------------------------------------------------13
Tethering and Wifi Hotspot------------------------------------------------------------------------------14
Internet---------------------------------------------------------------------------------------------------------15
Play Store------------------------------------------------------------------------------------------------------16
Camera----------------------------------------------------------------------------------------------------17
Gallery----------------------------------------------------------------------------------------------------------18
Music------------------------------------------------------------------------------------------------------19
FM radio--------------------------------------------------------------------------------------------------------20
Sound Recorder----------------------------------------------------------------------------------------------21
Calendar-------------------------------------------------------------------------------------------------------22
Alarm Clock---------------------------------------------------------------------------------------------------23
Settings-------------------------------------------------------------------------------------------------24
Maintenance and service-------------------------------------------------------------------------------25
2

Safety Information
Please carefully read the instructions below:
Usage Safety
Do not use the phone in situations where it might cause danger.
Transportation Safety
Please observe all transportation laws or regulations.
Please drive with both hands on the wheel.
PLEASE DRIVE RESPONSIBLY-DO NOT TEXT AND DRIVE.
Hospital Safety
Please follow hospital rules and limitations.
Please turn off your mobile phone when near medical instruments.
Airport Safety
Remember to follow all airport and flight safety regulations.
Please do not use your phone during flight unless in Airplane mode.
Chemical Warning
Do not use your mobile phone around fuels and chemicals.
Temperature Warning
Do not subject your phone to extreme temperature conditions.
Water Hazard
Keep your phone away from corrosive liquids.
Emergency Calls
Make sure your mobile phone is switched on and in a service area. In home screen, tap the phone key
and dial ,the emergency number. Your phone can also dial emergency from a lock screen and without a
sim card installed.
Accessories and Batteries
Use only Aspera batteries and accessories.
Information Backup
Remember to keep a written record of all important information such as passwords and PINs.
Battery Safety and Precautions
-For better performance and longer battery life, it is recommended that you charge the battery fully
before using the mobile phone for the first time.
-The optimum performance of a new battery is typically achieved after two or three complete charge
cycles Note: Keep in mind that continuous overcharging will affect long term battery life.
-While charging, keep the mobile phone out of the reach of children.
-Store the battery in a cool and dry place away from sunlight and water.
-Do not expose batteries to extreme temperatures (below-8℃(18℉) or above 43℃(110℉)).
-Immediately stop using the battery if it produces an odor, cracks or leaks, overheats, distorts or has any
other type of physical damage.
-Avoid using the charger near or around liquids. If the charger comes in contact with water or any liquids,
3 4
immediately unplug it from the outlet to reduce the risk of overheating, charger malfunction, electric
shock or fire.
Warning: Please be careful with the disposal of used batteries. Do not throw away the batteries with
daily waste. Please follow local environment laws and guidelines for proper waste disposal.
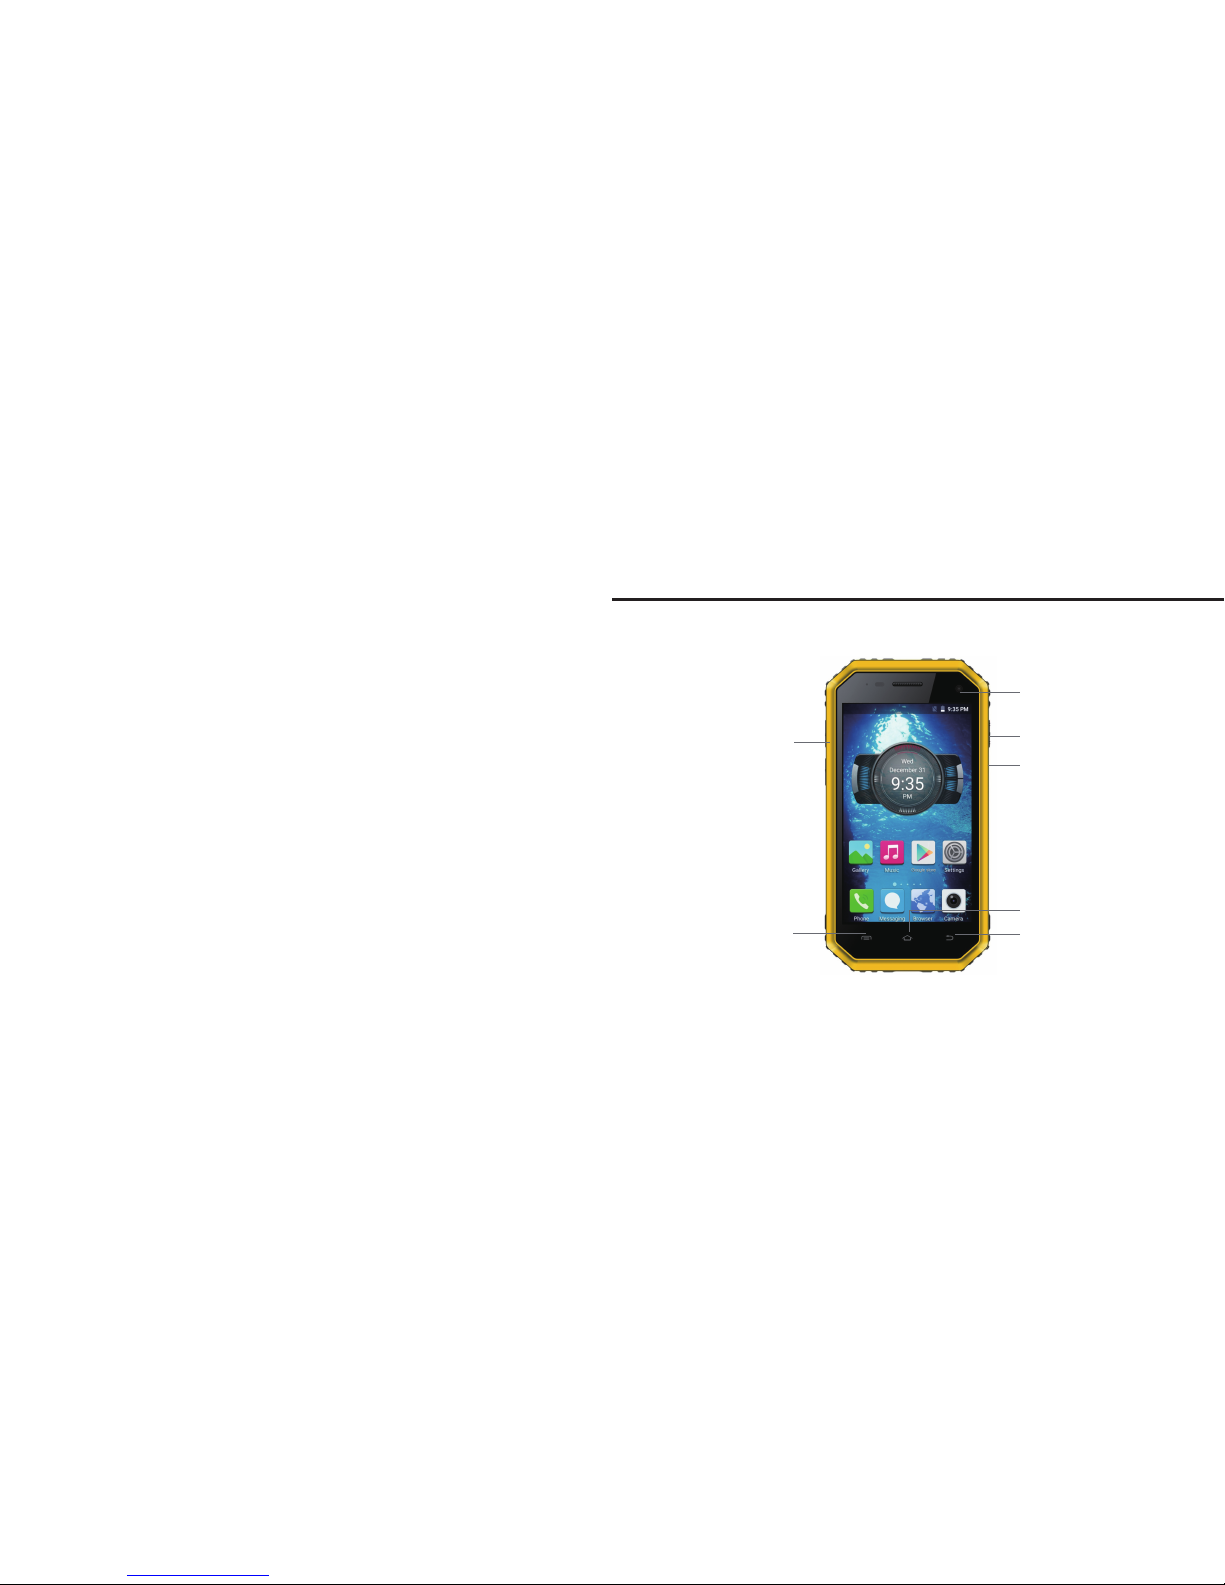
Appearance and Key Function
Vol u me
Fro nt Camera
Menu
Home
Back
Power On/Off
Reset
5 6

Introduction
Installation of the SIM card
Advisory: Please keep the SIM card out of the reach of children. The SIM card and its contacts are
easily damaged due to scratching or bending. Please use caution when carrying, installing or taking out
the SIM card, NB: Please contact your cellular phone service provider directly to obtain your SIM card.
To insert SIM card:
1.Lift the seal on the left side of the phone. Insert the micro SIM card
with the connectors facing up towards the screen and angled corner
of the SIM inserted first. Ensure the seal is replaced correctly.
2.Insert your SD card with connectors facing upward. (For additional
storage capacity). Replace the seal correctly.
Power On and Off
Power On - Please ensure the SIM card has been properly
inserted into the phone. Press and hold the Power key to
switch the phone on. The Power key is on the right side of the
phone.Power Off - In standby mode, press the Power key until
an options menu appears. Select Power Off in the menu and
confirm in the pop-up prompt to switch off the phone.
Security
You may set a security lock feature or DIN code as a security measure for the phone. For further
information regarding password locks, password revision and other functions please enter into the
Security option in system settings.
F lash
Rear Cam era
7 8
sim

Notifications Bar
The notification bar is located on the top of the screen. It contains
useful and important information regarding your phone and the
applications that are installed. Scroll downwards from top of the screen to get
an expanded notification bar.
All notifications from applications will appear here as well
as hardware notifications such as connection of the USB.
Shortcuts: The settings window
provides shortcuts to different phone
settings for quick access. Slide your
finger down twice from the top of the
screen to access Shortcuts. Click
on any of the shortcut notification
icons to turn on/off.
Call Functions
Click the Phone icon. At the dialing keyboard, enter the phone number and then click the dial key.
Call logs: Every telephone number called and received will be saved in the phones call log. All the
numbers in the call log can be dialed directly by clicking the dial icon on the screen.
9 10

Messaging
You will find the messaging icon at the bottom of the home screen, click the messaging icon to edit your
text and send to your chosen contact.
To delete messages, press down on the message until the phone notifies you of the options. Then click
the bin icon in the top leftto remove the message.
Contacts
Click on the Contacts icon.
The default display is the phone contacts, and the Contacts are listed alphabetically by default.
Select any contact and the dialing or messaging options will be shown. Click the add contact icon (+) to
add a new contact.
Contacts stored in Gmail will be synced
to the phone on signing into your Google
or Gmail account. In Contacts application
you can select the menu at top right to
choose which Contacts to display or to
import/export Contacts from your sim
card or other location.
11 12

Tethering and Wifi Hotspot
To set up a wireless hotspot go to settings->more->tethering and portable hotspots->wifi-Hotspot and
then turn on and select “Set up wireless hotspot.”
For tethering go to settings->more->tethering and portable hotspot. At this point you may either turn on
bluetooth tethering or USB tethering.
Note: USB tethering can only be
turned on when the USB is
connected.
Bluetooth and Wi-Fi
Power on Bluetooth
Settings˃ Bluetooth and select to power on Bluetooth.
The Bluetooth icon will appear in the notification bar, the phone will start to scan for all devices within its
range and will display all available devices in a list. Select which device to connect with.
Power on Wi-Fi:
Settings>Wi-Fi and select ON to
power on Wifi. Click on the
desired Wi-Fi network to be
connected and you will be
promptedto enter the network
password
13 14

Play Store
Play Store allows you to download music, movies, and applications directly to your device. To access
the Google Play Store, click on the Play Store Icon. You must be logged into your Google account or
create a new account.
Internet
Before using the browser, ensure that you have a data connection, either with a mobile network or Wi-Fi
network.Once connected you can use the browser search bar to enter the URL orsearch term.
Google Chrome is installed as default browser.
15 16

Gallery
Open images: Application Menu>Gallery.
Pictures are stored in separate albums. There will also be a separate
album for screen shots.
Camera
Open Camera - Click on the camera icon.
Take pictures: Aim at the desired object or scene.
Tap on a particular region to focus the camera on that specific region.
At the bottom of the screen you can slide across to choose video, photo or other options. You can also
tap the settings icon to choose other settings such as voice capture and pixel density.
Deleting Pictures: To delete a picture,
go to Gallery icon, select a picture
by tapping on it, then tap on the 3
vertical dots in top right of the
screen. Select the delete option to
delete the picture or see other
options.
Other Features: The Aspera R8
camera allows for various filters
and borders to be added to a
photo. To access these effects,
select a photo and click on the
pencil icon on the bottom left.
17 18
Table des matières
Autres manuels ASPERA Téléphone portable

ASPERA
ASPERA R12 Manuel utilisateur

ASPERA
ASPERA R3D Manuel utilisateur

ASPERA
ASPERA R5 Manuel utilisateur

ASPERA
ASPERA A42 Manuel utilisateur

ASPERA
ASPERA R7 Manuel utilisateur

ASPERA
ASPERA R5 Manuel utilisateur

ASPERA
ASPERA R10 Manuel utilisateur

ASPERA
ASPERA F40 Manuel utilisateur

ASPERA
ASPERA R25t Manuel utilisateur

ASPERA
ASPERA F26 Manuel utilisateur

ASPERA
ASPERA Wren Manuel utilisateur

ASPERA
ASPERA A50 Manuel utilisateur

ASPERA
ASPERA F28 Manuel utilisateur

ASPERA
ASPERA SWIFT Manuel utilisateur

ASPERA
ASPERA R6 Manuel utilisateur

ASPERA
ASPERA F46 Manuel utilisateur

ASPERA
ASPERA R3 Manuel utilisateur

ASPERA
ASPERA Jazz 2 Manuel utilisateur

ASPERA
ASPERA F42 Manuel utilisateur


