Asoka PlugLink PL9920-BBR Manuel utilisateur

© Copyright 2003. Asoka USA Corporation. All rights reserved. Asoka USA Corporation
reserves the right to modify product offerings or specifications without advance notice. No
part of this publication may be produced in any format without the express written permis-
sion of Asoka USA Corporation.
Part Number: 65-9920-001
Asoka™ PlugLink™ PL Cable/DSL Router
User’s Manual

Table of Contents
Asoka™ PlugLink™ PL Cable/DSL Router Manual
1
Page
Introduction 2
Important Safety Information 3
Getting Intimate with your Powerline Device 4
Getting Started 5
Connecting the Asoka PlugLink PL Cable/DSL Router 6
LAN Side Setup Guide 8
Router Setup Guide 11
Internet Connection WAN Side Setup Guide 13
Powerline Encryption Setup Guide 18
Checking the Internet Service Provider Setup 19
Advanced Features 19
Router LAN Setup Guide 21
Advanced Tab Setup Guide 22
Troubleshooting Guide 23
Appendix A: Specifications 26
Appendix B: Glossary 27
Appendix C: Technical Support & RMA 28
Appendix D: FCC Statement 29
Appendix E: Limited Warranty Information 30
Notes 32

Introduction
Congratulations! As the proud owner of the state-of-the-art Asoka™
PlugLink™ PL Cable/DSL Router, connecting multiple computing devices
together to establish a Local Area Network (LAN) is as simple as 1-2-3. The
Asoka PlugLink PL Cable/DSL Router combines the power of a router, the
intensity of a Powerline network, and the flexibility of a 4-port switch. It is
an ideal solution to provide you with the ability to share high-speed
Internet access.
This manual provides a step by step installation guide to quickly get your
network connect to your broadband Internet connection. We also suggest
that you give yourself some time to play with your new powerline net-
working device.
All Asoka PlugLink networking devices are designed and manufactured to
meet Asoka’s and industry organizations’ (i.e. HomePlug Powerline Alliance,
IEEE, FCC, and UL) rigorous specifications and world-class quality stan-
dards. During development, our laboratory testing team put the PlugLink
networking device through strenuous evaluations and standards. We are
confident that the one you purchase will meet your own exacting stan-
dards.
Thank you for choosing Asoka and, by all means, enjoy your PlugLink PL
Cable/DSL Router!
For the latest product information, please visit us on the web at
www.asokausa.com.
Asoka™ PlugLink™ PL Cable/DSL Router Manual
2

Important Safety Information
This product is intended for connection to the AC power. The following pre-
cautions should be taken when using this product.
• Read all instructions before installing and operating this product.
• Follow all warnings and instructions marked on the product.
• Do not operate this product near water.
• This product relies on a building’s electrical installation for short-cir-
cuit (over current) protection. Ensure that a fuse or circuit breaker no
larger than 15 Amp is used on the phase conductors (all current-car-
rying conductors).
• Do not allow anything to rest on the product interconnect cords.
• Do not locate this product where people may walk on the cords.
• The PL Cable/DSL Router should be plugged directly into an AC wall
outlet. (Note: The appropriate voltage, 120/240V, will be
clearly marked on the box.)
• Only a qualified technician should service this product. Opening or
removing covers may result in exposure to dangerous voltage points
or other risks. (Note: Opening or removing the covers will void
your product warranty.)
• Unplug the PL Cable/DSL Router from the AC wall outlet and refer
the product to qualifed service personnel for the following conditions:
- When the interconnect cords are damaged or frayed.
- If liquid has been spilled onto the product.
- If the product has been exposed to rain or water.
- If the product does not operate normally when the operating
instructions have been followed.
- If the product exhibits a distinct change in performance.
Asoka™ PlugLink™ PL Cable/DSL Router Manual
3

Getting Intimate with your Powerline Device
Before installing your powerline networking device, please take a moment
to examine and familiarize yourself with it. Below is a diagram of the
PL9920-BBR along with a brief description of what each LED and port rep-
resent.
The front panel of the router has a number of LEDs indicating the status of
the device, their functions are:
PWR: Steady light indicates the device is powered up.
RDY: Flashes quickly after the router is powered up. When the router
is ready to use, the LED flashes every second to indicate the router is
functioning normally. If the LED stops flashing or flashes more rapidly
an error has occurred. Refer to the troubleshooting section for help.
LINK: One or more powerline devices have been detected on the net-
work.
ACT: Traffic indicator on the powerline network (will flash occasional-
ly even if no powerline device is connected).
WAN/LAN 1-4 10/100M: If LED is on, the connected device is a
100 Mbps device.
WAN/LAN 1-4 LINK/ACT: Steady light shows a device connected
to the port. Flashes when traffic on the port is detected.
Asoka™ PlugLink™ PL Cable/DSL Router Manual
4

Getting Started
What This Package Contains?
When you receive your PL9920-BBR, please check to be sure that your
package contains all of the following:
• Asoka PL Cable/DSL Router (PL9920-BBR)
• 9 VDC Transformer
• One 6 ft Ethernet CAT 5 Cable
• User’s Manual
What are the Necessary Equipment?
• High-Speed Internet Connection
• Internet Access Unit (Cable/DSL Modem) with an Ethernet Port
• One or more computers with either Ethernet network cards or HomePlug
compliant Powerline network units
• Windows TCP/IP networking software installed on all computers
• Web browser installed on one or more computers
What Equipments can be used with the PL Cable/DSL Router?
• Computers
• Network Printers
• Ethernet Hub or Switch
• USB to Ethernet Bridge
• Mp3 Players
• Internet Enabled Video Game Consoles (i.e. XBox, PS2)
Important: After receiving the PL9920-BBR, please check for any
shipping damages to the carton and system unit before proceed-
ing with any installations.
Asoka™ PlugLink™ PL Cable/DSL Router Manual
5

Connecting the Asoka PlugLink PL Cable/DSL Router
1. Turn off all computers and other devices that will be connected to the
router.
2. Connect the Ethernet port ‘WAN’ on the Asoka PL9920-BBR to the
Internet access unit (Cable/DSL Modem) using the supplied Ethernet cable.
3. Connect the computers or other networking devices to the router:
a) To connect a computer (other networking devices) directly to the
router, simply connect the computer’s Ethernet port o the router’s LAN
ports (only port 2-4) using an Ethernet cable.
b) To connect computers (other networking devcies) to the router
using other HomePlug powerline network adapters, such as an Asoka
PlugLink Wall Mount device, connect the computer’s Ethernet or USB
port to the Wall Mount and plug the Wall Mount directly to an outlet.
For more information, please refer to the HomePlug Certified product
installation guide. (Note: Connect the powerline network
adapters directly into an AC wall outlet. Do not plug the pow-
erline network adapters to a power strip or extension cord.)
c) To connect an Ethernet Hub/Switch to the router, simply connect
one of the Ethernet ports on the Hub/Switch to the router using an
Ethernet cable. Be sure to connect to the router’s LAN 1 port. (Note:
LAN port 1 is meant for an Ethernet Hub/Switch. A crossover
cable must be used for LAN 1 port to connect a PC, printer,
etc.)
4) Power up the Internet access unit (Cable/DSL Modem).
Asoka™ PlugLink™ PL Cable/DSL Router Manual
6

5) Connect the power supply to the Asoka PL9920-BBR’s power port. Then
plug the power supply directly to an AC wall outlet. Wait until the ‘RDY’ LED
flashes with one second interval. (Note: Connect the power supply
directly into an AC wall outlet. Do not plug the power supply to a
power strip or extension cord.)
6) Turn on one or more of the devices on your network that will access the
Internet through the router.
7) All devices connected to the router and powered on will cause the cor-
responding ‘LINK’ light on the front of the router to turn on. Check that all
expected lights are on including the ‘WAN LINK/ACT’ light. Make sure that
the correct type of cabling is used for all ports. See the troubleshooting
guide if a light is not on. See illustration below for reference.
8) Now the necessary hardware setup is complete, and the software setup
of router and the connected computer begins.
Asoka™ PlugLink™ PL Cable/DSL Router Manual
7

LAN Side and WAN Side
The router creates a divider between the Internet (WAN side) and your
computers on the Local Area Network (LAN side). The router uses a
Firewall to protect the computers on your LAN from all other computers
connected to the Internet.
LAN Side Setup Guide
There are two parts of the software setup, first to get all equipment on the
LAN working with the router and then to get the router to connect to the
Internet. The connection of a local computer to the router is required first,
so that will be the first step.
The setup will be simplest if automatic IP address assignment (DHCP) is
used. To find out if DHCP is enabled, follow these steps depending on oper-
ating system:
Asoka™ PlugLink™ PL Cable/DSL Router Manual
8
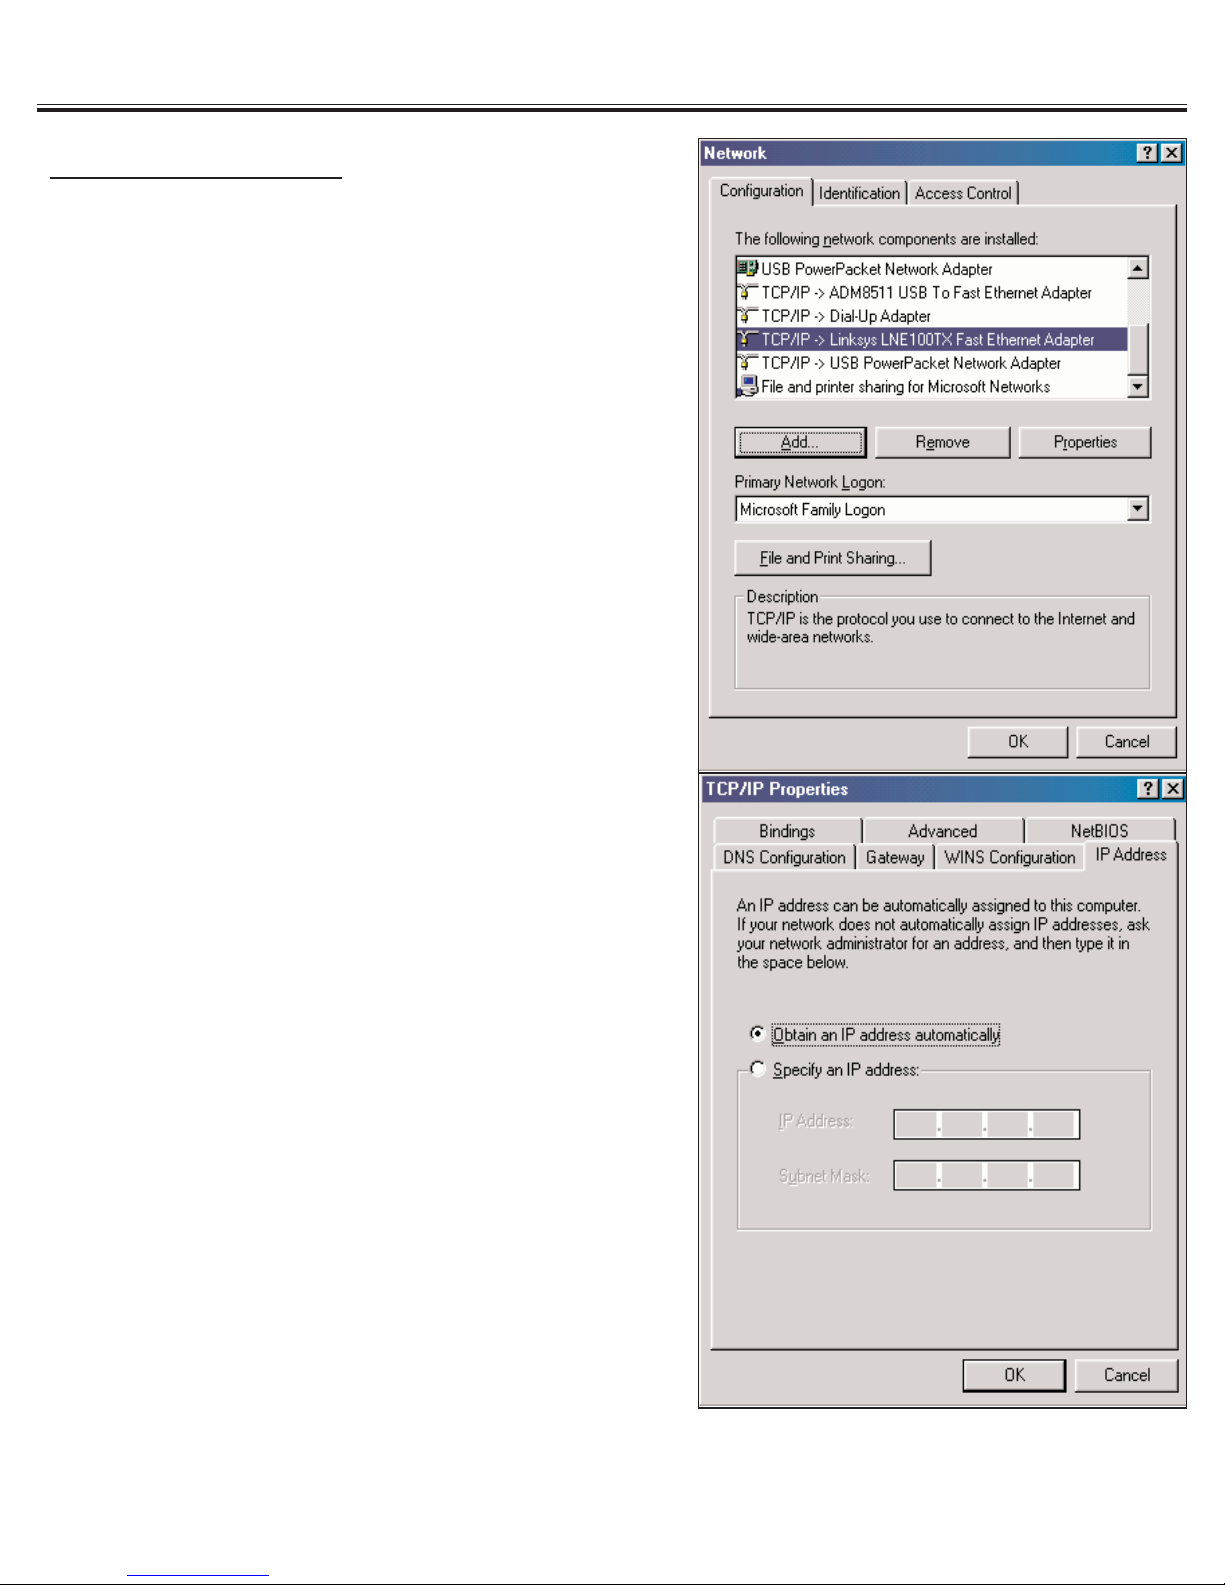
Windows 98 SE/ME
1) In the Start Menu, select ‘Settings’ -->
‘Control Panel.’
2) Double click on the ‘Network’ icon.
3) Select the TCP/IP entry for the Ethernet
adapter or Powerline adapter used to con-
nect to the router.
4) Click ‘Properties.’
5) Select the ‘IP Address’ tab.
6) Select ‘Obtain an IP Address
Automatically’ if not already selected.
7) If the computer was previously con-
nected to the Internet, it may have an old
gateway setting. Remove the gateway
setting by clicking on the ‘Gateway’ tab
and remove any IP addresses.
8) Click ‘OK’ to close the TCP/IP properties
panel.
9) Click ‘OK’ to close the Network panel.
The changes will take effect when this
panel is closed.
Asoka™ PlugLink™ PL Cable/DSL Router Manual
9
Table des matières
Autres manuels Asoka Routeur réseau


Manuels Routeur réseau populaires d'autres marques


NETGEAR
NETGEAR FS526T - Switch Manuel utilisateur

Korenix
Korenix JetNet 5710G Series Manuel utilisateur

Automated Logic
Automated Logic ZN551 Manuel du propriétaire

Cisco
Cisco ASR 1000 Series Manuel de l'opérateur

EnGenius
EnGenius ESR-9710 Manuel utilisateur

Cisco
Cisco 805 Series Instructions d'utilisation et de sécurité