Apperson datalink 1200 Manuel utilisateur

800.827.9219
www.apperson.com
User’s Manual

Table of Contents
About DataLink1200 ................................1
Scoring Tests ......................................2
Preparing the Key..............................................2
Key Reset Options.............................................3
Scoring..............................................................4
Getting a Summary of the Test Results..............5
Processing Ballots .................................................................. 7
Getting Election Results.....................................8
Processing Surveys .................................9
Getting Survey Results .....................................10
Data Collection Operation ...........................11
Print Cartridge Operations ...........................14
Installing a New Print Cartridge.........................14
Removing a Print Cartridge...............................15
Servicing a Print Cartridge ................................16
Connecting the DataLink1200 to a Computer .. ...........17
Calibrating the DataLink1200 ........................ 18
Cleaning the Read Sensors and Clearing Paper Path.......20
Displaying Machine Information .......................23
Ordering Supplies .................................24
Troubleshooting ...................................25
Obtaining Service for DataLink 1200.................25
Problems and Solutions....................................26
Compliance Statements.............................29

The DataLink 1200 is a versatile scanner designed to score
tests, process ballots and tabulate surveys. It can perform these
functions in stand-alone mode or connected to a computer for
advanced data collection.
The DataLink 1200 uses reective read technology for
superior pencil mark recognition. Always use a No. 2
lead pencil when completing DataLink scan sheets. The
scanner will not read marks from ink pens or markers,
even if the marks are black.
A large selection of DataLink answer sheets, ballots,
surveys and analysis forms are available. These forms have
been specically designed to utilize the advanced features of
the DataLink 1200 including paper skew detection and reading
student ID numbers.
About DataLink™ 1200
1

The DataLink 1200 must be programmed with the correct
answer pattern prior to scoring answers sheets. To program the
scanner, simply insert the teacher key. When properly keyed,
the scanner will display the number of questions keyed on the
display window and you may begin inserting answers sheets for
scoring. The DataLink 1200 will score up to 200 questions.
Scoring Tests
Preparing the Key
To designate an answer sheet as a key, mark the Key bubble
[K] in the keyline as shown below.
When the Verify [V] option is marked on the keyline,
correct answers are printed on individual student answer sheets.
If the Verify [V] bubble is not marked, a dash (-) prints next to
incorrect responses.
2

Mark the Rescore [R] bubble in the keyline to rescore a
previously scored test. Rescoring a test automatically enables
the verify option.
After marking the keyline, ll in the correct answer pattern for
each question on the test. Multiple marks may be keyed as the
correct answer for a question. Questions keyed with multiple
marks will be indicated with an ‘X’ printed next to the question
for verication purposes.
Key Reset Options
There are two key reset options available for test-scoring. When
your scanner is powered on it automatically enters into the Score
Mode option. Pressing the “Reset Options” button will put the
scanner in Rescore Mode. Rescore Mode has the identical effect
as marking the Rescore [R] bubble in the keyline.
The scanner must be in either Score Mode (Ready) or Rescore
Mode to score answer sheets.
Continued on page 4
3

Scoring
When the key has been marked with the correct answers,
insert it through the scanner. Always verify the key has been
properly recorded before inserting student answer sheets.
Once keyed, begin processing student answer sheets. Up to
9,999 answer sheets can be processed in a single batch.
If the test includes questions from both sides of the answer
sheet, rst process side 1 of the key immediately followed by
side 2 (the Key [K] bubble must be marked on each side of the
key in order to key multiple sides). When scoring multiple sides,
each side of a test answer sheet must be processed before
processing another answer sheet. You may score up to 200
questions in this manner.
As student forms are fed through the scanner, the total number
of correct answers for each student appears in the window
display and is also printed inside the Score box at the bottom
of the form, or inside the Rescore box if the Rescore [R] bubble
was marked.
If an answer sheet is rejected by the scanner, check the window
Scoring Tests…
4

display for the cause of the problem. Take corrective action and
reinsert the answer sheet. If the problem persists, refer to the
Troubleshooting section of the user manual.
Getting a Summary of the Test Results
There are several summary options available once a test has
been scored. Summaries can be printed using an Item Analysis
report form or viewed on the display panel. When viewing
summary information you may insert additional answer sheets for
continued scoring at any time.
Class Average
Press “Summary Display” on the display panel to view the class
average and number of sheets processed.
Continued on page 6
5
Scoring Tests…
6
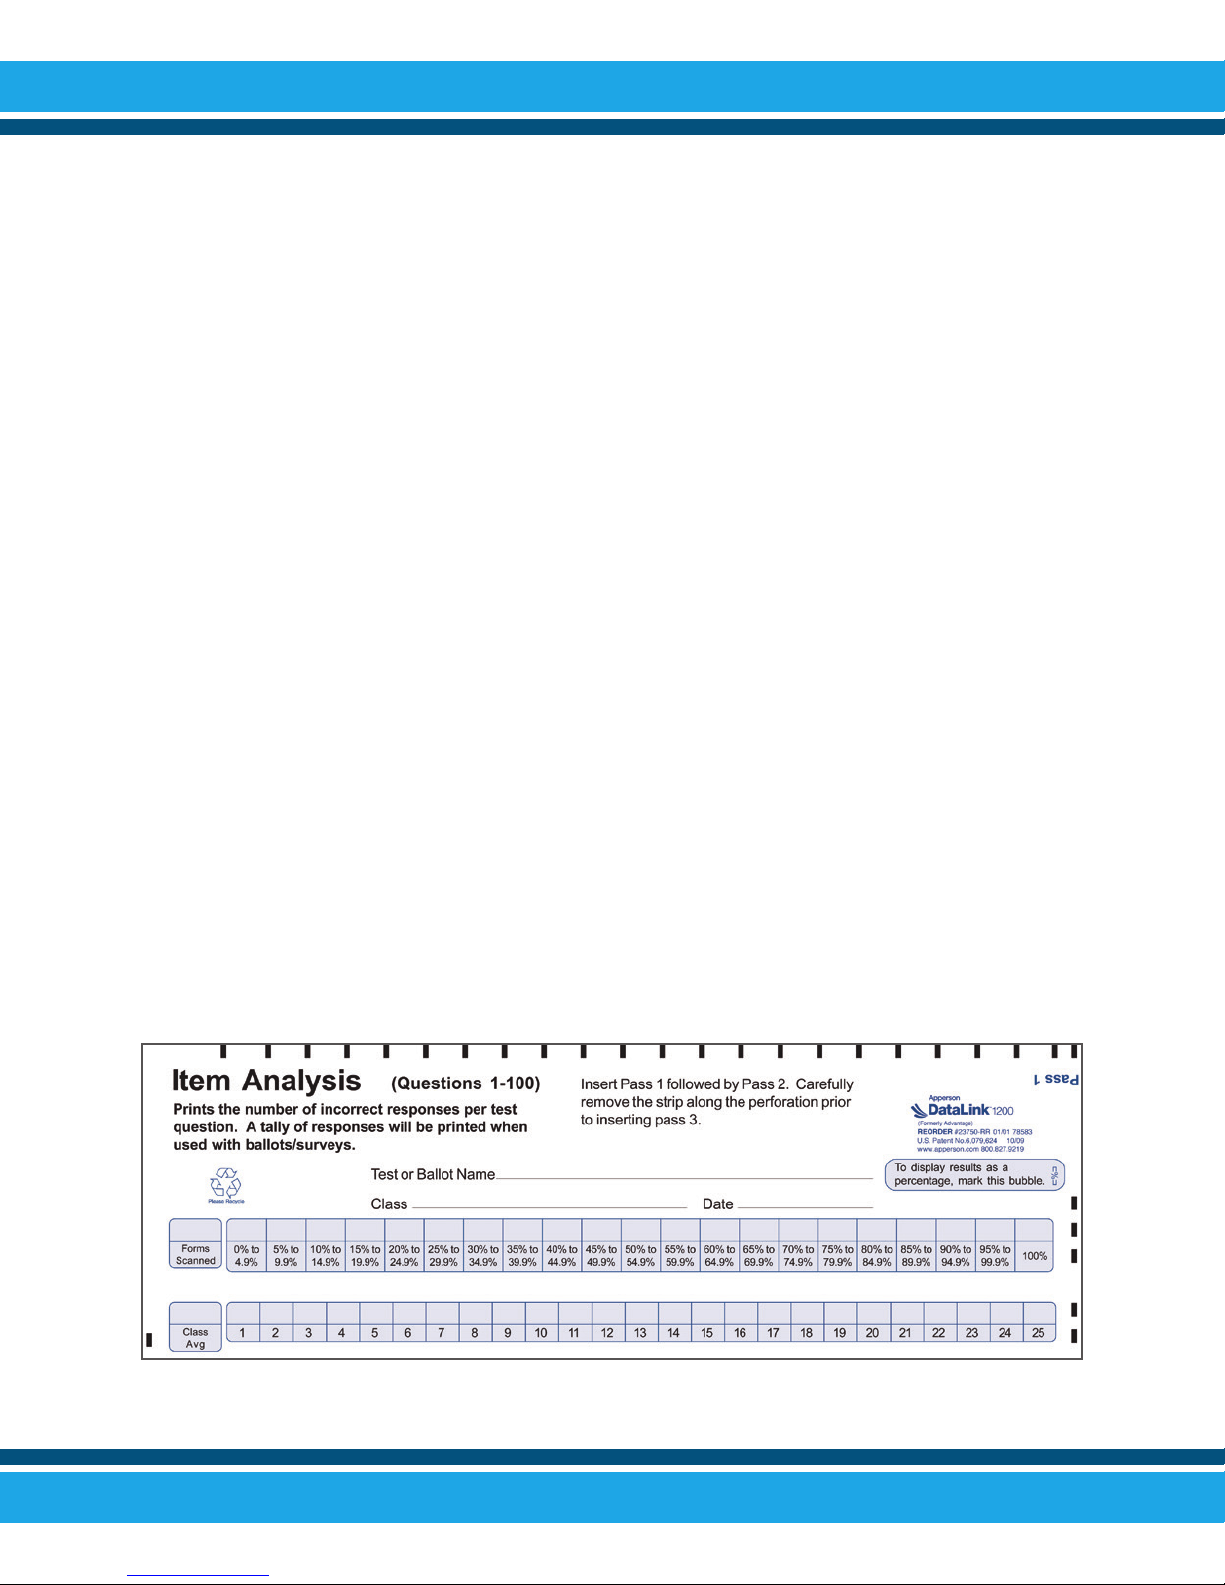
Tally of Incorrect Answers & Frequency Distribution
Report
After processing a batch of answer sheets use the Item
Analysis Form 23570 to get a detailed report of the test. The
Item Analysis report will provide a frequency distribution of
scores in 5% increments. The report also lists the number of
wrong answers selected for each test question.
If the Item Analysis Form is not available, the number of wrong
answers per question can be viewed in the display window. To
view the number of wrong answers for each question, press the
“Summary Display” button twice. Follow the instructions
displayed in the window for viewing the tally of wrong answers.
While viewing this information you can continue processing
additional answer sheets at any time.

Ballot Form 26440 is specically designed for processing ballots
with the DataLink 1200. This form tabulates the votes for up to
100 candidates. Election results can be obtained by inserting
Item Analysis Form 23570 through the scanner when the batch
processing is complete, or by viewing results on the display
window. Up to 9,999 ballots can be processed in a single batch.
Ballot response bubbles are labeled 1 through 100. Assign each
candidate a unique number which corresponds to a number on
the ballot form. You have an option of allowing multiple votes per
row or accepting only a single selection per row. Allowing only
single selections per row can restrict students from voting for
more than one candidate for an ofce. The default option allows
multiple selections per row.
To accept only one selection per row, you must mark the rst
ballot processed as indicated below. In this mode, if a ballot
contains multiple selections on a row, none of the selections for
Processing Ballots
Continued on page 8
7

that row will be included in the tally. After each ballot is scanned,
a verication number is printed inside the Ballot Verication box.
For information on how to process elections with more than 100
candidates or when using a standard answer sheet for elections,
refer to the section titled “Data Collection Operation” on page
11.
Getting Election Results
To obtain the results of an election, insert side 1 of Item Analysis
Form 23570 through the scanner. The Item
Analysis Form can be inserted at any time during or after batch
processing without interruption of the tabulation process
Warning: pressing the “Reset Options” button will clear
all election results.
In the event an Item Analysis Form 23570 is not available, the
election information can be viewed in the display window. To
view election results press the “Summary Display” button after
batch processing and follow the instructions displayed in the
window for viewing the results.
Processing Ballots…
8
Table des matières
Autres manuels Apperson Scanner


