American Eagle AE-60P2(A) Manuel utilisateur

American Eagle Food Machinery, Inc. AE-60P4 & 2(A) Owner’s Manual
1
©Copyright 1999 American Eagle Food Machinery, Inc. All Rights Reserved
Onwer’s Manual
PLANETARY MIXER
Models
AE-60P4(A) and AE-60P2(A)
Rev. 1.01
CONTENTS
Overview 2
Safety Precautions 2
Feature 2
Standard Accessories 3
Specifications 3
Installation 4
Installation Diagram 5
Wiring Diagram 6-8
Mixing Operation 9
Standard mixing procedures 9
Controls Illustrations 10
Maximum Mixing capacity 11
Functions of Accessories 12
Hub Attachments 12
Maintenance 13
General 13
Daily 13
Weekly 13
Periodic 13
Lubrication 13
Electrical 13
Troubleshooting 14
Warranty Information 15

American Eagle Food Machinery, Inc. AE-60P4 & 2(A) Owner’s Manual
2
©Copyright 1999 American Eagle Food Machinery, Inc. All Rights Reserved
OVERVIEW
AE-60P4(A) is a highly reliable machine that lets you handle even the most demanding of
professional food applications with ease. Its advance 4-speeds design makes it ideal for mixing
every type of dough, as well as for use in preparing eggs, cream, mayonnaise, and other food
products. Model No. AE-60P2(A) is equipped with high torque 2-speeds, which is the best pizza
mixer that manages to handle pizza and bagel dough the way you want.
SAFETY PRECAUTIONS
⎝WARNING:
The following safety precautions must be observed when operation this machine. Serious
injury or damage may result from failure to do so.
zKEEP HAND & CLOTHING AWAY FROM BOWL AND HUB ATTACHMENTS WHEN IN
OPERATION.
zKEEP RIGID OBJECTS AWAY FROM BOWL AND HUB ATTACHMENTS WHEN IN OPERATION.
zDO NOT USE THIS MACHINE FOR ANY APPLICATIONS OTHER THAN FOOD PROCESSING.
zUSE THE MACHINE ONLY WITH THE ELECTRICAL SERVICE SPECIFIED ON ITS NAMEPLATE.
zDISCONNECT THE MACHINE FROM ITS POWER SOURCE BEFORE CARRYING OUT ANY
MAINTENANCE.
zDO NOT DISABLE OR REMOVE THE SAFETY MECHANISMS INCLUDED WITH THE MACHINE.
zDO NOT LEAVE THE MACHINE IN OPERATION UNATTENDED.
zOBSERVE MAINTENANCE AND SAFETY INSPECTION SCHEDULS.
FEATURES
zRugged cast iron frame for maximum strength and stability.
zHardened steel drive worm & bronze alloy worm wheel.
zContinuously lubricated, fully gear-driven transmission with hardened steel alloy gears.
zNo. 12 (standard size) hub accommodates a variety of attachments for food grinding,
shredding, slicing, etc..
zBuilt-in timer.
zListed by ETL. (Conforms to Underwriters Laboratories, Inc. Standard No. 763 and certified
to Canadian Standards Association specification C222, No. 195.)
zListed by ETL Sanitation. (Conforms to NSF No. 8.)
zMeets food industry Sanitation Standards Committee requirements.
zSAFETY GUARD model conforms to European Union Directives of safety design and
performance.

American Eagle Food Machinery, Inc. AE-60P4 & 2(A) Owner’s Manual
3
©Copyright 1999 American Eagle Food Machinery, Inc. All Rights Reserved
STANDARD ACCESSORIES
zA high polish stainless steel bowl and a convenient bowl truck.
zHygiene-compliant aluminum alloy dough hook
zModels other than AE-60P2(A) includes a hygiene-compliant aluminum alloy beater and a
stainless steel whip.
zAE-60P4(A) comes standard configured for 220V/60Hz/1PH or 220V/60Hz/3PH and
AE-60P2(A) comes standard configured for 220V/60Hz/3PH.
zAE-60P4(A) AND AE-60P2(A) have a hand wheel bowl lift. Power lift available at extra
charge.
zOptional standard-sized (No. 12) Hub Attachments & Accessories are available.
SPECIFICATIONS
Model AE-60P4(A) AE-60P2(A)
Bowl Capacity (QT.) 60 60
3HP Motor Electrical (Standard) 220V, 60HZ, 1 PH 25A 220V, 60HZ, 3 PH 8.5A
220V, 60HZ, 3 PH 8.5A
Agitator R.P.M.
First Speed 100 65
Second Speed 177 97
Third Speed 297
Forth Speed 523
Dimensions L x W x H (inches) 40 x 25 x 55 40 x 25 x 55
Packing Size L x W x H (inches) 47 x 32 x 65 47 x 32 x 65
Net Weight (lbs.) 990 990
Standard Accessories :
Stainless Steel Bowl 1 PC 1 PC
Stainless Steel Wire Whip 1 PC Optional
AL Hook 1 PC 1 PC
AL Beater 1 PC Optional
Bowl Truck 1 PC 1 PC
15-Minute Timer 1 PC 1 PC
6-Foot Cord 1 PC 1 PC

American Eagle Food Machinery, Inc. AE-60P4 & 2(A) Owner’s Manual
INSTALLATION
IMMEDIATELY, BEFORE UNPACKING THE MIXER, INSPECT IT FOR POSSIBLE SHIPPING
DAMAGE AND/OR SHORTAGE. IF YOU FIND THE PACKAGING MATERIAL OR THE
MACHINE IS DAMAGED, INSTANTLY CONTACT THE CARRIER. THIS PROCEDURE MUST
BE FILED WITH THE TRANSPORTATION COMPANY BY YOU WITHIN 3 DAYS OF
DELIVERY. OUR RESPONSIBILITY CEASES WHEN MERCHANDISE IS DELIVERED TO THE
TRANSPORTATION COMPANY AND RECEIPTED FOR. ALSO, TAKE NOTICE TO THE
BRIGHT RED NOTICE ON EACH CRATE—1). CAUTION 2). FREIGHT CONDITION
zBEFORE INSTALLING YOUR MIXER, BE SURE TO CHECK THAT YOUR ELECTRICAL SERVICE
SPECIFICATIONS MATCH THOSE OF YOUR MIXER AS PRINTED ON MIXER’S NAMEPLATE.
zInstall the mixer in convenient location that permits easy access to the mixer’s control, and
maintenance access from top, front, and sides.
zUse a level and shims as necessary to ensure that the mixer is installed in a level position from front
to back and left to right.
zThe unit should be moved carefully by qualified personnel to avoid injury or damage from toppling.
zElectrical connections should be made by qualified
personnel in accordance with applicable codes and
regulations.
zPermissible voltage fluctuation is ±10% of normal
voltage.
zBe sure to tag any electrical outlets, fuses, or
connections involved in installing the mixer until
installation has been completed.
zTHE UNIT MUST BE PROPERLY GROUNDED TO
PREVENT ELECTRICAL SHOCK AND
INTERFERENCE. Use a grounding cable of not less
that the code-determined minimum length. The
diameter of the grounding cable must be the same as
that of the power cable. Each machine must be
separately grounded.
zTo move or relate the mixer after it has been installed,
first disconnect the power and grounding cables.
zBe sure the planetary runs in the direction shown by
the arrow in the planetary head. Reverse direction is
4
©Copyright 1999 American Eagle Food Machinery, Inc. All Rights Reserved

American Eagle Food Machinery, Inc. AE-60P4 & 2(A) Owner’s Manual
forbidden.
INSTALLATION DIAGRAM (inch)
5
©Copyright 1999 American Eagle Food Machinery, Inc. All Rights Reserved
21 30
55
40
24 18
30
25

American Eagle Food Machinery, Inc. AE-60P4 & 2(A) Owner’s Manual
ELECTRICAL DIAGRAM
6
©Copyright 1999 American Eagle Food Machinery, Inc. All Rights Reserved
SINGLE PHASE MIXER, TIMER &
A2
14
MC
L1 L2
13
MOTOR
54
CAPACITO
R
GOVERNOR
AE- 6 0 P4 A
GUARD
21
22
3HP 220/ 60/ 1
95
96
E
L.S.1
A1
ELECTRIC BOX
TIMER
30 MIN
CONTROL PANEL
START
13
3
14
11
2
21
STOP
2
21 22
GUARD
213
*AE-60P4 W/O L.S. 1

American Eagle Food Machinery, Inc. AE-60P4 & 2(A) Owner’s Manual
7
©Copyright 1999 American Eagle Food Machinery, Inc. All Rights Reserved
CONTROL PANEL
TIME
R
96
95
3 phase
MOTOR
13
21
1
STAR
T
1
14
22
STOP 22
TIMER &
22
21
13
14
MC
A1 A2
EL1 L3 AE- 60P4A
THREE PHASE MIXER,
ELECTRIC BOX
L.S.1
GUARD
L2
GUARD
3
2
1
30 MIN
*AE-60P4 W/O L.S.1

American Eagle Food Machinery, Inc. AE-60P4 & 2(A) Owner’s Manual
8
©Copyright 1999 American Eagle Food Machinery, Inc. All Rights Reserved
96
95
3HP4P/8P
MOTOR
TIMER&
22
21
13
14
HIGH
A1A2
EL1L3
AE-60P2A
THREEPHASEMIXER,
ELECTRICBOX
L.S.1
GUARD
L2
220/60/3
GUARD
CONTROLPANEL
1
TIMER
30MIN
2
1
2
STOP
HIGH
LOW
SW
95
LOW
96
14
22
21
A1A2
13
4
4
4
888
21
21
21
13
13
22
14
22
14
22
1
5
4
3
2
1
A1A2
MC

American Eagle Food Machinery, Inc. AE-60P4 & 2(A) Owner’s Manual
MIXING OPERATION
STANDARD MIXING PROCEDURES
NOTE: Before using a new mixing bowl, and before each use of any mixing bowl or mixing
egg whites or whole eggs, the bowl should be thoroughly washed with hot water and mild
soap. Rinse the bowl with a mild soda or vinegar solution, and then thoroughly rinse it
again with clean water.
1. Always place bowl in position before installing agitator.
2. Be sure the mixing bowl alignment pin at the back of the
bowl is properly engaged with the insertion receptacle in
the center of bowl support.
3. Be sure to seat the bowl properly on the alignment pins on
the bowl support.
4. If using a bowl adapter, install it as you would a bowl, and
then put the bowl in place as usual.
5. Install the agitator by lifting it on to the agitator shaft, and
twist it to the right until the agitator lock engages. To
remove the agitator, raise it on the shaft, twist it to the left,
and pull down.
6. To avoid splatters, add all ingredients before starting
mixer.
7. Select the desired speed. Always stop the machine to
change speeds-never change speeds while mixer is in
operation.
8. Set the timer to the desired mixing time and set timer
switch to ON position, or leave timer at “0” and timer
switch OFF for un-timed mixing. On AE-60P4(A), the timer
switch is integrated with the mixer START switch.
9. Raise the bowl into position using the bowl lift. Never
raised or lower the bowl while the mixer is in
operation.
10. On safety guard models, close the safety guard into
position.
11. Press START to begin mixing. Press stop to stop mixing.
9
©Copyright 1999 American Eagle Food Machinery, Inc. All Rights Reserved

American Eagle Food Machinery, Inc. AE-60P4 & 2(A) Owner’s Manual
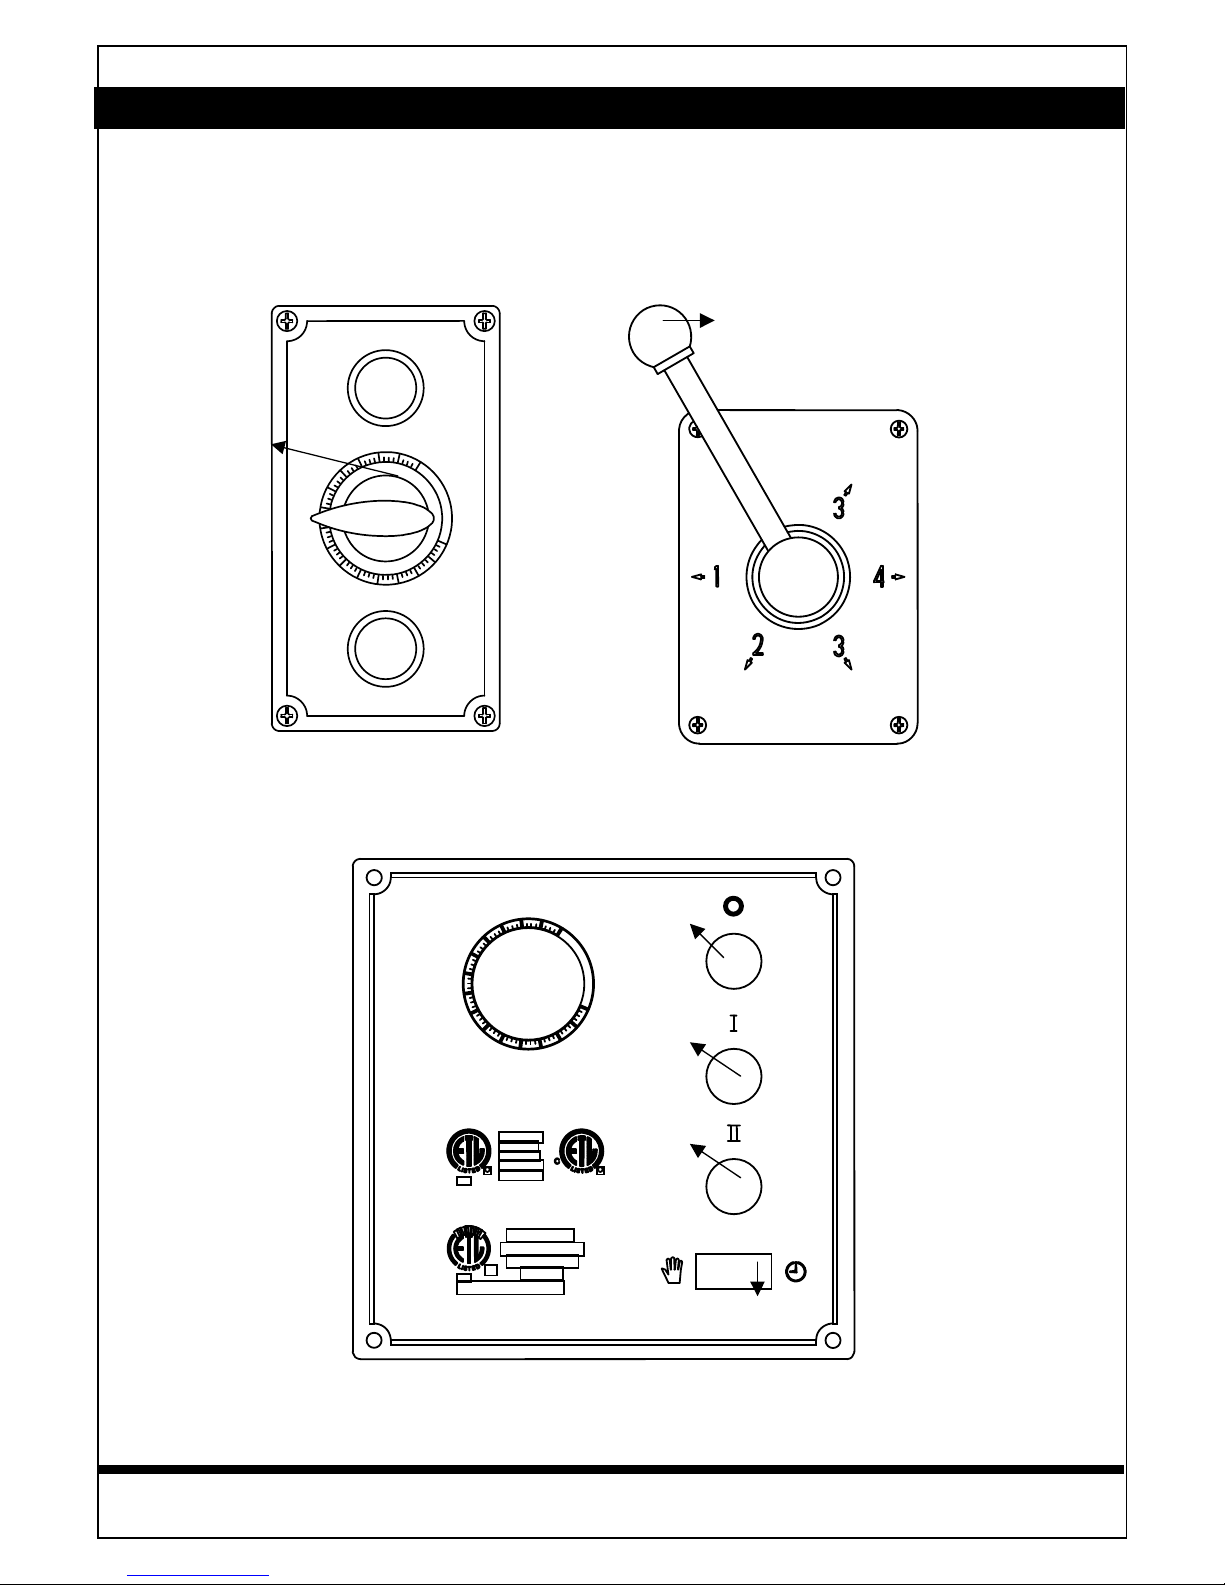
CONTROL
AE-60P4(A) furnished with two button-switches, which control power to the mixer.
AE-60P2(A) furnished with three button-switches, which control power to the mixer and speed
shifting.
10
©Copyright 1999 American Eagle Food Machinery, Inc. All Rights Reserved
POSITION AT 4 SPEED
STOP
1-SPEED
2-SPEED
TIMER
TIMER SWITCH
TIMER
STOP
START
Ce manuel convient aux modèles suivants
1
Table des matières
Autres manuels American Eagle Mixer