Alpha SPY DRONE Manuel utilisateur

4.5CH 2.4GHz LIVE FEED VIDEO RC HEXACOPTER

INDOOR AND OUTDOOR FLIGHT PRECAUTIONS
PREVENTING MOISTURE
PROPER OPERATION
TRANSMITTER AA BATTERY SAFETY
DRONE BATTERY PACK SAFETY
KEEP AWAY FROM HEAT
PRECAUTIONS
This drone is designed for outdoor flight. Please make sure there are no obstacles in
the flight path of the drone. Colliding into an obstacle while flying may damage the
drone. Make sure there is little to no wind when flying outside. Only fly the drone when
people are a safe distance away. Do not fly the drone within the vicinity of a crowd. The
spinning rotors may cause injury if the drone comes in contact with someone.
Do not fly the drone outside when it is raining. Do not fly the drone close to open water.
If the drone’s comes in contact with water, it may short circuit the electronics and
damage the drone.
Do not modify or add anything to the drone. Modifying the drone may change its ability
to fly properly causing it to crash. Do not disassemble the drone.
Make sure the AA batteries in the transmitter are installed with the correct polarity. Do
not mix rechargeable AA batteries with non-rechargeable AA batteries. Do not dispose
of drained AA batteries into a fire. Batteries may explode if disposed in a fire causing
injury. Remove the AA batteries in the transmitter if you are not going to fly the drone
for a long period of time. Store AA batteries in a cool dry place. Keep AA batteries away
from heat.
The drone’s battery pack is Lithium polymer. Li-po batteries pose higher operational
risks compared to other battery packs so it’s important to follow the instructions when
using the battery. Manufacturer and dealer assume no liability for accidental damages
caused by improper usage.
Do not use a charger other than the factory supplied charger to avoid causing a fire or
damaging the battery pack. Do not try to disassemble, crush, burn or reverse polarity.
Make sure there are no metallic materials close to the contacts of the battery. Do not
charge the battery unsupervised.
Do not charge the battery overnight. Over charging the battery may damage it, causing
it to not hold a charge. Stop using or charging the battery if you notice the battery
temperature has increased more than usual.
The drone is made out of various plastics and metal. Plastics are very susceptible to
damage or deformation due to extreme heat and cold temperatures. Make sure not to
store the drone near any source of heat such as an oven or heater. It is best to store
the drone indoors in a climate controlled room temperature environment.

Built-In Battery:
7.4V 1500mAh LiPo Battery
RC Controller Battery:
6 x 1.5V AA Batteries
(Not Included)
21.15 Inches
81.5 Inches
8.26 Inches
Length:
Width:
Height:
1.14 Pounds
7 To 9 Minutes
180 Minutes or less
Weight:
Flying Time:
Charge Time:
GENERAL SPECIFICATIONS
TRANSMITTER DIAGRAM
2.4GHz ANTENNA
POWER SWITCH
POWER INDICATOR
CARRYING HANDLE
LEFT TURN /
RIGHT TURN
LEFT TURN /
RIGHT TURN TRIM
MOVE LEFT /
MOVE RIGHT TRIM
THROTTLE
THROTTLE TRIM
EASY MODE
ALTITUDE LOCK
VIDEO SCREEN
POWER PLUG
FLIP STUNT BUTTON
BATTERY
COVER
LEFT STRAFE / RIGHT STRAFE
FORWARD / BACKWARD
FORWARD /
BACKWARD TRIM

LIVE FEED VIDEO SCREEN DIAGRAM
DRONE DIAGRAM
6 MAIN ROTOR BLADES
LED LIGHTS
6 METAL ARMS
720p
HD VIDEO/PICTURE
CAMERA
METAL LANDING SKIDS
6 ELECTRIC
MOTORS
POWER
MINI MEMORY
CARD SLOT
VIDEO SCREEN
POWER PLUG
VIDEO SCREEN
POWER CORD
ENTER
UP/RECORD
DOWN
MENU
LOWER MOUNTING BRACKET
LIVE FEED VIDEO SCREEN
MOUNTING BRACKET
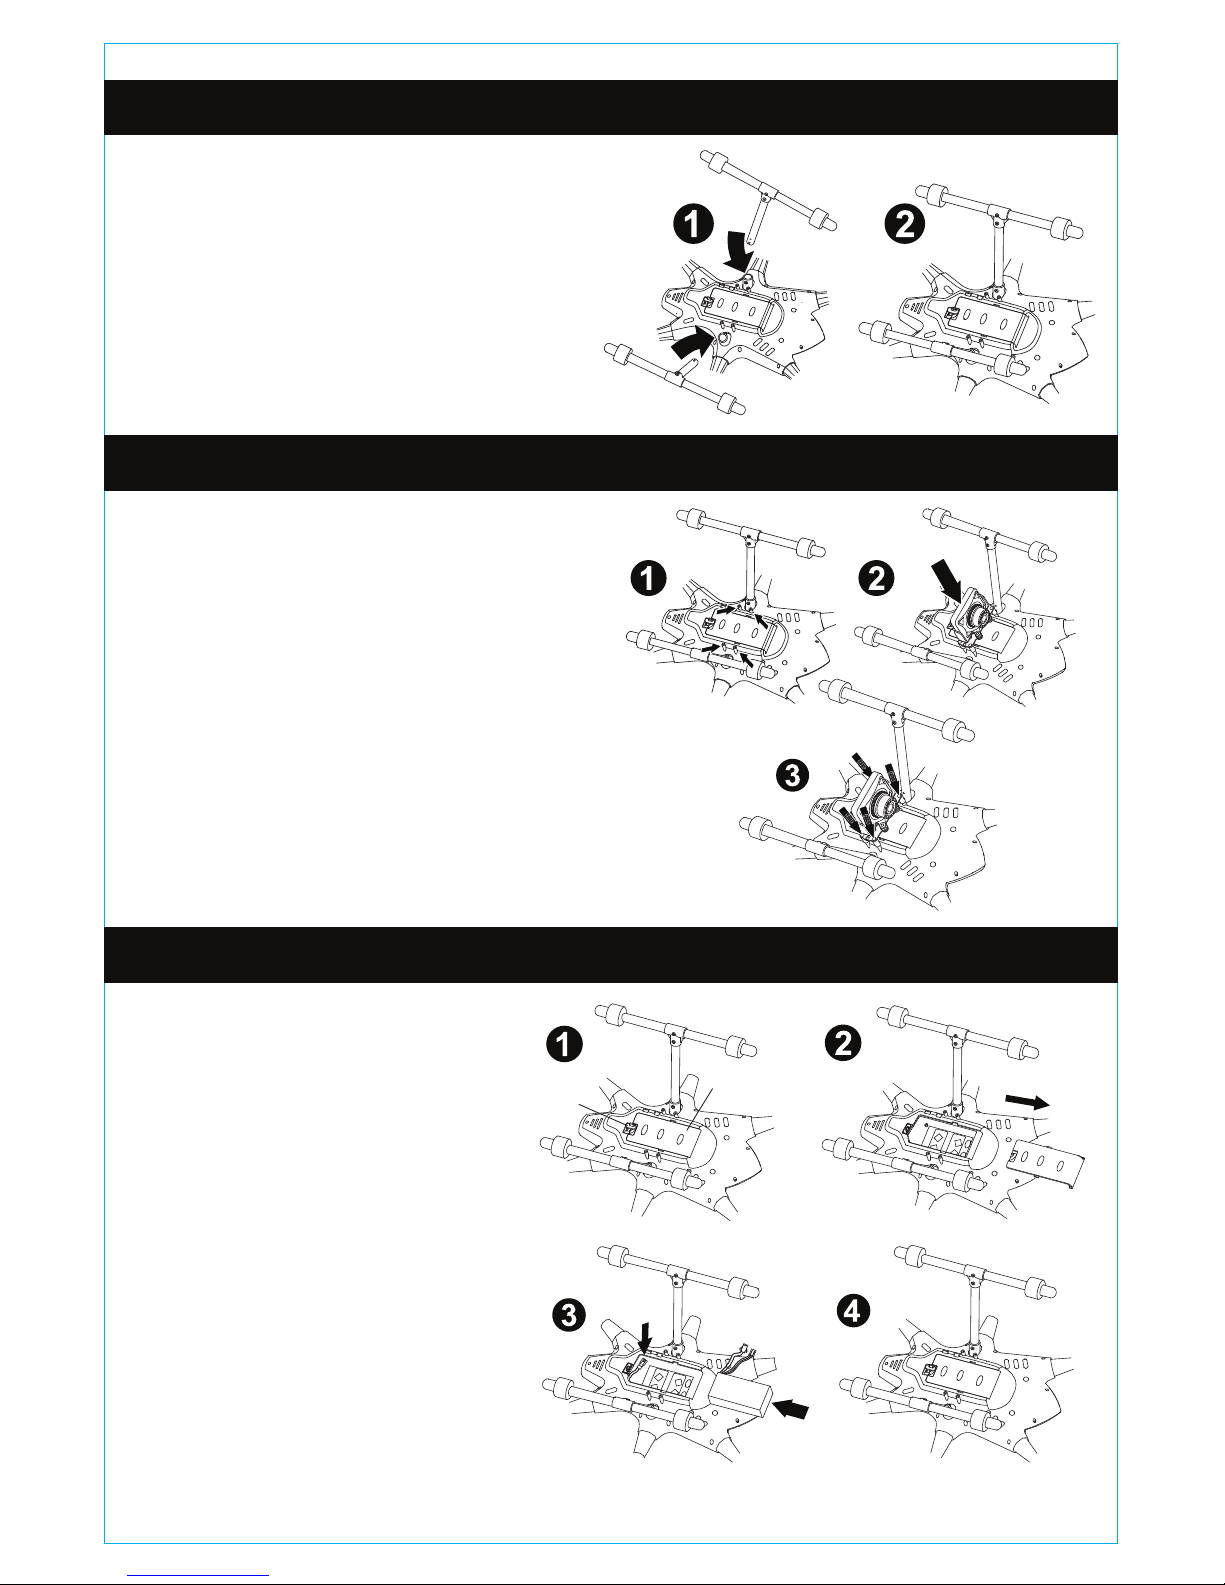
1.) Take the landing skid and place it
into the support frame. Make sure the
screw hole on the landing skid lines up
with the hole in the frame.
2.) Firmly screw in the landing skid to
the frame with a screwdriver.
3.) Repeat steps 1 and 2 for the other
landing skid.
1.) Locate the 4 connection pillars on
the bottom of the drone.
2.) Place the camera assembly on top
of the connection pillars so the screw
holes line up.
3.) Firmly secure the camera assembly
to the frame with the included 4 screws
and screwdriver.
4.) Attach the camera cable to the
drone.
1.) Turn on the cover lock on the
battery cover.
2.) Remove the battery cover by
sliding it off.
3.) Place the battery pack into
the battery bay. Connect the
battery cable to the drone.
4.) Replace the battery cover
and lock it with the cover lock.
Battery Cover
Cover Lock
LANDING SKIDS INSTALLATION
CAMERA INSTALLATION
DRONE BATTERY INSTALLATION

Slide open the battery cover and install 6
AA Batteries. Please note the polarity.
Replace the battery cover once the
batteries are properly installed.
1.) Place the lower mounting bracket underneath the carrying handle.
2.) Place the video screen assembly on top of the carrying handle so the mounting
brackets surround the carrying handle. Firmly secure the video screen by screwing
in the 4 included screws to the mounting bracket.
3.) Plug the video screen power cord to the power plug on the side of the video
screen and on the back of the remote.
INSTALLING TRANSMITTER BATTERIES
INSTALLING LIVE FEED VIDEO SCREEN

Easy Mode
Simplifies drone flight use by limiting command
directions based on direction. Use Easy Mode
when you are having difficulty telling which
direction the drone is pointing because of
distance. Press the Easy Mode button once to
activate it. Press it again to deactivate it.
Altitude Lock
Stabilizes the altitude level of the drone. Once it
has been enabled, the left joystick throttle
controls are locked and unusable allowing you
to focus on the turning controls. Press the
Altitude Lock once to activate it. Press it again
to deactivate it.
MINI MEMORY CARD INSTALLATION
SYNCING THE DRONE
EASY MODE / ALTITUDE LOCK
1.) Locate the mini memory card
slot on the right side of the live
feed video screen.
2.) Grab the included mini memory
card. The gold contacts on the
mini memory card should be
facing you when you insert it into
the slot. Push the card in until you
hear it click into place. To remove
the card push it in until you hear it
click then you can easily slide it
out.
1.) Plug the battery pack into the bottom of the drone and close the battery
compartment. The drone does not have an ON/OFF switch, connecting the battery
pack turns the drone ON. The LED lights on the drone will flash when the battery is
connected.
2.) Place the drone on a flat surface away from obstacles.
3.) Install 6 AA batteries in the transmitter and close the battery compartment. Make
sure the THROTTLE STICK (Left Joystick) is in the down position before turning on
the transmitter. Turn on the transmitter and you will hear an audible BEEP, the
power indicator light will be flashing. Quickly move the THROTTLE STICK all the
way up and all the way down, you will hear another BEEP and the power indicator
light will stop flashing. The transmitter is now SYNCED with the drone and is ready
to fly.
4.) Slowly push up on the THROTTLE STICK to make the drone ascend.
MINI MEMORY
CARD SLOT
MINI MEMORY
CARD
EASY MODE
ALTITUDE LOCK

CHARGING THE DRONE BATTERY PACK
1.) Open the battery cover on the bottom of the drone and disconnect the battery
pack from the drone.
2.) Remove the battery pack from the drone.
3.) Connect the battery pack cable to the wall charger cable.
4.) Plug the wall charger into an outlet. The LED light on the wall charger will be
RED while charging.
5.) When the battery is fully charged the LED light on the wall charger will turn
GREEN.
- DO NOT OVERCHARGE THE BATTERY PACK.
- ONLY CHARGE THE BATTERY PACK WITH THE INCLUDED WALL
CHARGER.
- DO NOT CHARGE THE BATTERY PACK OVER NIGHT.
- DO NOT CHARGE THE BATTERY PACK UNSUPERVISED.
- DO NOT DAMAGE OR PIERCE THE BATTERY PACK.
- DO NOT CHARGE A DAMAGED BATTERY PACK.
- KEEP THE BATTERY PACK AWAY FROM HIGH TEMPERATURES.
7.4V 1500mAh Li-Poly
Rechargeable Battery Pack Wall Charger
The drone battery pack can be recharged with the included wall
charger.
Full charge will take approximately 180 minutes.
WARNING:

Rotor Blade A is designed to
rotate counter-clockwise while
Rotor Blade B is designed to
rotate clockwise. Make sure that
you replace the Rotor Blades in
their corresponding position.
Wrong placement will greatly
affect its performance.
FLIGHT CONTROLS
REPLACING THE ROTOR BLADES
ASCEND
LEFT
JOYSTICK
LEFT
JOYSTICK
LEFT
JOYSTICK
LEFT
JOYSTICK
DESCEND
TURN LEFT
TURN RIGHT
RIGHT
JOYSTICK
RIGHT
JOYSTICK
MOVE LEFT
MOVE RIGHT
RIGHT
JOYSTICK
RIGHT
JOYSTICK
FORWARD
BACKWARD

When hovering, the drone may turn or move left or move right or move forward or
backward without your control input. To correct this you will need to adjust the trim on
the transmitter.
ADJUSTING THE TRIM
PROBLEM:
When hovering the drone
spins to the RIGHT without
your control input.
CORRECTION:
Click the LEFT TURN TRIM to
the left until the drone stops
spinning to the right.
PROBLEM:
When hovering the drone
spins to the LEFT without your
control input.
CORRECTION:
Click the RIGHT TURN TRIM to
the right until the drone stops
spinning to the left.
PROBLEM:
When hovering the drone
moves FORWARD without
your control input.
CORRECTION:
Click the BACKWARD TRIM
down until the drone stops
moving forward.
PROBLEM:
When hovering the drone
moves BACKWARD without
your control input.
CORRECTION:
Click the FORWARD TRIM up
until the drone stops moving
backward.
PROBLEM:
When hovering the drone
moves to the LEFT without
your control input.
CORRECTION:
Click the MOVE RIGHT TRIM to
the right until the drone stops
moving to the left.
PROBLEM:
When hovering the drone
moves to the RIGHT without
your control input.
CORRECTION:
Click the MOVE LEFT TRIM to
the left until the drone stops
moving to the right.
LEFT TURN /
RIGHT TURN TRIM
MOVE LEFT /
MOVE RIGHT TRIM
THROTTLE TRIM FORWARD /
BACKWARD TRIM
Table des matières


 Manuel utilisateur")


