All Pond Solutions CUV-207 Manuel utilisateur

POND & AQUARIUM
UV STERILISER
CUV-207 / 209 / 211
218 / 224 / 236 / 272

To ensure your UV Steriliser is set up and running correctly, and to prevent any
accidental damage or injury, please read and follow the below instructions
carefully before using your product.
SAFETY
IMPORTANT! Disconnect the mains electricity supply before attempting any
installation / maintenance of any kind. Do not attempt to modify this unit in
any way and only use the recommended parts for replacement.
· The CUV steriliser should never be submerged as this will cause
permanent damage to the unit.
· All connections must be earthed.
· The power cord of this appliance cannot be replaced; if the cord is
damaged, the appliance should be discarded. Never cut the cord.
· Do not connect to any voltage other than that stated.
· Do not use with liquids other than water.
· Do not use with water above 90F or 30C.
· Do not carry or pull the unit by its electrical cable.
· Do not use this unit if it has a damaged cord, if it is malfunctioning or it is
dropped or damaged in any manner.
· Do not attempt to modify this unit in any way and only use attachments and
the recommended parts for replacement recommended by the
manufacturer.
· Before installing, maintaining or handling your equipment, or before placing
your hands in your pond, ensure that the unit is disconnected from the
electricity supply.
· Always disconnect any electrical devices when not in use.
· Carefully examine your pond system after installation. Do not connect the
unit to the mains if there is water on any parts not intended to be wet.
· Do not look directly at the UV light when it is operational.
· Before operating your CUV system observe that water is flowing through it
- the UV requires constant flow to avoid overheating.

· To avoid injury, do not touch hot or moving parts such as, but not limited to
UV bulbs or impellers.
· During maintenance ensure all O-rings are present and intact.
· If the appliance shows any signs of water leakage or the RCD unit switches
off, disconnect the unit from the power supply and consult the retailer
where you purchased the unit.
· Do not install or store this unit where it will be exposed to temperatures near
to 0°C / 32°F. In freezing conditions, remove and store the unit in a
sheltered area ensuring all water has been drained from it.
· Do not bury the cord for this unit. Ensure it does not cause a trip hazard or it
at risk from damage from lawn mowers, strimmers or other garden
equipment.
· To avoid overheating do not operate when dry.
PLEASE NOTE: this appliance can be used by children aged from 8 years and
above and persons with reduced physical, sensory or mental capabilities or lack
of experience and knowledge, provided they are given supervision and
instruction concerning use of the appliance and understand the hazards
involved. Children must not play with the appliance. Any maintenance must not
be made by children without supervision.

ELECTRIC
This unit comes complete with a generous supply of 3 core cable, however
should any additional cable be required, the use of an approved waterproof
cable connector with a proper rating is essential. A cord rated for less amperes
or watts than the appliance rating may overheat.
Please Ensure:
· The power supply must be earthed and fused at 3amps.
· You regularly inspect the cable for damage and deterioration.
· Do not connect to any voltage other than that stated.
· You consult a qualified electrician if in doubt about any aspects of
wiring.
· A residential current device (RCD) is used for additional safety
· You have complied with Local Electricity Authority regulations if
permanently installing to the mains supply.
Please Ensure: The power supply must be earthed and fused at 3amps.
Regularly inspect the cable for damage and deterioration. Consult a qualified
electrician if in doubt about any aspects of wiring.
Please read the below instructions carefully before beginning to set up your UV
steriliser system. DO NOT CONNECT THE UNIT TO THE MAINS UNTIL SET UP IS
COMPLETE.
1. Prior to installing the unit, examine the quartz sleeve and UV bulb to make
sure these have not been damaged in transportation (see maintenance section).
Handle with care. Do not hold UV bulb with bare hands as this can affect
performance.
2. Assemble your CUV unit as per the diagrams in the “Parts Diagram” section.
PLEASE NOTE: unlike other sterilisers, CUV units (excluding CUV-207 and CUV-
272) come with one inlet and two outlets - very useful if you want to run the
output to a two-fall waterfall, or indeed a waterfall and a filter. The steriliser is
also supplied with a separate glass viewport which can be used to replace one
of the hosetails for use as a one-in / one-out unit.
INSTALLATION & USE
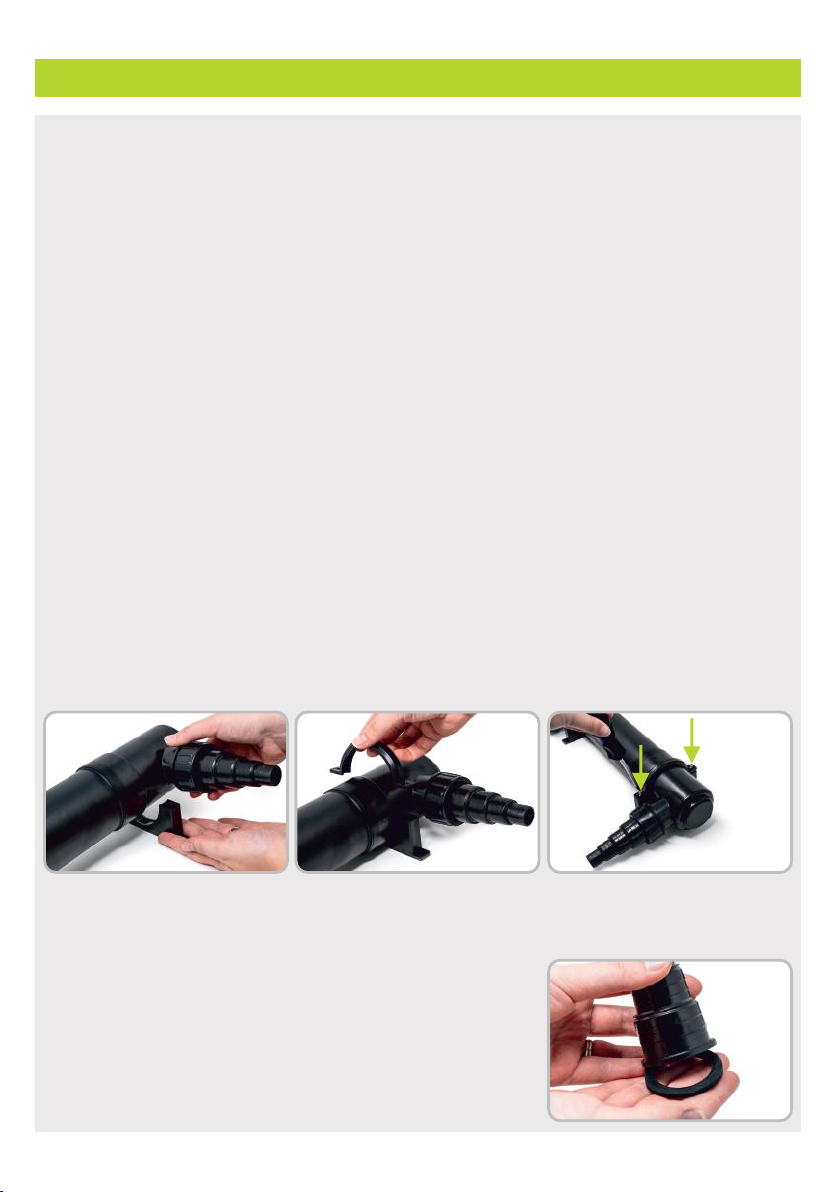
3. Add fixing brackets to your unit (CUV-211 model only). There should be one
at each end of the unit. You can then use them to secure the unit on flat surface.
PLEASE NOTE: CUV-207 / 209 / 218 / 224 / 236 / 272 models come with
preattached fixing brackets.
3. Clear hosetail - is interchangeable with the black hosetail. It has a spindle
that indicates the flow rate so you can use it on the inlet/outlet. Sometimes
you may notice the spindle stops rotating, this is
okay as long as the water runs through the unit.
4. Make sure the O-rings are placed smooth side up
to the hosetail (see image on the right for reference).
This will prevent leakage.

5. Pond installation - place your CUV unit at least 2 metres away from pond.
This is to ensure the UV unit cannot fall into the pond. Connect pipework from
feeder pump (not included) to inlet hosetail and secure using clip/clamp.
Connect pipework to hosetail outlet to feed into filtration system (not included)
or return water to pond to ensure this is water tight.
6. Aquarium installation - place your CUV unit securely on a flat surface.
Connect outlet pipework from aquarium pump or external filter to CUV inlet
hosetail.
Connect pipework to hosetail outlet to return water to aquarium. Secure all
pipework using hose clip/clamp to ensure this is water tight..
5. Connect your CUV to the mains - connect the unit to the mains using a
residual current device (RCD) for additional safety.
6. Switch on your unit at the mains - turn on the operation by switching on the
unit at the mains.

UVC OPERATION
· Always ensure that the filter has water flowing through the unit prior to
operating the UV.
· Never look directly at the UV light when operational.
· Check that the UV is operational visually using the UV indicator.
· Never operate the UV lamp outside its housing.
· Never operate the UV lamp in a housing that’s defective.
MAINTENANCE
To ensure optimal performance and that your unit functions correctly, regular
maintenance is essential. Failure to do so may result in damage to your unit and
may invalidate your warranty.
We recommend that a regular cleaning and maintenance schedule is followed
to ensure responsible fishkeeping. Depending on water volume and stocking
levels, regular cleaning of the quartz sleeve and inlet/outlet pipework will help
ensure that the product works efficiently and your pond remains healthy.
For further maintenance guidance, please see the table and additional
information below:
2-3 MONTHS
6 MONTHS
ANNUALLY
All Pipework
Clean & Inspect
Hosing
Clean & Inspect
O-Rings
Inspect, Clean &
Lubricate
Replace
UV Bulb
Replace
Quartz Sleeve
Clean & Inspect
Replace after 2
years

It is vital that O-rings are regularly inspected and replaced as the rubber
watertight seal will perish over time, which may cause your unit to leak. Before
replacing your o-rings, ensure they are well lubricated to ensure the seal is
kept water tight.
O-rings
General Maintenance
It is recommended that every 2-3 months you perform maintenance on your
CUV unit. This is necessary to prevent blockage and inspect the bulb and
quartz sleeve. Make sure to inspect the unit’s cable for damage or excessive
wear.
IMPORTANT! Disconnect mains electricity supply before handling or
attempting maintenance.
Quartz sleeve & UV bulb - to access UV bulb unfasten the clip located on the
side (CUV-207 / 209 and 211 models only) or using a coin push down the clear
plastic button on top of the ballast (CUV-218 / 224 / 236 / 272 models only).
Gently turn the ballast counter clockwise and pull the ballast apart from the UV
case.
CUV-207 / 209 / 211
CUV-218 / 224 / 236 / 272
NOTE: be very careful when removing the ballast as the UV bulb and UV
quartz are very fragile.
The quartz sleeve can be coated in limescale build up in hard water areas.
This should be carefully removed from the quartz sleeve and cleaned with a
soft damp cloth.
Use a flathead screwdriver to separate the quartz glass from the UV case
and remove the quartz by pulling it out (CUV-207 / 209 and 211 models only).
Unscrew the clamp screw and gently remove the UV quartz from the ballast
(CUV-218 / 224 / 236 and 272 models only).
Clean body and all attachments. Reassemble.
CUV-218 / 224 / 236 / 272CUV-207 / 209 / 211
IMPORTANT! When reassembling your unit you must replace all O-rings as
per the parts diagram as otherwise this can cause the unit to leak which will
cause permanent damage to the UV operation.
Common Reassembly Questions
CUV-207 / 209 / 211 - when reassembling your unit you must make sure the
black O-ring sits on top of the quartz sleeve as seen in the image below.
Close the unit with the ballast pointing downwards. This is to ensure the O-
ring doesn’t fall out of place and enables you to correctly close the unit.

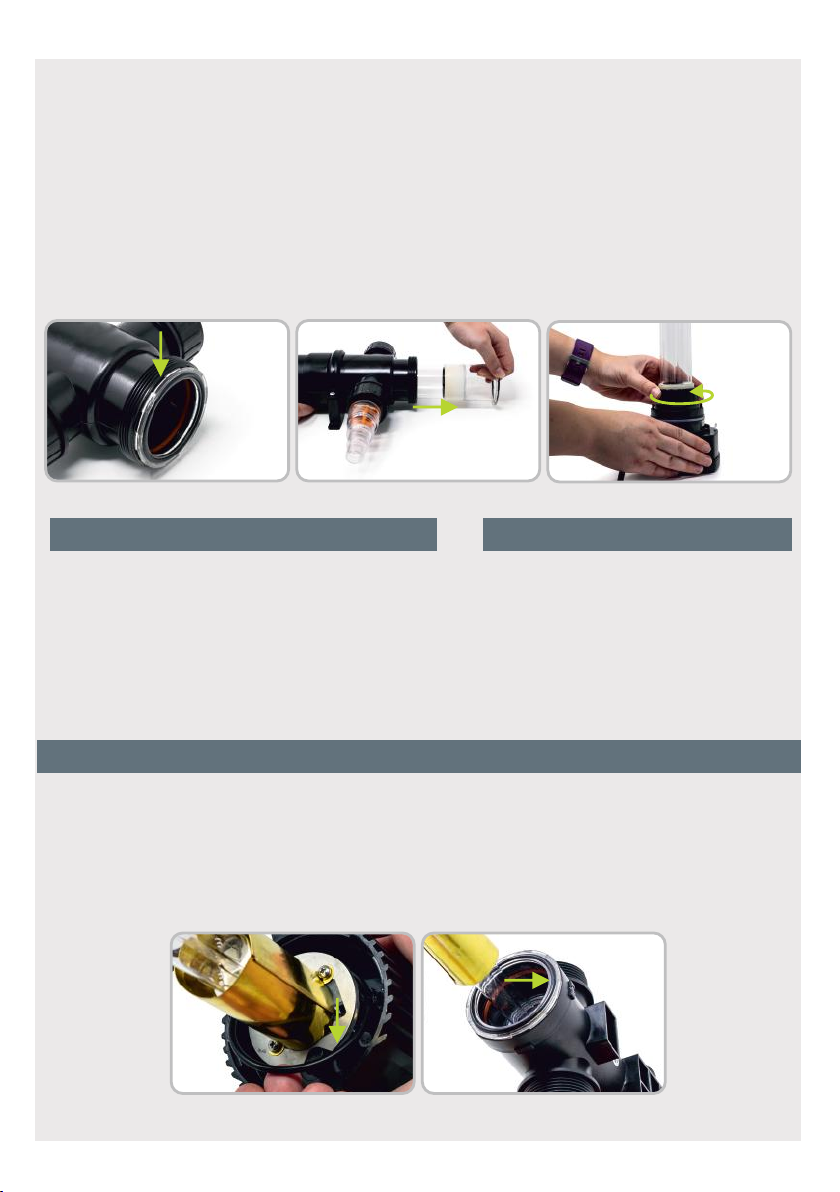
Replacing the UV Bulb
NEVER look directly at the UV light.
When replacing your UV bulb, use this time to clean your quartz sleeve and
carefully examine for any damage or cracks. Take care when handling the
quartz sleeve and UV bulb to avoid any damage to the glass.
1. To access UV bulb unfasten the clip located on the side (CUV-207 / 209 and
211 models only) or using a coin push down the
clear plastic button on top of the ballast (CUV-218 /
224 / 236 / 272 models only). Gently turn the ballast
counter clockwise and pull the ballast apart from
the UV case.
IMPORTANT! The replacement does not require
removal of the gold outer shell protecting the
bulb (CUV-207 / 209 and 211 models only).
The top of the gold outer shell has sharp edge, DO
NOT touch this part.
2. Once cooled, UV bulb can be safely removed by
gently moving it from side to side (CUV-207 / 209 /
211) and pulling free of unit.
3. You can now replace your UV bulb and
reassemble the unit. Ensure O-rings are
replaced when reassembling to avoid water
ingress.
CUV-218 / 224 / 236 / 272 - when taking your
quartz sleeve out, you might notice the orange O-
ring falls out into the ballast part of the unit. When
reassembling your unit make to replce it as seen in
the image on the right. This is to enable you to
correctly close the unit.
CUV-218 / 224 / 236 / 272
CUV-207 / 209 / 211
Ce manuel convient aux modèles suivants
6
Autres manuels All Pond Solutions Autre


