ADT ADC-V523 Manuel utilisateur

ADT Security
Wi-Fi Camera Installation Guide

2
Getting Started Congratulations on getting your new ADT Wi-Fi
Camera. To learn more about this amazing new
device and to support you in the DIY installation
process (if this applies to you), we have developed
the following Installation Guide.
To better support you through the process, this guide
has been broken down into key sections as below.
Setting up your ADT Interactive account and mobile app before connecting your camera.
1 |ADT Interactive Account & Mobile App 3
Learn more about your indoor (ADC-V523) or outdoor (ADC-V723) camera.
2 |Getting to Know Your Camera 4
Learn to optimally position your camera and understand the key considerations when picking a spot.
5 |Positioning Your Camera 11
Find the answers you are looking for using our troubleshooting Guide and FAQs
7 |Troubleshooting & Frequently Asked Questions (FAQ’s) 17
3 |Connecting Your Camera to Wi-Fi 5
Connecting your camera to your property Wi-Fi network in order to set up the camera.
4 |Enrolling Your Camera on ADT Interactive 8
Enrolling your camera onto your ADT Interactive account once the camera has a Wi-Fi connection.
6 |Configuring Your Camera’s Video Analytics 14
Video Analytics needs to be specifically calibrated using ADT Interactive, learn how.

3
1 |ADT Interactive Account & Mobile App
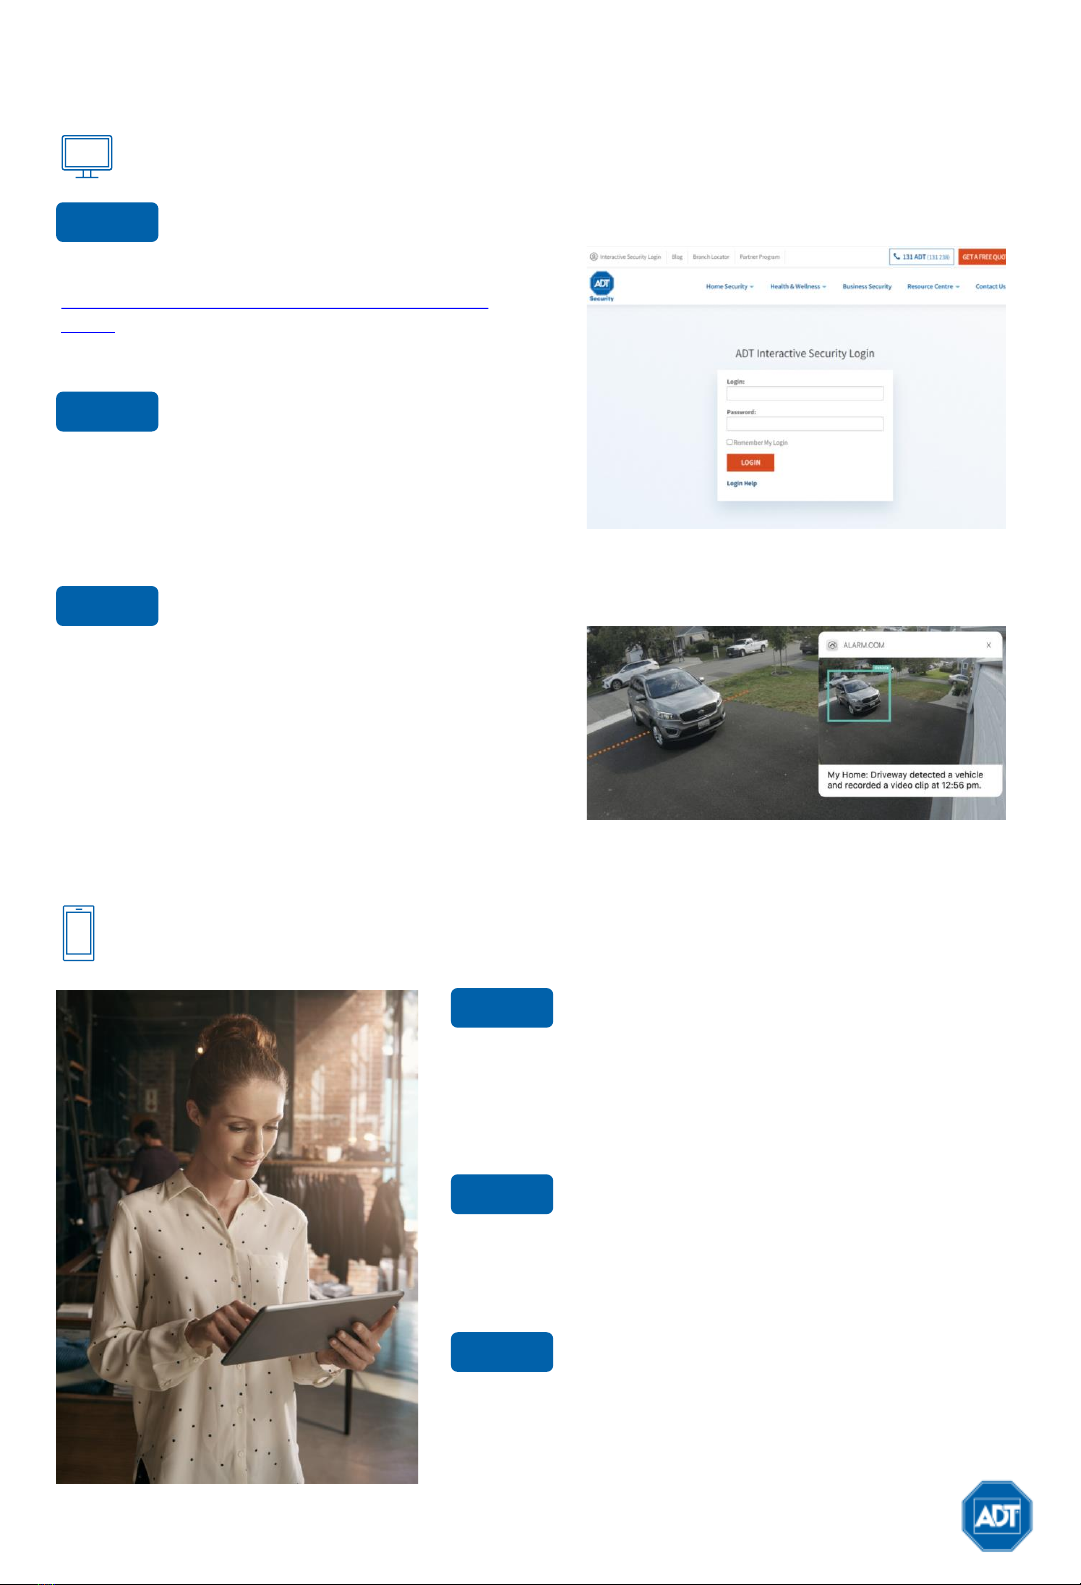
Step 1 Login to ADT Interactive
Go to the ADT Interactive Login page at
www.adtsecurity.com.au/interactive-security-
login/ and log in using the username and
password provided to you via email.
Step 2 Set Up Users & Manage Logins
Set up user codes and/or logins for whomever
requires access including family members and
friends. Go to ‘Users’ > ‘Add New User’ and
complete the details listed.
Step 3 Configure Camera Video Analytics
Before configuring your camera’s video analytics
rules, ensure that you have gone through the
process of ‘Connecting your camera’ to Wi-Fi
(refer to section for details).
Once you have connected your camera, follow the
instructions for ‘Enrolling Your Camera’ to
complete set up of recording rules (refer to
section for details).
Step 1 Download the App
The ADT Interactive Security app for smart phone and tablet
is available for free download from the Google Play and
Apple App Store. Search for ‘ADT Interactive Security’ and
install the app to your device.
Step 2 Navigate the Dashboard
Upon download, use the credentials used in Step 1.A to
login to the ADT Interactive app. Familiarise yourself with
the dashboard, exploring the features to view and control.
Step 3 Enable Notifications
In the app, click on Notifications to enable push notifications
and to ensure you can receive alerts in real-time. Here you
can add or manage all push, text and email notifications
related to your Interactive account.
1.A Install and Activate ADT Interactive via Web Browser
1.B Install ADT Interactive via Mobile App

MAXIMUM RESOLUTION
1920x1080
LOW
-LIGHT SENSITIVITY
0 lux with IR
RECORDING COMPRESSION
H.264, MPEG
-4
IR RANGE
Up to 12m
IMAGE SENSOR
1/2.7” CMOS, 2.1 MP, 1920x1080
DIMENSIONS (L X W X H)
6.4 x 6.4 x 11.4cm
ETHERNET CONNECTION
No
LENS
3.0 mm, F2.0
POWER
12V DC, 12W
OPERATING TEMPERATURE
-
20°C -50°C
ANGLE OF VIEW
117
°
WIRELESS CONNECTIVITY
802.11 b/g/n, 2.4 & 5 GHz
OPERATING HUMIDITY
<95% Non
-condensing
4
2.A Identifying Your Indoor Camera (ADC-V523)
2.B Identifying Your Outdoor Camera (ADC-V723)
Refer to the bottom of the camera and
look for the Code ADC-V523.
2 |Getting to Know Your Camera
Specifications
Refer to the bottom of the camera and look
for the Code ADC-V723.
MAXIMUM RESOLUTION
1920x1080
LOW
-LIGHT SENSITIVITY
0 lux with IR
RECORDING COMPRESSION
H.264
IR RANGE
Up to 4.6m
SIMULTANEOUS VIEWERS
10
IMAGE SENSOR
1/2.7” CMOS, 2.1 MP, 1920x1080
DIMENSIONS (L X W X H)
6.1 x 7.6 x 9.4cm
ETHERNET CONNECTION
Yes
LENS
3.0 mm, F2.0
POWER
12V DC, 12W
OPERATING TEMPERATURE
-
20°C -50°C
ANGLE OF VIEW
117
°
WIRELESS CONNECTIVITY
802.11 b/g/n, 2.4 & 5 GHz
OPERATING HUMIDITY
<95% Non
-condensing
Specifications
Note: Indoor Camera’s cannot be used outside as it
will wear and tear due to weather conditions.

5
4.A Connecting in Wi-Fi Protected Setup (WPS) Mode
1. Connect AC power adapter and plug into an outlet
2. Hold down the Reset button until the LED is flashing blue (3 seconds)
3. Press the WPS Button on the router. The router will connect to the wireless
network. The connection is complete once the LED turns solid green.
4. Follow the instructions under Enrolling Your Camera on your ADT Interactive
Account
Before we can proceed with any of the camera set up steps, it is critical that your
camera is connected to your property Wi-Fi network.
There are 2 ways to do this, please follow the instructions for either Connecting in
Wi-Fi Protected Setup (WPS) Mode or Connecting in Access Point (AP) Mode.
Wi-Fi Protected Setup (WPS) Mode Access Point (AP) Mode
You can also follow along step by step by using our video tutorial found here:
https://www.adtsecurity.com.au/panel/wifi-cameras/. Also refer to troubleshooting
and FAQs found in this Installation Guide if you experience any trouble.
Use WPS mode to connect the camera to
your network by physically pressing down
on the WPS button on your internet router
Use AP mode to use wireless internet
to connect the camera to your network
4.A 4.B
3 |Connecting Your Camera to Wi-Fi

4B. Connecting in Access Point (AP) Mode
1. Connect AC power adapter and plug into an outlet
2. The camera’s LED will begin to flash white. If the LED is not white after two minutes,
hold down the ‘Reset’ button until the LED is flashing white (6 seconds)
Reset Button Reset Button
3. Using your internet enabled device:
a) Search for available networks and connect to the wireless network ADC-V523IR
(XX:XX:XX). The (XX:XX:XX) is the last six digits of the camera’s MAC address
(located on the bottom of the camera or on the back of the packaging).
b) On the same device, open a web browser and enter the URL http://v523install
or 192.168.1.1 for indoor camera and URL http://v723install or 192.168.1.1 for
outdoor camera
3 |Connecting Your Camera to Wi-Fi
6

7
a) Click Scan to scan for available Wi-Fi Networks
b) Select the Wi-Fi Network that the camera will connect to:
d) The wireless connection is complete once the LED light turns a solid green
c) Enter Wi-Fi Credentials and click ‘Submit’
e) Your camera is now connected to Wi-Fi. Next, follow the instructions for ‘Enrolling
Your Camera on ADT Interactive’
4. Next, follow the on-screen instructions (steps also supplied below):
3 |Connecting Your Camera to Wi-Fi

8
4.A Using the ADT Interactive App
1. Open the ADT Interactive App on your device
2. Open the menu by selecting the menu icon and select
3. Select
4. The camera should have been discovered by the network. Click ‘Install’ to add the
camera to your ADT Interactive account.
If the device can’t be found, click on ‘Can’t find?’ and follow on-screen instructions.
5. Name the device and click ‘Next’.
6. Wait for the camera to be installed to the account. Once the camera has been
installed, follow the on-screen instructions regarding placement of the camera and
of setting up camera analytics (optional).
Once done, configuration is complete and you will receive a confirmation.
Once the camera has a Wi-Fi connection, it will need to be enrolled on your ADT
Interactive account. There are 2 possible ways to do this, follow the instructions below:
Using the ADT Interactive App Using the ADT Interactive Web Browser
Access ADT Interactive via the app if
you intend to access and manage your
new Wi-Fi camera system this way.
Access ADT Interactive via the web if you
prefer to manage your new Wi-Fi camera
system this way or have not installed the app.
4.A 4.B
4 |Enrolling Your Camera on ADT Interactive

9
1. Log in to ADT Interactive via https://www.adtsecurity.com.au/interactive-security-login/
4.B Using the ADT Interactive Web Browser
2. Add your Device:
a) Install the Camera:
If this is the first camera being added on to the account, then:
i. Select ‘Video’
ii. Click on ‘Add Camera’
Note: Use the login details used to activate
your ADT Interactive account in section 1
‘ADT Interactive and Mobile App’
4 |Enrolling Your Camera on ADT Interactive

If you have previously installed a different camera:
i. Select ‘Video’
ii. Click on ‘Settings’
iii. Select ‘Add Video Device’
3. The camera should have now been discovered by the network.
a) If no devices have been detected:
i. Click on ’Refresh Devices’
ii. Search by entering the 12-digit MAC address of your video device
(found on the video device label) and click on ’Find’
4. Once the camera has been discovered name the Video Device
5. Click on ‘Install’ to add the camera.
6. Click on ‘Refresh Devices’ again. The camera should now be listed under ‘Video
Devices Installed’
4 |Enrolling Your Camera on ADT Interactive
b) Add a new device:
10
Ce manuel convient aux modèles suivants
1
Table des matières
Autres manuels ADT Caméra de sécurité


