Zon DAZON 4MT08 Manuel utilisateur

1Zon 4MT08
Zon 4MT08
User Manual
DAZON bv

2
Dazon bv
General
The conversion kit Zon 4MT08 creates the possibility to convert a fully mecha-
nical gas cannon into a semi-electronic gas cannon.
The electronic control-unit MT08 makes the propane gas cannon produce 1,
2, 3 or 4 shots series, with approximately 5 seconds between each shot.
The time-interval between consecutive series can be configured electronically
between 1 and 60 minutes. The equipment provides three different possibili-
ties to choose random intervals between shots series, in which case the control-
unit selects a different time-interval after each series.
The control-unit is equipped with a 24-hours clock. No less than 4 periods
can be configured, during which the control-unit will operate the propane gas
cannon.
Always wear ear-protection near cannons in operation!!
1 Contents of the conversion kit
1 MT08, electronic control-unit 1x
2 SBBV, hose fracture protection valve 1x
3 NH14, hose clamp 3x
4 User manual 1x
2 Aansluiten
1 Close the valve of the gas tank. Do not open this until you have
finished installation and configuration of the MT08!!
2 Disconnect the pressure regulator from the gas tank.
3 Disconnect the hose from the precise regulator.
4 Unscrew the precise regulator from the pressure regulator (unscrew is
clockwise).
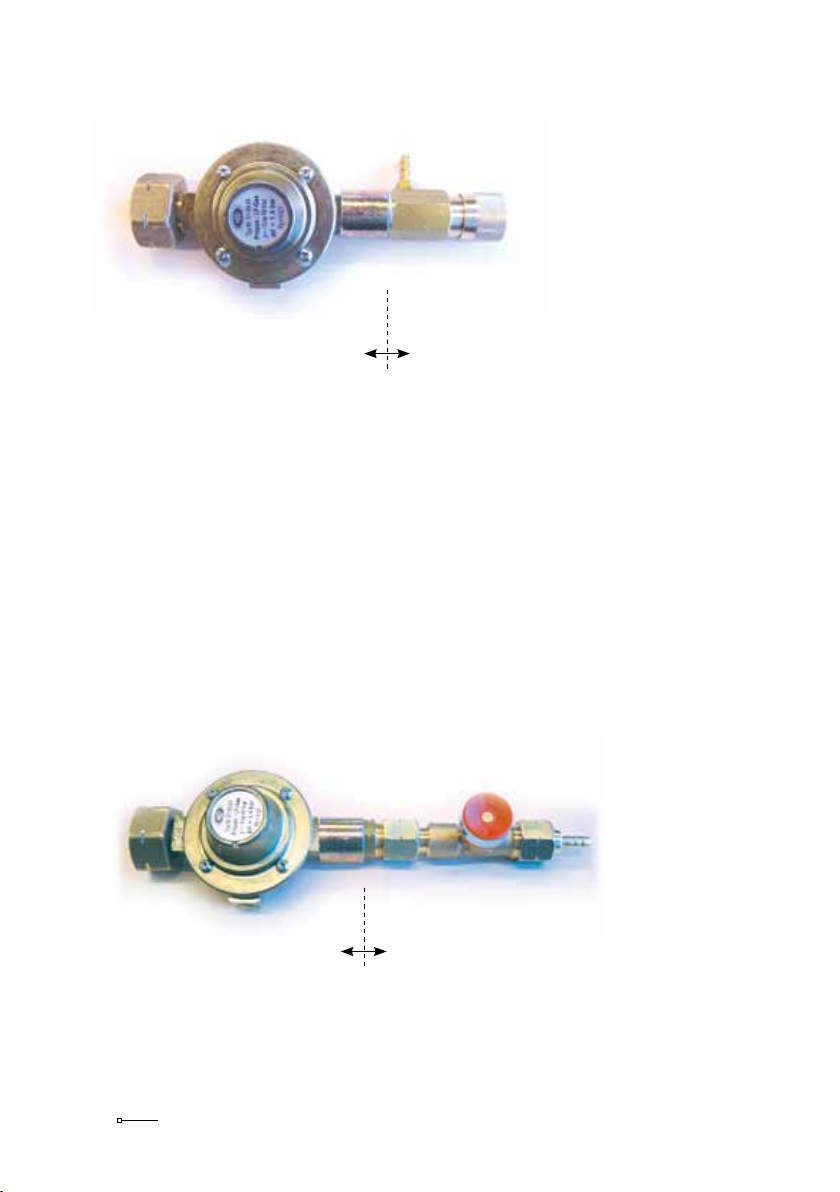
3Zon 4MT08
Pressure regulator (Shell type) Precise regulator
5 Screw the hose fracture protection valve onto the pressure regulator (on is
counterclockwise). Secure a no-leak connection by using Loctite or teflon
tape on the wire of the hose fracture protection valve. The precise regulator
only allows a small amount of gas flowing through in a relatively long pe-
riod. To produce a series of shots, it’s necessary to allow a large amount of
gas in a short period, that’s why the precise regulator has to be disconnec-
ted. The hose fracture protection valve provides extra security, by closing the
gas flow at the moment the counter-pressure disappears. For instance when
the hose detaches on either side of the equipment, or when it is accidentally
run over and severely damaged. After opening the valve of the gas
tank always push the red button of the hose fracture protection
valve, to make sure an unobstructed gas flow is guaranteed.
Pressure regulator Hose fracture protection valve

4
Dazon bv
6 Connect the hose to the hose fracture protection valve en secure it with
one of the supplied hose clamps NH14.
7 Cut the hose so the MT08 can be installed between the gas fracture pro-
tection valve and the propane gas cannon.
8 Connect both ends to the electronic control-unit MT08 and secure these
with the remaining 2 clamps NH14. The arrow on the magnetic valve in
the control-unit indicates the direction of the gas flow. Connect the gas
cannon on the side to which the arrow points out.
9 Connect the pressure regulator to the gas tank.
10 Connect the battery cable of the control-unit MT08 to a 12V battery. The
red or brown wire should be attached to the + of the battery. The blue
wire should be attached to the –. When attached properly, a red control
will light up to show the device is active. Check the connections when this
does not happen. The control-unit consumes 0.53 ampere per day. A fully
loaded car battery of 30Ah will operate the control-unit for approximately
60 days, a 7.2 Ah battery for approximately 14 days.
11 Position the battery and the control-unit preferably above the ground on
an elevated spot and protect them from rain and extreme heat. The con-
trol-unit is splash waterproof and heat resistant to at least 1900F/700C. A
careful positioning and protection will increase the lifespan of the equip-
ment significantly.
12 You have finished installation and the MT08 is ready to be configured.
Connect
gas tank to
this side
Connect
Zon Mark 4
to this side

5Zon 4MT08
3 Operating the MT08
The number of shots in a series and the time interval between consecutive
series are configured on the MT08 with DIPSWITCHES. There are 6 of them,
white in a red block, numbered 1 to 6, like in the next picture. Dipswitches 1
and 2 are used for configuring the number of shots in a series and dipswitch 3
to 6 are used to configure the time interval between consecutive series.
Block with 6 dipswitches
A dipswitch is ON when it is pushed fully to the ON-side of the red block. It
is OFF when it is pushed fully to the side of the red block with the numbers 1
through 6 on it. In above example dipswitches 2 and 5 are ON, the others
are OFF. With this configuration there are 3 shots in a series and 7 minutes
between series. These are our factory settings.
The current time and the periods, during which the control-unit should operate
the propane gas cannon, can be configured with the 5-figure display and the
4 push buttons. All times are in a 24-hour time notation. 00:00 is 12 o’clock
at midnight. The 1-figure display to the right shows the Mode. The 2-figure
display in the middle shows the minutes belonging to the displayed mode. The
2-figure display on the left shows the hours belonging to the displayed mode.

6
Dazon bv
Hours Minutes Mode
5-figure display, with 4 push buttons
Pushbutton Hours Pushbutton Minutes Pushbutton Mode Pushbutton Reset
Setting hours Setting minutes
Selecting Mode Reset

7Zon 4MT08
4 Configuring the number of shots in a series.
The electronic control-unit MT08 can be configured to operate the gas cannon
and let it produce 1, 2, 3 or 4 shots in a series, with approximately 5 seconds
between each shot. The number of shots in a series is controlled with dipswitch
1 and 2.
Series Dipswitch 1 Dipswitch 2
1 shot Off Off
2 shots On Off
3 shots Off On
4 shots On On
ON DIP
1 2 3 4 5 6
ON DIP
1 2 3 4 5 6
ON DIP
1 2 3 4 5 6
ON DIP
1 2 3 4 5 6

8
Dazon bv
5 Configuring the time between consecutive series
The time, that has to pass between consecutive shots series, is controlled with
dipswitch 3 through 6. These are the possible settings:
Interval Dipswitch Dipswitch Dipswitch Dipswitch
3 4 5 6
1 minute Off Off Off Off
2 minutes On Off Off Off
3 minutes Off On Off Off
5 minutes On On Off Off
7 minutes Off Off On Off
10 minutes On Off On Off
13 minutes Off On On Off
16 minutes On On On Off
20 minutes Off Off Off On
25 minutes On Off Off On
30 minutes Off On Off On
45 minutes On On Off On
60 minutes Off Off On On
ON DIP
1 2 3 4 5 6
ON
ON DIP
1 2 3 4 5 6
DIP
1 2 3 4 5 6
ON DIP
1 2 3 4 5 6
ON
ON
ON
ON
ON
ON
ON
ON
ON DIP
1 2 3 4 5 6
DIP
1 2 3 4 5 6
DIP
1 2 3 4 5 6
DIP
1 2 3 4 5 6
DIP
1 2 3 4 5 6
DIP
1 2 3 4 5 6
DIP
1 2 3 4 5 6
DIP
1 2 3 4 5 6
DIP
1 2 3 4 5 6

9Zon 4MT08
Interval Dipswitch Dipswitch Dipswitch Dipswitch
3 4 5 6
Random 5 On Off On On
Random 10 Off On On On
Random 15 On On On On
Random 5 the time after a shots series is randomly chosen by the control-unit
between 1 and 5 minutes.
Random 10 the time after a shots series is randomly chosen by the control-unit
between 1 and 10 minutes.
Random 15 the time after a shots series is randomly chosen by the control-unit
between 1 and 15 minutes.
.
ON
ON
ON DIP
1 2 3 4 5 6
DIP
1 2 3 4 5 6
DIP
1 2 3 4 5 6

10
Dazon bv
6 Setting the current time
When the display is not lit, it will light by pushing one of the push buttons for
the Hours, Minutes or Mode and show the current time.
When the display is already lit, the current time is displayed at the moment the
Mode display is empty. When the Mode display shows one of the figures 1
through 8, it does not show the current time, but one of the starting or ending-
times. To show the current time, push the Mode button several times until the
Mode display is empty. Now it shows the current time and this can be set or
changed.
If no current time is set, the hours and minutes both contain the value 99. The
current time is a continuously changing value that can’t be stored into memory.
After each power interruption the current time will contain 99:99. When no
current time is set, the control-unit will operate the gas cannon continuously,
regardless of the periods of operation being set.
Hours Minutes Mode Hours Minutes Mode
No current time set The current time is 12:44 hr
By pushing the Hours button or the Minutes button, the displayed current time
can be altered. Keeping the button pushed down, will speed-up the changing
of hours or minutes.
By pushing the Reset button for 1 second, the current time will be set to 00:00,
this is 12 o’clock at midnight.
Opposite from starting and ending-times, the current time has not got to be
confirmed by pushing the Mode button again, it’s not stored into memory.
Table des matières


