ZK ZK-SAM Manuel utilisateur

ZK-SAM, ZK-SAMp,
ZK-MPS
User Manual
ZK Celltest, Inc.
256 Gibraltar Drive
Suite 109
Sunnyvale, CA 94089
(Tel) 408.752.0449 (Fax) 408.752.0477
Web: www.zk.com
e-mail: [email protected]
Release Version: 9.2
Log Format Version 6.16
Release Date: April 27, 2007


Table of Contents
Installation ..........................................................................................................................1
Configurations ....................................................................................................................3
Features Table .........................................................................................................3
Compatible Phones .................................................................................................3
Quick Start ..........................................................................................................................4
Voice Call Testing ..................................................................................................4
Data Call Testing ....................................................................................................4
ZK-SAM .................................................................................................................5
ZK-SAMp ...............................................................................................................5
ZK-MPS ..................................................................................................................5
Operation & Screens ...........................................................................................................6
Status Elements .......................................................................................................6
Compact Flash Memory Card .....................................................................7
Phone 1, 2, 3, 4 and 5 Indicators .................................................................7
Removable Battery .....................................................................................7
Battery Level Indicator ...............................................................................8
Memory Indicator .......................................................................................8
Markers .......................................................................................................8
Time with GPS Available ...........................................................................8
Summary of Screens ...............................................................................................9
Main Menu ............................................................................................................10
SAM-ALL Screens ...............................................................................................11
CDMA Summary ......................................................................................11
Screen Elements ............................................................................11
EvDO Summary Screen ............................................................................13
CDMA/EAMPS Handoff ..........................................................................14
EvDO Handoffs ........................................................................................15
CDMA Message Screen ............................................................................16
CDMA EvDO Message Screen ................................................................17
PN Call Follow Screen .............................................................................18
CDMA Data Testing Screen .....................................................................18
CDMA EvDO Data Testing Screen ..........................................................19
PN Scan Screen .........................................................................................20
GSM Summary 1 ......................................................................................21
GSM Summary 2 ......................................................................................22
GSM Handoff ...........................................................................................23
GSM Messages .........................................................................................24
GSM RSSI/BSIC Scanning Screen ...........................................................25
GPRS/EDGE Data Testing Screen ...........................................................26
iDEN Summary 1 - Graph ........................................................................27
iDEN Summary 1 - Table .........................................................................28

EAMPS Summary .....................................................................................29
Phone Summary ........................................................................................30
Replay ...................................................................................................................30
Audible Alerts .......................................................................................................32
Log Memory .........................................................................................................32
Configuration Menus ............................................................................................33
Delete Log Files ........................................................................................33
Device Setup .............................................................................................33
Setting up a CDMA Phone ...........................................................34
Alerts Setup ...............................................................................................35
Setting up a CDMA Phone for Data Testing ............................................36
Data Testing: .................................................................................36
Auto Redial: ..................................................................................36
FTP Upload: ..................................................................................37
FTP Download: .............................................................................37
FTP Setup . . .: ..............................................................................37
HTTP Test: ...................................................................................37
HTTP Test Setup . . .: ...................................................................38
Link Setup . . .: ..............................................................................38
Dual-Port Setup . . .: .....................................................................39
Default Setup . . .: .........................................................................40
Setting up the Retriever Phone (PN Scanner) ...........................................40
Setting up the Comarco HPN (PN Scanner) .............................................42
Setting up a GSM Phone ...........................................................................43
Setting up a GSM phone for GPRS_EDGE Data Testing ............45
Data Testing: .....................................................................45
Auto Redial: ......................................................................45
FTP Upload: ......................................................................45
FTP Download: .................................................................46
FTP Setup . . .: ..................................................................46
HTTP Test: .......................................................................47
HTTP Test Setup . . .: .......................................................47
Link Setup . . .: ..................................................................48
Default Setup . . .: .............................................................48
Setting up the GSM Scanner Phone ..............................................49
User-defined channels for GSM Scanning .......................50
Setting up an iDEN Phone ........................................................................51
GSM/CDMA/iDEN Cell Site ...................................................................52
Global Setup .............................................................................................55
Auto Start ......................................................................................55
Auto Keylock ................................................................................55
GPS Setup . . . ...........................................................................................56
Features . . . ...............................................................................................57

Appendix A - Cellsite File Format v4.2 1 ...................................................................... A-1

ZK User Manual 1
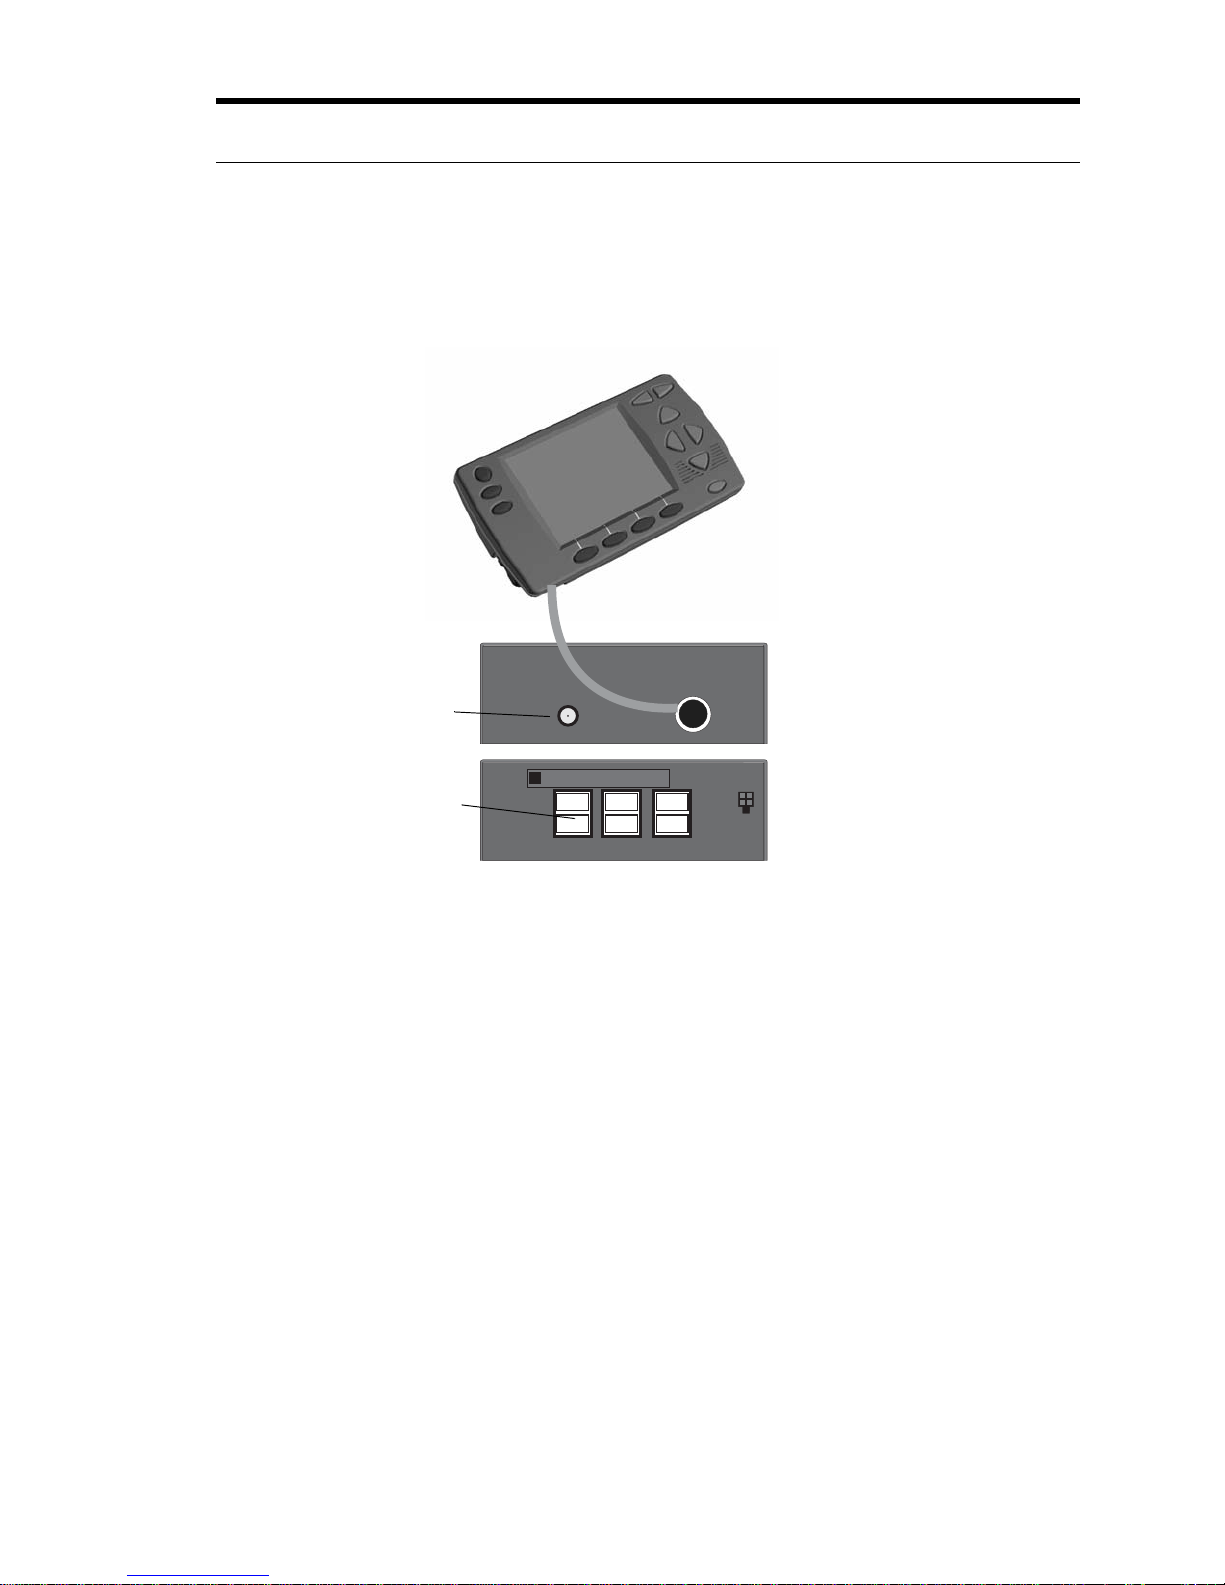
Installation
Installation: Your unit came with the fused vehicle power assembly.
Step 1 - Crimp one of the mini-fused leads to the Red (Constant Power)
wire of the Unit Power Assembly cable.
Step 2 - Crimp the other mini-fused lead to the Yellow (Ignition Sensor)
wire of the Unit Power Assembly cable.
Step 3 - Crimp the ring lug to the Black (Ground) wire of the Unit Power
Assembly cable.
Step 4 - Referring to your vehicle owner's manual locate a fuse position
with constant power for the Unit Power Assembly Red Wire.
Step 5 - Remove the existing fuse from the vehicle fuse position you
selected in Step 4 and insert it into the available fuse position in the mini-
fused lead.
Step 6 - Insert the mini-fused lead into the vehicle fuse position you
selected in Step 4.
Step 7 - Referring to your vehicle owner's manual locate a fuse position
with ignition sensor for the Unit Power Assembly Yellow Wire.
Step 8 - Remove the existing fuse from the vehicle fuse position you
selected in Step 7 and insert it into the available fuse position in the mini-
fused lead.
GPS
P2/P5
PWR
Power
+12VDC (Unswitched) - Red
Ignition Sense (Switched) - Yellow
Ground - Black
(Fuse taps and fuses included in
installation kit)
P1/P4 P3/P6
Display
Display cable
GPS Antenna
Phone connections
Use supplied mount and
screws to mount display

2 ZK Celltest, Inc.
Step 9 - Insert the mini-fused lead into the vehicle fuse position you
selected in Step 7.
Step 10 - Attach the Black lead of the Unit Power Assembly to a ground
surface of the vehicle.
ZK User Manual 3
Configurations
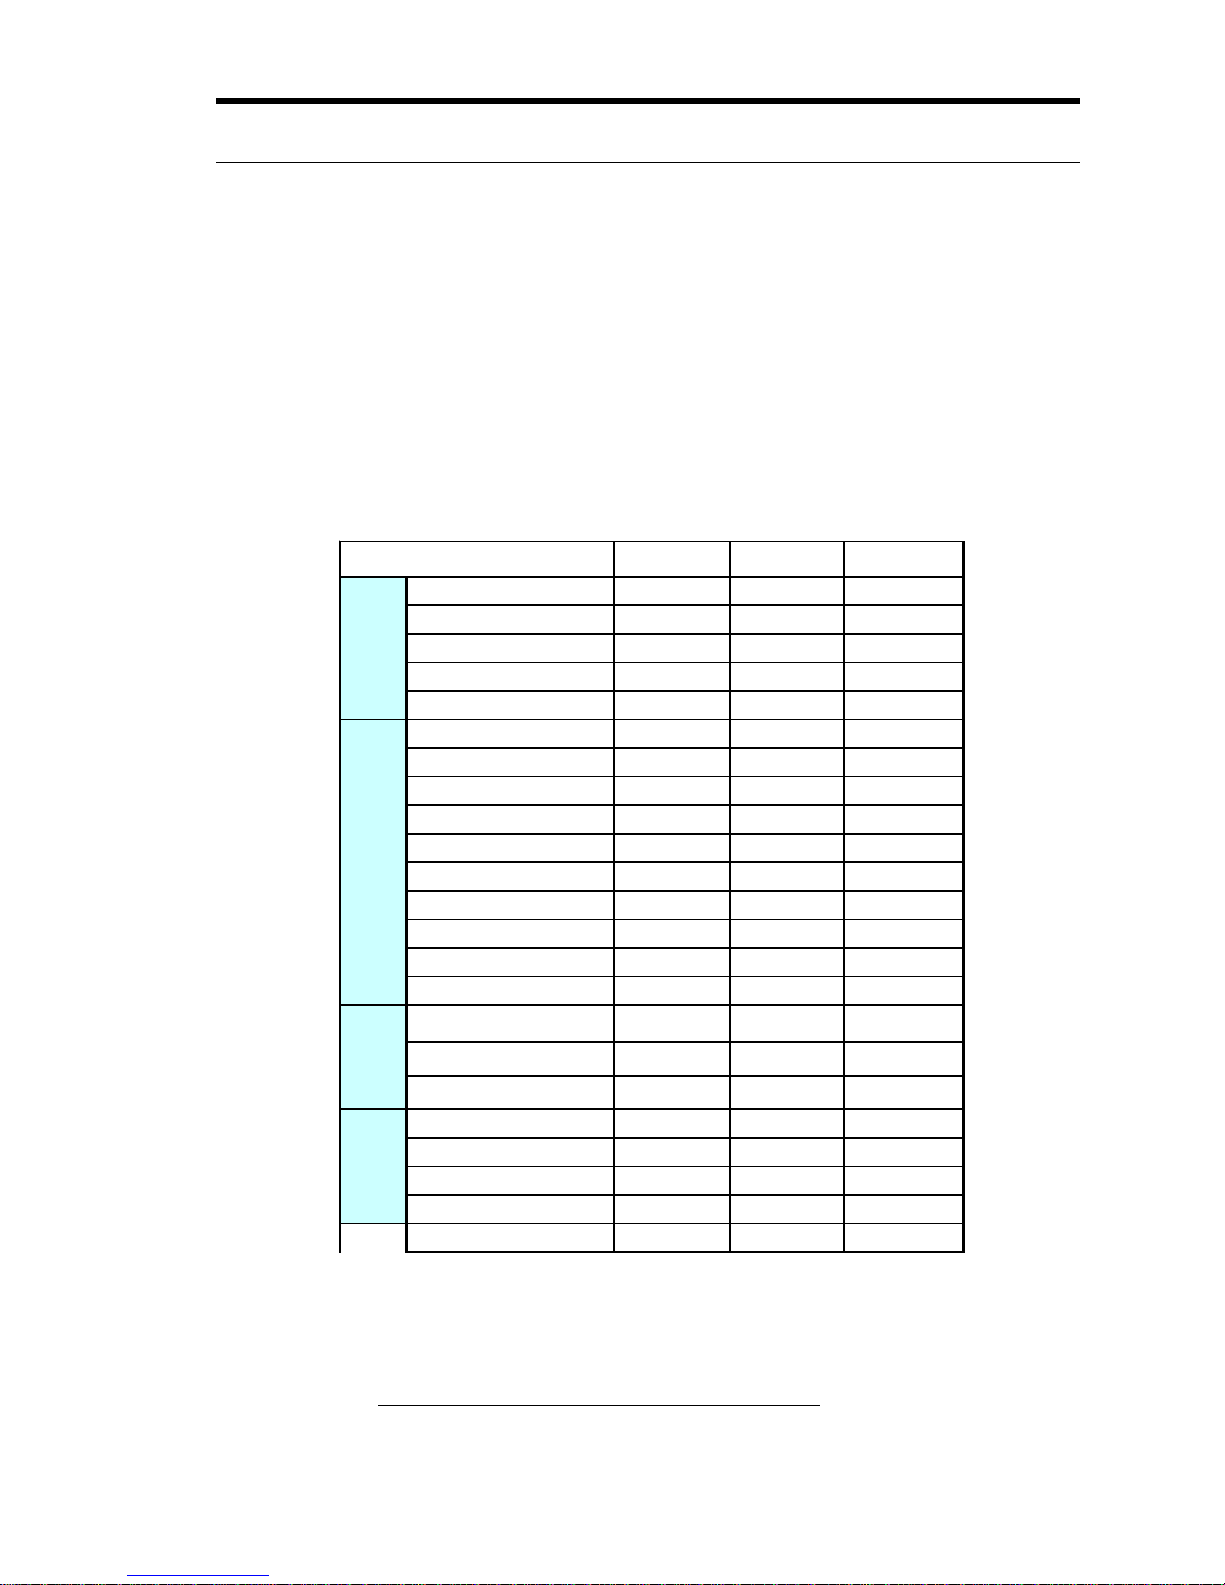
Features Table
Below is a table of the Features and Options available on each of the three
data collection products, ZK-SAM, ZK-SAMp and ZK-MPS.
Compatible Phones
Go to http://www.zk.com/support/release_info.html for an updated list of
compatible phones.
ZK-SAM ZK-SAMp ZK-MPS
Port 1 Y Y Y
Port 2 Y Y Y
Port 3 Y Y Y
Port 4 N Y Y
Port 5 N Y Y
EAMPS Voice Y Y Y
CDMA Voice Y Y Y
GSM Voice Y Y Y
iDEN Y Y Y
CDMA 2000 Y Y Y
EvDO RevO F F F
GPRS/EDGE Y Y Y
UMTS Y Y Y
EvDO RevA F F F
HSDPA F F F
GSM/BSIC Y Y Y
PN 850MHz Y Y Y
PN 1900MHz Y Y Y
Comarco PN N N Y
Comarco GSM/BSIC N N Y
Comarco EvDO N N Y
Comarco UMTS N N Y
Portable N Y N
Integrated
Scanner Simultaneous
phones
Technologies
Phone
scanners

4 ZK Celltest, Inc.
Quick Start
NOTE: The Compact Flash memory card must be securely in its slot for
the unit to function properly. When removing the Compact Flash card you
must FIRST turn the unit off, otherwise you risk losing data and corrupting
the compact flash card file system.
Voice Call Testing
To get up and running right away do the following:
Step 1. Securely install the Compact Flash memory card in the unit.
Step2. After installation, turn on the phones, and turn on power.
Step 3. In the Phone Setup Screen select the correct phones for the phone
connections.
Step 4:In the Main Menu highlight SAM-ALL and press ENTER
Step 5: Use the arrow keys to change screens.
Data Call Testing
To get up and running right away do the following:
Step 1. Securely install the Compact Flash memory card in the unit
Step2. After installation, turn on the phones, turn on power.
Step 3. In the Phone Setup Screen configure for the CDMA or GSM phone
and connect the data-capable phone to the unit.
NOTE: Data testing works only when the direct connect cable is used.
Data testing will not work when the phone is connected to the
unit via the handsfree kit.
Step 4. Enable the Dual-Port Mode. See “Dual-Port Setup . . .:” on
page 39.
Step 5. Configure the Link. See “Link Setup . . .:” on page 38.
Step 6. In the Main Menu highlight SAM-ALL and press ENTER.
Step 7. Use the left/right arrow keys to change screens and go to the “Data
Test” Screen.
Ce manuel convient aux modèles suivants
5
Table des matières
Manuels Équipement de test populaires d'autres marques

SMART
SMART KANAAD SBT XTREME 3G Series Manuel utilisateur

Agilent Technologies
Agilent Technologies BERT Serial Manuel utilisateur

Agilent Technologies
Agilent Technologies N3280A Manuel utilisateur

Vernier
Vernier Go Direct Voltage Manuel utilisateur

Lifeloc
Lifeloc R.A.D.A.R. Manuel utilisateur

Fluke
Fluke T5-600 Instructions d'utilisation et d'installation


