ZK Technology L7000 Manuel utilisateur

Fingerprint Lock User Manual
Version: 1.0
Date: Sept. 2010
About This Manual
This manual introduces the fingerprint lock interface and menu operations. For the
fingerprint lock installation, see the animated installation instructions.
Our products are subject to update from time to time, so our company
will neither make a commitment to guarantee the consistency between the
actual products and this document, nor assume any responsibility for any
dispute arising out of the discrepancy between the actual technical parameters
and this manual. This document is subject to change without prior notice.


Table of Contents
Table of Contents
1. Instruction for Use.....................................1
1.1 Functions Introduction........................................................................ 1
1.2 List of Installation Accessories........................................................... 3
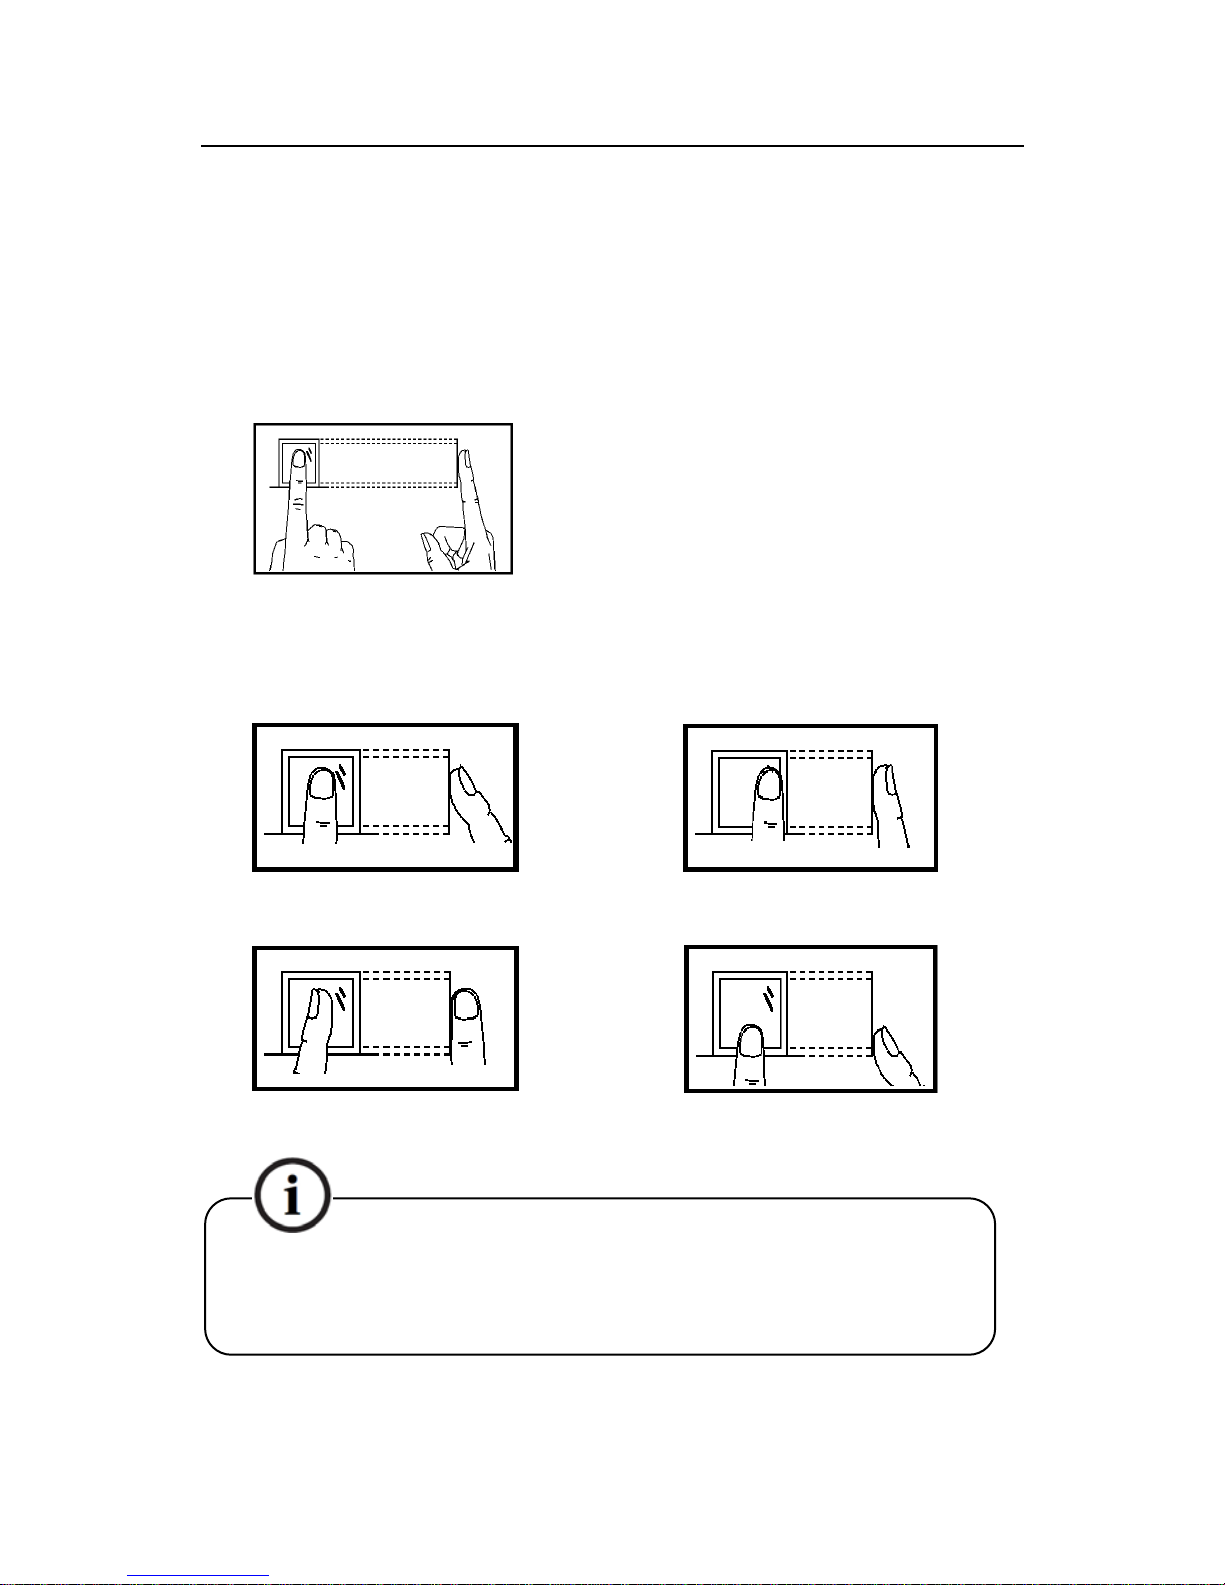
1.3 Fingerprint Press Introduction ............................................................ 5
1.4 Installation Requirements ................................................................... 6
1.4.1 Precautions .................................................................................. 6
1.4.2 Use Backup Battery..................................................................... 8
1.4.3 Backup (Emergency) Mechanical Key........................................ 9
1.4.4 Convert of Unlock Direction ....................................................... 9
1.5 Front and Rear Views ....................................................................... 10
1.6 Precautions ....................................................................................... 13
1.7 User Privileges.................................................................................. 13
1.8 Time Setting...................................................................................... 14
1.9 Operation Overtime .......................................................................... 15
2. Enrollment and Verification....................16
2.1 Enroll an Administrator .................................................................... 16
2.1.1 Enroll a Fingerprint ................................................................... 17
2.1.2 Enroll a Password...................................................................... 18
2.2 Enroll an Ordinary User ................................................................... 19
2.3 Backup Enrollment........................................................................... 21
2.4 User Verification and Set NO Status................................................. 22
2.5 Delete User Information ................................................................... 23
I

Fingerprint Lock User Manual V1.0
II
3. Lock Function and Settings.....................27
3.1 Operation Settings ............................................................................ 27
3.1.1 Operate Alarm Setting ............................................................... 28
3.1.2 Illegal Times.............................................................................. 28
3.1.3 Lock Setting .............................................................................. 29
3.1.4 Verify Mode Setting .................................................................. 29
3.1.5 Normal Open Setting................................................................. 30
3.2 Language Settings ............................................................................ 31
3.3 Advanced Settings ............................................................................ 32
3.4 Browse System Information ............................................................. 34
3.5 Browse Logs..................................................................................... 36
3.6 USB Pen Drive Management (Optional).......................................... 37
4. Conventions on Other Functions............40
4.1 Routine Operation Indications.......................................................... 40
4.2 Administrator Loss Prevention ......................................................... 40
4.3 Battery Low Voltage Protection........................................................ 41
4.4 Program Automatically Exit and Power off...................................... 41
5. Appendix: Technical Specifications........42

1. Instruction for Use
Functions marked with “★” in this manual are only supported by specific product or
customized product and will be marked below.
1.1 Functions Introduction
1. By leveraging the perfect combination of biometrics and cryptography, our
fingerprint locks ensure double security through the fingerprint plus password
unlocking feature.
2. The state-of-the-art Organic LED (OLED) display affords crisp bright readouts
and makes our fingerprint locks intuitive and easy to use. You can simply use
our fingerprint locks with ease after following the operation instructions for
once.
3. Support setting of classified privileges for super administrators, administrators
and ordinary users.
4. Support deletion of all or the specified registered data.
5. Support firmware upgrade, uploading/downloading of user information and
unlocking records through a USB pen drive.
6. Support offline browse of unlocking records.
7. Support accurate display of time and date with annual deviation less than two
minutes.
8. Support temporary supply of backup batteries.
9. You can set the fingerprint locks to be in the Normally Open (NO) state in
special cases.
10. Support display of the battery charge level and generate low voltage alarms.
11. Feature an electric clutch handle design which helps effectively prevent the
fingerprint lock failure caused by damage to the internal structure as a result of
the forced destruction of the handle.
1

Fingerprint Lock User Manual V1.0
12. Single latch lock (support both 60mm and 70mm locks) of American standard
supports deadbolt lock either.
13. The max user capacity is 500 fingerprints. The max unlocking record is 30000
logs.
14. Unlock mode: fingerprint, password, mechanical key.
2

1. Instruction for Use
1.2 List of InstallationAccessories
2 Square shaft of handle
3 Lock body
4 Waterproof washer
5 Rear hold-down plate
6 Screw
7 Rear panel assembly
8 Battery
9 Battery cover
6
15 installation disk
1
6 Mountin
g
p
a
p
er
14 Key
1 Front panel
13 Backup battery
12 Wood grain screws
11 Strike plate
10 Box keep
3

Fingerprint Lock User Manual V1.0
List of Installation Accessories
SN Name Quantity Unit Remarks
01 Front panel assembly 1 Set
02 Square shaft of
handle 2 PCS One need to select base on the
door thickness
03 Lock body 1 Set Single latch lock
04 Waterproof washer 2 PCS Including the one on the front
panel assembly
05 Rear hold-down plate 1 PCS
06 Screw 6 PCS Two of screws need to select
base on the door thickness
07 Rear panel assembly 1 Set
08 Batteries 4 PCS Four pieces of alkaline AA
batteries
09 Battery cover 1 PCS
10 Box keep 1 PCS
11 Strike plate 1 Set
12 Wood grain screws 4 PCS
13 Backup battery 1 PCS 9V
14 Key 2 PCS
15 Installation disk 1 PCS
16 Mounting paper 1 PCS
4

1. Instruction for Use
1.3 Fingerprint Press Introduction
Enroll fingerprint by pressing index finger, middle finger or ring finger (thumb and
little finger are clumsy) .
1) Proper press:
Make finger center pressed on the
sensor window.
2) Improper press:
Upright Too lean
Too downward
Slant
Please adopt the correct way to place the finger to avoid improper
operation led to the identification performance degradation.
5

Fingerprint Lock User Manual V1.0
1.4 Installation Requirements
1.4.1 Precautions
1. The fingerprint lock is applicable to doors of 35–70 mm in thickness. Be sure to
list your special requirements or remarks for fingerprint locks to be installed on
doors in excess of 70 mm in thickness before placing an order.
2. Before ordering or installation of single latch lock, please confirm the
corresponding accessories.
Single latch lock:
3. Please confirm the door opening directions. Assume you are standing outside and
facing a door and then there are four door opening directions: Left inward, left
outward, right inward and right outward. Left inward/outward means the door
swings inward/outward with hinges on the left; right inward/outward means the door
swings inward/outward with hinges on the right, as shown in the following figure:
6
Table des matières


