Yakima HoldUp Plus2 Manuel utilisateur

HoldUp Plus2
1034431D-1/21
IMPORTANT WARNING
ITISCRITICALTHATALLYAKIMA RACKS AND ACCESSORIES BE PROPERLYANDSECURELYATTACHEDTOYOURVEHICLE.IMPROPER
ATTACHMENT COULD RESULT IN AN AUTOMOBILE ACCIDENT, AND COULD CAUSE SERIOUS BODILY INJURY OR DEATH TO YOU OR
TO OTHERS. YOU ARE RESPONSIBLE FOR SECURING THE RACKS AND ACCESSORIES TO YOUR CAR, CHECKING THE ATTACHMENTS
PRIOR TO USE, AND PERIODICALLY INSPECTING THE PRODUCTS FOR ADJUSTMENT, WEAR, AND DAMAGE. THEREFORE, YOU
MUST READ AND UNDERSTAND ALL OF THE INSTRUCTIONS AND CAUTIONS SUPPLIED WITH YOUR YAKIMA PRODUCT PRIOR TO INSTALLATION
OR USE. IF YOU DO NOT UNDERSTAND ALL OF THE INSTRUCTIONS AND CAUTIONS, OR IF YOU HAVE NO MECHANICAL EXPERIENCE AND ARE NOT
THOROUGHLY FAMILIAR WITH THE INSTALLATION PROCEDURES, YOU SHOULD HAVE THE PRODUCT INSTALLED BY A PROFESSIONAL INSTALLER.
SAFETY CLIP (1X)
BASE (1X)
WRENCH (1X)
REAR WHEEL TRAY
ASSEMBLY (1X)
FRONT WHEEL TRAY
ASSEMBLY (1X)
BOLT (1X)
LOCK WASHER (1X)
BOLT (8X)
LOCK WASHER (8X)
WASHER (8X)
INsTAll ThIs
PROducT ON 2"
hITch veRsION Of
The hOlduP
PIN (1X)
PLUG (1X)
KEY (2X)
For Your
Safety
Warranty
Registration
on-line
YAKIMA.com
Safety Kit included:
See additional
instructions for
installation.
Part #1034431 Rev.D

1034431D-2/21
ReMOve eNd cAP
fROM hOlduP.
Using a flathead screwdriver, remove
the end cap from the HoldUp.
INseRT Plus2 BAse INTO hOlduP.
Insert the Plus2
base into the
HoldUp tube,
aligning holes.
Align
INsTAll MAIN BOlT.
Insert bolt,
and lock-
washer in
order shown.
Tighten with
adjustable
wrench.
ROTATe TO uPRIGhT POsITION.
Pull spring pin to
release base.
Lift frame.
Release spring pin. Pin
should snap into place.
75 ft-lbs.
ReMOve fAsTeNeRs.
The fasteners are installed in the trays for shipping
purposes. Remove them to prepare for assembly.

1034431D-3/21
ATTAch fIRsT TRAY TO BAse.
LOWER TRAY:
IMPORTANT: Wheel strap is
to your right, and pivot arm is
to your left.
wheel strap
•Alignholesintraytobecenteredinslotsonbase.
•Installbolt,lock-washer,andwasher,inordershown.
•Fingertightenallfourbolts.
•Tightenwithsuppliedwrench.
pivot arm
17 ft-lbs.
ATTAch secONd TRAY TO BAse.
UPPER TRAY:
IMPORTANT:
Wheel strap is
to your left, and
pivot arm is to
your right.
pivot arm
wheel strap
17 ft-lbs.
•Alignholesintraytobecenteredinslotsonbase.
•Installbolt,lock-washer,andwasher,inordershown.
•Fingertightenallfourbolts.
•Tightenwithsuppliedwrench.

Tuck strap into slot at
rear of whelltray.
Release wheelstrap by pressing
the lever on the buckle.
PRePARe fOR lOAdING.
CAUTION: If any part
of your bike comes in
contact with the red
trigger, do not use this
carrier with that bike.
Note: HoldUp can fold
down past horizontal to
aid in loading your bikes.
lOAd heAvIesT BIKe fIRsT.
Do not install your bike
if tire may go flat or has
a slow leak. Lost tire
pressure after install may
result in an insecure load.
If a fender prevents proper placement
of the wheel hook, remove the fender
for proper and safe loading.
Be sure to return the HoldUp to the locked
horizontal position after loading.
fOld hOlduP dOWN.
Pull spring Pin.
Fold down holdup
Spring pin should
snap into place.
INseRT sTABIlIzeR PIN.
ALWAYS USE
STABALIZER PIN.
Completely insert pin
into hole. Pin will lock
into place.
Use pin when HoldUp
Plus2 is in down
position, or up position.
fOld PIvOT
ARM dOWN.
INsTAll sTABIlIzeR PIN.
Thread plug
through loop
on lanyard.
Firmly press
plug into
hole on base.
Do not push
arm beyond
horizontal.
1034431D-4/21

4X
>
1034431D-5/21
If you have bike to bike interference
when loading two or more bikes,
adjust trays as necessary to eliminate
interference between bikes.
Loosen the 4
tray bolts (do not
remove bolts).
Slide the tray
left or right.
Retighten the 4
tray bolts.
Each tray can be
adjusted.
Rotate the pivot arm up until the
hook rests on the bike tire 1” or
less from the brakes or the fork.
sWING PIvOT ARM INTO PlAce. secuRe The hOOK.
Compress the
hook against
the wheel by
applying firm
pressure.
Refer to steps 11 through 17 to load additional bikes..
Alternate bike direction with each additional bike
lOAd AddITIONAl BIKes.
Failure to place
wheel hook
in the correct
position can cause
your bicycle to
eject, and cause
personal injury,
property damage,
or death.
Feed the strap through the spokes of wheel.
Rotate the wheel
slightly, if necessary.
strap end
through
the top of
the ratchet
buckle.
pad rests on
the rim.
secuRe ReAR Wheel sTRAP. TIGhTeN ReAR Wheel sTRAP.
Move the ratchet tab up and
down to tighten the strap.

1034431D-6/21
Access locking cables at
the end of each pivot arm.
Wrap locking cable
around bike frame.
Insert the pin from the
pivot arm into hole at the
end of the locking cable.
Lock with key.
checK The
INsTAllATION
BefORe
dRIvING AWAY.
ReAd All WARNINGs ON NeXT PAGe BefORe dRIvING AWAY.
AlWAYs use INTeGRATed lOcKING cABle WheN TRANsPORTING BIKes.
Slide the hook
against the rear
wheel cradle.
Fold up HoldUp.
secuRe PIvOT ARMs WheN NOT IN use.
WheN NOT cARRYING BIKes AlWAYs fOld hOlduP uP.
Tilt wheeltray
inboard.
Rotate pivot
arm down.
Fold wheeltray
inboard.

1034431D-7/21
IMPORTANT lOAd lIMITs:
• Never drive off-road with bicycles loaded.
• Do not install on trailers, campers, or RVs.
• Do not position bicycle tires near vehicle’s
hot exhaust.
• Do not install if spare tire causes
interference with bikes or folded carrier.
BIKes:
• Make sure your tires are lled to
recommended pressure found on the tire.
• Do not carry tandem or recumbent bikes.
• Do not transport bicycles with attached
baby seats, panniers, wheel covers, full
bike covers or motors.
TOTAl lOAd fOR 4 BIKes NOT TO eXceed 200 lBs (91 KG).
INsTAll ThIs
PROducT ON 2"
ReceIveRs ONlY.
In addition, some undersized
receivers may not accept this product.
If you do not know the capabilities
of your hitch receiver, consult an
automotive professional.
• Do not use with a hitch-extender.
Remove this rack before entering an
automatic car wash, and when not in use.
MAINTENANCE: Periodically use non-
water soluble lubricant on moving metal
parts. Use a soft cloth with water and mild
detergent to clean rubber parts.
KeeP These INsTRucTIONs!
MAINTeNANce
TECHNICAL ASSISTANCE OR
REPLACEMENT PARTS:
GO ONLINE: WWW.YAKIMA.COM
Contact your dealer or call
(888) 925-4621
Monday through Friday
7:00 am to 5:00 pm PST
Attachment hardware can loosen over time. Check before
each use, and tighten if necessary. Failure to obey load limits
can result in property damage, personal injury, or death.
This product is covered by YAKIMA’s
“Love It Till You Leave It” Limited Lifetime Warranty
To obtain a copy of this warranty,
go online to www.yakima.com
or call (888) 925-4621
TechNIcAl AssIsTANce
HoldUp Plus2
1034431D-8/21
BROCHE DE
SÛRETÉ (X 1)
CLÉS (X 2)
BASE (X 1)
CLÉ (X 1)
SUPPORT ARRIÈRE (X 1)
SUPPORT AVANT (X 1)
BOULON (X 1)
RONDELLE DE
SÉCURITÉ (X 1)
BOULONS (X 4)
RONDELLES DE
SÉCURITÉ (X 4)
RONDELLES (X 4)
Pour
votre sécurité
Validation de
la garantie
en ligne
YAKIMA.com
N'INsTAlleR ce
PROduIT Que suR
le hOlduP POuR
ATTelAGe de
51 MM (2 PO).
Trousse de
sécurité incluse :
voir les instructions
additionnelles pour
son installation.
OuTIls NÉcessAIRes:
AveRTIsseMeNT IMPORTANT:
IL EST IMPÉRATIF QUE LES PORTE-BAGAGES ET LES ACCESSOIRES YAKIMA SOIENT CORRECTEMENT ET SOLIDEMENT FIXÉS AU
VÉHICULE. UN MONTAGE MAL RÉALISÉ POURRAIT PROVOQUER UN ACCIDENT D’AUTOMOBILE, QUI POURRAIT ENTRAÎNER DES
BLESSURES GRAVES OU MÊME LA MORT, À VOUS OU À D’AUTRES PERSONNES. VOUS ÊTES RESPONSABLE DE L’INSTALLATION
DU PORTE-BAGAGES ET DES ACCESSOIRES SUR VOTRE VÉHICULE, D’EN VÉRIFIER LA SOLIDITÉ AVANT DE PRENDRE LA ROUTE ET
DE LES INSPECTER RÉGULIÈREMENT POUR EN CONTRÔLER L’ÉTAT, L’AJUSTEMENT ET L’USURE. VOUS DEVEZ DONC LIRE ATTENTIVEMENT TOUTES
LES INSTRUCTIONS ET TOUS LES AVERTISSEMENTS ACCOMPAGNANT VOTRE PRODUIT YAKIMA AVANT DE L’INSTALLER ET DE L’UTILISER. SI VOUS
NE COMPRENEZ PAS TOUTES LES INSTRUCTIONS ET TOUS LES AVERTISSEMENTS, OU SI VOUS N’AVEZ PAS DE COMPÉTENCES EN MÉCANIQUE ET
NE COMPRENEZ PAS PARFAITEMENT LA MÉTHODE DE MONTAGE, VOUS DEVRIEZ FAIRE INSTALLER LE PRODUIT PAR UN PROFESSIONNEL.
GOUPILLE (X 1)
BOUCHON (X 1)
1034431D-9/21
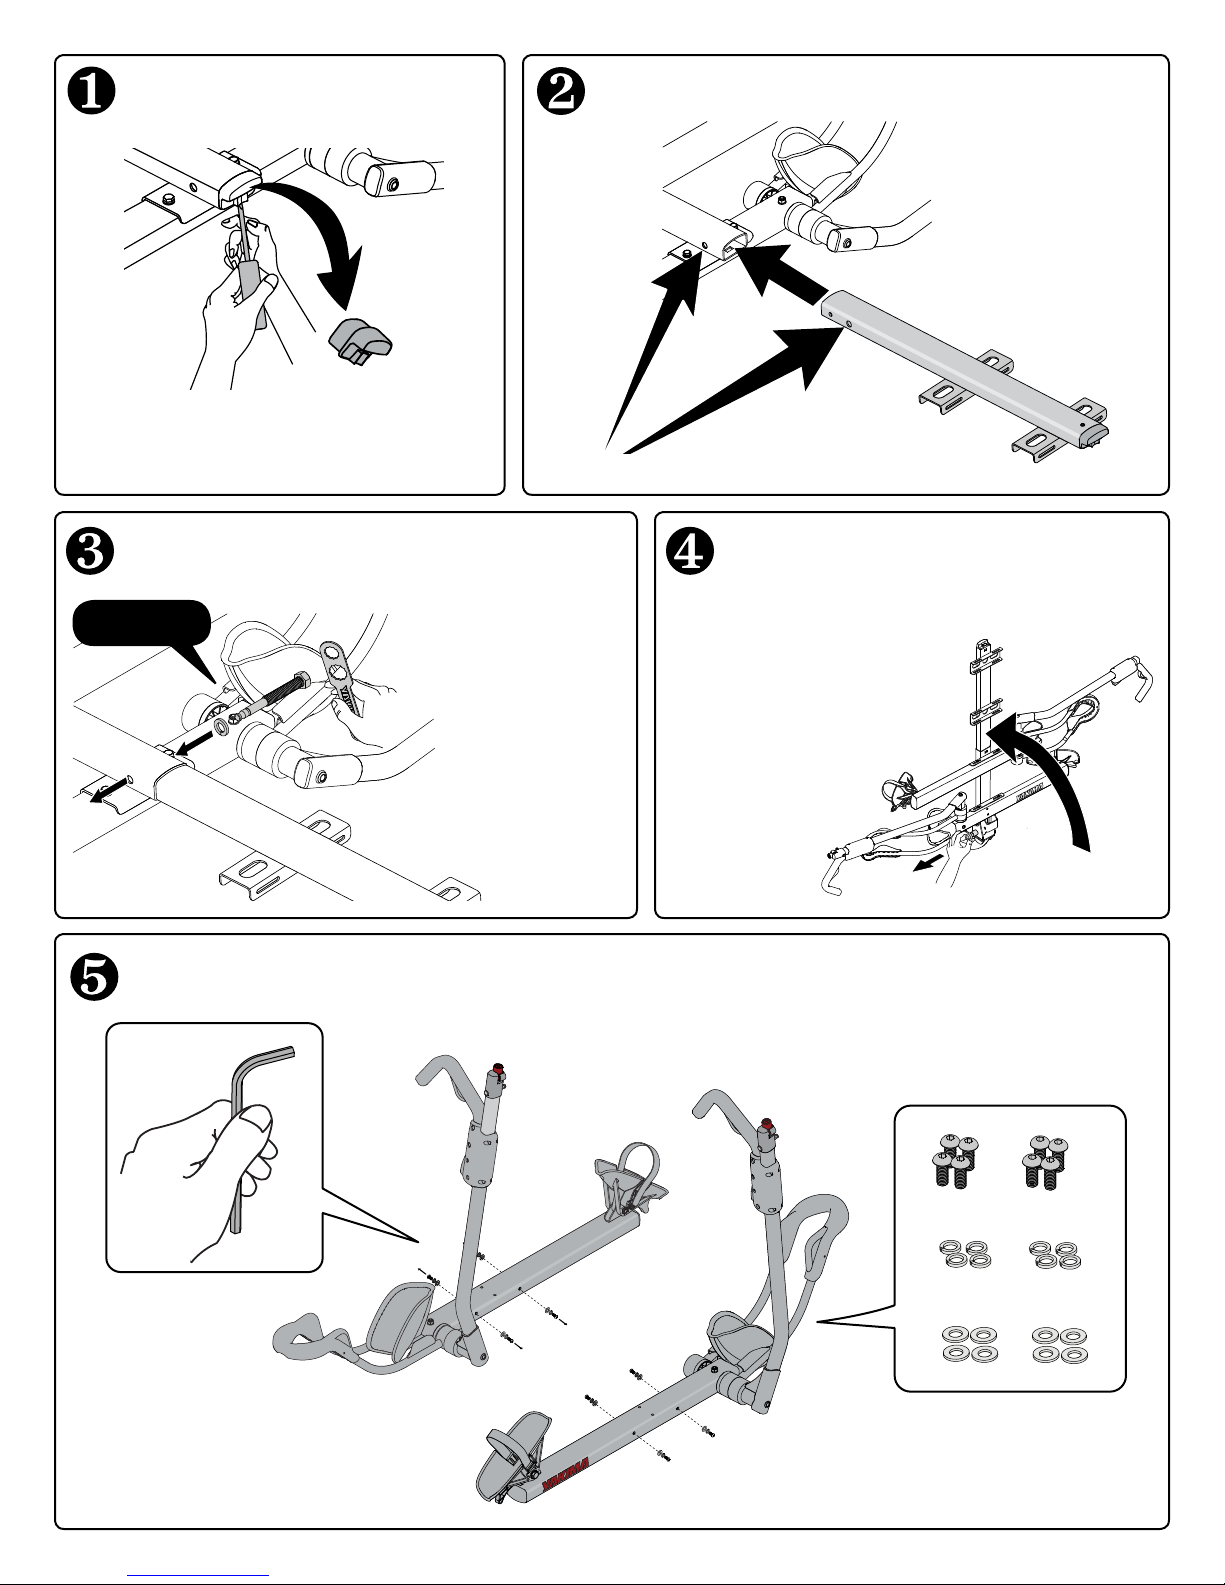
eNleveR le BOuchON
d'eXTRÉMITÉ du hOlduP.
À l'aide d'un tournevis plat, enlever
le bouchon d'extrémité du HoldUp.
eNfIleR lA BAse du Plus2
dANs le hOlduP.
Enfiler la base du
Plus2 dans le tube
du HoldUp, en
alignant les trous.
Aligner
INsTAlleR le
BOulON PRINcIPAl.
boulon et le
rondelle de
sécurité dans
l'ordre illustré.
clé à molette.
ReleveR lA BAse eN
POsITION veRTIcAle.
pour libérer la base.
devrait se verrouiller en
place.
eNleveR les BOulONs.
Les boulons sont vissés dans les supports pour le
transport. Les enlever avant de procéder au montage.
75pi/lb

1034431D-10/21
fIXeR le deuXIÈMe suPPORT À lA BAse.
SUPPORT SUPÉRIEUR :
IIMPORTANT : lacer la
courroie crantée à gauche
et le bras pivotant à droite.
Bras pivotant
Courroie crantée
fIXeR le PReMIeR
suPPORT À lA BAse.
SUPPORT
INFÉRIEUR :
IMPORTANT : Placer
la courroie crantée
à droite et le bras
pivotant à gauche.
Bras pivotant
Courroie crantée
Centrer les trous du support dans les rainures de la base.
Enfiler les boulons, les rondelles de sécurité et les
rondelles plates dans l'ordre illustré.
Serrer avec la clé fournie.
17pi/lb
17pi/lb
Centrer les trous du support dans les
rainures de la base.
Enfiler les boulons, les rondelles de sécurité
et les rondelles plates dans l'ordre illustré.
Serrer avec la clé fournie.
Autres manuels pour HoldUp Plus2
3
Table des matières
Langues :
Autres manuels Yakima Accessoires pour vélos


