XtendLan VIP-150W Manuel utilisateur

VIP-150W
VoIPWiFi Phone
User’s Guide

VIP-150W User’s Guide
-2-
Contents:
1.
Introduction
, ........................................................................................................................3
2.
Setup
.....................................................................................................................................4
2.1 Install the battery ..................................................................................................................................... 4
2.2 Power on.................................................................................................................................................. 4
2.3 Setup the necessary parameter................................................................................................................. 4
2.3.1 Setup Wireless.................................................................................................................................. 5
2.3.2 Setup IP address ............................................................................................................................... 5
2.3.3 SIP Setting........................................................................................................................................ 5
2.3.4 STUN & UPnP Setting..................................................................................................................... 5
3.
Make/Receive a call
.............................................................................................................5
3.1 Make a call by number ............................................................................................................................ 5
3.2 Make a call by IP address........................................................................................................................ 6
3.3 Received a call ........................................................................................................................................ 6
4.
Advance
setup
......................................................................................................................6
4.1 Login ....................................................................................................................................................... 6
4.2 Management Setting................................................................................................................................ 8
4.3 Management Setting – Restore Factory Setting.............................................................................................. 9
4.4 Management Setting – Firmware update ................................................................................................ 9
4.5 Network Setting – DHCP...................................................................................................................... 10
4.6 Network Setting – PPPoE ..................................................................................................................... 10
4.7 Network Setting – Static IP ................................................................................................................... 11
4.8 SIP Setting – SIP Phone Setting, Registrar and Outbound Proxy Server ............................................. 11
4.9 SIP Setting – Message Server ............................................................................................................... 12
4.10 SIP Setting – Others ............................................................................................................................ 13
4.11 SIP Account Settings ........................................................................................................................... 14
4.12 STUN Setting – STUN Server Setting, UPnP Setting ........................................................................ 15
4.13 Voice Setting and QoS......................................................................................................................... 16
4.14 Phone Settings – Phone Setting........................................................................................................... 17
4.15 Phone Setting – Timer......................................................................................................................... 18
4.16 Phone Book ......................................................................................................................................... 19
5.
5.Advance
function
............................................................................................................20
5.1 Phonebook Edit/ Browse ....................................................................................................................... 20
5.2 Call log .................................................................................................................................................. 20
5.3 Phone Setting......................................................................................................................................... 20
5.3.1 Melody ........................................................................................................................................... 20
5.3.2 Image.............................................................................................................................................. 20
5.3.3 Time................................................................................................................................................ 20
6.
Java
.....................................................................................................................................21
6.1 Play JAVA game .................................................................................................................................... 21
6.2 JAVA download process........................................................................................................................ 22
7.
7. Firmware upgrade.
........................................................................................................23

VIP-150W User’s Guide
-3-
1.
Introduction
,
This VoIP WiFi Phone is an innovation of combining the most popular communication technology,
WLAN and VoIP.
The VoIP use the most popular standard that could easily connect with other VoIP service (ITSP,
Voice over Broadband) or VoIP components (IP PBX, IP Centrex, SIP Proxy).
The WLAN use the IEEE802.11b, which is most wide deployed everywhere.
The user interface designs just same as the Cellules phone. So, user could easily use without any
learning curve. It is also as stable and powerful like the mobile phone. The phone comes with 2.2 inch
TFT LCD display that can bring a very nice user interface. The phone builds in the Java virtual
machine. It can download any J2ME shareware from the internet.
Description:
Display Speaker/Receiver
Side key
3 Soft key
Ear set Jack
Navigation Key
Off-Hook
On-hook
Microphone
Numeric key
VIP-150W User’s Guide
-4-
2.
Setup
2.1 Install the battery
•Pull down the battery cap by push the battery cap lock.
•Then move battery cap upward to open.
•Put in the battery.
•Put back the battery cap while the top of the cap is 3mm gap.
•Push the cap toward to the top until you hear the click from the lock.
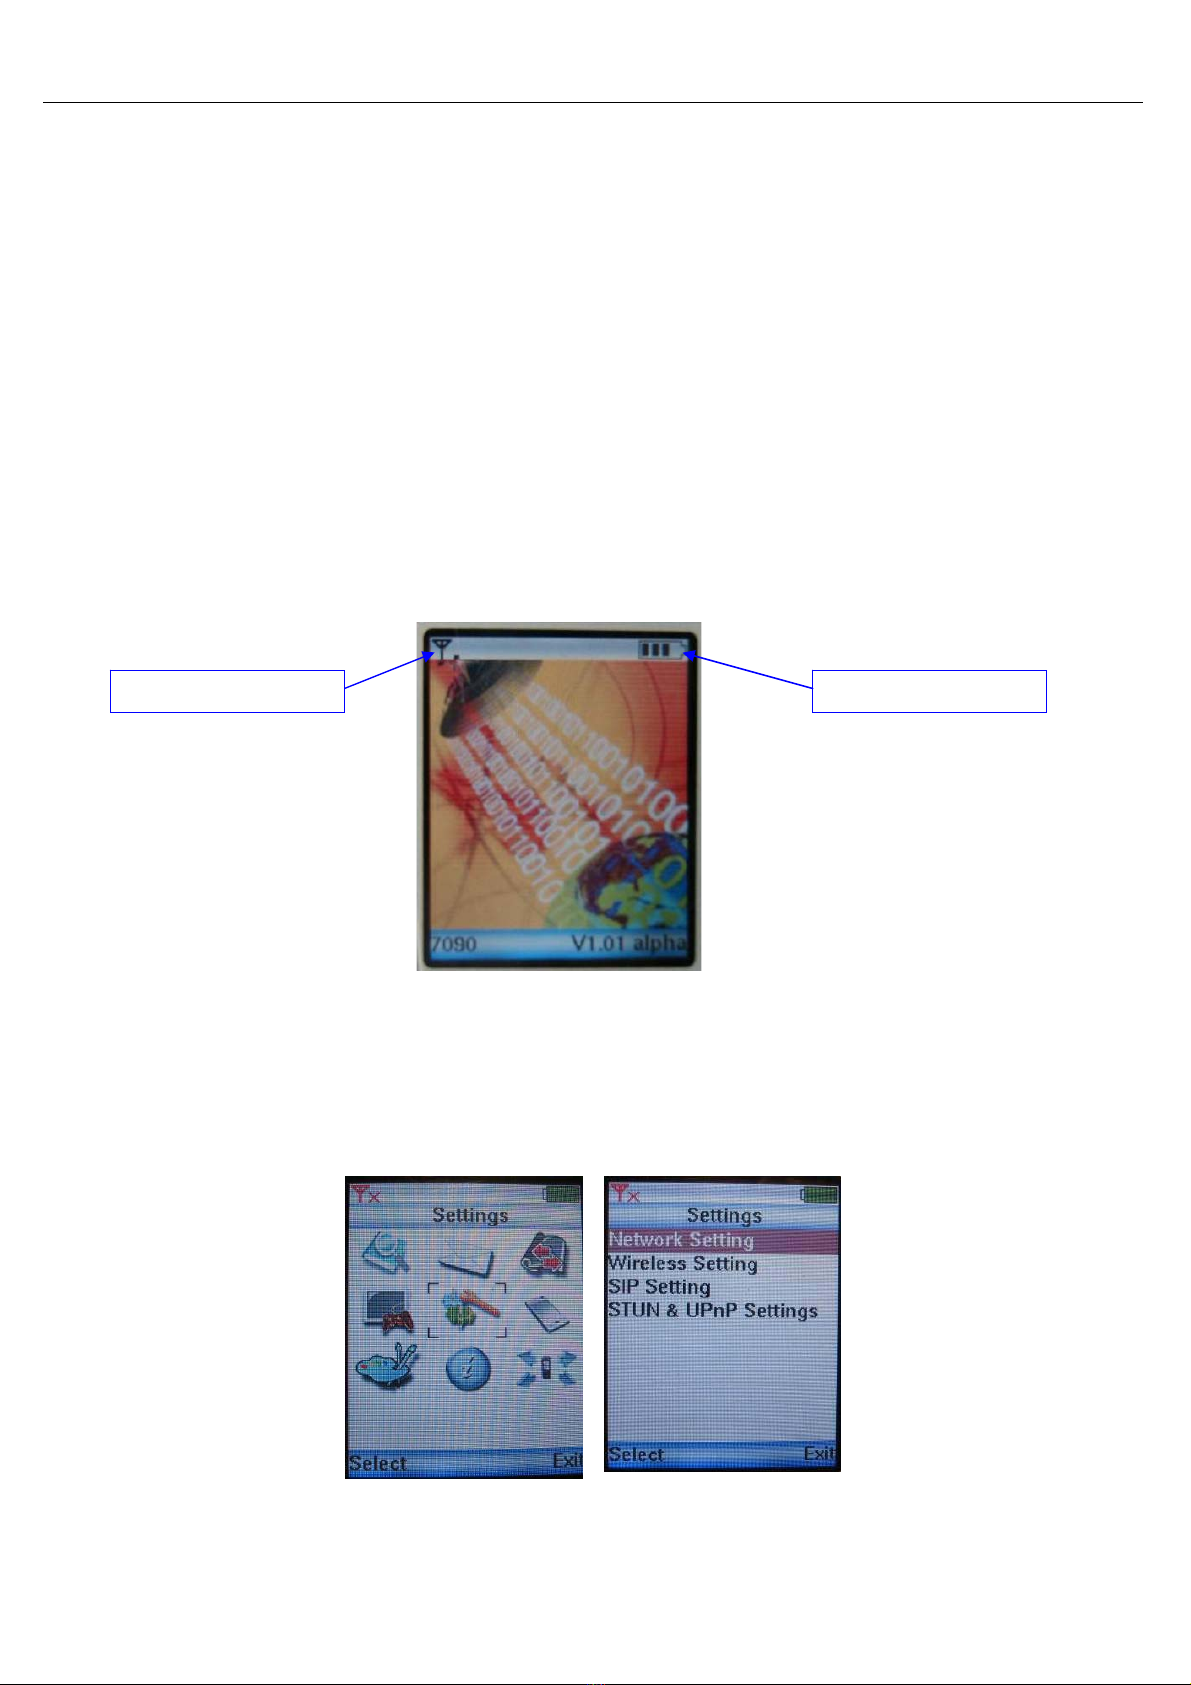
2.2 Power on
The first time battery should be fully charged. Usually it will take 2 hours for normal charge. Turn on the
power by press the [on-hook/PWR] key for more than 3 sec. It will show the boot up sequence. (Scan AP/
Network Initializing/ DHCP Initializing/ DSP Initializing). When the phone boots up ok, it will show the
following screen.
WLAN signal strength Battery status
2.3 Setup the necessary parameter
Setup mode, press middle Softkey in the standby display, it will show 9 icons. Press [Select] while
move the icon to {Settings}. It will show the following screen.
Main menu Settings

VIP-150W User’s Guide
-5-
2.3.1 Setup Wireless
•The 1
st
time when you boot up the phone, it will automatically search for the available AP. You
can also select by yourselves by following Step.
•Select <Wireless Setting>, use up/down navigation key by scroll in the Setting Menu and press
[Select] Softkey.
•Select <SSID>, select {ESSID} in the wireless setting menu.
•It will show available AP. Then, select the one you want to connect.
•Press [Select] to connect. When go back to the <Wireless Setting>, press [Exit] to exit.
2.3.2 Setup IP address
•Default IP address is DHCP. You can also setup manually.
•Select <Network Setting>, use up/down navigation key by scroll in the Setting Menu and press
[Select] Softkey.
•Select <IP Address> by press [Select].
•Input IP address, press [OK] to go back to Network setting menu.
•Do it in as the same way to the Subnet Mask and Default Gateway.
2.3.3 SIP Setting
•Use the same way as 2.4.2. to input the SIP display name/SIP Account Name/ SIP Password/SIP
Port/ SIP Server.
•The UP key stand for toggle of the number and English character.
2.3.4 STUN & UPnP Setting
•When you are behind the NAT. you should setup the STUN or UPnP to enable the NAT traversal
function.
•The UPnP will support in some NAT router. Enable the UPnP function of router by reference to
the operation manual of your router.
3.
Make/Receive a call
3.1 Make a call by number
Dial number and press [off-hook], if you have already registered to
the SIP server. When the call is valid, then it will show the ringback.
You could hear the ring back tone and wait for the callee to answer
the call.

VIP-150W User’s Guide
-6-
Once the callee answers the call, it will show the talking. At this moment, you will not hear the ring back
tone and begin to talk each other.
3.2 Make a call by IP address
You could dial by IP address as well. Dial IP address, “*” stand for “.” in the IP address.
3.3 Received a call
When hear ring Melody, press [off-hook] to answer.
4.
Advance
setup
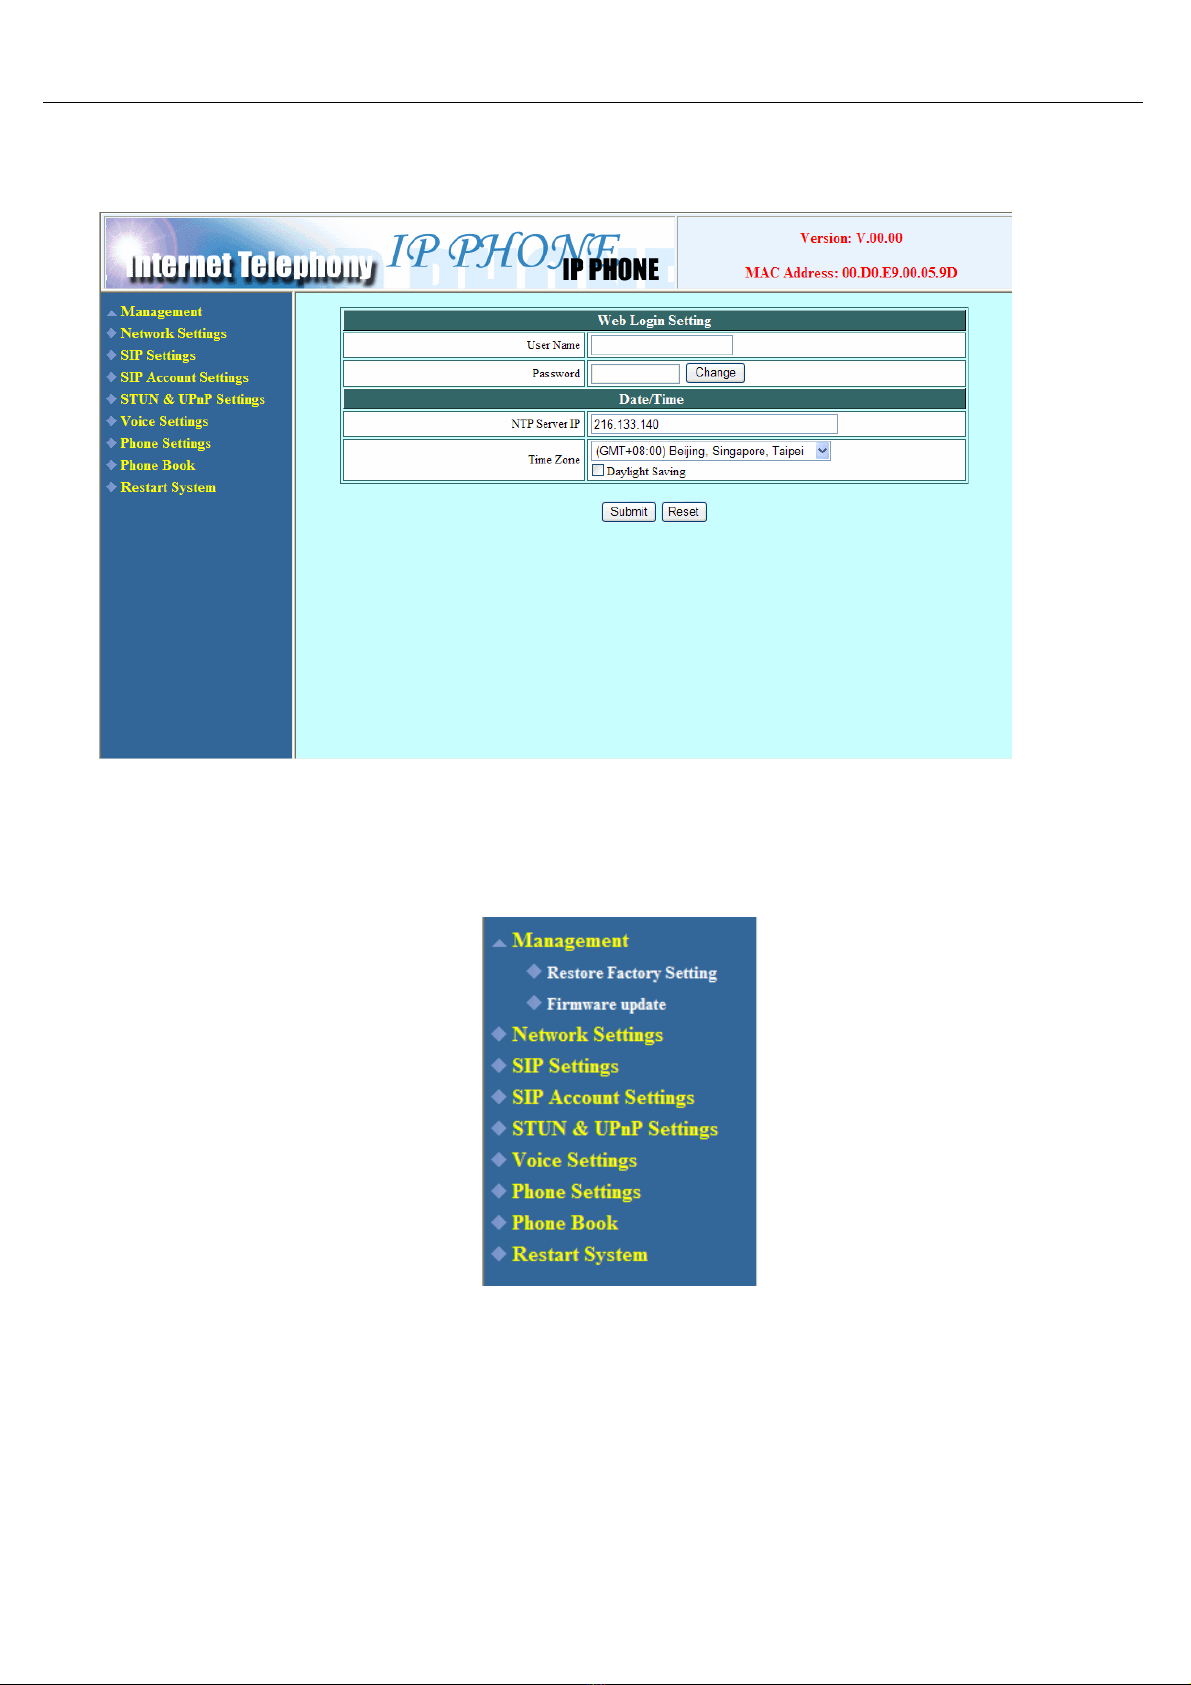
This VoIP WiFi Phone equipped with web server for system configuration. User could use the most
popular web browser (e.g. Microsoft IE, Netscape) to setup this WiFi phone.
Use browser by typing http://IP_address:9999
in the URL to begin the setup procedure. Some of the advanced function could be done by
only
4.1 Login
It will popup a new window for user to input the ID and password. After enter the correct ID and
password then press enter.
Default ID and password are blank.
VIP-150W User’s Guide
-7-
After input the correct ID and password it will show the main page for the web configuration as
below.
You could click the item to setup on the left menu. Some of the item (Management) will extend to the
submenu when you click the on the icon. Click again on the item to collapse the submenu.

VIP-150W User’s Guide
-8-
4.2 Management Setting
User Name Configuration menu login name.
Password Configuration menu login password.
NTP Server IP Network Time Protocol (NTP) is a protocol used to help match your system
clock with an accurate time source (such as atomic clock, time server). It is
good practice to have all your networked computers synchronized with one
server.
Time Zone Select your time zone. If there is daylight saving in your area, click the
check box.

VIP-150W User’s Guide
-9-
4.3 Management Setting – Restore Factory Setting
Click on Management. Select Restore Factory Setting and the above screen will display on the screen.
Restore Factory
Setting
Restores all the settings back to factory default settings.
4.4 Management Setting – Firmware update
FTP server, login ID, login password and firmware filename are preset when you purchase the phone.
These are required to download and update the firmware.
FTPServer FTP Server address.
Login ID Login ID provided by your supplier.
Login Password Login password provided by you supplier.
Firmware
Filename
Updated firmware filename. Do not change the file name unless specified
by your supplier.

VIP-150W User’s Guide
-10-
4.5 Network Setting – DHCP
Select DHCP if you have cable internet.
DHCPServer Dynamic Host Configuration Protocol (DHCP) Server address. This IP
address information is obtained automatically from your ISP.
4.6 Network Setting – PPPoE
(* Current version of firmware does not support PPPoE function)
Choose PPPoE if your ISP uses PPPoE. Most DSL users use PPPoE.
PPPoE ID PPPoE ID/username provided by your ISP.
PPPoE Password PPPoE password.
DNS Server DNS address provided by your ISP.
Table des matières
Autres manuels XtendLan Téléphone IP


