XPG XENIA 15 Manuel utilisateur

MODEL NO.: XENIA 15
REGULATORY MODEL: KC57
XPG XENIA 15
GAMING NOTEBOOK
QUICK
START
GUIDE

Quick Start Guide
Guía de Inicio Rápido
快速使用手冊
快速使用手册
EN
ES
TC
SC
01
21
41
61
Product Overview
0201
B
C
G
H
I
K
J
L
E
A
F
D
A
B
E
F
G
H
I
J
K
L
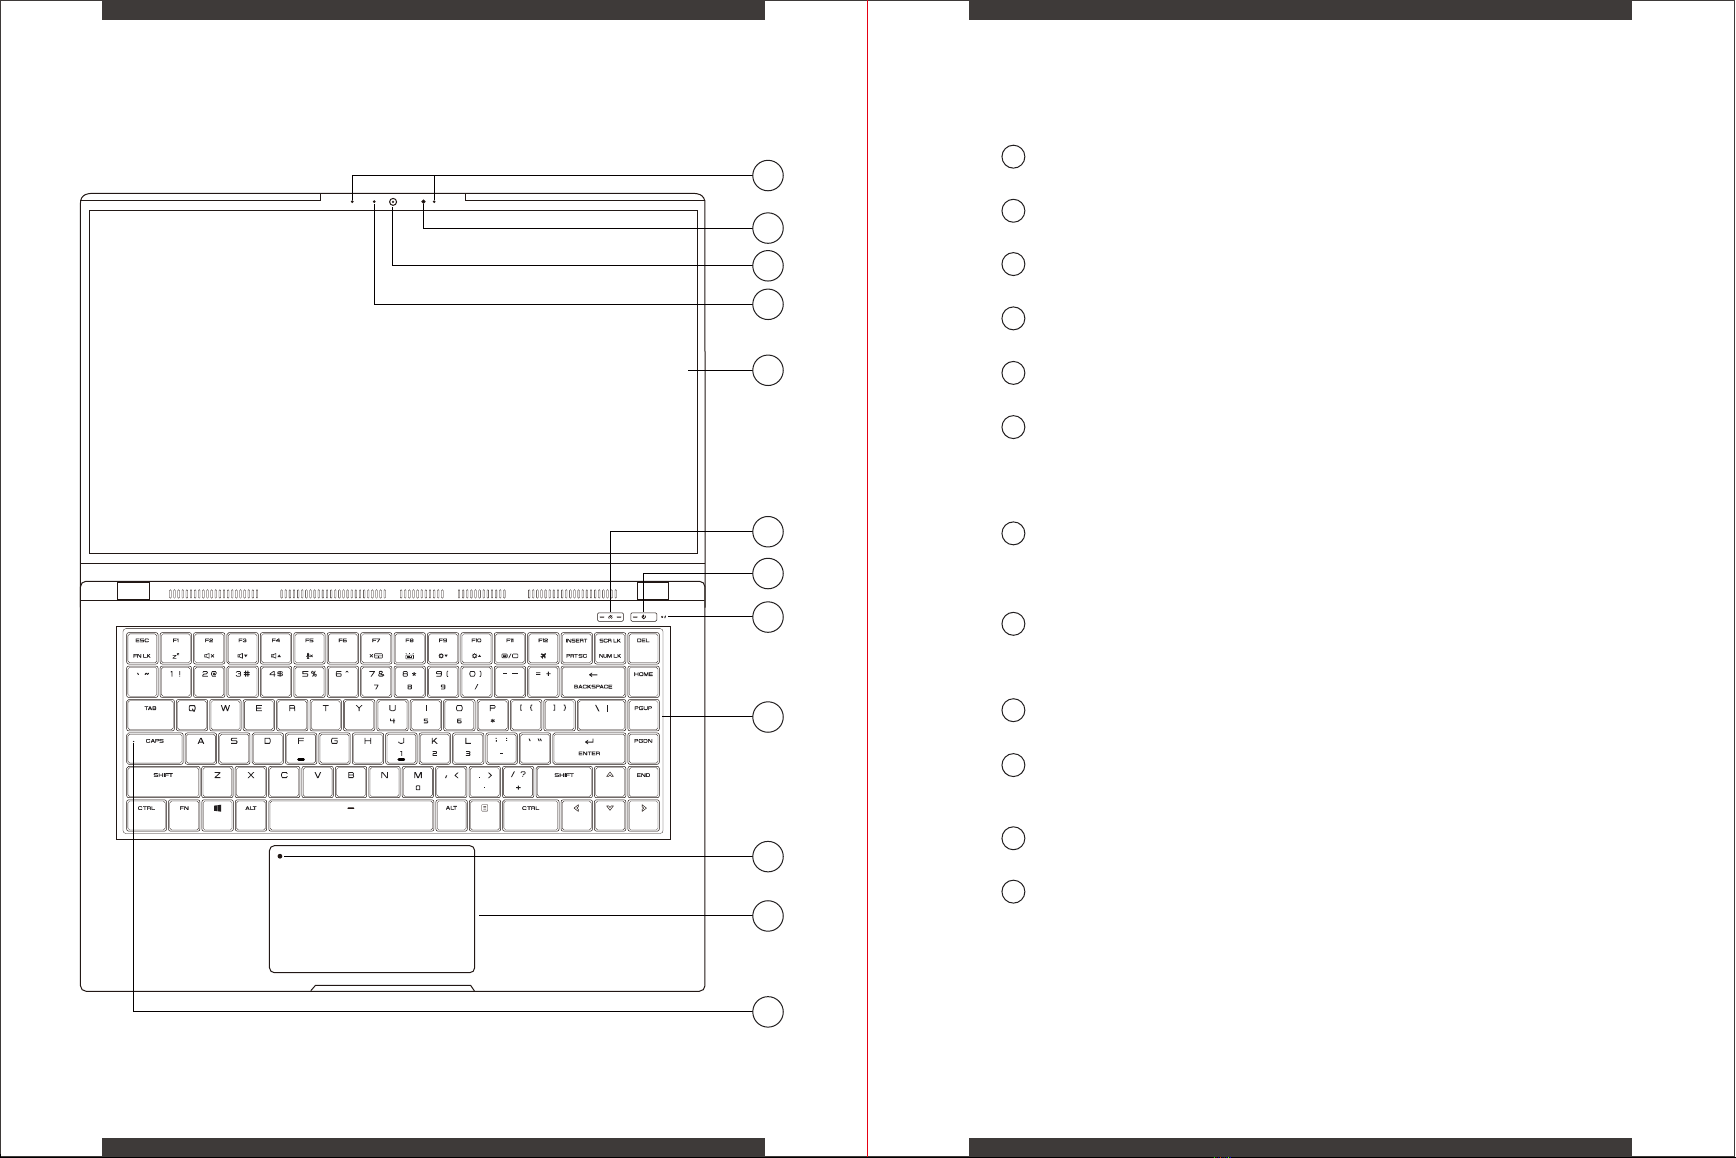
LCD Screen
Internal display/panel
Digital Microphones
Dual built-in microphones
Infrared LED
Used to support Windows Hello feature
C
D
Camera
High Definition Camera
Blue LED
Camera Activity Indicator
Caps Lock Status Indicator
Caps Lock ON: Indicator On
Caps Lock OFF: Indicator Off
Power Button and Power LED
Press once - turn the laptop on
In Windows - notify to power off, or enter sleep mode.
Indicator LED - Power On: White, Power Off: Off, Suspend: Blinking White
Touchpad/Clickpad
Touch-sensitive pointing device which functions like a mouse
Touchpad Enable/Disable Switch with Indicator
Double tap to enable or disable the touchpad.
Indicator will turn on when the touchpad is disabled.
Charging and Battery LED
Battery Low (<6%): Amber
Charging (Power ON): Blinking White, Charging (Power OFF): Blinking White
Charging Finish (with AC): White, Charging Finish (without AC): Off
Keyboard
Silent Mechanical Keyboard with RGB Backlight
Mode Button
Selects operating mode when the laptop is powered on:
Battery Saver – Both Indicators are off
Balanced - Left indicator is on
Performance - Both indicators are on
Right Side Left Side
A
B
C
A
B
C
D
0403
ABD
C
AB
C
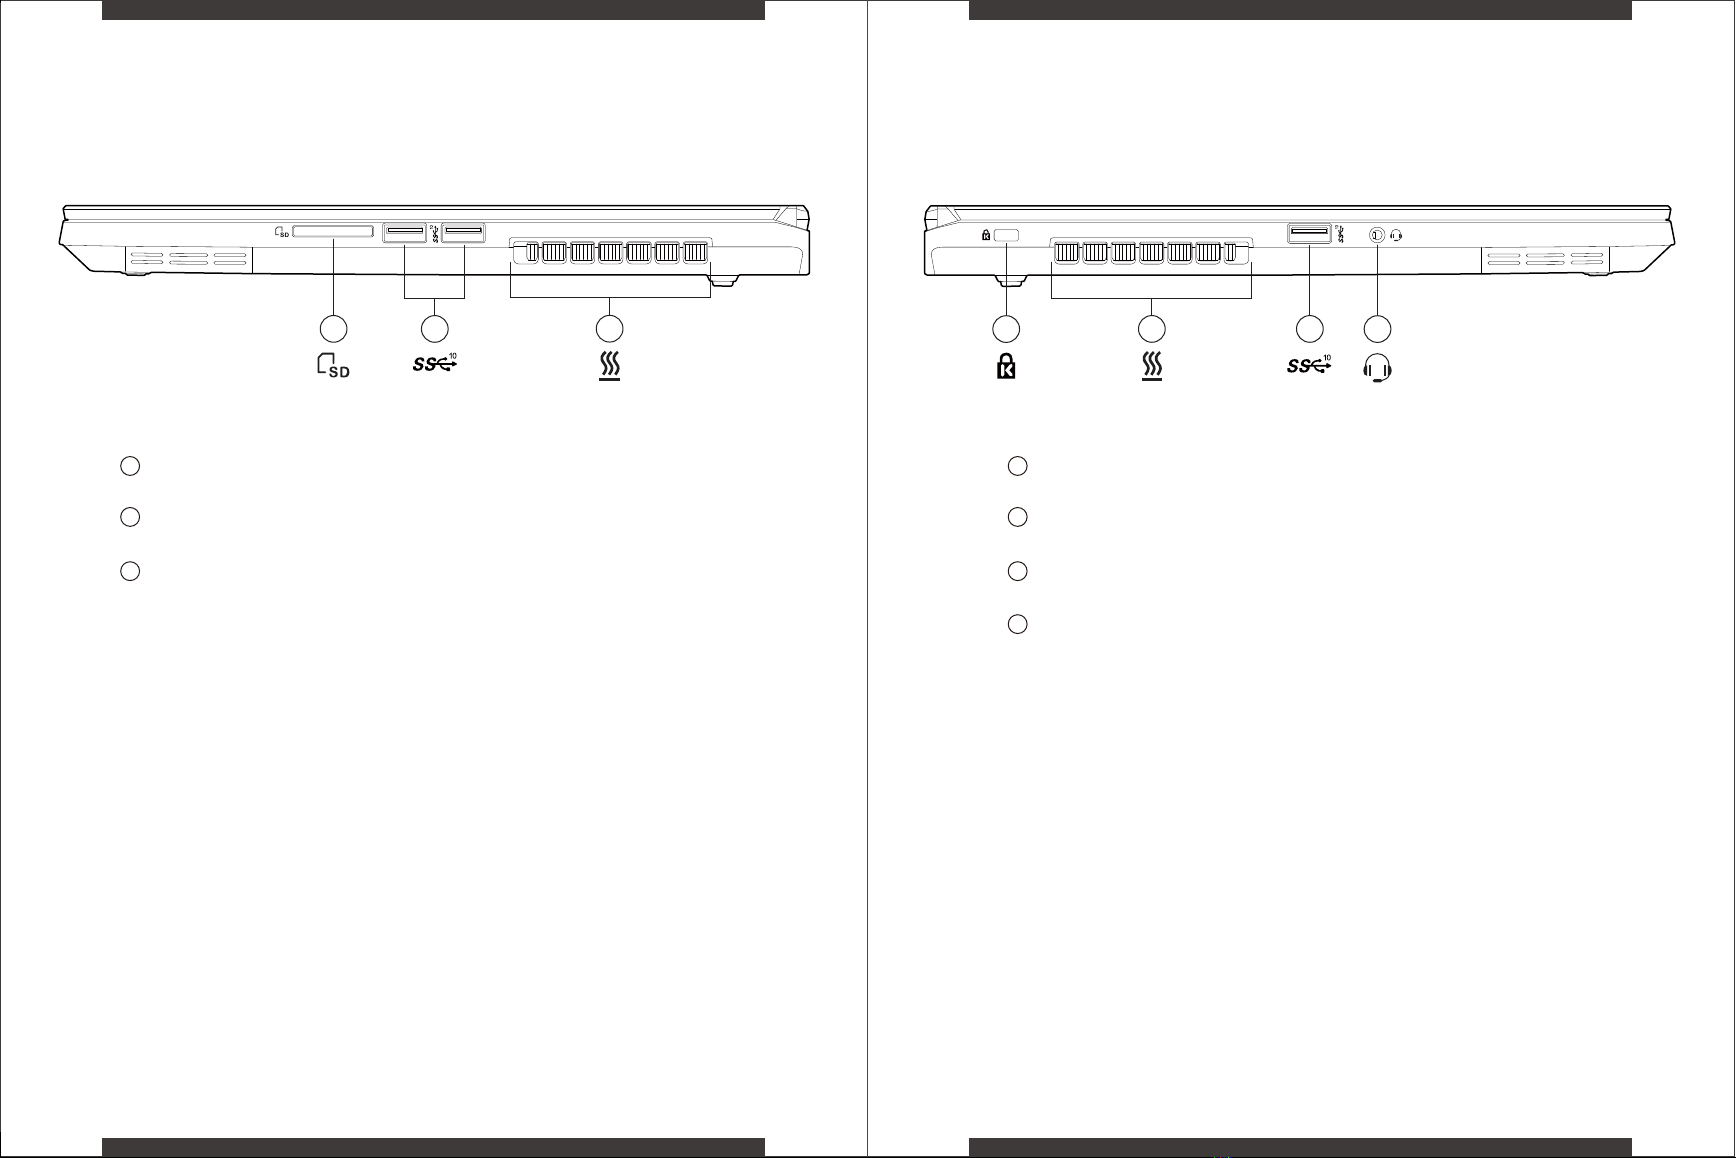
Vents
The thermal vents are designed to cool the internal components and avoid overheating
USB 3.2 Gen2 Port
Connect any USB device into this port, such as a USB flash drive, keyboard, or mouse.
2 in 1 Card Reader
Support for SD/SDHC/SDXC memory cards
USB 3.2 Gen2 Port
Connect any USB device into this port, such as a USB flash drive, keyboard, or mouse.
Kensington Lock
Anti-theft key lock hole
Vents
The thermal vents are designed to cool the internal components and avoid overheating
Headset Jack
Connect amplified speakers or headphones into this jack

Bottom Side Front Side
Back Side
0605
A
CB
A
B
C
Vents
The thermal vents are designed to cool the internal components and avoid overheating
Back Cover Screws
Modification of any of the laptop’s components will void the warranty
Speakers
Stereo audio output
A
RGB Light Bar
May be controlled through NUC Software Studio
D
B EC
A F
A
A
B
E
F
Power Connector
Connect the AC adapter into this connector
Vents
The thermal vents are designed to cool the internal components and avoid overheating
Thunderbolt™ 4 Port
Connect any USB Type C or Thunderbolt™ device into this port, such as a USB Flash drive or an
external storage device. This port will also support displays using a Type-C to DisplayPort cable.
C
D
HDMI Port
Supports high-definition digital video connections
Network Jack (RJ-45)
This jack lets you connect to a Local Area Network (LAN)
Vents
The thermal vents are designed to cool the internal components and avoid overheating
0807
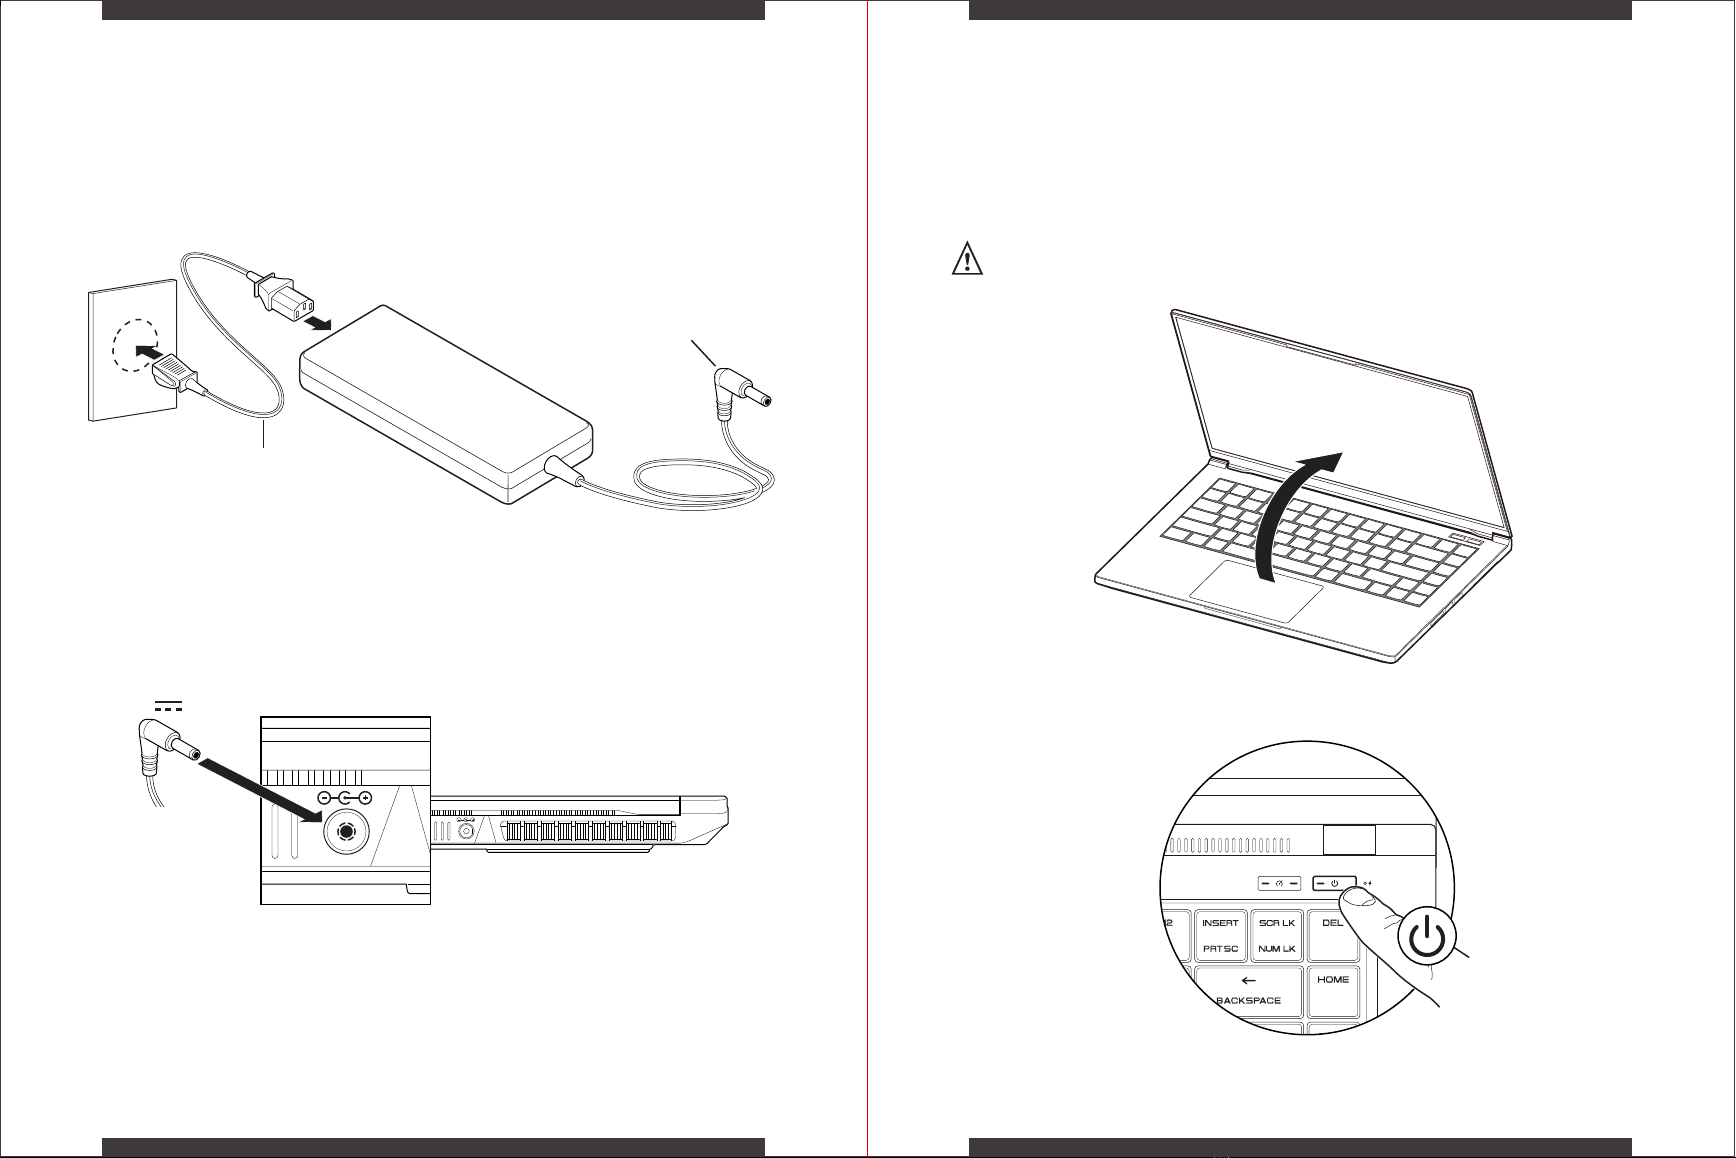
Preparing Your Computer
Connect the power cord to the AC adapter then to a grounded 100-240VAC outlet.
Connect the AC adapter’s DC output plug to the DC IN jack on the back of the system.
Caution: Risk of shock or fire. Do not use power cord if damaged.
Please reach out to place of purchase for replacement.
20V
AC
ADAPTER
Power Cord
DC Output Plug
The display panel can be opened to a wide range of angles for optimal viewing.
Press the power button to turn on your laptop computer.
Attempting to force the lid open beyond 180 degrees will cause damage to
the hinges and/or the display.
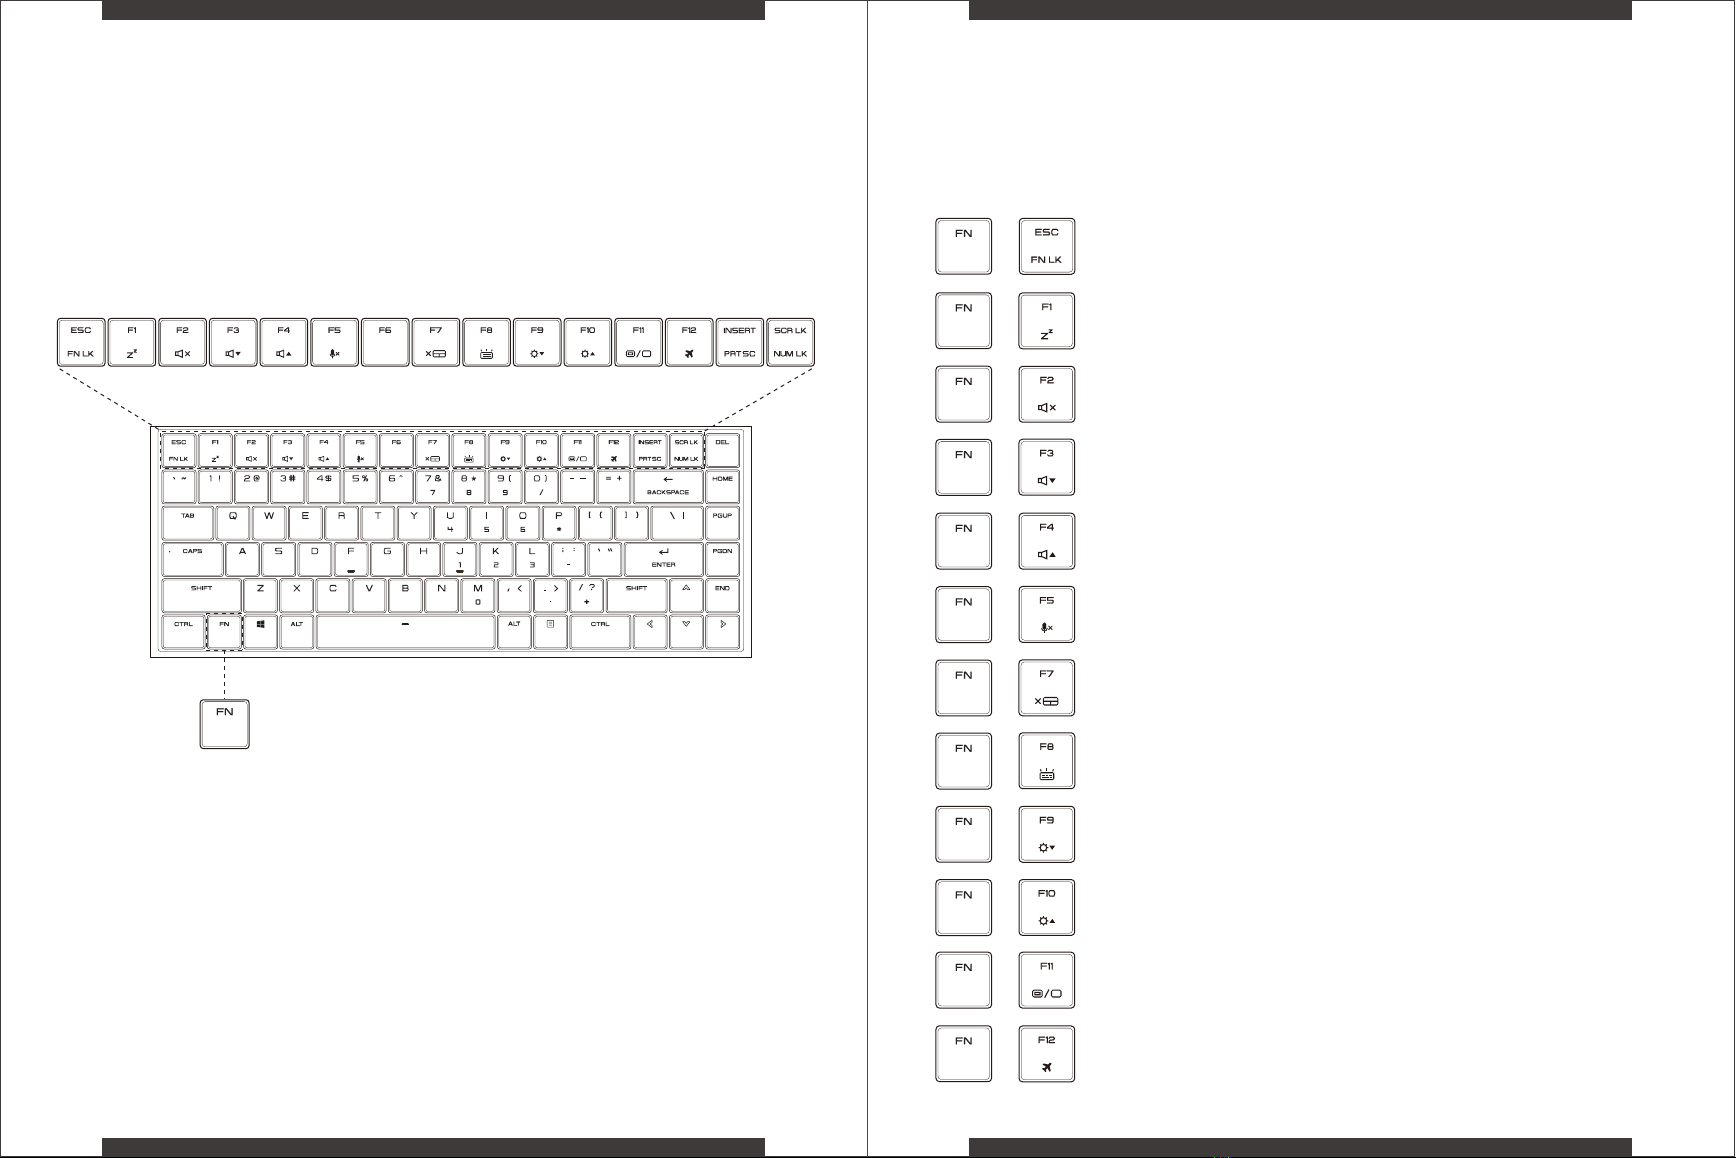
Understanding the Keyboard
To activate these functions, press the hotkey associated with the desired function as
indicated below:
1009
The following defines the row of function keys which also contain a secondary
hotkeys/shortcuts which can be accessed by pressing and holding down the Function
Key (FN) while simultaneously pressing the desired hotkey/shortcut.
+
Function
Lock:
Press this key combination (FN + ESC) to toggle control for
primary/secondary Fn row assignment.
+
Sleep: Press this key combination (FN +F1) to initiate low power state.
+
Mute
Audio:
Press this key combination (FN + F2) to toggle between mute
and unmute.
+
Volume
Down:
Press this key combination (FN + F3) to turn the audio volume
down.
+
Volume Up: Press this key combination (FN + F4) to turn the audio volume
up.
+
Press this key combination (FN + F5) to toggle enable/disable
for the integrated microphones.
+
Press this key combination (FN + F7) to toggle enable/disable for
the clickpad.
+
Press this key combination (FN + F8) to toggle control for
keyboard brightness between off, 50%, full.
+
Press this key combination (FN + F9) to decrease screen
brightness.
+
Press this key combination (FN + F10) to increase screen
brightness.
+
Press this key combination (FN + F11) to initiate secondary
monitor display mode.
+
Press this key combination (FN + F12) to turn Wireless and
Bluetooth® on or off.
Mic
Disable
(Mute):
Clickpad
Enable/
Disable:
Keyboard
Brightness:
Screen
Brightness
Down:
Screen
Brightness
Up:
2nd Monitor
Control:
Airplane
Mode:
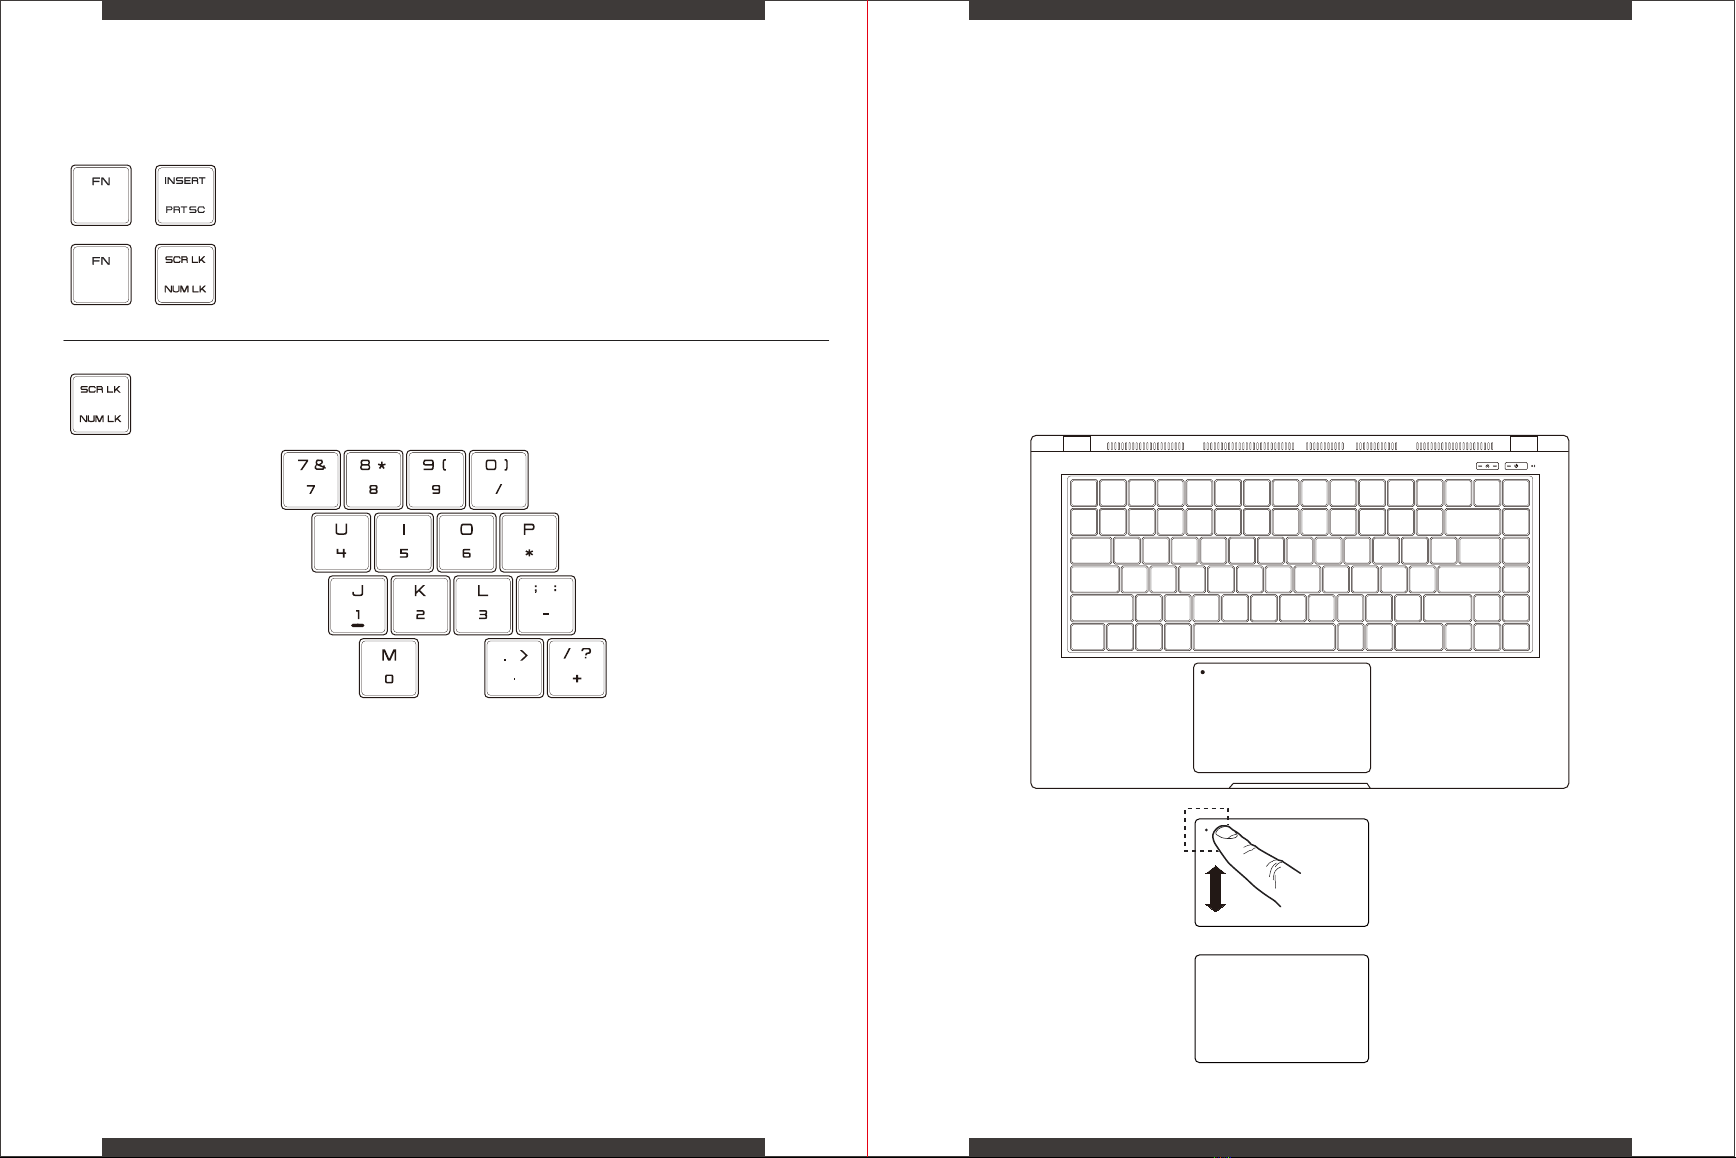
Using the Touchpad/Clickpad
1211
+
PRT SC: Press this key combination (FN + PRT SC) to send the current screen
image to the printer.
+
NUM LK: Press this key combination (FN + NUM LK) to toggle enable/disable
for the number lock.
Press NUM LK to enable the Embedded Keypad.
The touchpad / clickpad is a rectangular electronic panel located just below your
keyboard. Clicking twice within the 15mm x 15mm corner in the top left will enable or
disable (lighted indicator) touchpad functionality. You can slide your finger on the
static-sensitive panel of the touchpad / clickpad to move the cursor.
Press the left and right bottom corners located on the bottom edge of the touchpad /
clickpad to make selections and run functions. These two buttons are similar to the left
and right buttons on a mouse. Tapping on the touchpad / clickpad produces similar
results.
x2
LEFT RIGHT
Touchpad/Clickpad
Use these bottom corners
similar to mouse buttons
Click twice here to enable
or disable the touchpad

1413
Customize Your Laptop Configuration
Intel® NUC Software Studio is an application for customizing
the laptop functionality.To launch, click the Intel® NUC
Software Studio icon that is on the desktop or in the tray.
Allows you to enable/disable the following system settings using the toggle button:
System Configuration
Number Pad
Enable or Disable number lock functionality
Windows Key
Enable or Disable windows key functionality. (Gaming mode)
Function Key Lock
Enable or Disable Fn lock.
Trackpad Pad Toggle
Enable or Disable upper left corner button on touch pad that enables/disables the touch
pad functionality. (Gaming Mode)
On-Screen Display
Enable or Disable on-screen display for function keys, performance modes, & other features.
Battery Charge Lim it:
Allows you to customize the battery charge limit to any value between 50-100% using
the control arrow. Selecting a lower charge limit can improve the system battery health.
Optimal value is 60%.
This feature allows the user to switch between Display Profiles with varying
Brightness, Contrast and Color. There are 5 pre-setting can be selected:
Standard (default), Gaming, Video, Reading, & Custom.
Each profiles are also can be customized by applying different Brightness,
Contrast, Colors (Red, Green, Blue), and Color Temperature values as supported.
Display Settings
User can switch between different colors and modes on the Light Bar LEDs.
Color value between 0-100% PWM for Red, Blue and Green using the sliders.
There are 2 pre-setting can be selected: Rainbow Mode, Breathing Mode
Light Bar
System Monitor displays the real time indication of the hardware’s system settings.
The System Monitor’s data includes:
CPU, Memory, iGPU, dGPU, Network speed, Storage, Battery health indicator,
system information, Fan speed, Battery remaining percentage.
System Monitor
User can switch between different Keyboard Profiles to customize effects,
colors, brightness, and speed. There are 12 pre-setting can be selected: Monocol-
or (default), Gaming, Breathing, Raindrop, Marquee , Music, Wave, Reacive,
Ripple, Spark, & Aurora.
Keyboard
Aurora is a utility that unifies RGB lighting devices across different brands and enables them to
work alongside each other, all while adding and improving RGB lighting support for various
games that previous had none or little RGB lighting support.”
More info for Project Aurora can befound here: https://www.project-aurora.com/
Custom Profile feature is also available to enable the keyboard as an interactive control to select
individual or groups of keys to set different colors.
Performance Tuning supports the profiles (Performance, Balanced,
Battery Saver) with default mapping of Power and Fan Modes. On
startup, Balanced profile is applied by default.
Performance Tuning
Benchmark Mode
Turning ON Benchmark mode will enable maximum performance
mode with high fan RPMs.
Passive Cooling Mode
Turning ON Passive cooling mode will minimize fan transitions by
limiting time off. Passive Cooling Mode is on by default.
Usage
For selected profile, display current CPU and dGPU usage
Fan Speed
For selected profile, display current Left Fan and Right Fan speed
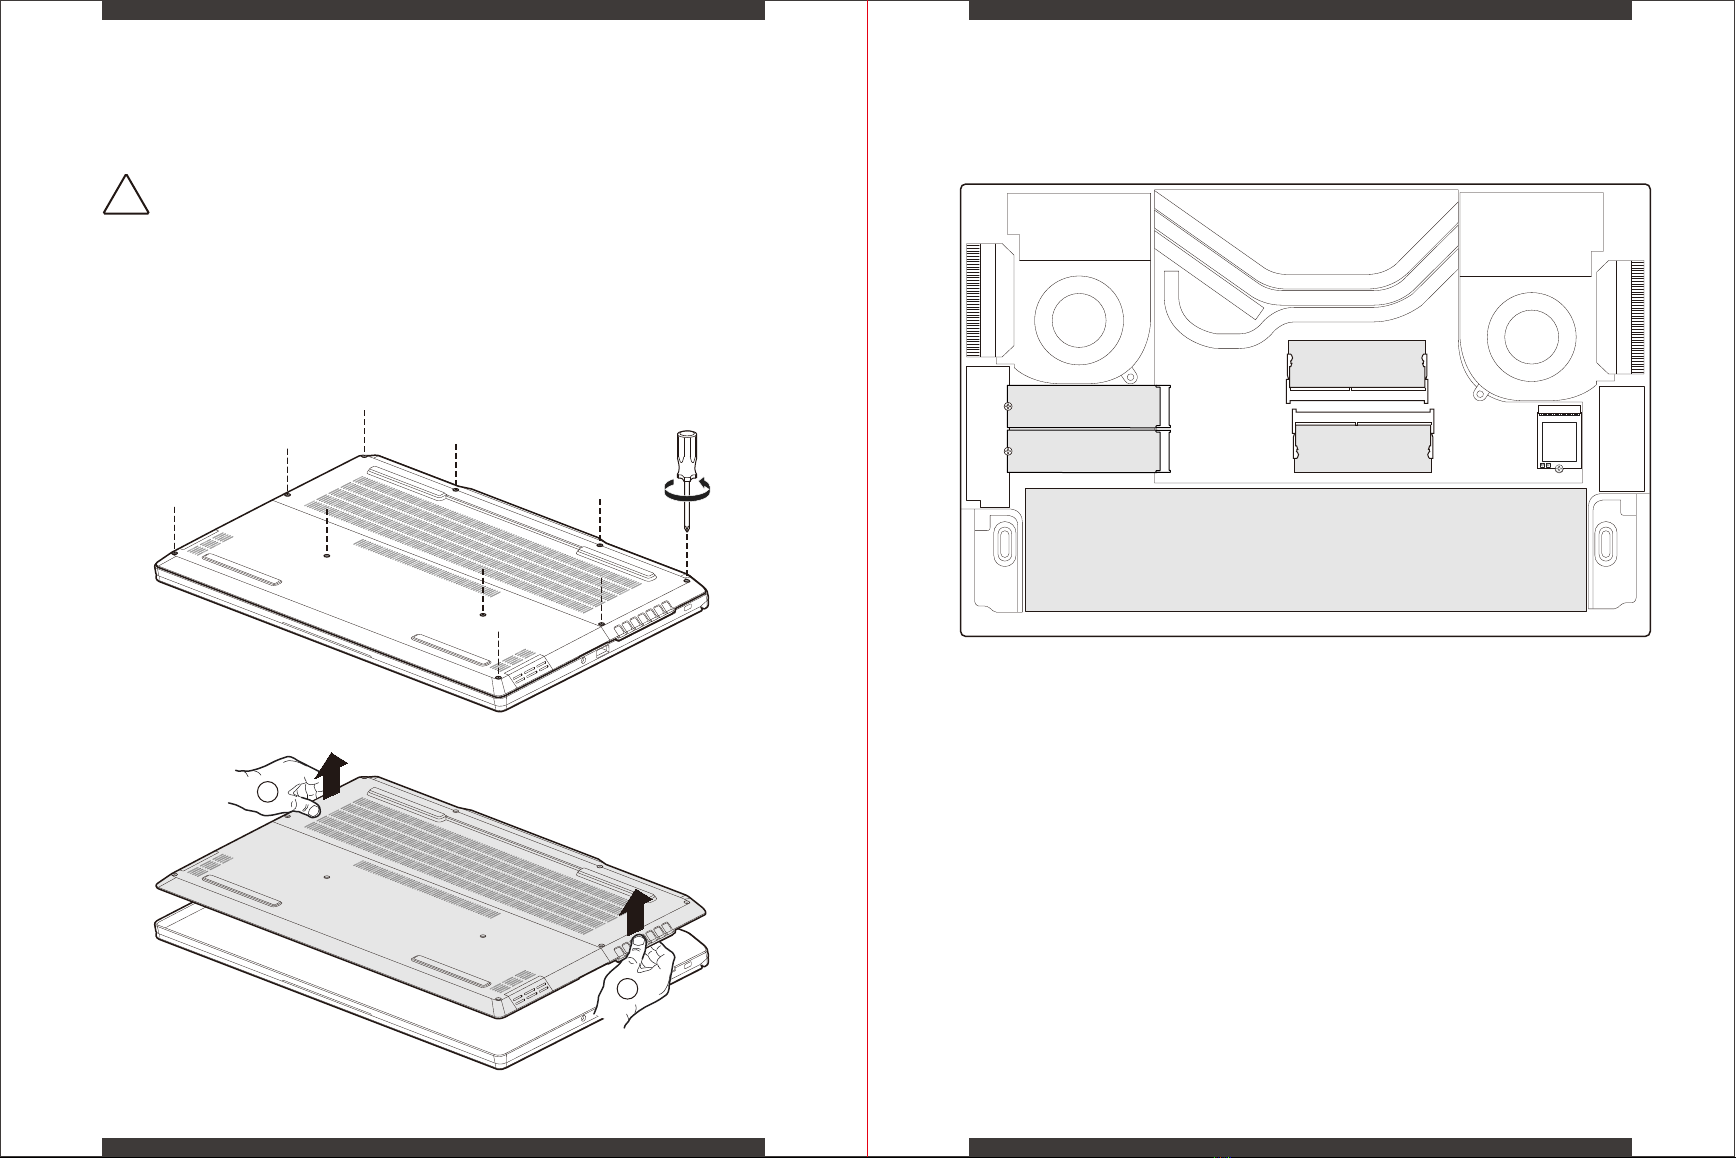
Inside View
1615
Remove Back Cover
To remove the back cover, remove the 10 screws securing the cover to the
chassis.
Do not remove or replace the back cover with the power on.
Always power off and unplug the power cord from the system before
removing or replacing the back cover.
!
2
2
1
Battery
M.2 Slot A
NVMe Only
M.2 Slot B
SATA & NVMe
SODIMM A
SODIMM B
Ce manuel convient aux modèles suivants
1
Table des matières
Langues :
Autres manuels XPG Ordinateur portable


