Xomax S64 Manuel utilisateur
CHILD RESTRAINT SYSTEM
0-36kg
PRODUCT TYPE: S64
0+I II III
INSTRUCTION
EN
$"5"-0(6&
1.Notice....................................................................
2.Structure Name.....................................................
4.Warning.................................................................
5.Safety Seat Use Method........................................
5.1 Install location...................................................
5.2 How to Use the Harness Buckle......................
5.4 Adjust Safety Belt Lengthen.............................
5.5 Adjust the seat rotation angle .........................
5.6 Adjust the Angle of the Child Safety Car
Seat.......................................................................
5.7 Removing 5-Point Harness, sleeping pad
and 5-piont harness ........................................
5.8
5.9 Removing the Fabric Cover.............................
6.Installed in Car ....................................................
6.1Installed in Rearward facing position................
3
5
3.Product Information............................................... 6
7
9
9
10
12
13
14
16
17
18
18
18
18
11
*.1035"/53&"%5)&4&
*/4536$5*0/4$"3&'6--:#&'03&
64&"/%,&&1'03'6563&
3&'&3&/$&
If these instructions are not followed, the
safety of a child may be severely endangered.
Removing Triangle Pad and Sleeping Pad......
5.3 Adjust the height of headrest and
shoulder belts...................................................
6.1.1 Installed in Rearward facing position with Belt
Group 0+(0-13kg)..................................................
6.1.2 Installed in Rearward Facing Position with
ISOFIX and Top Tether Group 0+I(0-18kg)............. 20
6.2 Installed in Forward facing position.................... 22
6.2.1 Group I(9-18kg)............................................... 22
6.2.1.1 Installed in Forward facing position with Belt
or Belt and ISOFIX connector................................... 22
6.2.2 Group II III(15-36kg)......................................... 23
6.2.2.1 Installed in forward facing position with ISOFIX
connector and Belt or only Belt................................. 23
6.2.2.2 Installed in forward facing position with ISOFIX
connector, Belt and Top Tether................................ 25
7. CARE AND MAINTENANCE.................................... 26
8.MAIN TECHNICAL PARAMETER............................. 27
INSTRUCTION
EN
* ** ***
8IFOVTJOHBT6OJWFSTBMDBUFHPSZ(SPVQ
* ** *** QMFBTFOPUJDFCFMPXJOGPSNBUJPO
1.NOTICE
This is a “Universal” child restraint. It is approved to
Regulation No. 44, 04 series of amendments, for
general use in vehicles and it will fit most, but not all,
car seats.
A correct fit is likely if the vehicle manufacturer has
declared in the vehicle handbook that the vehicle is
capable of accepting a “Universal” child restraint for
this age group.
This child restraint has been classified as
“Universal” under more stringent conditions than
those which applied to earlier designs which do not
carry this notice.
If in doubt, consult either the child restraint
manufacturer or the retailer.
Only suitable if the approved vehicles are fitted with
lap/3 point/static/with retractor safety-belts,
approved to UN/ECE Regulation No. 16 or other
equivalent standards.
8IFOVTJOHBT4FNJVOJWFSTBMDBUFHPSZ(SPVQ
QMFBTFOPUJDFCFMPXJOGPSNBUJPO
This child restraint is classified for “Semi-universal”
use and is suitable for the seat positions of
the following cars:
CAR FRONT REAR
Outer Centre
(Model) Yes Yes No
/PUJDFSFHBSEJOH*40'*9DIJMESFTUSBJOUTZTUFN
1. This is an ISOFIX CHILD RESTRAINT
SYSTEM. It is approved to the Regulation No.44,04
series of amendments, for general use in cehicles
fitted with ISOFIX anchorages systems.
2. It will fit vehicle with positions approved as
ISOFIX positions (as detailed in the vehicle
handbook), depending on the category of the child
seat and of the fixture.
3. The mass group and the ISOFIX size class for
which this device is intended is:
Seat positions in other cars may also be suitable to
accept this child restraint. Please refer to the information
documents or the retailer's website for the suitable car
model list. If in doubt, consult either the child restraint
manufacturer or the retailer any time. Only suitable if the
approved vehicles are fitted with 3 point safety-belts and
ISOFIX attachments, approved to UN/ECE Regulation
No. 16 or other equivalent standards.
(SPVQ*3FBSXBSEGBDJOH
D for Group 0+(0-13kg) and Group *(9-18kg) .

INSTRUCTION
EN
3.PRODUCT INFORMATION
ISOFIX
Attachment
Point ISOFIX Insert Guide
(If you don’t have ISOFIX
Insert Guide, please ignore this.)
Rotate Adjuster
Recline Handle
Base
Belt GuidanceΏ
Headrest
Belt Guidance
Seat Cover
Shoulder Pad
Shoulder Belt
Buckle Tongue
Red Button
Buckle
Crotch Pad
Press Button
Sleeping Pad
360c
Headrest
Height Adjuster
Harness connector
ISOFIX Locking Arms
Top Tether Clip
metal link
ISOFIX Button
Top Tether Adjuster
2.STRUCTURE NAME
This product is a 360 degree rotating child restraint system.
The following information can help you better understand this
product.
Tested and approved according to ECE R44/04
Body Weight
0+(0-13kg)
0+I(0-18kg)
I(9-18kg)
II III(15-36kg)
Adult seat belt Rearward facing
Forward facing
ISOFIX+Top Tether
Adult seat belt
Adult seat belt
ISOFIX connector+Adult seat belt
ISOFIX connector+Adult seat belt
ISOFIX connector+Adult seat belt
+Top Tether
Installation method Installation direction

Because of potential
use this child restraint with any other base
INSTRUCTION
EN
Please carefully read and make
medical
4.WARNING
IMPORTANT!
IMPORTANT!
use a child safety seat with damaged or
missing parts.
use damaged or frayed harness straps or
vehicle belt.
except ones that the manufacturer permits.
use a child safety seat that has been in a
crash. A crash can cause damage to the child safety
seat that you cannot see.
use a second-hand child seat or child seat
whose history you do not know.
NEVER
DO NOT
DO NOT
DO NOT
DO NOT
leave your child in this restraint for an
extended period of time.
use on vehicle seats that face the
sides or rear of the vehicle. Use the child
safety seat only on forward-facing vehicle
seats.
DO NOT
DO NOT
sure you understand all instructions in this
manual and in the vehicle owner’s manual
related to child safety seats. Install and use the
child safety seat as described in the instruction
manual. Failure to do this could result in
serious injury or death of your child. Keep the
instructions together with the child restraint for
future reference.
issues inherent to low birth weight and
premature infants, always have a trained
professional doctor or hospital staff member
assess the suitability of the child restraint prior
to leaving the hospital or using the child
restraint.
Make sure the rigid items and plastic parts of a
child restraint shall be so located and installed that
they are not liable, during everyday use of the
vehicle,to become trapped by a movable seat or in a
door of the vehicle.
DO NOT use forward- facing before the child’s
weight exceeds 9kg.
Make sure any straps holding the restraint to the
vehicle should be tight.Any straps restraining the child
should be adjusted to the child's body.Make sure
straps should not be twisted.
Make sure the lap strap is worn low down, so that the
pelvis is firmly engaged to prevent child from falling
out of the safety car seat.
DO NOT make any alteration or additions to the
device without the approval of the Type Approval
Authority, and a danger of not following closely the
installation instructions provided by the child restraint
manufacturer.
HOT! The child seat should be kept away from
sunlight if the seat is not provided with a textile cover,
otherwise it may be too hot for the child’s skin.
DO NOT leave your child unattended in this restraint
even for a short time.
Make sure any luggage or other objects liable to
cause injuries in the event of a collision shall be
properly secured.
DO NOT use the child restraint system without the
cover.
DO NOT replace seat cover with any other than the
one recommended by the manufacturer, because the
cover constitutes an integral part of the restraint
performance.
DO NOT use the child restraint system if position of
the adult safety-belt buckle to the main load bearing
contact points on the restraint is unsatisfactory,
please contact the manufacture in doubt about this
point.
DO NOT use any load bearing contact points other
than those described in the instructions and marked
in the child restraint. please contact the manufacture
in doubt about this point.
Please read the car manufacturer's handbook before
installing this ISOFIX child safety seat.

INSTRUCTION
EN
Car Safety Belt—Diagonal Belt
Car Safety Belt—Lap Belt
ISOFIX Attachments
5.SAFETY SEAT USE METHOD
5.1 Install Location
5.1.1 When using as Universal categort (Group 0+ I II III),
this child restraint system is suitable for seatbelt
models equipped with a three-point retractor that
complies with ECE R16 and does not apply to models
only equipped with 2-point seat belts.
Correct/ Proper Wrong/ Improper
When front the of the seat with opened
airbag, cannot install in this place.
Only with 3-point seat belt and ISOFIX attachments
can install in this place.
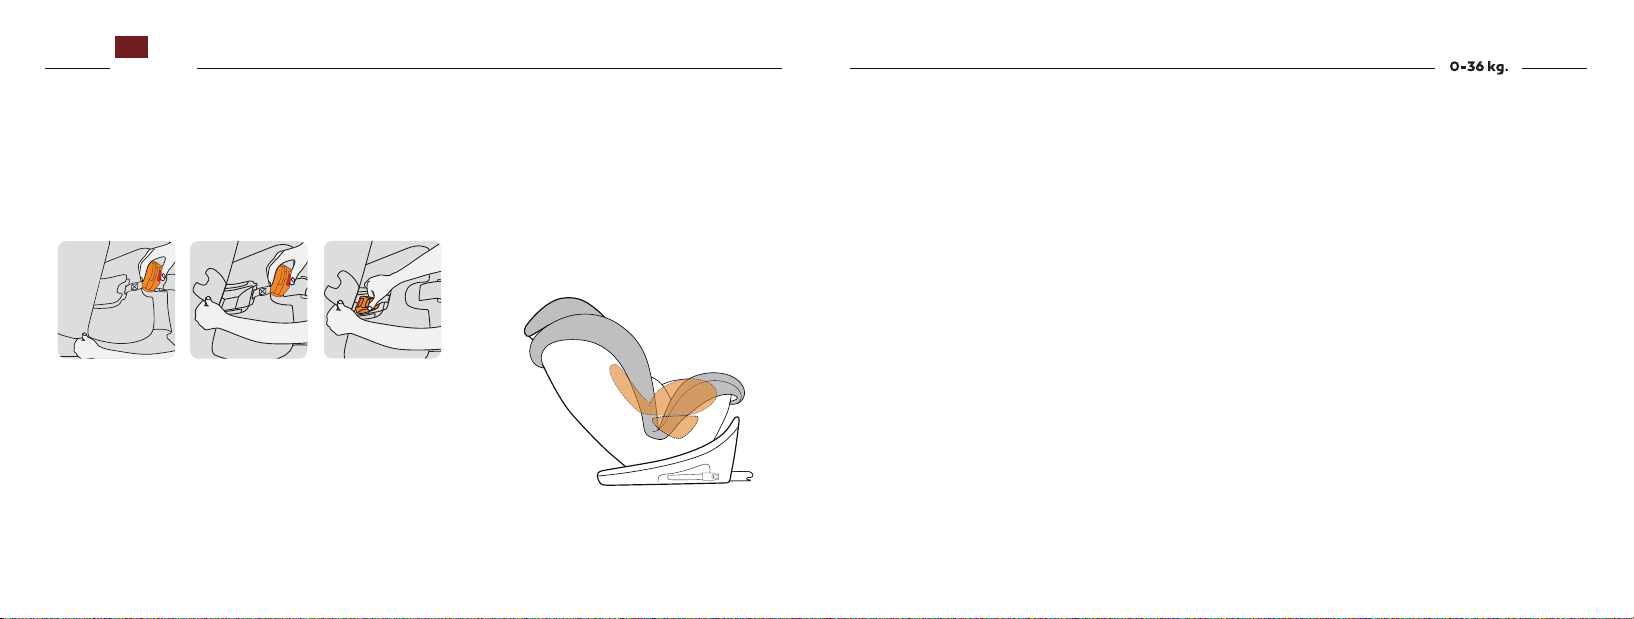
5.2 How to use the harness buckle
Make sure the right side is up.
Engage them before putting them into the harness
buckle, which should make a CLICK noise.
Pull shoulder straps to remove all slack from the
lap section ensuring that the hamess is lying flat
and the hamess buckle is locked.
Open the hamess buckle by pressing the red
button.
5.1.2 When using as Semi-Universal category
suitable for seat belt models equipped with the
three-point retractor that has passed the ECE R16
requirement and is not suitable for models only
equipped with 2-point seat belts. And only after
installed ISOFIX, then can use on it.
Hold the two buckle tongues together.
(Group 0+I II III), this child restraint system is

INSTRUCTION
EN
A Tighten Safety Belt
Pull up shoulder belt and the lap belt will
tighten, then pull crotch belt to tighten safety
belt.
Tighten the safety belt as much as possible without
causing discomfort to the child. The lap belt is as
low as possible and should put near child's crotch
not abdomen.
P.S.: Loose safety belt is dangerous. Please
check safety belt adjuster whether work, then
tighten safety belt. After tightening the seat belt,
adjust the shoulder pads to the appropriate position
on the chest.
B Loosen Safety Belt
5.4 Adjust Safety Belt Lengthen
A correctly adjusted headrest ensures optimal protection
for your child in the safety seat:
The headrest must be adjusted so that the shoulder
straps are at the same level as your child’s shoulders.
Keep the lower edge of headrest as close as possible
to the child's shoulder and keep a finger distance
between the lower edge of headrest and child’s
shoulder.(see picture a)
When pressing limited slide button, the other
hand grasping shoulder belt which under
shoulder pad (not grasp shoulder pad belt) to
child right ahead to loosen safety belt.
5.3 Adjust the height of headrest and
shoulder belts
If the height of headrest or shoulder belt is
inconsistent with the required height, Pull the
headrest adjustment handle upward and pull
the headrest upward at the same time, You
can adjust the height of the headrest and
shoulder belt upward; Pull the headrest
adjustment handle upward, at the same time,
press the headrest down to adjust the headrest
height (after adjustment, pull up and down the
headrest to ensure that the headrest is locked)

Press the rotate button to rotate the child safety seat
360 degrees.
Note! After trip, rotate the seat in both clockwise and
counterclockwise directions, To make sure that the
rotating part of the child car seat is fully engaged.
When the seat is rotated to 90o, as shown in figure a,
the child can be placed on the safety seat.
NOTE! The car cannot be placed in this position when
driving (see picture a).
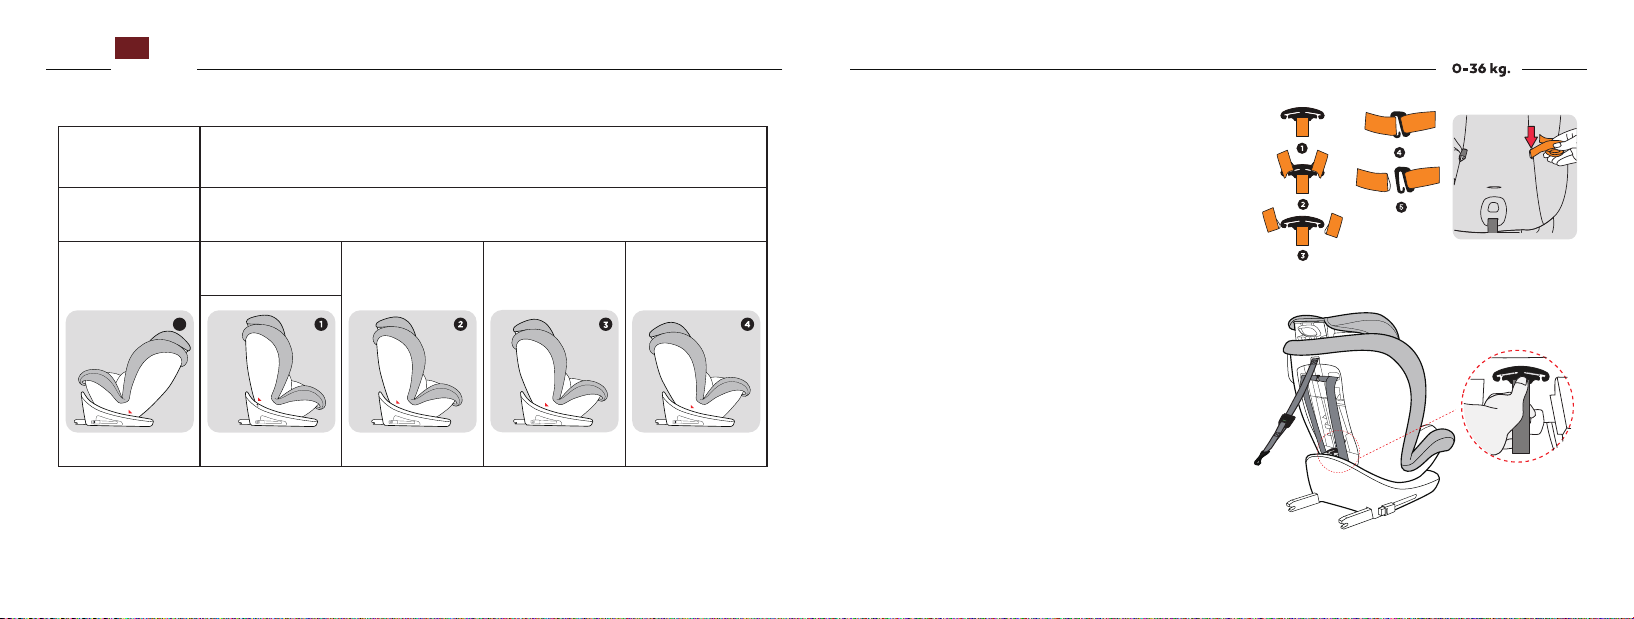
Pull the recline handle up which is in the bottom of body
shell.
Pull the body shell at the same time, Then adjust the angle
of the seat. The seat have 5 recline positions as shown in
the figure below.
Different groups use different reclining levels.
Rearward facing:Group 0+ I( 0-18KG ): Fifth Level
Forward facing:Group I( 9-18KG ): First Level to Fourth Level
Group II III( 15-36KG ): First Level
INSTRUCTION
EN
p
5.5 Adjust the seat rotation angle 5.6 Adjust the Angle of the Child Safety Car Seat
p
NOTE! When used in rearward facing, you
need to rotate the seat to a 90-degree position
(as shown in Figure a), pull the recline handle,
and adjust the angle to the most inclined
position,then you can turn the seat to rearward
facing position.
a
NOTE! You need to rotate the seat to a 90-degree position
(as shown in P13 Figure a), pull the recline handle, and
adjust the angle to the most inclined position,then you can
turn the seat to fifth position.(see5.5)
p
Step 1: Turn the child safety seat to the back,
According to the sequence of ΎΏ in picture A, the two
shoulder belts from the metal link.
Remove the shoulder belt from the harness connector,
according to ΐΑ in picture A,
storage metal link to metal link area on the behind of the
backrest. shown in picture C.
Then pull out the shoulder belt and harness from the seat
hole, so that the shoulder belt and harness can be
removed.
Then pull out the shoulder belt from the buckle on the front
of the seat, And remove the sleeping pad , shoulder pad
and buckle. Finally put redundant belt into cloth cover.
(Picture B)
p
INSTRUCTION
EN
Fifth Level (Lying Level) First Level
Second Level Third Level Fourth Level
Installation of
rearward facing Installation of forward facing
Group 0+I(0-18kg) Group I(9-18kg)
Group II III
(15-36kg)
5
5.7 Removing 5-Point Harness ,
sleeping pad and 5-piont harness
AB
C
Step 2: push the buckle down from the front of the seat,
and lift the cushion cloth cover,
Take out the buckle from the cloth cover, and store the
buckle according to the picture below (Picture D).
17 18
INSTRUCTION
EN
Never use the child seat without it
correctly installed.
Check that the harness straps are not
twisted and that they have been correctly
inserted in the belt slots of the cover.
5.9 Removing the Fabric Cover
CAUTION!
CAUTION!
1. Remove the 5-point harness.
2. Take off the cover from the backrest and base.
3. Move the headrest of the child seat up to the
highest position.
4. First take the cover off the base of the
headrest, then remove the cover of the
headrest.
To re-fit the cover, simply follow the above steps
in reverse.
6. INSTALLED IN CAR
6.1 Installed in Rearward facing position
6.1.1 Installed in Rearward facing position with Belt
Group 0+(0-13kg)
D
5.8 Removing Triangle Pad and
Sleeping Pad
When your child's weight exceed 8kg, remove
the triangle pad.
When your child's weight exceed 12kg, remove
the sleeping pad.
Pull the vehicle seat belt , the diagonal seat belt
Rotate the seat to 90 degree first, then use the
recline handle to adjust the seat to the maximum
angle.
Later fix the seat in the rearward facing position.
section is bypassed from the back of the seat and
passes through from the between of the headrest
and backrest, the lap belt section through the belt
guidance and under the sleeping cushion. Ensure
that the buckle tongues are properly locked into the
vehicle seat buckle - you will hear an audible
CLICK!
Then adjust diagonal belt and lap belt as follows:
The side which can pull out belt:
Adjust the diagonal seat belt section is through
from the between the headrest and the backrest.
The side which can insert buckle:
Fasten the seat belt and pull it tight, ensuring that
the seat belt is not twisted.
Table des matières
Autres manuels Xomax siège auto


