wtw ConOx-3 Manuel utilisateur


ConOx
26
Accuracy when
going to press
The use of advanced technology and the high quality standard of our
instruments are the result of continuous development. This may result in
differences between this operating manual and your instrument. Also, we
cannot guarantee that there are absolutely no errors in this manual.
Therefore, we are sure you will understand that we cannot accept any legal
claims resulting from the data, figures or descriptions.
Copyright ©Weilheim 2004, WTW GmbH
Reprinting - even as excerpts - is only allowed with the explicit written
authorization of WTW GmbH, Weilheim.
Printed in Germany.

ConOx Contents
27
ConOx - List of contents
1 Overview . . . . . . . . . . . . . . . . . . . . . . . . . . . . . . . . . . . . . . . . . 28
1.1 Structure and function . . . . . . . . . . . . . . . . . . . . . . . . . . . . . . . . 28
1.2 Instrument identification . . . . . . . . . . . . . . . . . . . . . . . . . . . . . . 29
2 Safety . . . . . . . . . . . . . . . . . . . . . . . . . . . . . . . . . . . . . . . . . . . 30
3 Commissioning . . . . . . . . . . . . . . . . . . . . . . . . . . . . . . . . . . . 30
3.1 Scopes of delivery . . . . . . . . . . . . . . . . . . . . . . . . . . . . . . . . . . 30
3.2 Getting the sensor ready for measuring . . . . . . . . . . . . . . . . . . 32
4 Measuring / Operation . . . . . . . . . . . . . . . . . . . . . . . . . . . . . . 33
4.1 Calibration . . . . . . . . . . . . . . . . . . . . . . . . . . . . . . . . . . . . . . . . . 33
4.2 Measuring . . . . . . . . . . . . . . . . . . . . . . . . . . . . . . . . . . . . . . . . . 33
4.3 Storage . . . . . . . . . . . . . . . . . . . . . . . . . . . . . . . . . . . . . . . . . . . 34
5 Maintenance, cleaning, replacement . . . . . . . . . . . . . . . . . . 34
5.1 General maintenance instructions . . . . . . . . . . . . . . . . . . . . . . 34
5.2 Outside cleaning . . . . . . . . . . . . . . . . . . . . . . . . . . . . . . . . . . . . 35
5.3 DO module: Changing the electrolyte solution and
membrane cap . . . . . . . . . . . . . . . . . . . . . . . . . . . . . . . . . . . . . 36
5.4 DO module: Cleaning the electrodes . . . . . . . . . . . . . . . . . . . . 38
5.5 Checking the DO module for freedom from zero-current . . . . . 40
5.6 Aging of the conductivity measuring cell . . . . . . . . . . . . . . . . . . 40
5.7 Disposal . . . . . . . . . . . . . . . . . . . . . . . . . . . . . . . . . . . . . . . . . . 41
6 What to do if... . . . . . . . . . . . . . . . . . . . . . . . . . . . . . . . . . . . . 42
6.1 Error symptoms of DO measurement . . . . . . . . . . . . . . . . . . . . 42
6.2 Error symptoms of conductivity measurement . . . . . . . . . . . . . 42
7 Technical data . . . . . . . . . . . . . . . . . . . . . . . . . . . . . . . . . . . . 43
7.1 Conductivity basic module . . . . . . . . . . . . . . . . . . . . . . . . . . . . 43
7.2 Dissolved oxygen (DO) module . . . . . . . . . . . . . . . . . . . . . . . . 44
8 Wear parts and accessories . . . . . . . . . . . . . . . . . . . . . . . . . 47

Overview ConOx
28
1 Overview
1.1 Structure and function
The ConOx is a modular sensor for conductivity, dissolved oxygen (DO) and
temperature. It consists of two basic components:
Conductivity basic module, according to the quadripole measuring princi-
ple, with integrated temperature sensor
Removable dissolved oxygen module, according to the galvanic measur-
ing principle
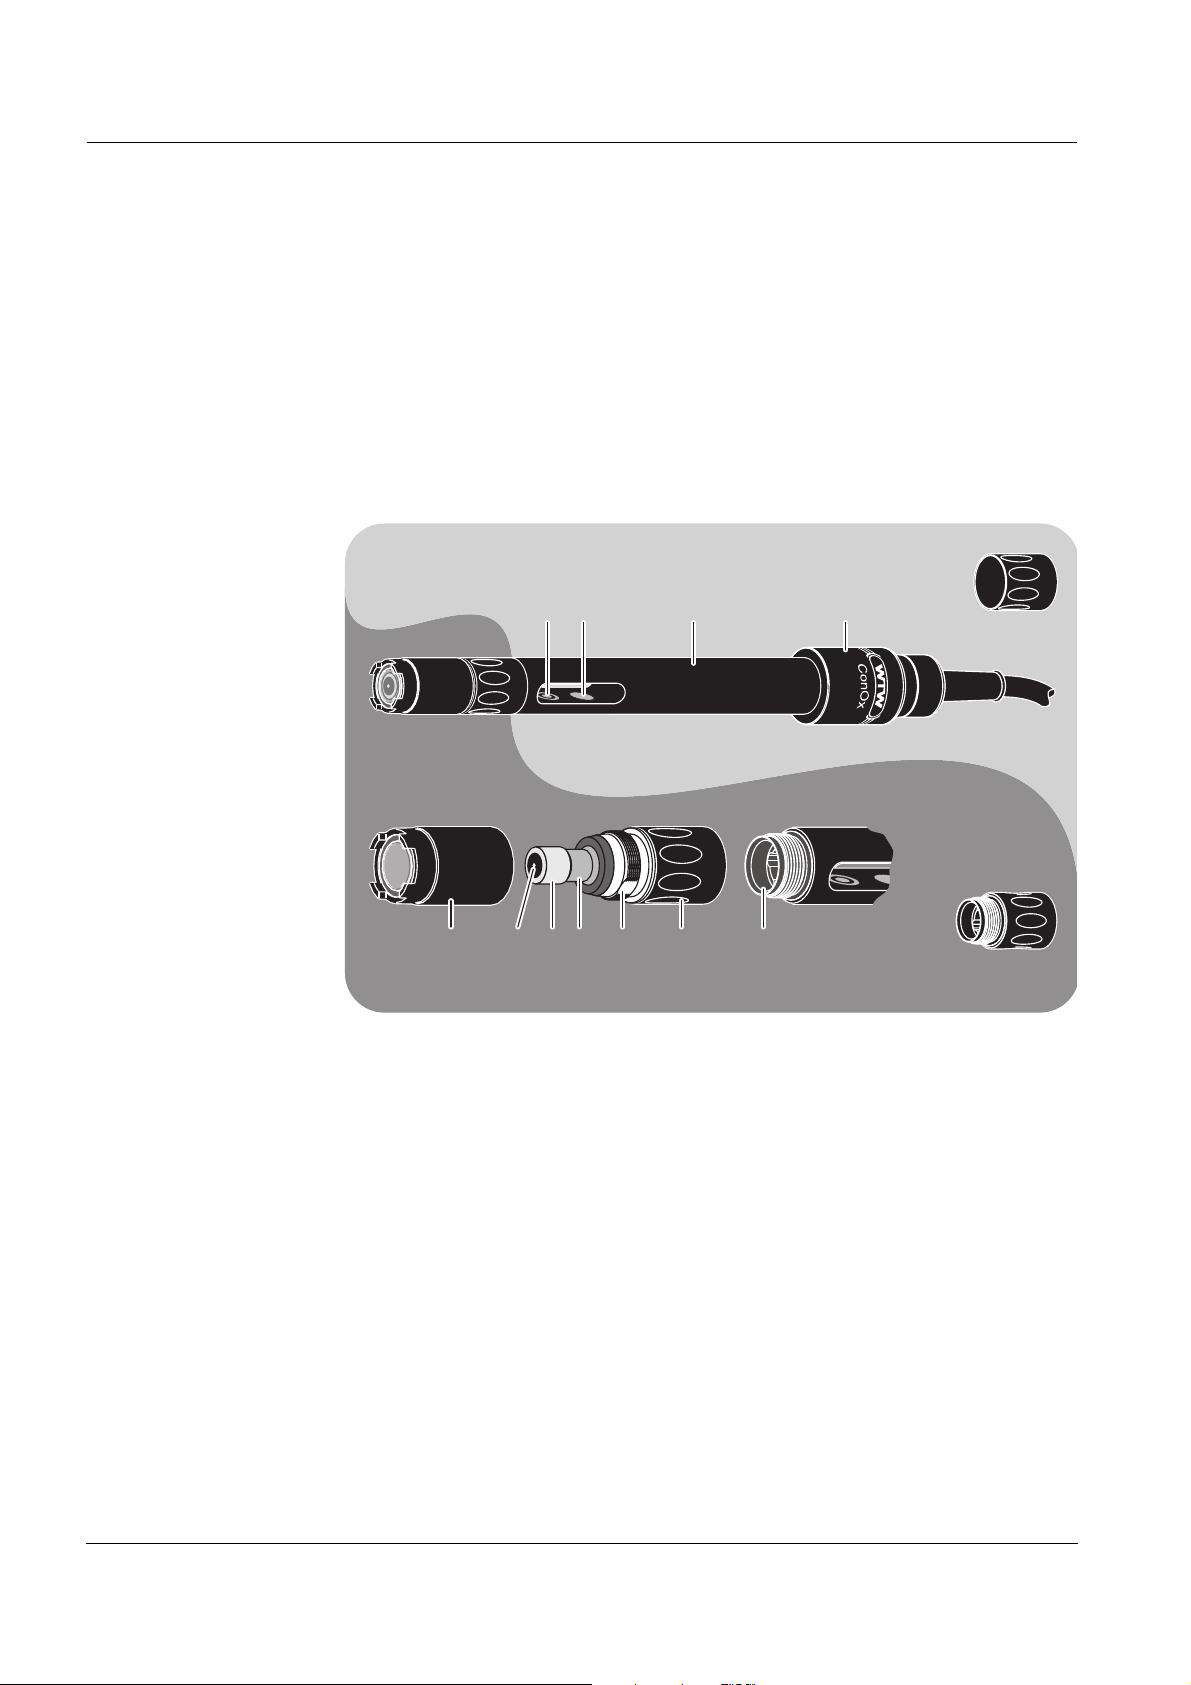
Structure of the
ConOx
1Voltage electrode (inside, 2x)
2Current electrode (ring, 2x)
3Temperature sensor in a graphite enclosure
4Shaft
5Connection head
6WP 90 membrane cap (filled with electrolyte solution)
7Gold working electrode (cathode)
8Insulator
9Lead counter electrode (anode)
10 Screw thread base with ventilation area
11 Cap nut
12 Plug connection
13 Closing cap for conductivity basic module
14 Closing cap for DO module
41, 2 3 5
7 8 96 1110 12
13
14
Conductivity basic module
Dissolved oxygen (DO) module

ConOx Overview
29
The conductivity basic module can be used as an independent conductivity
measuring cell. For this purpose, unscrew the DO module and close the open
plug connection with a closing cap.
The DO module is connected to the conductivity basic module via a water-
tight, three-pole plug connection. The conductivity basic module measures
the temperature, which is required for the determination of the DO content.
For this reason the DO module only works in conjunction with the conductivity
basic module.
Recommended
fields of
application
On site measurements in rivers, lakes and wastewater
fishfarming
Ground water measurements
Applications in water laboratories
1.2 Instrument identification
A series number is printed on both ConOx modules. Keep these numbers
ready if you have questions to ask the WTW service department.
The series numbers contain the following information:
Conductivity basic
module
The number is printed on the shaft.
Dissolved oxygen
(DO) module
The number is printed on the cap nut.
1Manufacturing year 20... (example: 2003)
2Calendar week of manufacturing (CW 36)
3Sequential batch number (0013)
03360013
1 2 3
1Manufacturing year 20... (example: 2003)
2Calendar week of manufacturing (CW 42)
3Sensor type (type A)
4Sequential batch number (007)
0342A007
1 2 3 4

Safety ConOx
30
2 Safety
This operating manual contains special instructions that must be followed
during the operation of the sensor.
Always keep this operating manual in the vicinity of the sensor.
Special user
qualifications
The membrane cap of the DO module is filled with a small amount of an
alkaline electrolyte solution. All maintenance work that requires dealing with
the electrolyte solution must only be carried out by persons who know how to
deal with chemicals safely.
General safety
instructions
The individual chapters of this operating manual use safety labels like the one
below to indicate danger:
Caution
indicates instructions that must be followed precisely in order to avoid
slight injuries or damage to the instrument or the environment.
3 Commissioning
3.1 Scopes of delivery
3.1.1 Scope of delivery of the ConOx
ConOx combination conductivity and DO sensor,
DO module filled with electrolyte solution and ready to use
1 closing cap for conductivity basic module
1 closing cap for DO module
3 exchange membrane caps, WP 90
Calibration and storage vessel, OxiCal®-CX
Polishing strip, SF 300
Electrolyte solution, ELY/G
Cleaning solution, RL/G
Operating manual for ConOx
Note
The membrane cap that is mounted on the DO sensor for delivery serves
mainly as a transport protection. Depending on the duration of the transport
and storage period, it may have a shortened operational lifetime. If the mea-
suring system cannot be calibrated (error message on the instrument),
please proceed according to section section 5.3 DO MODULE: CHANGING THE
ELECTROLYTE SOLUTION AND MEMBRANE CAP.

ConOx Commissioning
31
3.1.2 Scope of delivery of the conductivity basic module
Conductivity basic module
1 closing cap, mounted on the conductivity basic module
Operating manual for ConOx
3.1.3 Scope of delivery of the DO module
DO module, filled with electrolyte solution and operable
1 closing cap, mounted on the DO module
1 exchange membrane cap, WP 90
Polishing strip, SF 300
Electrolyte solution, ELY/G
Cleaning solution, RL/G
Operating manual for ConOx
Note
The membrane cap that is mounted on the DO sensor for delivery serves
mainly as a transport protection. Depending on the duration of the transport
and storage period, it may have a shortened operational lifetime. If the mea-
suring system cannot be calibrated (error message on the instrument),
please proceed according to section section 5.3 DO MODULE: CHANGING THE
ELECTROLYTE SOLUTION AND MEMBRANE CAP.

Commissioning ConOx
32
3.2 Getting the sensor ready for measuring
3.2.1 Measurements with the conductivity basic module
Make sure that the plug connection is tightly closed by the closing cap. When
mounted, the closing cap (1) must be screwed on up to the stop.
Before screwing on the closing cap, check the following points:
The sealing (2) must be clean and evenly positioned in the groove.
The plug connection and the inside of the closing cap must be clean.
3.2.2 Measurements with the combination sensor
Make sure that the DO module and conductivity basic module are screwed
together tightly. When mounted, the cap nut of the DO module has to be
screwed on up to the stop.
Before screwing on the DO module, check the following points:
The sealing (3) must be clean and evenly positioned in the groove.
The plug connection must be dry on both sides.
Screwing on the
DO module
Position the DO module (1) on the conductivity basic module and carefully
and with slight pressure turn it until the guiding nib on the DO module locks
in place in the corresponding groove on the conductivity basic module.
Subsequently tighten the cap nut (2) up to the stop. The thread only snatches
if the DO module was correctly positioned.
1 2
21 3

ConOx Measuring / Operation
33
Unscrewing the
DO module
Unscrew the cap nut and remove the DO module from the conductivity basic
module.
Caution
Inappropriate handling can lead to the release of electrolyte solution.
When unscrewing the DO module only turn the cap nut (not the
membrane cap!).
3.2.3 Preparing the measuring operation
Connect the sensor to the measuring instrument. The sensor is immediately
ready to measure. It is not necessary to polarize the DO module.
4 Measuring / Operation
4.1 Calibration
To calibrate for DO measurements, use the OxiCal®-CX calibration and
storage vessel. If the A 325/K or A 325/S armoring is used, you have to
remove the protective hood and fixing nut of the armoring first.
When determining the cell constant, observe the respective minimum
immersion depth with the closing cap or D. O. module screwed on (important:
the temperature sensor must be submersed). The minimum immersion
depths are given in chapter 7 TECHNICAL DATA.
Note
Please read the course of the calibration in the operating manual of the mea-
suring instrument.
4.2 Measuring
Please always observe the required minimum immersion depth and the
minimum approach flow that is important for DO measurements (see
chapter 7 TECHNICAL DATA).
Minimum
approach flow for
DO measurements
The minimum flow can be provided in different ways, e. g.:
The flow of the water to be measured is sufficient (aeration tank, water
pipe, stream)
Slowly pull the sensor through the water by hand (lake, container), or
Use a flow aid, e. g. a magnetic stirrer with stirring device or a battery stir-
rer (see chapter 8 WEAR PARTS AND ACCESSORIES)
Note
When using the BR 325 battery stirrer, please make sure that the protective
pipe already has the groove in the area of the conductivity basic module (from
the year of manufacture, 2004).

Maintenance, cleaning, replacement ConOx
34
4.3 Storage
Always store the sensor with the DO module in the calibration vessel at a
temperature of 0 to +50 °C. Make sure that the sponge in the calibration ves-
sel is always moist.
Storage in the
calibration vessel,
OxiCal®-CX
Moisten the sponge:
Remove the cap (1).
Take out the sponge (2), wet it, then slightly squeeze it out.
Reinsert the sponge and close the calibration vessel with the cap.
5 Maintenance, cleaning, replacement
5.1 General maintenance instructions
For your safety Note the following safety instructions when handling electrolyte and cleaning
solutions:
Caution
The ELY/G electrolyte solution irritates eyes and skin. When dealing
with the ELY/G electrolyte solution, observe the following points:
During working activities, always wear suitable protective gloves
and protective goggles/face shield.
If it comes into contact with the skin, rinse thoroughly with water and
immediately change contaminated clothing.
If it comes into contact with the eyes, rinse thoroughly with water
and consult a doctor.
Follow the safety datasheet.
1 2
Ce manuel convient aux modèles suivants
2
Table des matières