Weaver Leather Master Tool Cub Manuel utilisateur

weaverleathersupply.com
800-932-8371
1
MASTER TOOL CUB SEWING MACHINE
OWNER’S MANUAL
U.S. Patent #9,657,418
INSERT-133 7/21
18-2129-SP

22
Hand-Crank Design Simulates a
Flywheel for Natural Movement
and Precision Stitching
Congratulations on your purchase of the Master Tool Cub Sewing Machine. This
heavy-duty cylinder arm sewing machine stitches up to 3/4" leather, nylon and
canvas with ease and precision with a non-motorized, portable design that’s
perfect for crafters, hobbyists and repair shops.
• Patented, hand-crank design simulates a flywheel, encouraging natural
movement for smooth operation that makes it easy to maintain a continuous
line of stitching.
• Sews up to 4 stitches per inch with a consistent stitch length no matter
the speed.
• Portable design is great for taking to shows.
• Backed by our Limited Lifetime Guarantee.
Table of Contents
Page
Unpack Your Box...................................................3
Attaching the Hand-Crank Flywheel ................................4
Getting to Know the Master Tool Cub Sewing Machine ...............5
Threading .....................................................6 & 7
Filling Bobbins .....................................................7
Removing and Inserting Bobbin.....................................8
Stitching ..........................................................9
Adjusting Thread Tension .........................................10
Adjusting Bobbin Tension .........................................10
Changing the Needle..............................................11
Needle & Thread Chart ............................................ 11
Troubleshooting ..............................................12 & 13
Maintenance ................................................ 14 & 15
Replacement Parts................................................16
HANDCRAFTED IN THE USA
LIMITED LIFETIME GUARANTEE

weaverleathersupply.com
800-932-8371
33
UNPACK YOUR BOX
The Master Tool Cub arrives
completely assembled.
You’ll find the following in your box:
➊Master Tool Cub Sewing Machine
➋Thread Holder
➌Two 4 oz. Spools White Thread
➍Thread Nipper
➎Bobbin Winder
➏Two Bobbins
➐One Pack of 794S-200 Needles
➑Allen Wrenches
➒Roller Guide
➓Mounting Hardware
➓Owner’s Manual
Machine holds Allen
Wrenches and Bobbin
Winder for easy access
Shipping Weight:
60 lbs.
➊
➋
➌➌
➍➍➎➎➏➏
➐➐
➑➑
➓➓
11
➒
11
weaverleathersupply.com
800-932-8371
1
MASTER TOOL CUB SEWING MACHINE
OWNER’S MANUAL
U.S. Patent #9,657,418
INSERT-133 7/21
18-2129-SP

4
You may find it easier to transport the Master Tool Cub without the Flywheel
attached. The Flywheel can be easily removed after loosening the Bolts with a
3/16" Allen Wrench. Below are instructions on attaching the Flywheel.
1) Locate the flat sides on the Flywheel Shaft. (Figure 1)
2) Slide the Hand-Crank Flywheel on the Flywheel Shaft, making sure to
line up the Bolts with the flat sides on the Flywheel Shaft. (Figure 2)
3) Tighten the Bolts using the included 3/16" Allen Wrench. (Figure 3)
ATTACHING THE HAND-CRANK FLYWHEEL
Figure 2 Figure 3Figure 1
Hand-CrankHand-Crank
FlywheelFlywheel
FlywheelFlywheel
ShaftShaft
BoltsBolts

weaverleathersupply.com
800-932-8371
5
GETTING TO KNOW THE MASTER TOOL CUB SEWING MACHINE
Do not operate this machine until you have read and understand the instructions in this manual.
This machine is designed for stitching up to 3/4" leather, nylon and canvas. Use for any other
purpose is prohibited and voids the warranty.
Hand-Crank
Flywheel
Safety
• Never use this machine unless it is securely fastened to a workbench. Simply
secure machine to your workbench with included mounting hardware.
• Always keep all fingers and body parts away from moving parts.
• Keep in mind that this machine weighs 60 lbs. Always use proper lifting
techniques when moving it and verify its stability before use.
• Keep away from children at all times.
TensionerTensioner
Jump FootJump Foot
AdjustmentAdjustment
TopTop
ThreadThread
EyeletEyelet
ThreadThread
StandStand
ThreadThread
GuidesGuides
FootFoot
LiftLift
LeverLever
NeedleNeedle
FootFoot
ShuttleShuttle
ThreadThread
CutterCutter
CheckCheck
SpringSpring
NeedleNeedle
BarBar
StitchStitch
Length DialLength Dial
Limited Lifetime Guarantee
Every Master Tool is built to last using the finest materials and skilled American workmanship. We are proud to stand behind our products with an
unmatched Limited Lifetime Guarantee. This quality standard warrants each product for its lifetime against defects in materials and workmanship
under correct use, normal operating conditions and proper application. This guarantee does not extend to any component parts not manufactured
by Weaver Leather, or if the machine is modified in any way. Weaver Leather makes no express warranties other than those that are specifically
described herein. This warranty is expressly in lieu of all other warranties express or implied. There are no implied warranties of any kind including
merchantability or fitness for a particular purpose. Weaver Leather will in no event be liable for any incidental or consequential damages whatsoever,
nor for any sum in excess of the price received for the goods.

6
THREADING
AA
BBDD
BB
CC
DDEE
FF
HH
KK
GG
II
JJ
LL
MM
Figure 4 Figure 5 Figure 6
CC
EE
1) Run thread from spool (A) on thread stand (B) (Figure 4) to the Tensioner Eyelet 1 (C).
(Figure 5)
2) Run thread between the Tensioner Discs (D), making sure the thread is pulled tightly,
and out through Tensioner Eyelet 2 (E). (Figure 6)

weaverleathersupply.com
800-932-8371
7
FF
HH
II
JJ
KK
GGLL
MM
Figure 7 Figure 9Figure 8 Figure 10
3) Run through Top Thread Eyelet (F). (Figure 7)
4) Run thread through top of Needle Bar (G) and through Top Hole in Side Plate (H). (Figure 8)
5) Run thread through Check Spring (I), the Bottom Thread Guide (J) and the Top Thread
Guide (K) located on the side plate. (Figure 9)
6) Run thread through the bottom of your Needle Bar (L) and your Needle (M). (Figure 10)
FILLING BOBBINS
Figure 11 Figure 12
A bobbin winder is included that may be attached to an electric drill to assist you in winding
bobbins if desired. We accept no liability for any injury or damage incurred through the
use of this method.
TO USE THE BOBBIN WINDER
1) Bring the thread from the spool through the split end of the bobbin winder, then place the
bobbin on the bobbin winder. (Figure 11)
2) With a light tension on the thread, turn the drill over slowly and allow the bobbin to wind
evenly. (Figure 12)

8
REMOVING BOBBIN
1) Turn machine over until bobbin case sets in position shown. (Figure 13)
2) Pull back tab (A) to release bobbin case.
3) Lift base of bobbin case out to remove bobbin. (Figure 14)
When closing bobbin case, be sure it snaps into the tab.
INSERTING BOBBIN
1) Slip the thread from the bobbin into the slot (B) at the base of the bobbin case. (Figure 15)
2) Continue pulling thread under the tension spring until it rests in the fork (C) of the spring.
(Figure 16)
Important Note: The bobbin should always be inserted so thread unwinds counterclockwise
to ensure consistent tension. (Figure 17)
REMOVING & INSERTING BOBBIN
Figure 13
Figure 15
Figure 14
A
BB
Figure 16
CC
Figure 17

weaverleathersupply.com
800-932-8371
9
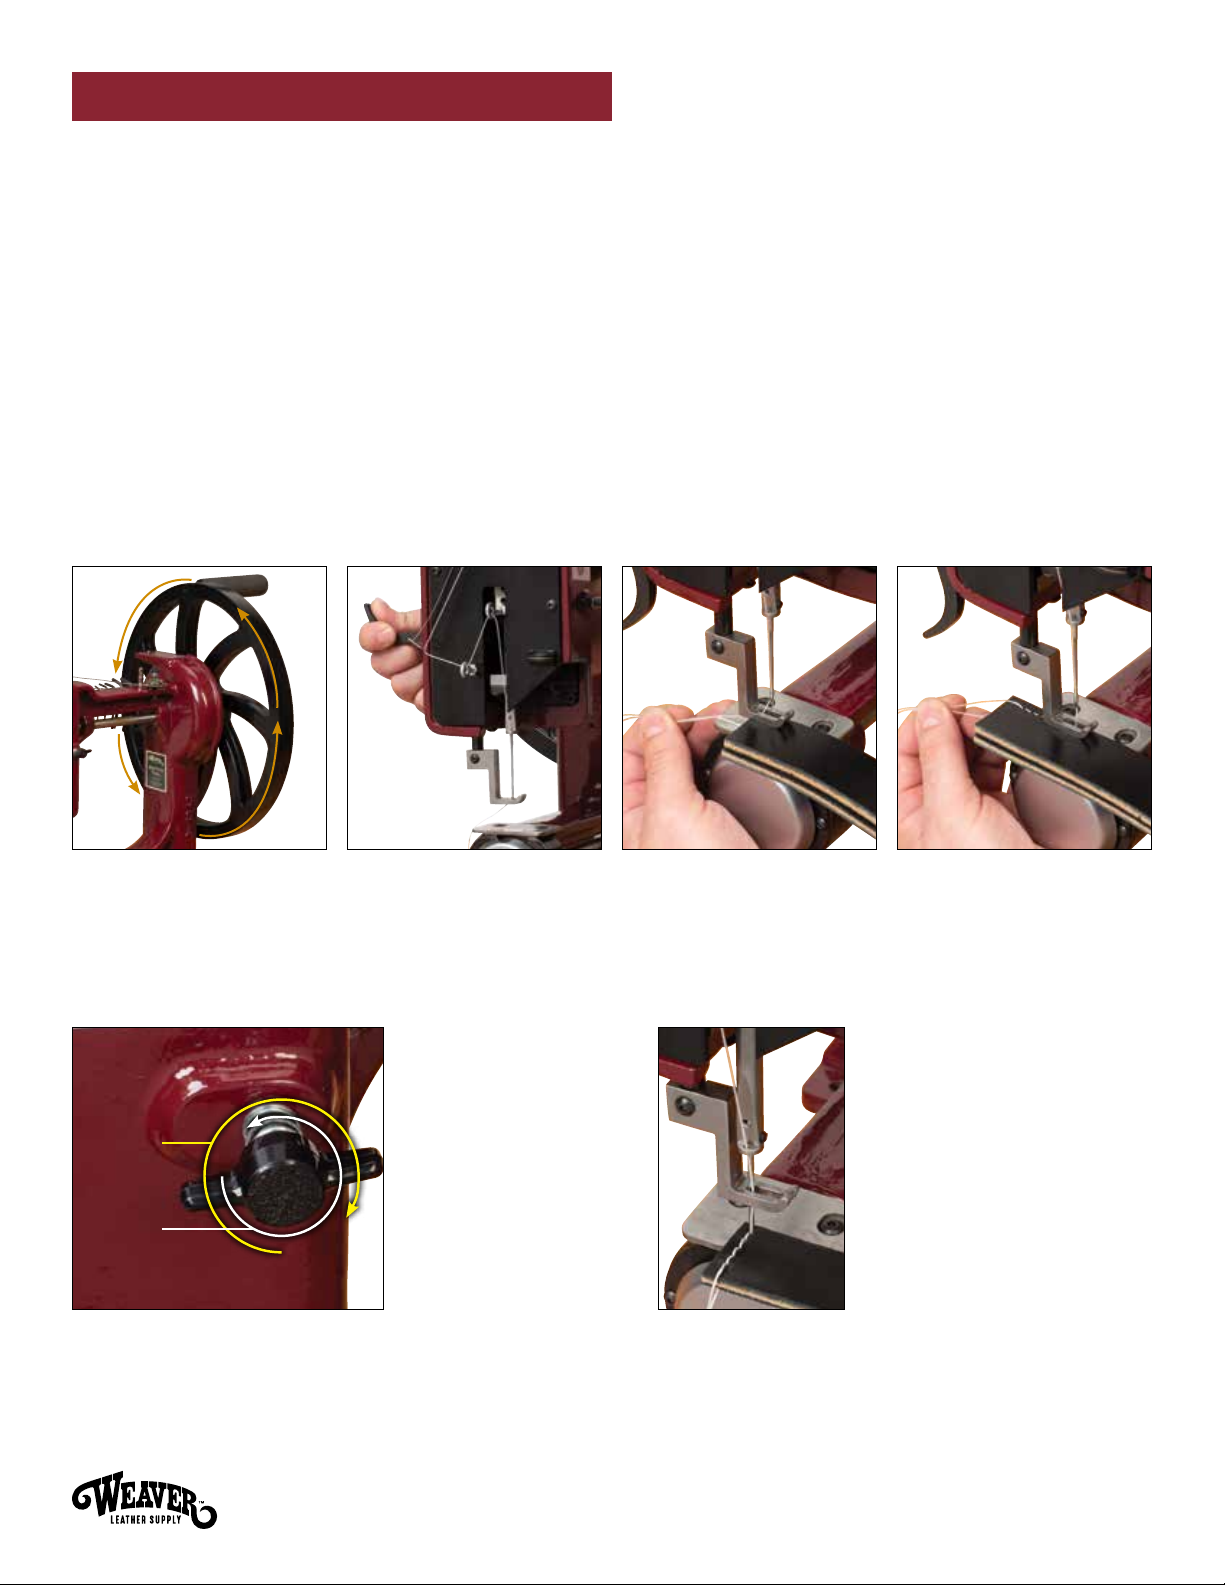
STITCHING
Figure 18 Figure 20Figure 19 Figure 21
Please Note: This machine does not have reverse. DO NOT attempt to turn the crank in
reverse or “backstitch.” You may choose to turn your work and take a “forward stitch”
for a “backstitch,” or tie the thread off manually. (Figure 18)
1) Begin by lifting the presser foot by raising the Foot Lift Lever located directly behind it.
(Figure 19)
2) Hold the upper thread and bobbin thread under the presser foot and to the rear. Insert
your work under the foot, positioning it so the needle is directly above the desired point
of entry for your first stitch. (Figure 20)
3) While still holding the thread to the rear, lower the foot and turn the crank to complete
your first couple stitches. After the stitches are made, you can release the thread.
(Figure 21)
ADJUSTING STITCH LENGTH TURNING YOUR WORK AT CORNERS
Figure 22 Figure 23
Locate the Stitch
Length Dial on the
front of the machine.
For a longer stitch
length, turn the dial
counterclockwise.
For a shorter stitch
length, turn the
dial clockwise.
(Figure 22)
Please note: Your work
should be turned before
your needle exits the
material. At this point,
raise the presser foot
slightly, pivot your work
to the new position,
and resume stitching.
(Figure 23)
LongerLonger
StitchStitch
ShorterShorter
StitchStitch

10
Thread tension on the Master Tools Cub is
controlled primarily from the Upper Thread
Tension. As needed, turn the Tension Assembly
Nut (A) clockwise to tighten the tension or
counterclockwise to loosen the tension.
(Figure 24)
ADJUSTING THREAD TENSION
ADJUSTING BOBBIN TENSION
Figure 24
Figure 25
AA
Important Note: The bobbin tension rarely needs adjusted, even when using varying sizes
of thread. The rule of thumb is that the bobbin thread tension is always less than the upper
thread tension.
TO ADJUST TENSION (Figure 25)
1) Loosen Lock Screw (B). Failure to loosen lock screw may result in a broken screw or
damage to the bobbin case.
2) Turn Adjusting Screw (C) clockwise to tighten tension or counterclockwise to loosen tension.
3) Tighten Lock Screw (B) when proper tension has been established.
Correct
Needle and bobbin threads
are equally drawn into
material resulting in a
perfect stitch.
Wrong
When the knot is on top of
the material, the top tension
is likely too tight. Turn
Tension Assembly Nut (A)
counterclockwise to
loosen tension.
Wrong
When knot is on the bottom
of material, the top tension
is likely too loose. Turn
Tension Assembly Nut (A)
clockwise to tighten tension.
BB
CC
Ce manuel convient aux modèles suivants
1
Table des matières