wattstopper WS-250 Manuel utilisateur

WS-250 & WS-250-347
Passive Infrared Wall Switch
Occupancy Sensor
SPECIFICATIONS
WS-250 Voltages ...................................................120 or 277VAC, 60Hz
Load Requirements
@ 120VAC, 60Hz ............. 0-800W ballast & tungsten, 1/6 hp
@ 277VAC, 60Hz ........................................... 0-1200W ballast
WS-250-347 Voltage ........................................................ 347VAC, 60Hz
Load Requirements ............................................. 0-1200W ballast
Time Delay Adjustment ...................................30 seconds - 30 minutes
Sensitivity Adjustment...........................................Minimum-Maximum
Light Level Adjustment ..................................................... 10 - 200 + FC
Installation Instructions

UNIT DESCRIPTION AND OPERATION
The WS-250 and WS-250-347 PIR Wall Switch Occupancy Sensors turn lighting
or fan loads ON and OFF based on occupancy and ambient light level. They are
designed to replace a standard light switch. The WS-250 operates with 120 or
277VAC line voltage and the WS-250-347 operates with 347VAC line voltage. All
other features are the same in both models. (Throughout this manual, “WS” is
used to indicate either sensor.)
The sensor uses passive infrared technology to sense human motion, and
defines it as occupancy. A green LED on the sensor blinks upon occupancy and
then resets. It will blink again when it detects motion after the 2-second reset.
The sensor turns ON the load automatically when it detects occupancy.
Once the space is vacant and the time delay elapses, it turns OFF the load
automatically.
If adequate ambient light is already present in the area, the sensor will hold
OFF the load it controls. When the light drops below a field selectable level and
the sensor detects occupancy, the sensor turns ON the load. Once turned ON,
the load remains ON until the space is vacant or the light level rises above the
setpoint and the time delay expires.
Manual Operation: The occupant can press the ON/OFF button to turn the
load ON and OFF. When the load is turned OFF or ON manually, it stays OFF or
ON as long as the sensor detects motion. After no motion is detected for the
length of the time delay, the
sensor goes back to automatic
operation. If the load was ON,
it turns OFF. The next time
the sensor detects occupancy
and the ambient light is lower
than the set level, the sensor
automatically turns ON the load.
Walk-test feature:
When the Time Delay trimpot
is in the fully counterclockwise
position, the sensor has a 30
second time delay and the Light
Level function is disabled. This
allows you to quickly check the
sensor coverage area.
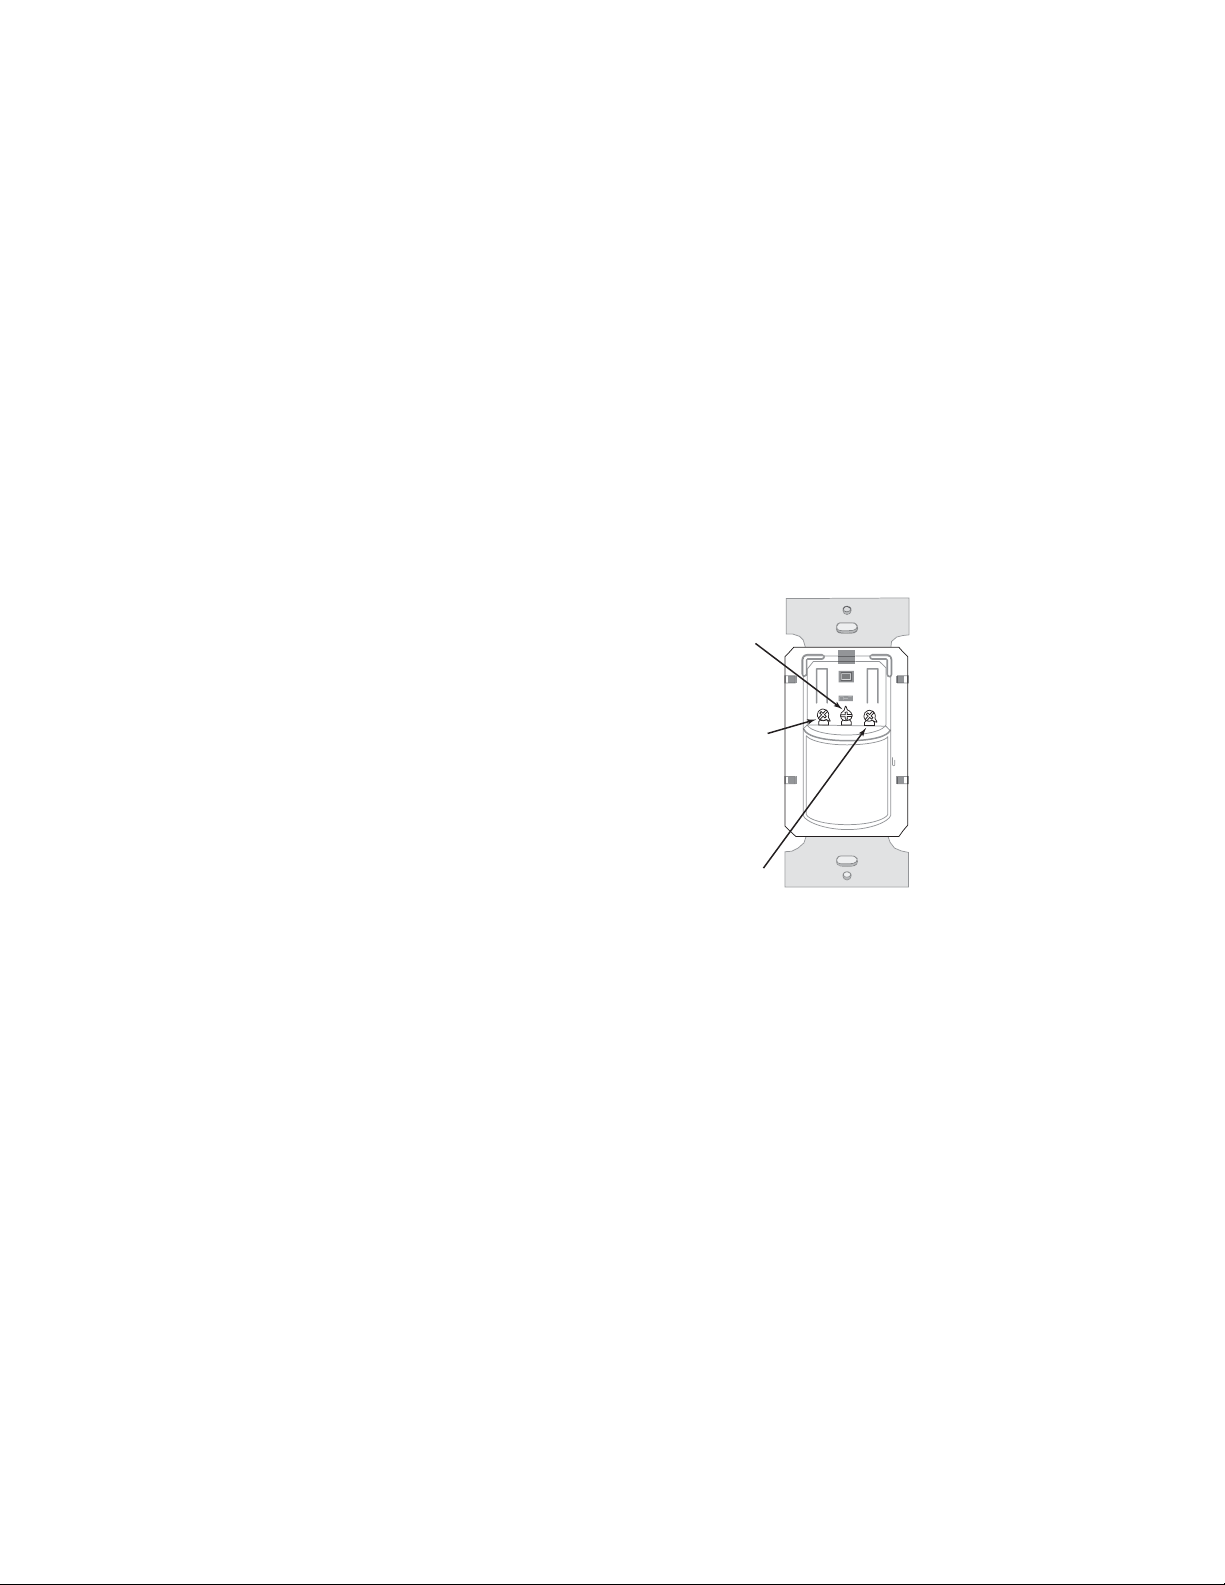
Service function:
In the event of unit failure or if
it is necessary to leave the load
ON, remove the Service Jumper plug. This disables all automatic ON and OFF
functions and the load can only be operated using the ON/OFF button.
Call 800.879.8585 for Technical Support
ON/OFF
Switch
Service
Jumper
Light Level
Time Delay
Sensitivity
LED
Fresnel Lens
ON/OFF Button
(Switch Cover)
Press down
on tab and
pry off Cover
(L)
(T)
(S)
Maximum = clockwise
Minimum = counterclockwise

COVERAGE PATTERNS
The WS detects motion in areas up to 900 sq. ft. and up to 35 feet from
the sensor. Ideally, the sensor is designed for small amounts of motion in
spaces up to 300 sq. ft. The Fresnel lens on the sensor is a multiple segment
viewing lens with a field of view of 180°.
The sensor must have a
clear view of the people in
the space in order to detect
occupancy. Obstructions,
such as furniture blocking
the sensor’s lens, may
prevent occupancy
detection.
15'
(4.6m)
35'
(10.7m)
4.0'
(1.2m)
35'
(10.7m)
floor
Opaque adhesive tape is supplied so that
sections of the sensor’s view can be masked.
This allows you to eliminate coverage in
unwanted areas.
Since masking removes bands of coverage,
remember to take this into account when
troubleshooting coverage problems.
Masking the lens
Visit our website for FAQs: www.wattstopper.com
Side View
Top View
Opaque tape

1. Connect the existing wires in the wall box to the sensor flying leads. (See
Wiring Directions at right).
• Do not allow bare wire to show below connector.
• The ground wire must be tightly grounded for the unit to operate
properly.
2. Attach the sensor to the wall by mounting it in the wall box with the two
mounting screws provided.
3. Turn ON power at the circuit breaker.
4. Test the sensor using the procedure in the Sensor Adjustments section.
There is an initial warm-up period after installation. It may take up to a
minute before the load turns ON due to a sensor warm-up period during
initial power-up (this occurs during installation only). The load turns ON
after the warm-up period ends if the sensor detects motion.
Rapid successive pressing of the ON/OFF button causes a delay in
function. A single press of the button causes an immediate response. If the
button is pressed again within 2 seconds, the switch ignores it. Wait at least
two seconds between button presses.
5. Install industry standard decorator wall switch cover plate (not included).
CAUTION
Turn the power OFF at the circuit breaker before installing the sensor.
INSTALLATION
WS
Wall Switch
Wall
Junction Box
Call 800.879.8585 for Technical Support

Load
Red Black to Line
Green
Neutral
Single-level wiring
WIRING DIRECTIONS
For normal installation of the WS-250 and WS-250-347, connect:
1. LOAD to Red flying lead.
2. LINE to Black flying lead.
3. GROUND to Green .
Manual bi-level lighting wiring
Load
Load
Green
Red Black to Line
Neutral
Visit our website for FAQs: www.wattstopper.com

SENSOR ADJUSTMENT
DO NOT OVERTURN TRIMPOTS WHEN ADJUSTING THE SENSOR!
1. To test unit operation, press the ON/OFF button to turn the load ON.
2. Remove the button cover to access the adjustment controls. Use a small,
flat blade screwdriver to press down the locking tab at the top of the button,
then gently pry it off.
a) Set the time delay to the “walk test” position (fully counterclockwise).
b) Leave the room. The load should go OFF after 30 seconds.
3. To test sensitivity:
a) Make no motion for 3 seconds.
b) Wave your hand sideways in front of the sensor at a distance of
approximately 12”. The LED blinks when movement is detected. Typically,
the sensitivity should be at maximum (fully clockwise).
4. Set the light level when the controlled light would normally be turned OFF
due to the presence of sufficient daylight or other electric light. [If this
feature is not needed, leave the light level at maximum (fully clockwise)].
a) Set the Time Delay to at least 5 minutes. This takes the sensor out of
Walk-test mode, and enables the light level feature.
b) Set the Light level to 50% (12 o’clock position) which is approximately
100fc. Let the sensor time out so lights are OFF. Enter the space and
lights should remain OFF.
c) Make sure your body does not cast a shadow on the sensor, and adjust
the light level trimpot clockwise in small increments.
d) After each adjustment, wait 5-10 seconds to see if the lights turn ON.
Repeat until the lights turn ON. At this setting the load connected to the
sensor will not turn ON if light levels are above the current illumination.
Note: Users can override this function by placing their hand in front of
the sensor to block incoming light. The load will then remain ON until the
space is unoccupied or the light level rises above the setpoint and the
time delay expires.
5. Reset the time delay to the
desired setting. The time delay
can be set from 30 seconds
(see Walk-test feature, light
level feature is disabled)
to 30 minutes in 5-minute
increments.
Visit our website for FAQs: www.wattstopper.com
Time Delay (T)
Shown as set for
15 minutes
30 seconds
(Walk-test)
5 minutes
10 minutes 20 minutes
25 minutes
30 minutes
LTS

TROUBLESHOOTING
Load will not turn ON:
• LED does not flash:
- Check the sensitivity for proper configuration.
- Check all wire connections. Verify the ground wire is tightly secured.
• LED does flash:
- Press the ON/OFF button. If load does not turn ON, check all wire
connections and verify the load wire is tightly secured.
- Check the light level trimpot. Turn it fully clockwise
• If load still does not turn ON, call 800.879.8585 for technical support.
Load will not turn OFF:
• The time delay can be set for 30 seconds
(Walk Test), 5, 10, 15, 20, 25, or 30 minutes.
Ensure that the time delay is set to the
desired delay and that there is no movement
within the sensor’s view for that time period.
• To quickly test the unit for proper operation,
turn the time delay to minimum (fully
counterclockwise) and move out of the
sensor’s view. Load should turn OFF after 30
seconds.
• If load still does not turn OFF, call
800. 879.8585 for technical support.
Sensing motion outside desired area:
• Opaque adhesive tape is included with the sensor and can be used to limit
the detection areas. See Masking the Lens.
• Adjust sensitivity counterclockwise to reduce excessive sensitivity.
Call 800.879.8585 for Technical Support
Sensitivity (S)
shown as set
for Maximum
Light Level (L)
shown as set
for Maximum (+)
to disable
Time Delay (T)
Shown as set for
15 minutes

Please
Recycle
2800 De La Cruz Boulevard, Santa Clara, CA 95050
Technical Support: 800.879.8585 • www.wattstopper.com
COVER PLATES
WattStopper WS wall switches fit behind industry standard decorator style
switch cover plates.
WARRANTY INFORMATION
WattStopper warranties its products to be free of defects in materials and
workmanship for a period of five (5) years. There are no obligations or liabilities
on the part of WattStopper for consequential damages arising out of, or in
connection with, the use or performance of this product or other indirect
damages with respect to loss of property, revenue or profit, or cost of removal,
installation or reinstallation.
09266r3 05/2009
Ce manuel convient aux modèles suivants
3
Table des matières
Autres manuels wattstopper Capteur de sécurité

wattstopper
wattstopper CX-105 Manuel utilisateur

wattstopper
wattstopper LMDW-101 Manuel utilisateur

wattstopper
wattstopper LMDC-100 Manuel utilisateur

wattstopper
wattstopper Legrand LMPX-100-1 Manuel utilisateur

wattstopper
wattstopper EW-105-24 Manuel utilisateur

wattstopper
wattstopper Legrand LMPX-100 Manuel utilisateur

wattstopper
wattstopper LMUC-100 Manuel utilisateur

wattstopper
wattstopper CI-300 Manuel utilisateur


