WAI WAI1000 Manuel d'instructions
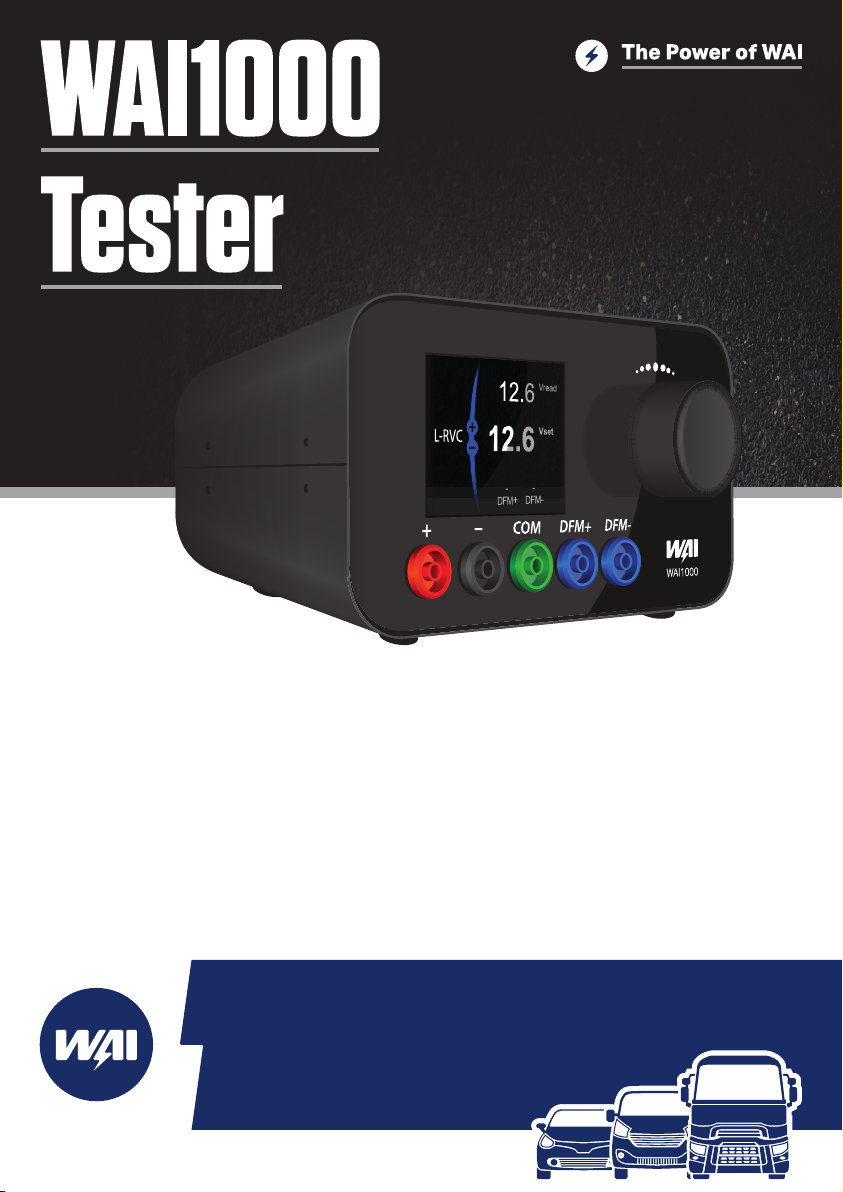
Quick Start Manual
www.waiglobal.com
WAI1000 Tester QuickStartManual
WAI1000 Tester Quick Start Manual
Please read this manual before rst using your WAI1000 Tester and familiarize yourself with
it’s functions to ensure safe operation of the unit.
Disclaimer
All information, illustrations, and specications contained in this technical instruction manual
are based on the latest information available at the time of publication. WAI Global reserve the
right to make changes at any time without obligation to notify any person or organization of
such revisions or changes.
Copyright
No part of this manual may be reproduced, stored in a retrieval system or transmitted, in any
form or by any means, electronic, mechanical, photocopying, recording, or otherwise without
the prior written permission of WAI Global.
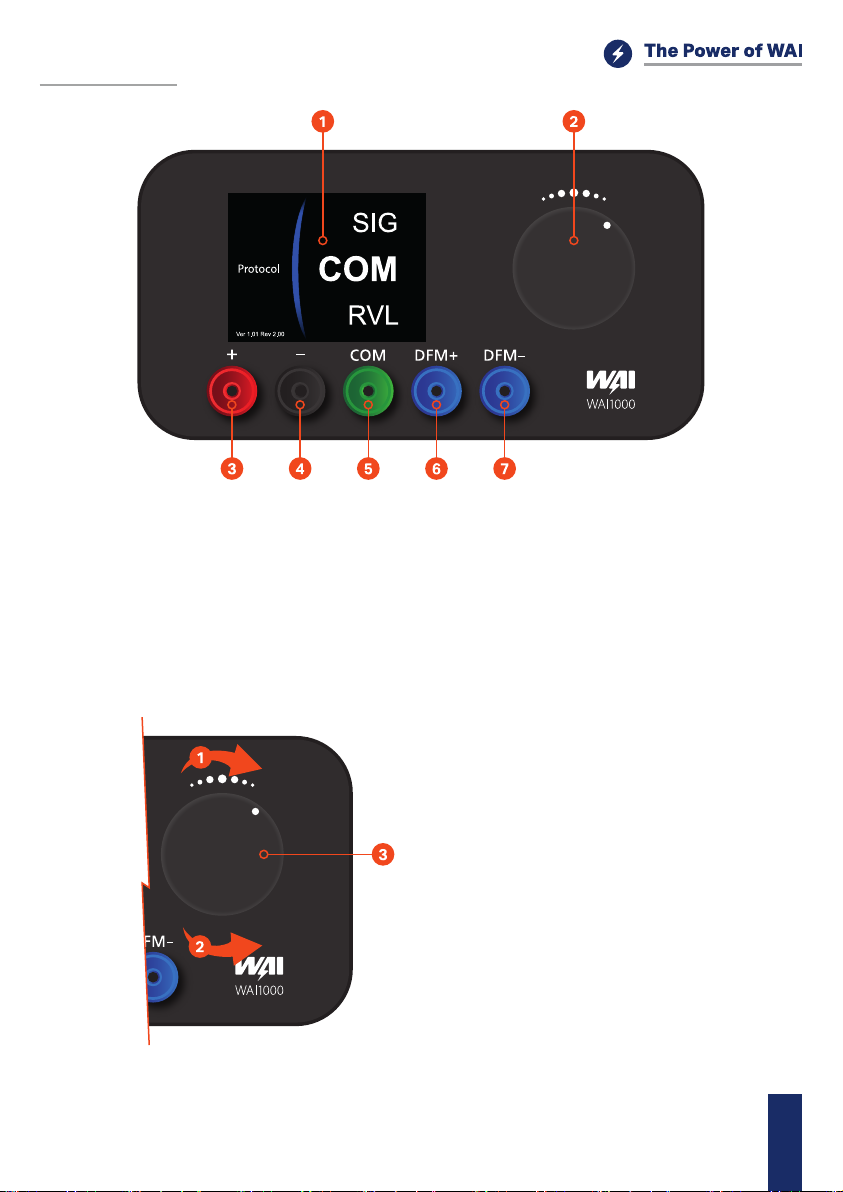
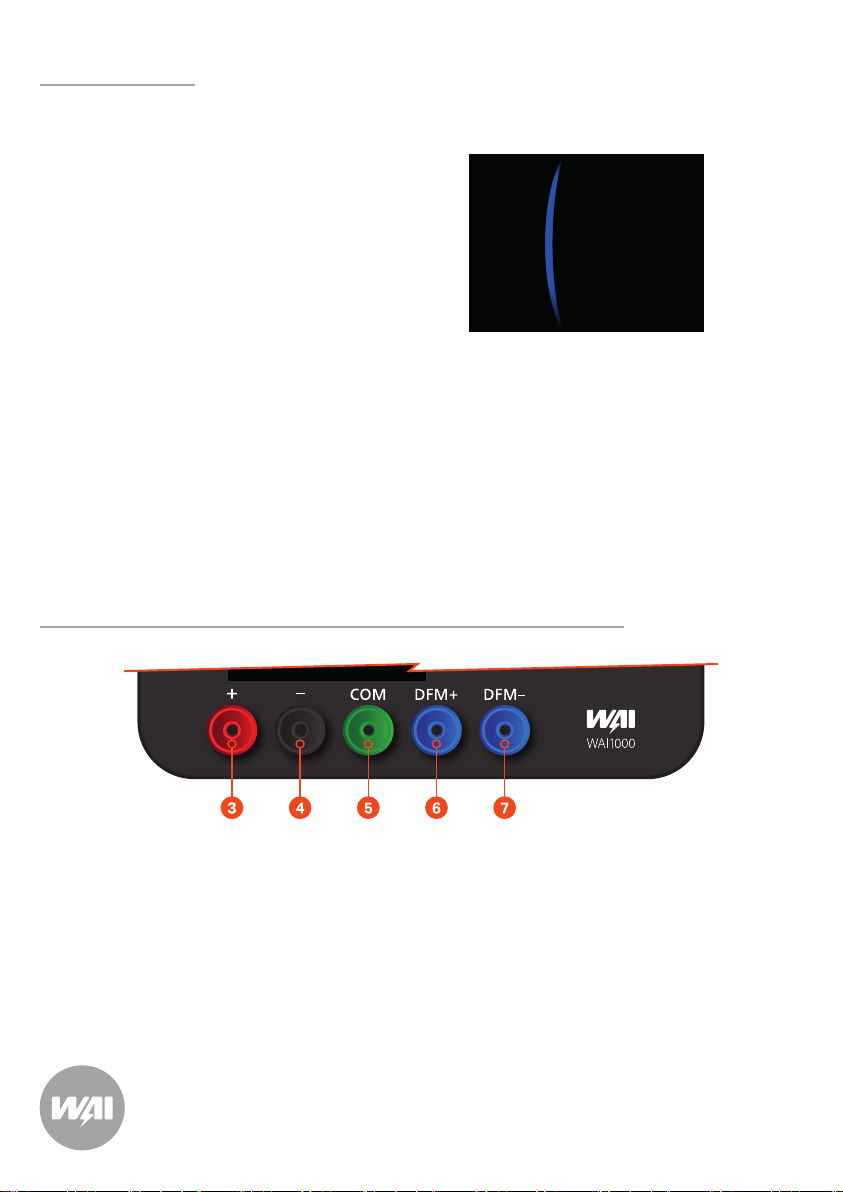
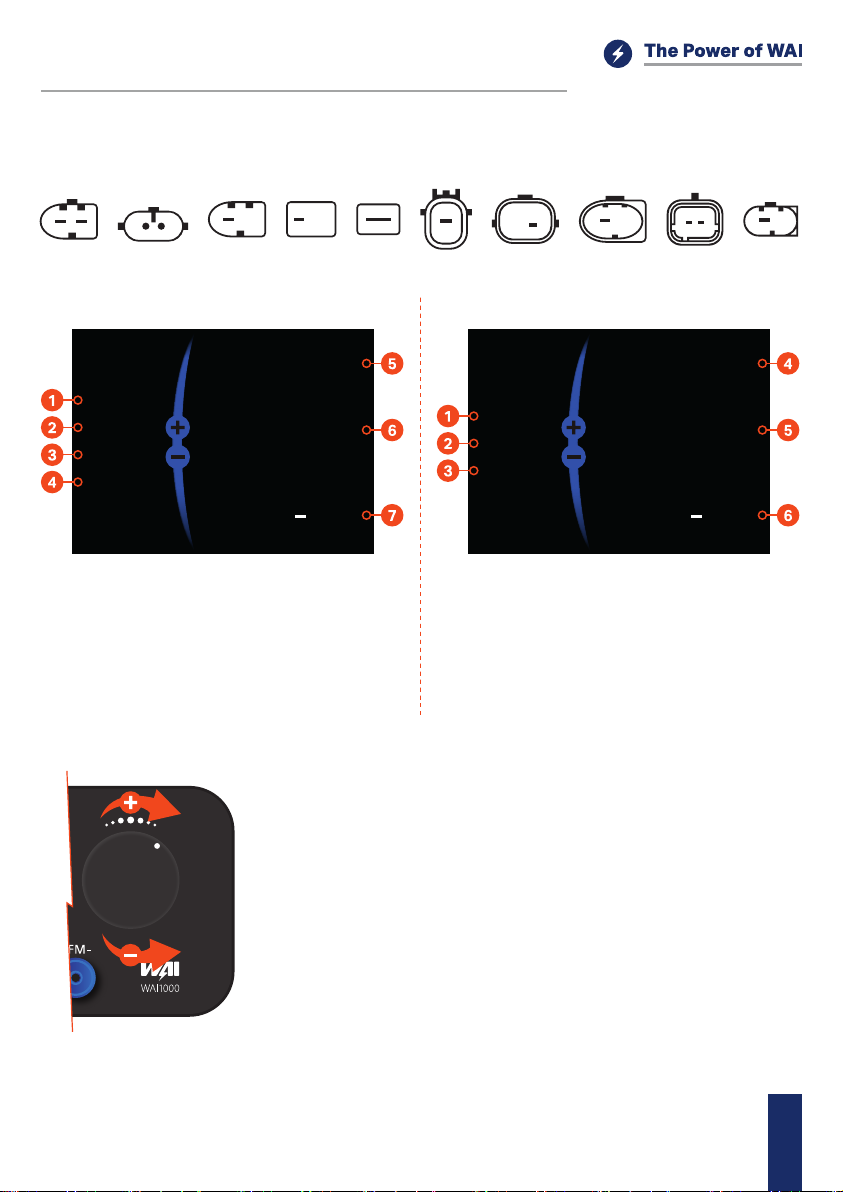
Controls
1- LCD Display
2- Control Knob used to operate device options
3- B+ terminal, power supply (use only 12V input)
4- B- terminal, power supply
5- COM terminal - control line for ECU protocols
6- DFM monitor positive eld order
7- DFM monitor negative eld order
Turn knob clockwise or counter clockwise to
switch between options (1&2).
Conrm your selection by pushing the knob (3).
WAI1000 Tester QuickStartManual EN
Common applications:
Connecting WAI1000 with Alternator
Protocol options screen
Protocol
SIG
RVL
COM
Ver 1.01 Rev 2.00
After powering the WAI1000 you will see the following options to choose from:
Protocols
COM (LIN and BSS / BSD)
C
RLO
PD
L-RVC
SIG
DFM
l
l
l
l
l
l
l
COM - BMW, Mercedes-Benz, VW Group
C - Honda, Hyundai, Mitsubishi
RLO - Toyota, Lexus
PD - Mazda
L-RVC - Chevrolet, Opel, GM
SIG - Ford, Volvo, Mazda
DFM - Various
Steps:
1- Connect red clamp (3) to b+ terminal of alternator or to the + terminal of battery
2- Connect black clamp (4) to ground (alternator housing) or minus terminal of battery
3- Connect green wire (5) to the com/lin/bss/sig/rc/rlo/c/d terminal*
4- Connect blue wire to the dfm+(6) or dfm-(7) / fr (6,7)
*Note - green wire is always used to control alternator
After connecting the WAI1000 to a power source it will bring up the protocol menu.
Please select the proper protocol with the control knob and submit your option by pressing it.
WAI1000 Tester QuickStartManual
COM (LIN and BSS / BSD) Terminal
Digital regulators are automatically detected by the WAI1000.
Sample plugs:
COM DFM LINCOM COM/BSS2COM BSSLIN BSDCOM COM/LIN2C
2 1
Main screen LIN
Testing
Main screen BSS / BSD
LIN 1.3
BOSCH
Class 03
TME
12.6 Vread
Vset
DFM
%
12.6 BSS
ID 05
M E
12.6 Vread
Vset
DFM
%
12.6
1- Lin protocol version
2- Vendor
3- Class of regulator
4- Errors (T=Temperature, M=Mechanical, E=Electrical)
5- Read Voltage value
6- Setting of regulator Voltage
7- DFM
1- Protocol
2- Regulator ID
3- Errors (T=Temperature, M=Mechanical, E=Electrical)
4- Read Voltage value
5- Setting of regulator Voltage
6- DFM
l
l
l
l
l
l
Speed up the alternator to about 1000 RPM
Wait for the WAI1000 to connect to the regulator
When information about the regulator shows up you can control
the Voltage by rotating the control knob
When changing the Vset value Vread should decrease or
increase accordingly
If the regulator supports DFM while Vset changes the value
should also change
Pressing the control knob makes the WAI1000 go back to the
protocol selection screen
WAI1000 Tester QuickStartManual EN

1- Terminal
2- Read Voltage value
3- Setting of regulator Voltage
4- DFM
C Terminal
Sample plugs:
Testing H/L setpoint and PWM type C terminal regulators
Main screen C
l
l
l
l
H/L setpoint type: Dial knob clockwise for the High (H) set point
until Vset = 15.8V. The Vread value will equal the upper set point
of the regulator (it will not match Vset). Dial the knob counter
clockwise for the Low (L) set point until the Vset = 11.4V. The
Vread value will equal the lower set point of the regulator (it will
not match Vset). Note: Dial settings between the High (H) and
Low (L) will not be accurate.
PWM type: Dial knob clockwise/Counter clockwise to set Vset
value. Vread should increase or decrease accordingly.
If the regulator supports DFM, whilst Vset changes the value
should also change.
Pressing the control knob makes the WAI1000 go back to the
protocol selection screen.
12.6 Vread
Vset
DFM+DFM-
12.6
C
S
L
G S L F
(C) (FR)
CFR
LIG
CFR
LIG
There are two types of C terminal regulators H/L setpoint type
and PWM type the two methods for testing Vset/Vread are
described below.
WAI1000 Tester QuickStartManual
Note: Small dierence between the voltage is acceptable. What is important is the appropriate reaction
of the alternator – increasing or decreasing the output voltage according to the required voltage and
DFM value.
1- Terminal
2- Read Voltage value
3- Setting of regulator Voltage
4- DFM
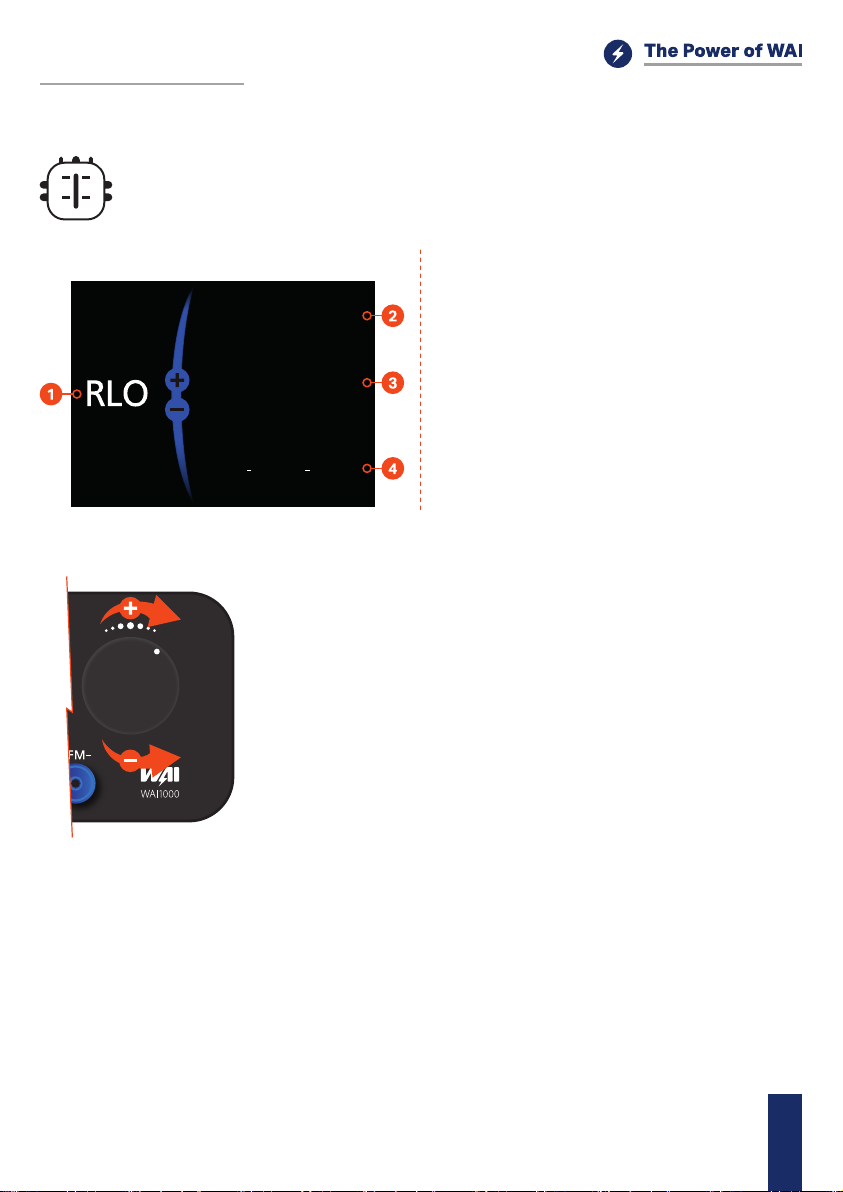
RLO Terminal
Sample plug:
Testing RLO terminal regulators
Main screen RLO
12.6 Vread
Vset
DFM+DFM-
12.6
l
l
l
l
l
l
Speed up the alternator to about 1000 RPM
Wait for the WAI1000 to connect to the regulator
When information about the regulator shows up you can control
the Voltage by rotating the control knob
When changing the Vset value Vread should decrease or
increase accordingly
If the regulator supports DFM while Vset changes the value
should also change
Pressing the control knob makes the WAI1000 go back to the
protocol selection screen
L M
IG RLO
WAI1000 Tester QuickStartManual EN
1- Terminal
2- Read Voltage value
3- Setting of regulator Voltage
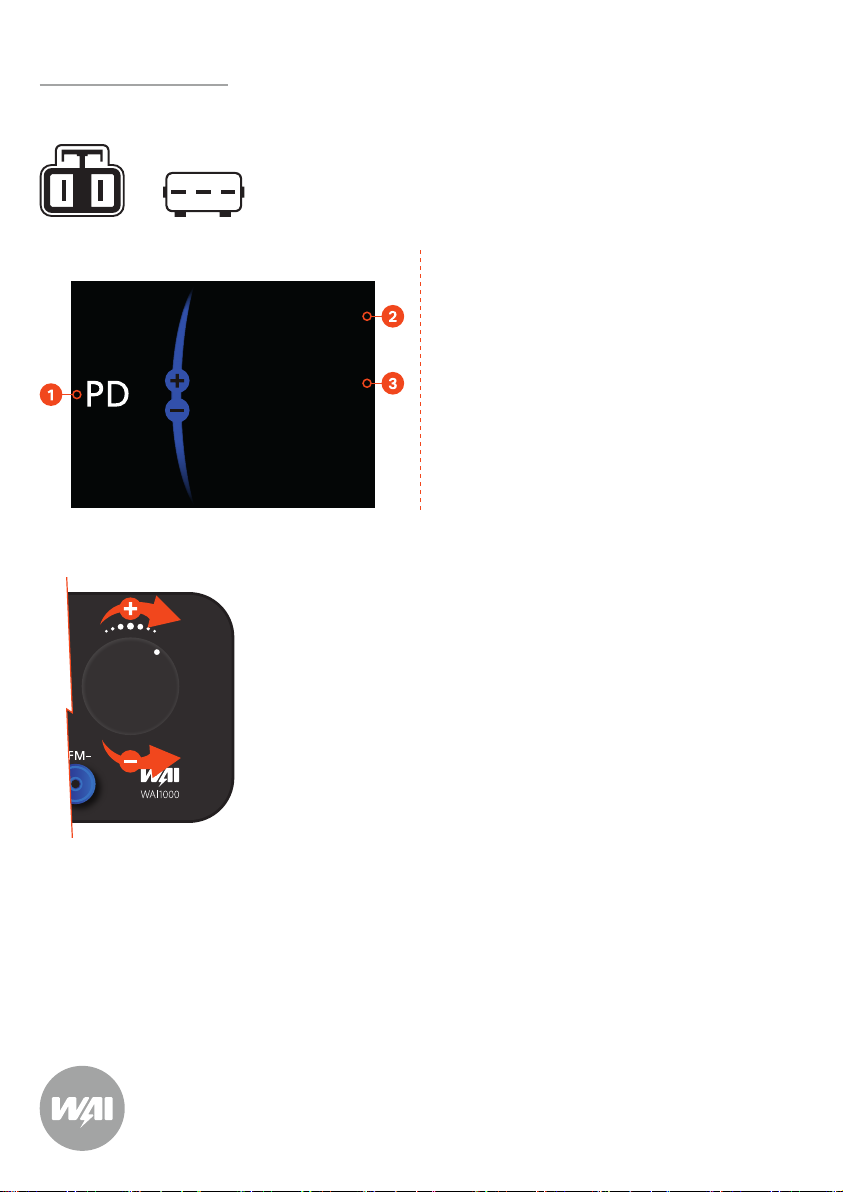
PD Terminal
Sample plugs:
Testing PD terminal regulators
Main screen PD
12.6 Vread
Vset
12.6
l
l
l
l
l
Speed up the alternator to about 1000 RPM
Wait for the WAI1000 to connect to the regulator
When information about the regulator shows up you can control
the Voltage by rotating the control knob
When changing the Vset value Vread should decrease or
increase accordingly
Pressing the control knob makes the WAI1000 go back to the
protocol selection screen
P
D1 P1 D
WAI1000 Tester QuickStartManual
1- Terminal
2- Read Voltage value
3- Setting of regulator Voltage
4- DFM
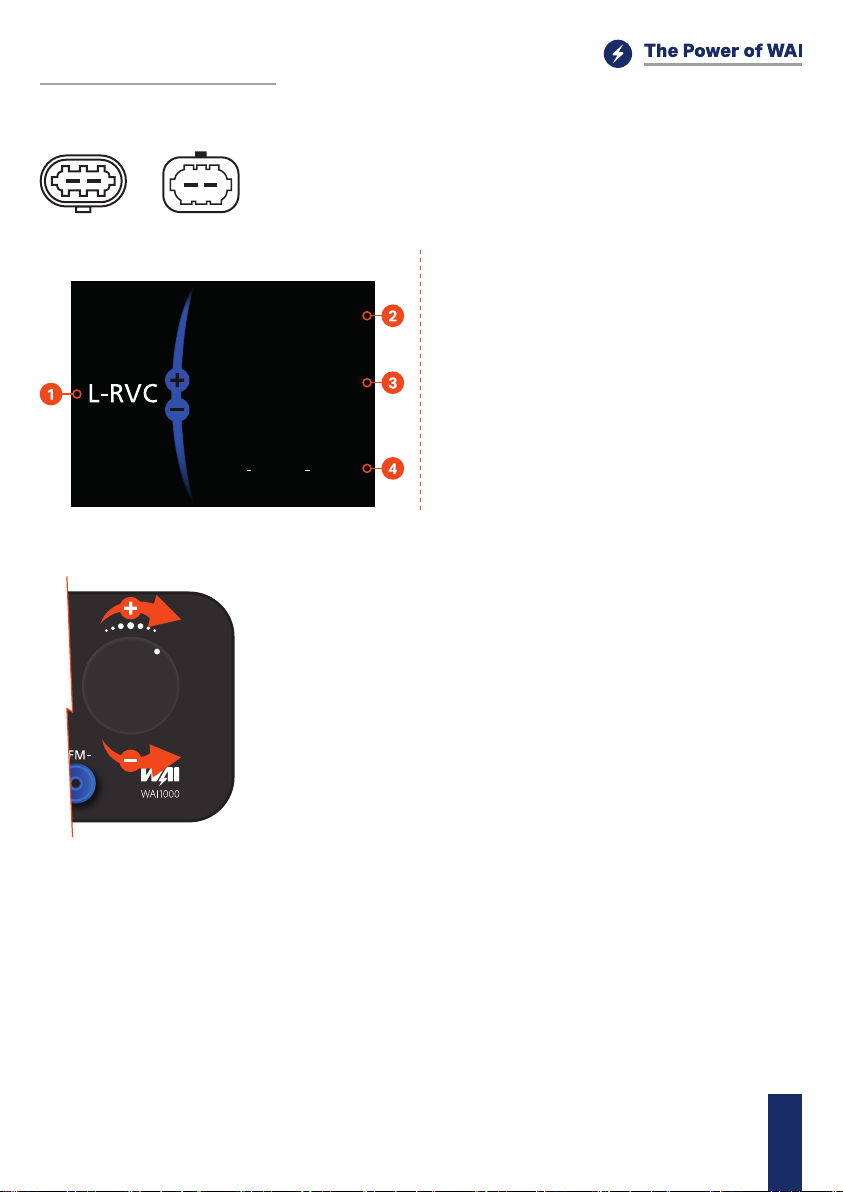
L-RVC Terminal
Sample plugs:
Testing L-RVC terminal regulators
Main screen L-RVC
12.6 Vread
Vset
DFM+DFM-
12.6
l
l
l
l
l
l
Speed up the alternator to about 1000 RPM
Wait for the WAI1000 to connect to the regulator
When information about the regulator shows up you can control
the Voltage by rotating the control knob
When changing the Vset value Vread should decrease or
increase accordingly
If the regulator supports DFM while Vset changes the value
should also change
Pressing the control knob makes the WAI1000 go back to the
protocol selection screen
F LRVC DFM
WAI1000 Tester QuickStartManual EN
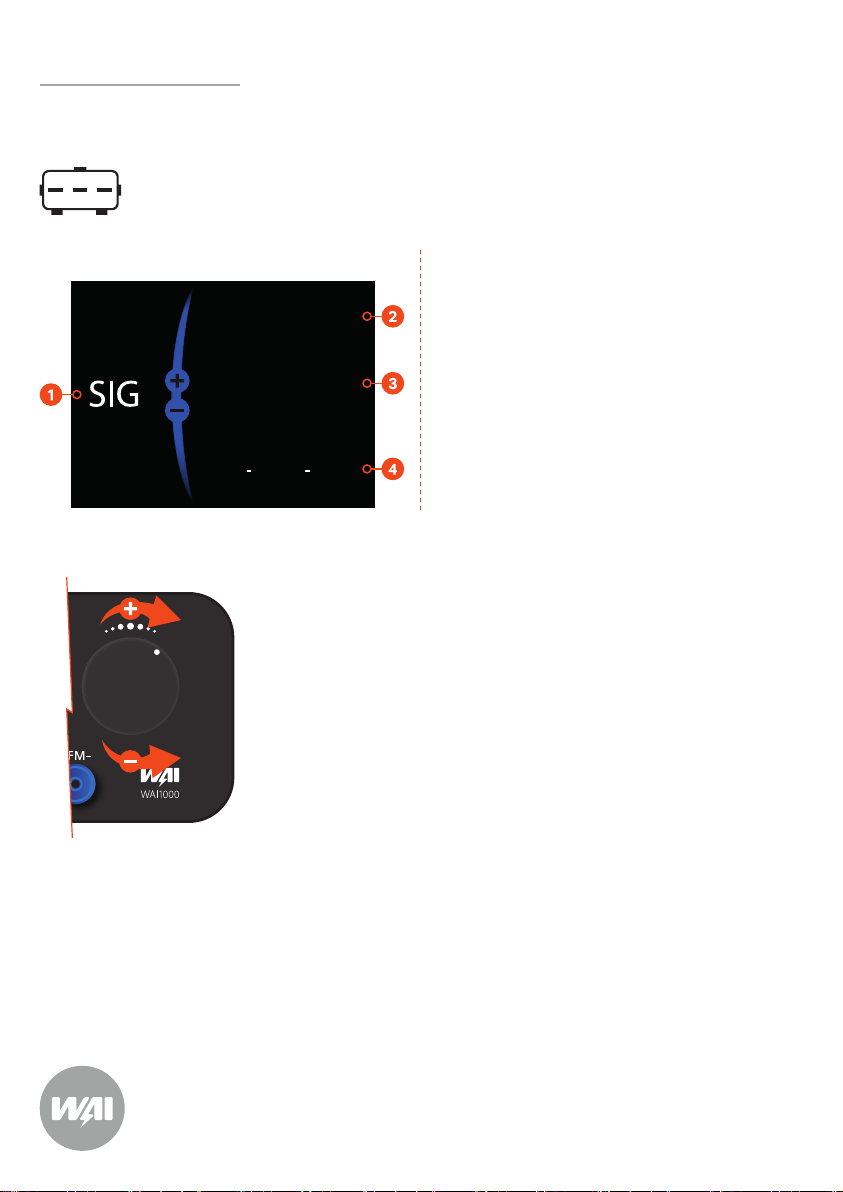
1- Terminal
2- Read Voltage value
3- Setting of regulator Voltage
4- DFM
SIG Terminal
Sample plugs:
Testing SIG terminal regulators
Main screen SIG
12.6 Vread
Vset
DFM+DFM-
12.6
l
l
l
l
l
l
Speed up the alternator to about 1000 RPM
Wait for the WAI1000 to connect to the regulator
When information about the regulator shows up you can control
the Voltage by rotating the control knob
When changing the Vset value Vread should decrease or
increase accordingly
If the regulator supports DFM while Vset changes the value
should also change
Pressing the control knob makes the WAI1000 go back to the
protocol selection screen
FR SIG A
WAI1000 Tester QuickStartManual
Manuels Équipement de test populaires d'autres marques

SMART
SMART KANAAD SBT XTREME 3G Series Manuel utilisateur

Agilent Technologies
Agilent Technologies BERT Serial Manuel utilisateur

Agilent Technologies
Agilent Technologies N3280A Manuel utilisateur

Vernier
Vernier Go Direct Voltage Manuel utilisateur

Lifeloc
Lifeloc R.A.D.A.R. Manuel utilisateur

Fluke
Fluke T5-600 Instructions d'utilisation et d'installation


