Vybra VS001-W Manuel utilisateur

Multi -3-IN-1
Heater | Cooling Fan | Air Steriliser
VS001-W (white) | VS001-B (black)
Before using the unit, please read these instructions and keep them for future reference
Vybra Solutions Ltd, 5 Kingsway, Andover, UK

1. Important Safety Information
WARNING
When using electrical appliances, basic precautions should always be followed to reduce
the risk of re, electrical shock and injury.
1.This appliance is suitable for indoor use only and should not be used
outdoors.
2.The appliance must not be repaired or modied by laypersons or
unauthorised repair personnel.
3.Before connecting the power supply unit, verify that the rated voltage
matches the voltage in your home.
4.Keep the appliance at least 1.5 metres away from any re sources and
do not expose to direct sunlight.
5.The appliance must not be used near objects that are ammable
or explosive or sensitive to heat, deformation, discolouration or
deterioration.
6.Do not use the appliance in places with a high amount of dust.
7.Never switch the appliance on or off by connecting or unplugging the
power plug instead of using the on/off switch.
8.To avoid overheating, do not cover the heater.
9.To avoid the risk of electric shock, never insert any wires or other foreign
objects into the openings of the appliance.
10. Ensure the power outlet is behind the fan when the appliance is in
use.
11. Do not connect any further high-power appliances to the same socket.
12. Do not use the appliance in the vicinity of bathtubs, shower heads or
swimming pools.
13. There is a risk of re when the appliance is covered or wrongly
positioned.
14. Do not use any programmers or timers which will start the appliance
automatically.
15. If the appliance fails, immediately turn off the power and unplug the
power cord.
Cover
Air outlet
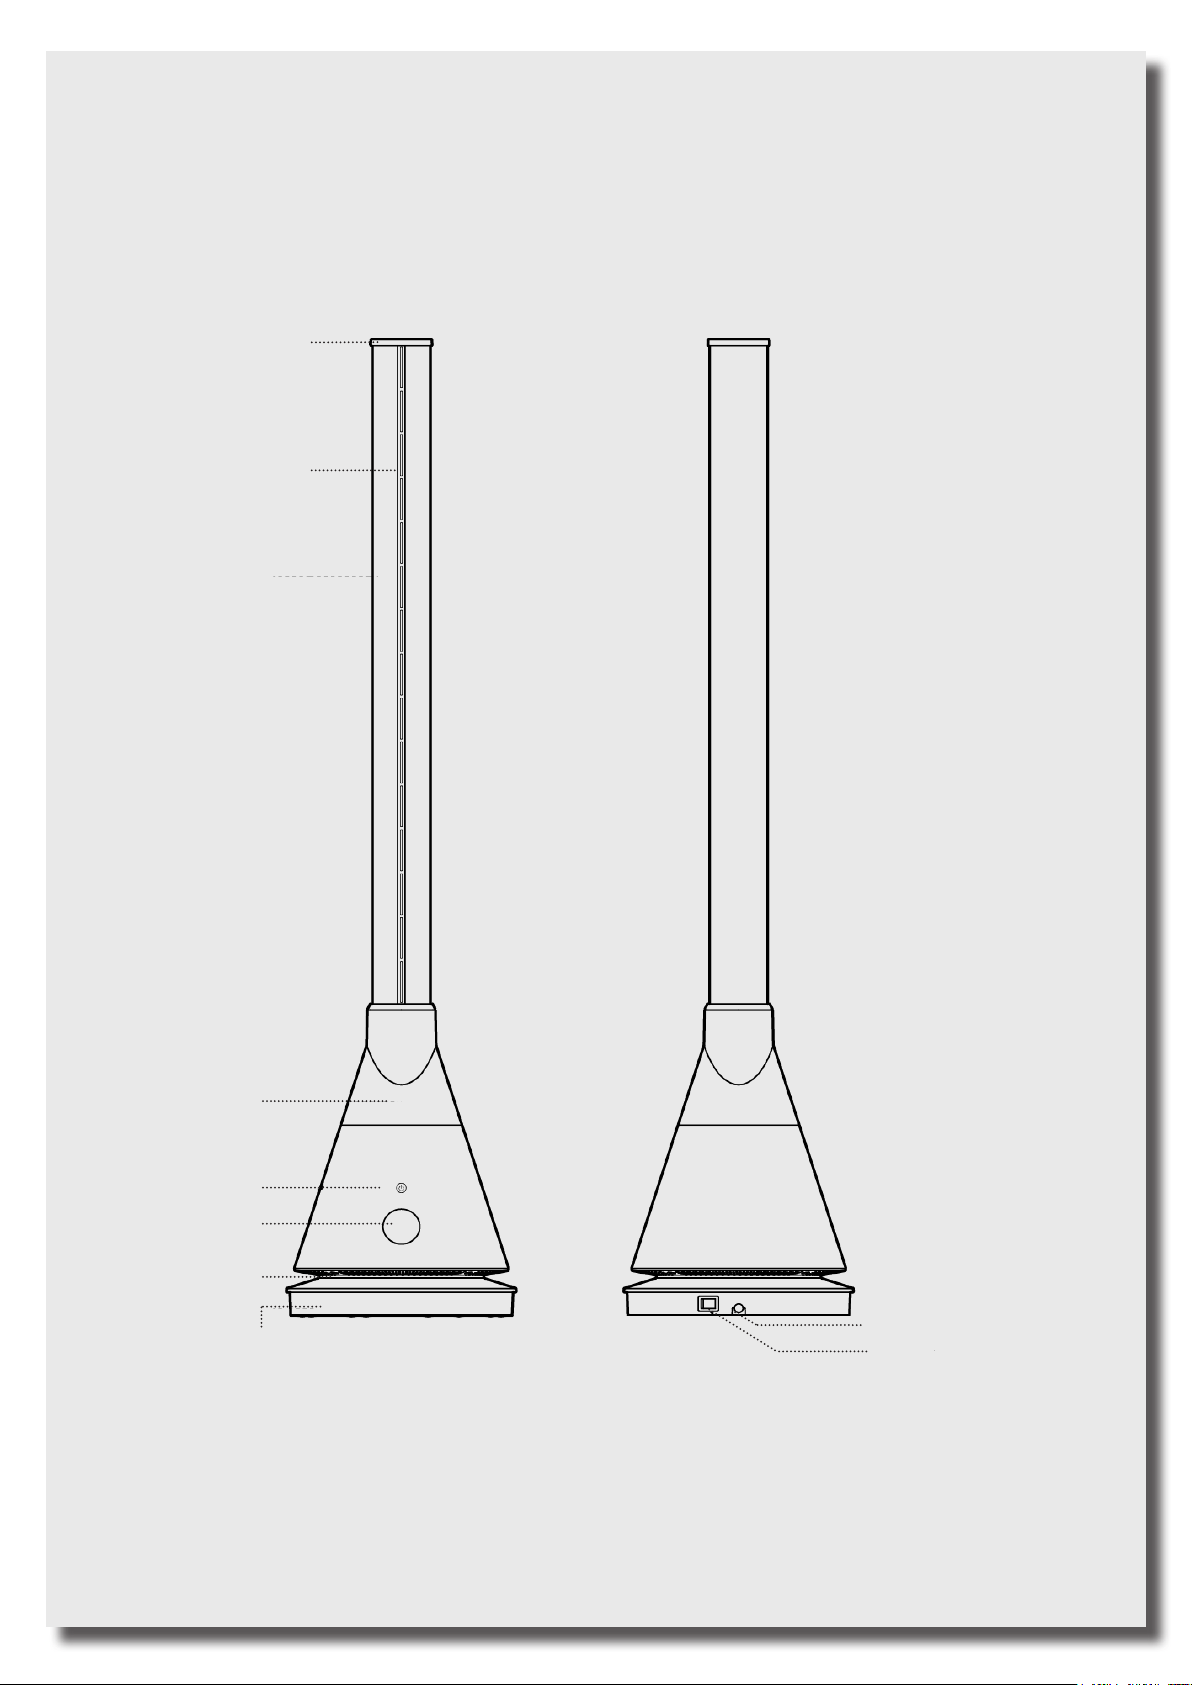
2. Product Description
Equipped with PTC heating elements, this product generates heat through hot air which
heats the room.
Basic information
Model no: VS001-W (White) VS001-B (Black)
Rated voltage: 220-240V~
Rated frequency: 50-60Hz Output power: 2000W (H) /30W (C)
Oscillating Angle: 80° Timer: 1-8h
Body
Power button
Display
Air inlet
Base Power cable
Switch
Cover
Air outlet

3. Remote Control
1. Cooling mode
2. Oscillation mode
3. Increases air speed
4. Reduces air speed
5. Heating mode
6. Turbo mode
7. Timer
8. Sleep mode
9. Increase temperature
10. UV sterilisation
11. Reduces temperature
NOTE:
When the remote is operated, the main buzzer will
make a “beep” sound.

The appliance can be switched on and off by pressing the “ON/OFF” button
Press the sleep mode button on the remote control
The display reads “L” and the air speed is minimised
Press the button again to exit the sleep mode
(You can also exit the current mode by pressing the “air speed +” button)
Press the turbo mode button on the remote control
The display reads “H” and the air speed is maximised
Press the button again to exit the turbo mode
(You can also exit the current mode by pressing the “air speed +” button)
Press the oscillation button to activate the oscillation mode
The fan can swivel to the left and right by 80°
Press the button again to stop the oscillation mode
Press this button to turn on the germicidal UV lamp
The display reads “U”
The UV lamp will be turned off after one hour of operation
Press the button again to turn off the germicidal UV lamp
In cooling mode, the LED lights up blue
Press this button to activate the cooling mode
Note: The cooling mode is the appliance’s default mode
To increase or decrease the air speed, press the “+” or “-” button on the left
side of the remote control
The cooling mode offers 9 different speed options.
The heating mode offers 4 different speed settings
In heat mode, the numbers are displayed in red
Press this button to activate the heating mode
Note: In heating mode, there are no turbo or sleep features available
Press the temperature button on the right side of the remote control to set the
temperature when the appliance is in heating mode (1-30°C)
Note: This button does not work in cooling mode.
Press the timer button on the remote control to set the timer between 1 and 8
hours.

For the best signal, point the
remote control at the unit.
Effective distance is 5 m
4. How to Use the Remote Control
Signal receiver
Warning:
1. When appliances are controlled remotely, frequency overlapping may
occur.
2. The unit may react when using remote controls operating other
appliances.
3. When using the remote control of this bladeless heater, other electrical
appliances may also react
When pressing the on/off button on the remote control, the appliance is
not turned off completely, but switched into standby mode only.
If you are not using the unit, switch it off using the power switch.
If the appliance is not to be used for a longer period of time, unplug the
unit.

5. Instruction for using the heating mode
Press the heating mode button.
The ambient temperature will be shown on the display.
Press the temperature button to set the desired temperature. The display
ashes and allows the temperature to be set between 1 and 30°C.
For the heating function to be activated, the set temperature should be higher
than the ambient temperature.
Once the ambient temperature has reached the set temperature, the hot airow
will stop and turn into a cool breeze.
If the ambient temperature is lower than the set temperature, the heating
function will be switched on automatically.
Set temperature > ambient temperature: heating function enabled.
Set temperature ≤ ambient temperature: heating function disabled.
Note: The default temperature setting is 25 °C.
If the ambient temperature is below 0 °C in heating mode, the display reads 01.
It cannot display negative temperature values.
If the appliance has been running in heating mode for more than 9 hours, it will
be switched off automatically.
Use the switch on the appliance or the remote control to restart the appliance.
Ambient temperature:
23°C
Set temperature:
25°C
Heating mode:
Use the remote control to set the temperature.
The temperature cannot be set directly at the appliance.

6. Unit
Power button
: power on
: power off
Insert the plug into the socket then press the power on/off switch to start
the unit - this puts it into standby mode.
Press the power button of the unit.
The buzzer will prompt you to click and the fan will start running.
Press and hold the power button for 2 seconds.
The buzzer will prompt you twice and stop running when you release the
button.
Adjusting air speed
When the appliance is running, press the main power button to adjust the
air speed.
You can choose from 9 different settings.
Oscillation mode
Press and hold the power button for 1 second.
The buzzer will beep once and the fan will start oscillating.
Press and hold the power button for 1 second again.
The buzzer will beep once and the fan will stop oscillating.

7. Installation Location and Precautions
Location
Place the appliance in a horizontal position. Do not use the appliance in high-
temperature and high-humidity environments (bathroom, kitchen).
Do not cover!
High temperature!
Do not place objects within 1metre
Keep distance
Safety system:
Equipped with an overheat protection sensor and automatic failover, this unit
will switch off automatically if it is falls over or overheats.
If the sensor is triggered, unplug the appliance and allow it to cool down.

8. Remote control and Troubleshooting
How to insert the batteries:
1. Open the battery cover of the
remote control
2. Insert two new AAA batteries
3. Close the battery cover of the
remote control
Battery cover
Check batteries have been inserted
correctly.
If none of the aforementioned methods work, contact the customer
Do not disassemble or repair the appliance yourself.
Troubleshooting
The appliance does not work
The remote control does not work
- check the unit is plugged in to the
power socket
- check the unit is switched ON at the
ON/OFF switch on the base of the unit
- are the batteries dead?
- have the batteries been correctly inserted?
- is the remote control aligned with the signal
receiver?
Autres manuels pour VS001-W
2
Ce manuel convient aux modèles suivants
1
Table des matières
Autres manuels Vybra Chauffage


Manuels Chauffage populaires d'autres marques

oventrop
oventrop Regucor Series Manuel utilisateur

Blaze King
Blaze King CLARITY CL2118.IPI.1 Manuel utilisateur

ELMEKO
ELMEKO ML 150 Manuel utilisateur

BN Thermic
BN Thermic 830T Manuel utilisateur

KING
KING K Series Mode d’emploi

Empire Comfort Systems
Empire Comfort Systems RH-50-5 Guide de démarrage rapide


Empire Heating Systems
Empire Heating Systems WCC65 Manuel utilisateur

Wetekom
Wetekom 92 86 43 Manuel utilisateur

Desa
Desa SPC170-F Manuel utilisateur

Watlow
Watlow Watrod Electric Tubular Heaters Manuel utilisateur

Haverland
Haverland ECO-DRY GPS Series Manuel de la liste des pièces

Stelpro
Stelpro ASILVC2060 Series Manuel utilisateur