Vortex Linear Manuel utilisateur

LPVSAM301121
FAR INFRARED SAUNAS
Please read this manual before using your sauna for the first time.
Please keep this manual for future reference.
OWNER’S MANUAL
LPVSAM301121

LPVSAM301121
Congratulations on your purchase!
Your new Vortex™ Infrared Sauna is an excellent investment in your health
and wellbeing. You can now enjoy all the benefits of a sauna session – in
the comfort and privacy of your own home.
Please note, this is the starting point for information about your new
sauna. As you read through this document you’ll see links and QR codes
you can scan with your device, which will lead you to the complete User
Guide.
The User Guide contains all the information you need to assemble,
install, use and maintain your new sauna. It applies to all Vortex™
Linear and Prestige sauna models.
The User Guide is a digital-only document. As an environmentally-
conscious, carbon-neutral company – we’re making all our full user
manuals digital-only.
Now we’ve covered the basics… are you ready for some relaxation and
rejuvenation? Great, let’s get started!
www.vortexspas.com
LPVSAM301121

LPVSAM301121
Linear™and Prestige™Models
Important safety information
Your safety is paramount. Please read the following safety information carefully before you begin
assembling your new sauna.
Health and safety warning
Infrared saunas and sauna heaters can pose serious dangers and health risks, including, without
limitation, risks of burns to your body, fires, and serious health complications from inappropriate
use or over-exposure, up to and including death. Users should consult their doctor prior to use. Do
not use an infrared sauna if you are pregnant, trying to conceive, are under the influence of drugs
or alcohol, live with a medical device that is sensitive to heat, or have hemophilia.
Fire warning
Heaters are located in sauna walls and under most sauna benches. All sauna heaters (and not just
the glowing near-infrared heaters) can cause a fire if covered or even partly obstructed. DO NOT
leave pillows or other objects leaning up against any of the heaters.
Electronics
Heat can also cause damage to electronics such as smartphones, media tablets, and laptop
computers. Any use of the foregoing in a sauna is at the sole risk of the user.
www.vortexspas.com
LPVSAM301121

LPVSAM301121
Linear™and Prestige™Models
Before you start assembling your sauna...
As a general rule, it takes two people around 3 hours to assemble this sauna. Before you start,
you’ll want to make sure you have enough time and extra help available. Also, when deciding
where to put your sauna – check you have a power socket nearby to plug it into.
For your safety and convenience please:
• Wear protective shoes and glasses
• Keep children away from the assembly process
• Ensure you have two people assisting with the installation
• Allow 2-3 hours for installation
Choosing a location
1. Place your sauna inside on a dry and level surface for the best results. An unlevel surface will
make it so that the sauna cannot be assembled correctly.
2. The ambient room temperature of your selected location will directly affect your sauna room
temperature.
3. During a 30-minute sauna session, the sauna air temperature will reach between 46-51 degrees
depending on the starting ambient room temperature. Your sauna heater panels will get to 65
degrees but the ambient sauna temperature will not.
Installation requirements
1. Your Vortex sauna is a self-contained and freestanding unit. Your sauna will not be covered
under warranty if it is built into a structure.
2. Please maintain a minimum of 8cm clearance on all sides of the unit to allow air to circulate
while giving access for the power cord.
www.vortexspas.com
LPVSAM301121

LPVSAM301121
1
www.vortexspas.com
Table of Contents
This manual covers the Vortex™Linear and Prestige models. While the
installation process for these two models is similar, there are some key
differences to be aware of which we note in the manual.
Linear™ and Prestige™ Models
Packaging contents ................................................................................................... 3
Contents of boxes ................................................................................................... 3
Accessory box contents ......................................................................................... 3
Installation video ........................................................................................................ 4
Assembly instructions ................................................................................................ 5
Location of sauna and installation order ............................................................. 5
1. Placing floor panel ............................................................................................ 5
2. Placing back panel ............................................................................................ 5
3. Connecting side walls ....................................................................................... 6
4. Installing floor molding .................................................................................... 7
5. Installing under bench support ...................................................................... 8
6. Connect heater connection under bench ................................................... 9
7. Installing the bench ........................................................................................... 10
8. Installing the roof panel ................................................................................... 11
9. Installing the side and front wall glasss ....................................................... 12
Linear™ Models
10. Installing the door, front and side glass for Linear™ Models only ...... 13
Right front wall glass .................................................................................. 13
LPVSAM301121

LPVSAM301121
Linear™and Prestige™Models
2
Prestige™ Models
10. Installing the door, front and side glass for Prestige™ Models only 14
Right front wall glass .................................................................................. 14
Completed glass installation (Prestige™ Models only) ........................ 15
11. Installing the front element heaters (Prestige™ Models only) ......... 16
12. Installing roof brackets .................................................................................. 17
13. Connect heaters in roof ................................................................................. 18
14. Installing door handle .................................................................................... 19
Installation Complete ..................................................................................... 20
Linear™ Models
Using your sauna control panel (Linear™ Models) ....................................... 21
Prestige™ Models
Using your sauna control panel (Prestige™ Models only) ............................ 23
Cleaning and maintenance ............................................................................... 25
Warranty information ......................................................................................... 25
Safety accreditations ......................................................................................... 25
www.vortexspas.com
LPVSAM301121

Linear™and Prestige™Models
3
LPVSAM301121
Packaging contents
Box 1 of 3 Box 2 of 3 Box 3 of 3
1. Floor panel 1. Left side panel 1. Front wall
2. Ceiling panel 2. Right side panel 2. Back wall
3. Bench 3. Accessories
4. Bench support . Installation manual
1. Corner Strip x 2
2. Single magnetic strip x 2
3. Handles x 2
CONTENTS OF BOXES
ACCESSORY BOX CONTENTS
Door Handles
www.vortexspas.com

Linear™and Prestige™Models
5
LPVSAM301121
www.vortexspas.com
Assembly instructions
Two adults are required to assemble this sauna. Please read the instructions thoroughly before
and during assembly to ensure proper installation of the unit.
LOCATION OF SAUNA & INSTALLATION ORDER
When determining a location for your sauna, please keep in mind the following:
a. The main power cord on the sauna must be easily accessible.
b. The location must be dry and level. Note: During installation, if the base is not level gaps may
appear. In this instance you may need to add packers under the base of your sauna.
c. Panels should be installed in the following order:
1) Floor 6) Heater connection 11) Front element heaters
2) Back panel 7) Bench 12) Roof brackets
3) Left and right side wall 8) Roof panel 13) Roof and heaters connection
4) Floor molding 9) Side & front wall glass 14) Door handle
5) Under bench support 10) Front wall glass 15) Power cord
1. PLACING FLOOR PANEL 2. PLACING BACK PANEL
Place the bottom floor panel on the
ground near the location you will be
using the sauna. Make sure the front of
the floor is in the desired location of the
door.
Place the back panel on the floor panel
by lining up the back panel on the
groove of the floor panel.

Linear™and Prestige™Models
6
LPVSAM301121
www.vortexspas.com
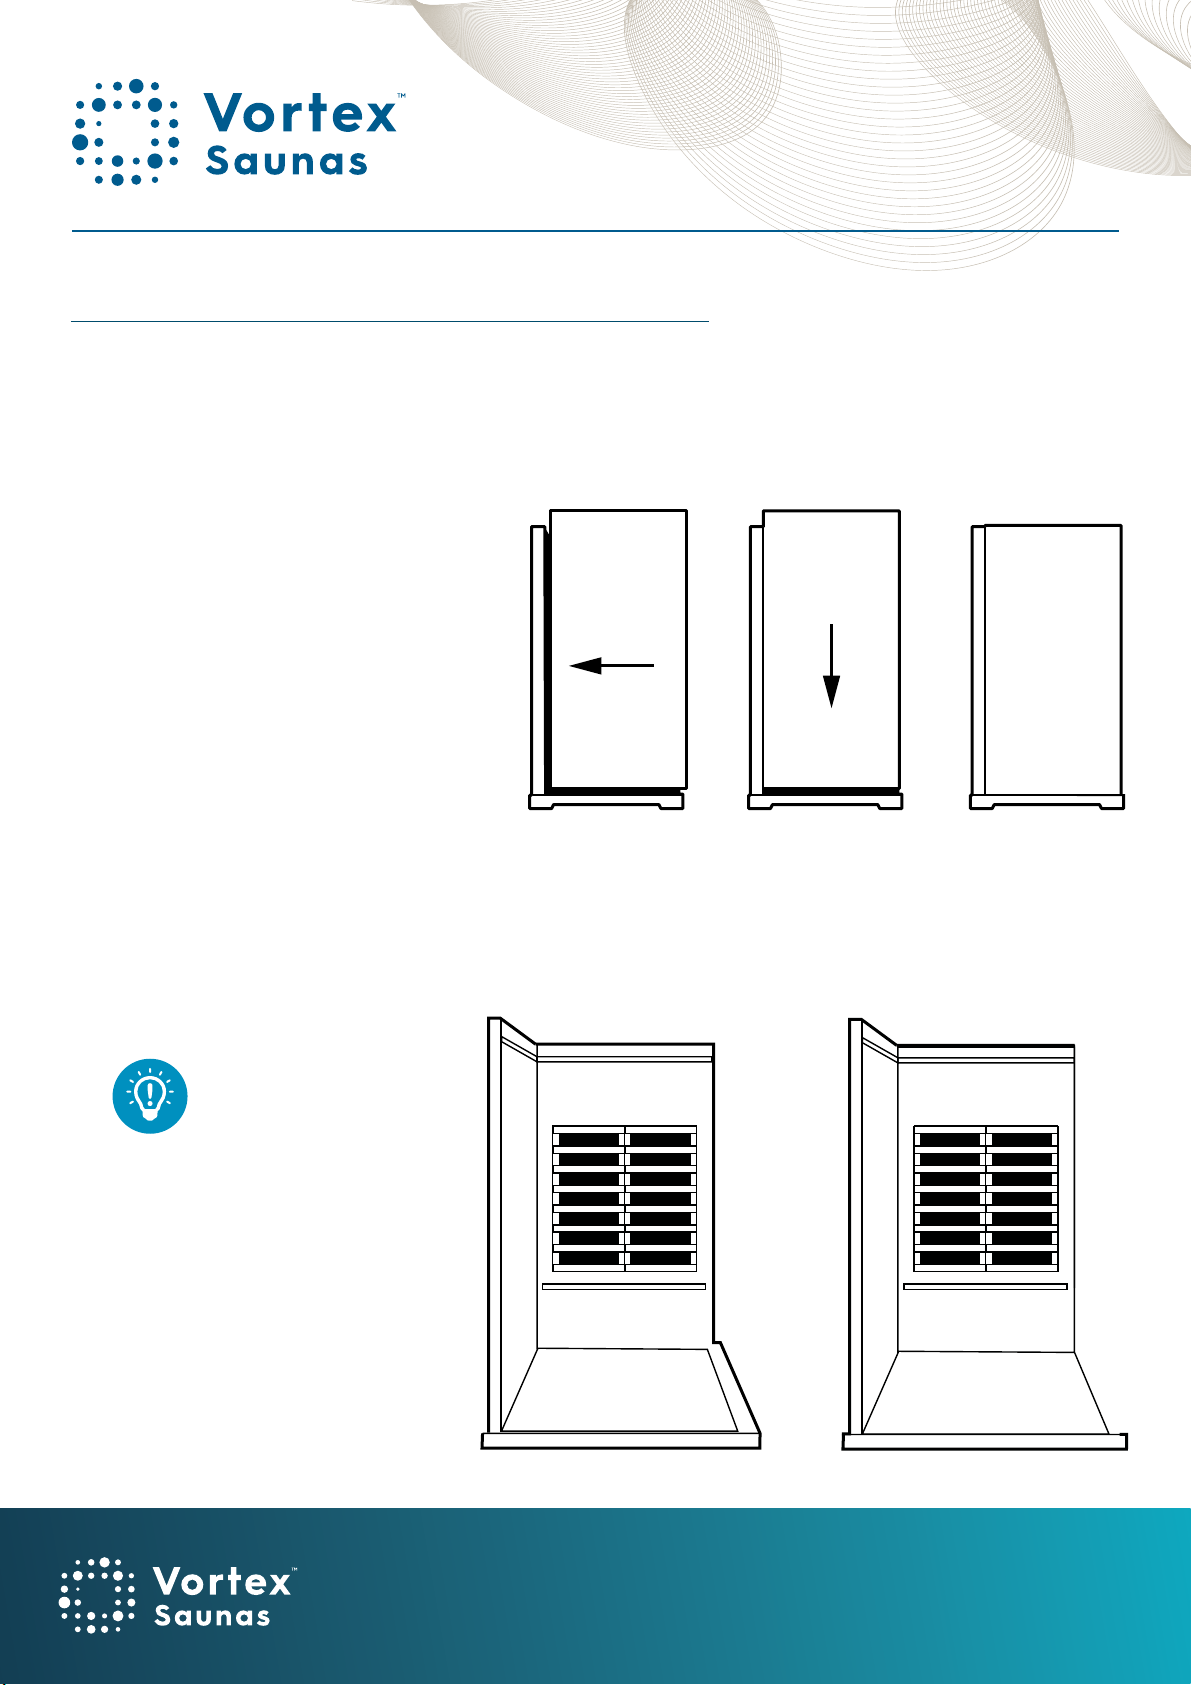
3. CONNECTING SIDE WALLS
The side wall panels will be connected to the back wall by connecting together the installed
brackets. There are “+” brackets and “-” brackets on the side of each panel. The side walls will
be installed as follows:
1. Place the left side wall in the slot in
the floor. Lift the side wall up about
10cm higher than the backwall
panel (See Picture 1).
2. Place the side wall panel against
the back wall (See Picture 2), then
slide down side wall panel until the
two panels are equal height. (See
Picture 3).
3. If the panels are not equal height or
there is an obvious gap between the
two panels, this means they are not
properly attached and you should
try again.
4. Repeat the steps above for the right
side wall panel.
Picture 1 Picture 2 Picture 3
If the panels still seem too tight to
come down all the way, try backing
off the bracket screws by one half turn
with a Phillips head screwdriver on the
female bracket.
Ce manuel convient aux modèles suivants
1
Table des matières