Virtual Trunk D'Call VT36 Manuel utilisateur


Note
Before using the product, please read the Operating Guide to enhance
your user experience.
Warranty period is 1 year from date of purchase.
The property right of all parts in this product including fittings and
relevant accessories belong to Virtual Trunk Pte. Ltd. (The
“Company”), any unlawful imitation, reproduction, extract and/or
translation is not permissible without the written consent and
permission from the company.
This product involves constant upgrading and/or improvement, our
company reserves the right to change the specifications of software
and/or hardware mentioned in this operating guide without any prior
notice. The product specifications and information mentioned in the
operating guide are for reference only.
Check list
Please check the following accessories before you discard the
packaging. Please contact your local dealer immediately if there is any
missing or damage parts.
Accessories Quantity
VT36 1
USB Data Cable 1
Battery 1
Charging Plug 1
Operating Guide 1

WHFKQRORJ\9RLFHLVWUDQVIHUHGE\
1. Overview of VT36
7KH,3ZDONLHWDONLHLVEDVHRQWKH3R&377RYHU&HOOXODU
3R&DVEHORZ
7KH3R&IHDWXUHLQYROYHVWKHXVHRIDWHUPLQDOGHYLFHWKDW
SURYLGHVDEXWWRQRURWKHUIDFLOLW\WRSODFH3R&FDOOV
$3R&FDOOFRQVLVWVRIDVHULHVRIWDONEXUVWVEHWZHHQWZRRU
PRUHLQGLYLGXDOVWKDWFRPSULVHDVLQJOHFRQYHUVDWLRQ
$3R&FDOOLVUHIHUUHGWRDVDRQHWRRQH3R&FDOOZKHQRQO\
WZRLQGLYLGXDOVSDUWLFLSDWHLQWKH3R&FDOO$3R&FDOOLVUHIHUUHG
WRDVDRQHWRPDQ\RUDJURXS3R&FDOO
ZKHQPRUHWKDQWZRLQGLYLGXDOVSDUWLFLSDWHLQWKH3R&FDOO
/4GGDWDFKDQQHO
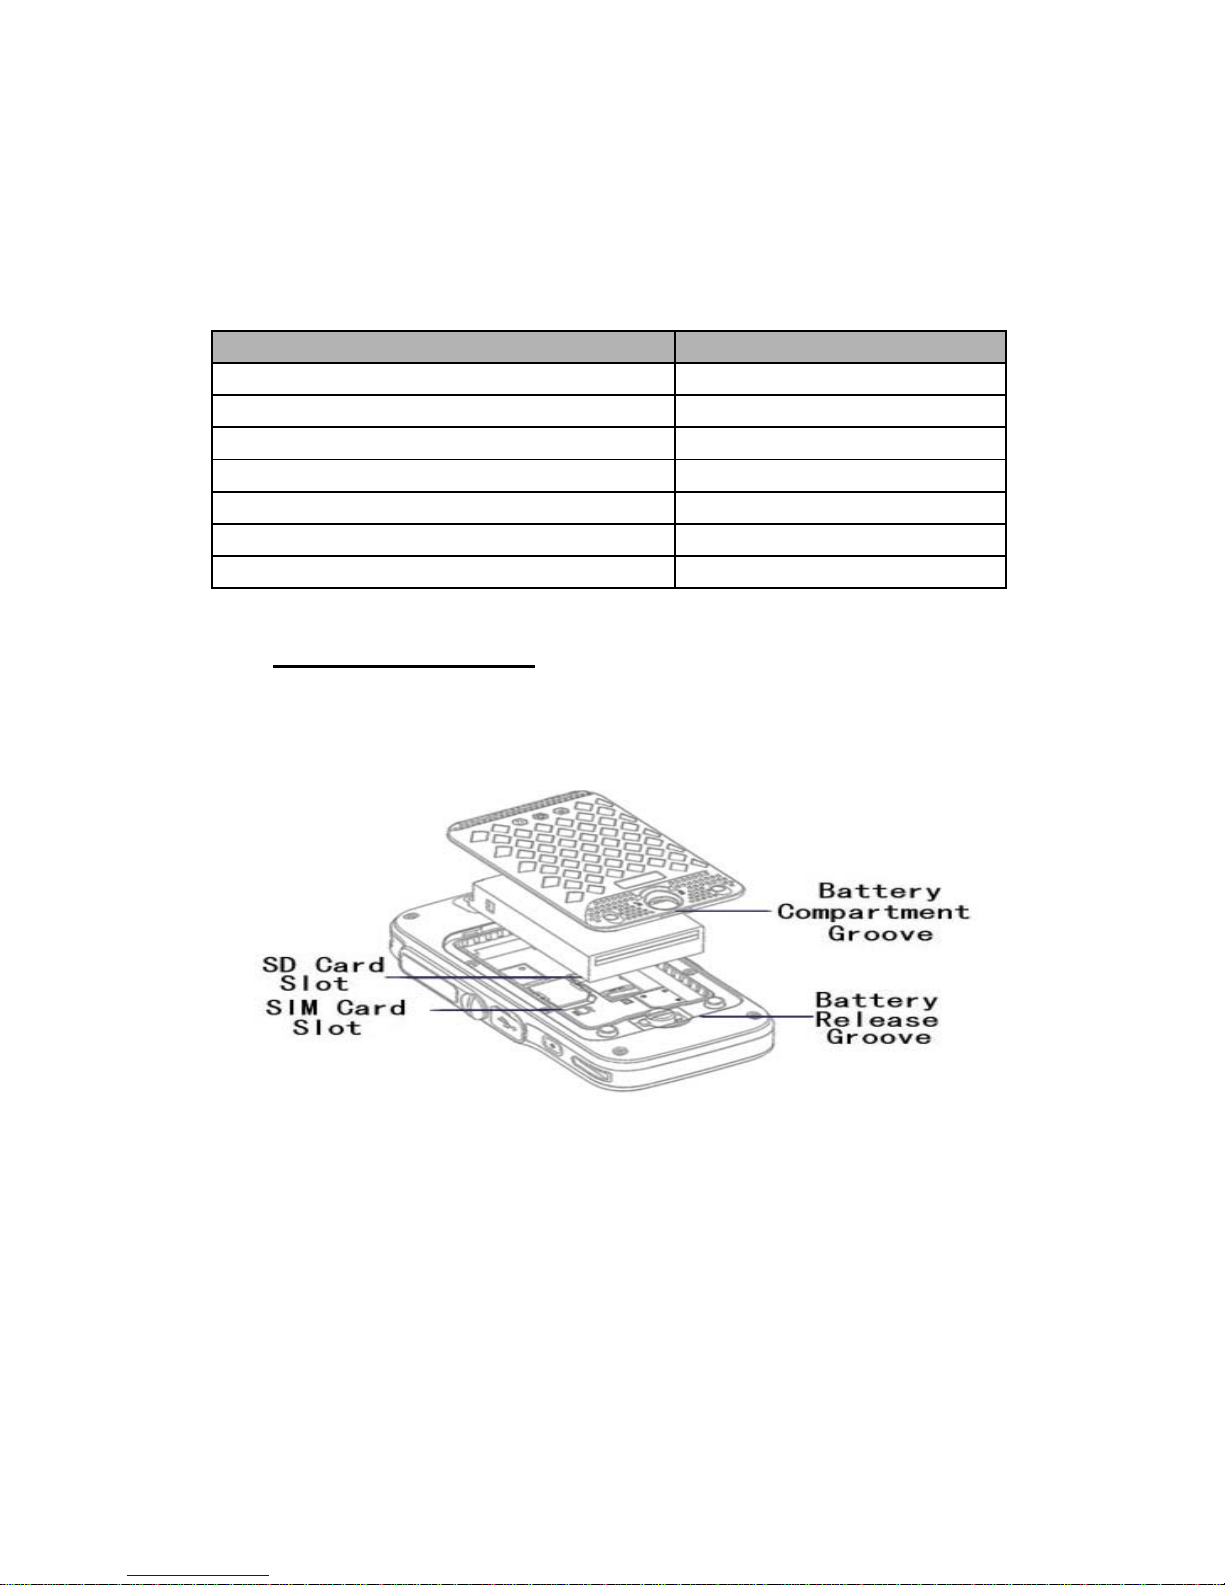
2. Installation of SIM card
1. Turn the switch at the back cover anticlockwise to open. Remove the
battery
2. Insert the SIM card as shown in the picture.
3. Insert the SD card into the slot as shown in the picture.
4. Reinstall the battery and cover. Turn the switch clockwise to lock.
LED indicator light
Operating state Indication
USB Charging Red (Blinking)
No Network Red (Steady)
Standby Mode Green (Steady)
PTT Green, (Steady)
PTT Receiving/ Queuing Green (Blinking)
Emergency Initiation Blue (Blinking)
Emergency Call Ongoing Blue (Steady)

3. Charging the Battery
Using Desktop Charger
Connect the Desktop Charger and the Power Adapter using the USB Data
Cable.
Red light on the desktop charger indicates battery charging in progress.
Green light on the desktop charger indicates fully charged.

Using USB Data Cable
Connect D’call IP smart terminal and power adapter using the USB Data
Cable.
Red light on D’call IP smart terminal indicates battery charging in progress.
Lights off indicates fully charged.
WARNING: DO NOT USE THE ABOVE TWO
CHARGING METHODS SIMULTANEOUSLY.
Important:
Use only the approved D’Call designated charger.
Battery must be fully charged before first use.
Do not expose the battery to high temperature.
Do not dismantle the battery.

4. Basic operations
Startup
Press the power button for 3 seconds, once the screen goes light up, you will
hear the “Startup tone”, it indicates successful login.
Shut Down
Press the power button for 3 seconds, once the screen goes blank,
D’call smart terminal is fully shut down.
Group Selection
Screen blank
●Press theChannel +/- button, the current group will be announced. Screen
lighted
●Press the Channel +/- button, you will hearthe “tinkling” tone.
Unlock
●Press menu button then press back button tounlock.
●Slide lock iconon the screen to unlock.
Group Call
●Press and hold the PTT button until you hear the Permit Tone.
●You are now connected tothe Group.
●You may begin to talk.
●Release PTT button to end the call and the device will be in the receiving
mode.
Emergency Call
Press and hold the Emergency button for 3 seconds and an emergency
call will be made to the Console.
Outgoing Call
D’call IP Smart terminal can do mobile call, VoIP call and Dynamic
PTT. After keying number, select the mode of outgoing call.
Input Method
When in text mode, press # to change input text.

Backlight
Press “End” button to on and off backlight. You can select the time
duration of the backlight.
Low Batt
When the battery power fall below 10%, a “beeping” tone will be heard.
Document Manager
Select document manager and you will see all folder including pictures
and videos.
Troubleshooting
No Problem Solution
1 Silent, no
response
●Battery might be drained, please replace the battery
or charge it.
●Battery may not be mounted properly. ●Replace
with a fully charge battery or charge the battery
●Check if the device has been power on.
●Check the volume level.
●Check if the external audio accessory is connected.
2 Unable to make /
receive calls ●Check if you are in the same group.
●Check whether the network is connected.
3 Battery
drained
rapidly.
●Turn off the D’call IP smart terminal when not using.
●Shut down the WiFi and GPS if not in use.
4 Cannot Charge
●Check USB cable, replace if faulty.
●WLAN
●Settings and select WLAN Settings, then turn on the WLAN switch.
●The screen will detect the WLAN network.
●If the network is open, the connection will be done automatically.
●If the network is encrypted, enter the network password as prompted and
click Connect.
●BT
The version is BT4.1, It is downward compatible.

Important Safety Instructions
To prevent possible hearing damage, do not listen at high volume levels for long
periods.
Please use appointed battery in case of explosion risk, please dispose of lifeless
battery under guidance. Recycle your phone
TheWEEElogo(shownattheleft)appearsontheproduct toindicatethatthis
productmustnotbe
disposedoffordumpedwithyourotherhouseholdwastes.Youareliabletodispose
ofallyourelectronicor
electricalwasteequipmentbyrelocatingovertothespecifiedcollectionpointfor
recycling.ofsuchhazardouswaste.

FCC NOTE:
Any Changes or modifications not expressly approved by the party responsible for compliance could
void the user's authority to operate the equipment.
This device complies with Part 15 of the FCC Rules.
Operation is subject to the following two conditions: (1) this device may not cause harmful interference,
and (2) this device must accept any interference received, including interference that may cause
undesired operation.
This equipment has been tested and found to comply with the limits for a Class B digital device, pursuant
to part 15 of the FCC Rules. These limits are designed to provide reasonable protection against harmful
interference in a residential installation. This equipment generates, uses and can radiate radio frequency
energy and, if not installed and used in accordance with the instructions, may cause harmful
interference to radio communications. However, there is no guarantee that interference will not occur in
a particular installation. If this equipment does cause harmful interference to radio or television
reception, which can be determined by turning the equipment off and on, the user is encouraged to try to
correct the interference by one or more of the following measures:
-- Reorient or relocate the receiving antenna.
-- Increase the separation between the equipment and receiver.
-- Connect the equipment into an outlet on a circuit different from that to which the receiver is connected.
-- Consult the dealer or an experienced radio/TV technician for help.
RF Exposure Information (SAR):
The SAR limit of USA (FCC)is 1.6W/Kg averaged over one gram of tissue. Product, FCC ID:2AKDA-
VT36 has also been tested against this SAR limit. The highest SAR value reported under this standard
during product certification for use at the head is 0.76 W/Kg and when properly worn on the body is
1.17 W/Kg The device was test for typical body-worn operations with the back of headset kept 10mm
from the body.To maintain compliance with FCC RF exposure requirements, use accessories that
maintain a 10mm separation distance between the user body and the back of the headset.
Table des matières


