VideoLogic GrafixStar 600 Manuel utilisateur

- 1 -
GrafixStar600 User Guide
Contents
Introduction ..................................................................................................... 2
Installing GrafixStar600 ................................................................................ 3
The SmartTools for Windows95 .................................................................... 7
Technical details ........................................................................................... 15
Troubleshooting ............................................................................................ 17
Technical support .......................................................................................... 18
Index .............................................................................................................. 20

- 2 -
GrafixStar600 User Guide
Introduction
GrafixStar600, VideoLogics new video-graphics card provides you with high performance
graphics, with display sizes up to800x600 pixels with 16.7 million colors, 1152 x 864 pixels
with 65,536 colors, or 1600 x 1200 pixels with 256 colors, along with Smar tTools for
Windows95 which let you control the graphics and video display of your PC.
To run GrafixStar600 you need an IBM or fully compatible 486 PC or above which complies
with the PCI local bus specification and which has a spare PCI bus slot.
Before you begin installing your GrafixStar600 card, read the Readme file in the GS600
directory on the VideoLogic Software Library CD.
Conventions used in this guide
The following conventions are used throughout this document: bold text is used for anything
you type; italic is used for cross-references to other documents; small capital letters are used
for keyboard keys, for example, ENTER, SHIFT, CTRL .
Handling GrafixStar600
Like other adapter cards, GrafixStar600 can be damaged by electrostatic charges during
handling. To minimize the risk, follow these simple guidelines:
Keep the card in its protective packaging until you are ready to install it.
Just before handling the card, touch the metal frame of your computer with the back of
your hand to discharge any static electricity which may have built up on you or your clothes.
Hold the card by the adapter bracket or by its edges; do not touch the printed circuit board.
Do not place the card on top of your computer or on any other metal surface.
Make sure that the card is not accidentally touched by anyone else.
Handle the card with care to avoid damage to the fragile electronic components mounted on
the circuit board.

- 3 -
GrafixStar600 User Guide
Installing GrafixStar600
Installing the GrafixStar600 hardware
Note that if you are running Windows 3.1 or 3.11, Windows should be set for a standard VGA
display before you install the hardware.
Warning: Always switch off your computer before removing the cover and observe the
warnings specified in the manufacturers documentation.
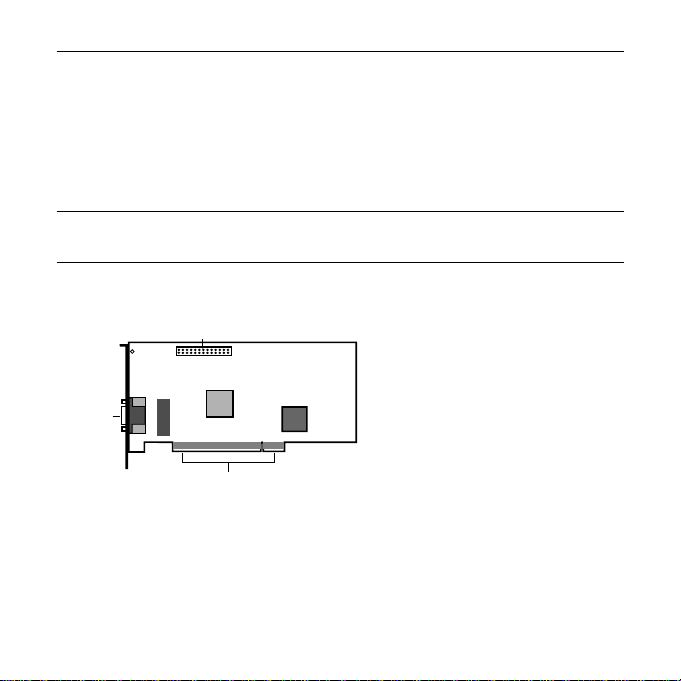
The following diagram shows the connectors on the card.
feature connector
monitor
connector
PCI bus connector
GrafixStar 600
1. Switch off your computer, monitor, and any hardware devices such as printers connected
to your computer. Leave the power cable connected to the power outlet so that your
computer is grounded.
2. Disconnect your monitor cable from your computer.

- 4 -
GrafixStar600 User Guide
3. Remove the computers cover. You may need to refer to the documentation supplied with
your computer for instructions on how to do this.
4. Remove your existing display card or disable your built-in graphics controller. Refer to the
documentation supplied with your computer for instructions on how to disable a built-in
graphics controller.
5. Locate an empty PCI bus expansion slot and remove the slot cover. Keep the screw, you
will need it later to secure the card.
6. Touch the bare metal chassis of your computer with the back of your hand to discharge
any static that may have built up on you or your clothes.
7. Align GrafixStar600 with the slot you have chosen. Firmly press the card into the slot.
You will need to use some pressure to push the card into position, but do not use
excessive force.
8. Secure GrafixStar600 using the screw that you removed previously.
9. Replace the cover of your computer.

- 5 -
GrafixStar600 User Guide
10. Connect your monitor cable to GrafixStar600. All cables connected to GrafixStar600
should be properly shielded and comply with radio frequency interference standards.
11. Switch on your computer and your computer monitor.
Installing the GrafixStar600Windows95 software
The easiest way to install the GrafixStar Windows95 software is using the Display Properties
window:
1. Insert the CD or disk into your computer.
2. Open the Control Panel window. To do this, click Start, point to Settings and click Control
Panel.
3. Double click on the Display icon to open the Display Properties Window.
Note: You can go directly to the Display Properties window by clicking on the
Windows95 desktop with the right mouse button and choosing Properties from the
menu.
4. Choose the Settings page by clicking on the Settings tab.
5. Choose the Change Display Type button.
6. Make sure that the Monitor Type line contains the name of your monitor. If not, click the
Change button and select the name of your monitor from the list.
7. Click on the Change button for the Adapter Type.
8. Insert the GrafixStar CD into your computer and choose Have Disk from the Select Device
menu. Browse to the folder [disk]:\gs600\win95\disk1.
9. Select GrafixStar600 from the list and choose OK.
10. When the GrafixStar files have been copied to your PC, the Change Display Type window
is displayed again. Choose Close.

- 6 -
GrafixStar600 User Guide
11. A message appears telling you that you will have to restart Windows95 for the new
display type to take effect. Choose OK.
12. Windows95 restarts with the new GrafixStar Windows95 drivers. You are now ready to
install the Smart Tools for Windows95.
13. Choose Run from the Start menu.
14. Type [disk]:\gs600\win95\disk1\setup and choose OK.
15. Follow the instructions that appear on the screen.
Installing GrafixStar600 for Windows 3.1
Note: before installing the GrafixStar600, make sure that you have configured Windows to
run with a standard VGA display. You can do this by using the Windows Setup from the Main
program group, choosing Change Systems settings from the Options menu and selecting VGA
from the display list box. You can also run the Windows Setup program from DOS. See the
Windows Users Guide for details on running Windows Setup from DOS.
To install the GrafixStar600 software for Windows 3.1:
1. Insert the CD into your system.
2. Type [disk]:\gs600\win31\disk1\setup and choose OK.
3. Follow the instructions that appear on the screen.
At the end of the setup procedure a dialog box will appear asking you to choose the display
mode that you want for your monitor, and will prompt you to restart Windows once you have
chosen a display mode. You can access this dialog to change your display mode by running
the Video Select program. This program is installed in the ET6000 program group by default.

- 7 -
GrafixStar600 User Guide
The SmartTools for Windows95
The SmartTools are a new set of applications which let you get the most out of the powerful
capabilities of your graphics card, giving you more control over the appearance and behavior
of your Windows desktop.
The instructions in this chapter are intended to give you an overview of how the SmartTools
work. For more detailed instructions, refer to the online help supplied with the SmartTools.
There are three Smart applications, SmartTools, Smar tDisplay and SmartDesktop.
SmartTools
SmartTools lets you create toolbars for quicker access to your applications and documents.
With SmartTools you can:
Use toolbars for the other Smart applications, and customize these toolbars to suit your
needs.
Create toolbars for other applications, adding buttons for the programs, documents and
files you use most.
Assign hotkeys for commands that you use most often.
SmartDisplay
SmartDisplay makes it easier and quicker for you to set up the properties for your monitor.
SmartDisplay gives you:
A SmartDisplay Wizard, which guides you through a step-by-step procedure that helps you
find the ideal display settings for the kind of work you are doing.
A SmartDisplay set up procedure for advanced users, which lets you select the display size,
color palette, refresh rate, desktop size, connectivity and monitor alignment for your
display.

- 8 -
GrafixStar600 User Guide
SmartDesktop
SmartDesktop controls the size and behavior of your desktop.
With SmartDesktop you can:
Set a virtual desktop that is larger than the display size.
Control the way you move around the desktop and reach the off-screen portion of your
desktop.
Change the display size at the touch of a button, allowing you to zoom in and zoom out
while you are working.
Using SmartTools
With SmartTools, you can customize the toolbars for the other Smart applications and create
toolbars of your own.
Starting SmartTools
To start SmartTools, press the Start button, choose Programs, then VideoLogic Smar tTools,
then Smar tTools, or use the Smar tTools shortcut icon on the Windows95 desktop.
The Smar tTools window contains three pages, Toolbar Properties, Customize Toolbars and
Customize Hotkeys.
Toolbar properties
With Toolbar Properties selected, you can
Open and close existing toolbars by checking and unchecking them.
Set the proper ties (Name, On Top, Tool Tips, Status Bar and Lock) for each toolbar.

- 9 -
GrafixStar600 User Guide
Customize Toolbars
With Customize Toolbars selected, you can:
Create new toolbars and add them to the list of toolbars on the Toolbar Properties page by
dragging applications from the Applications list onto the desktop, or by dragging one of the
buttons in the commands list onto the desktop.
Add buttons to toolbars by dragging them from the Commands list onto the toolbar, move
buttons by holding down the SHIFT key and dragging them along the toolbar, or remove
buttons by holding down the SHIFT key and dragging them off the toolbar.
Add buttons for other applications to the Other Apps list and set properties for these
buttons.
Assigning hotkeys
With Customize Hotkeys selected, you can assign hotkey combinations to the commands you
use most often, using combinations of SHIFT, CTRL and ALT, plus the other keys on the keyboard.
Using SmartDisplay
SmartDisplay is an application that lets you select, customize and create display modes for
your monitor. If you have never set a display mode before, or if you need help in choosing
your settings, you should use the SmartDisplay Settings Wizard. If you are familiar with
setting display modes, you should use the Advanced Settings button.
Starting SmartDisplay
1. Select the Display Properties Control Panel either by right-clicking on the Windows
background and choosing Properties from the menu or by pressing the Start button,
choosing Settings, then Control Panels, then Display.
2. Click the SmartDisplay tab. The following window appears:

- 10 -
GrafixStar600 User Guide
Setting display modes using the Wizard
The Wizard takes you through a step by step procedure for setting up a display mode.
To use the Wizard:
1. Choose the SmartDisplay page on the Display Properties window.
2. Select the display mode you want to modify from the Display Modes list.
3. Click on the SmartDisplay Settings Wizard button.
4. Follow the instructions given by the Wizard.
Autres manuels VideoLogic Carte vidéo
Manuels Carte vidéo populaires d'autres marques

Gainward
Gainward GeForce GTX 690 4GB Manuel utilisateur

ATI Technologies
ATI Technologies RADEON 137-40225-20 Manuel utilisateur

MSI
MSI N220GT series Manuel utilisateur

ATI Technologies
ATI Technologies RADEON 7000 MAC EDITION Manuel utilisateur

SIIG
SIIG aurora Manuel utilisateur

ClearSpeed
ClearSpeed ClearSpeed Advance e720 Manuel utilisateur