Trilogy 903 Manuel utilisateur

903
USER MANUAL

1
thank you
Welcome
Firstly, thank you for purchasing your Trilogy Audio Systems 903 Preamplier, we value your custom.
We strive to design and build world class products that stand the test of time. By reading this manual you
can gain a clear understanding of the 903’s operation and learn to care for it correctly. In turn, it will reward
you with a lifetime of outstanding performance.
......................................
Nic Poulson.
CEO Trilogy Audio Systems.
www.trilogyaudio.com

2
Getting Started
4 Introduction
4 About this manual
5 Unpacking
5 Environment
5 Power Supply
7 Connections
9 Mains Supply
9 Security
9 PIN Code Protection
11 Powering the preamplier
13 Overview
Menu Operation Section
15 Cartridge Settings (when optional Phono stage is tted)
17 Time Settings
17 Sleep To set the sleep timer
19 Timers To set the daily on/off timers
21 Time Set To set the day and time
23 Defaults
23 PIN Codes To enable or disable PIN codes when power applied or for menu
25 Volume To set various default volume parameters
27 Input To assign the default input
27 Film In To assign an input to be the lm input
27 Output To select the default output source
29 Balance To assign the default balance setting
29 Display To set various display parameters
31 Warm Mode To enable or disable Warm Mode
31 External To set TAS link parameters
33 Names
33 Inputs To assign user names to the inputs
35 External To assign user names to peripherals connected by TAS link
37 Tools
37 Int Status To view internal temperature, current, and safety trip counter
37 Graph To view the current graph of peripherals connected by TAS link
contents

3
37 Ext Status To check the status of peripherals connected by TAS link
37 Bus Status To check the status of the TAS link bus
39 Version To check the software version in this unit and peripherals
39 Bond To bond peripherals to this 903 for security
39 Unbond To unbond peripherals from this 903
39 IR Code To display the codes received by the IR receiver
41 Factory To reset the 903 to factory default settings
TAS link
43 Overview
43 Bus power
43 Bus remote on
43 High speed bus
45 Low speed (quiet) bus
45 Rear Panel LEDs
45 Front Panel Warnings LEDs
Appendices
47 Appendix A TASlink Pinout
49 Appendix B Default settings
Care & Service
51 Cleaning
51 Servicing
51 Declarations
Glossary
52 Glossary
Specications/Returns
53 903 Specications
53 Returns
Acknowledgements
54 Acknowledgments
contents

4
Introduction
We prefer that your Trilogy dealer delivers, installs, sets up and explains your 903’s operation to you.
However, we still recommend that you read through this manual thoroughly and keep it to hand for reference if you intend
using some or all of the 903’s powerful and rather unique features.
Should any part of this manual or the operation of the 903 not be clear to you, please do not hesitate to contact your Trilogy
dealer. If they are not available please contact ourselves directly.
About this manual
Throughout this user manual, the following icons are used:
[enter] This refers to a physical control on the 903.
SEND This refers to a physical connection on the 903.
Bal Centre
This indicates information that is presented on the display.
From this point on, any information presented on the left hand pages are pictorial representations of either the front or back
views of the 903 or of the display.
Therefore consider the left hand pages as additional information to accompany the written descriptions on the opposite
pages.

5
Unpacking
Be careful when unpacking your 903, it is heavy. Seek assistance if necessary. Store the packaging safely for future use. It is
the ideal method of protecting your 903 from damage during transport.
Environment
Do not site the 903 near liquids, or place liquid-lled containers near the unit. If liquid does come into contact with the
unit there is serious potential for an electric shock or re hazard. Immediately pull out the mains plug from the wall socket.
Contact your dealer to arrange an inspection before further use.
The 903 is cooled by convection and so needs good circulation of room temperature air, both under and around it. Do not
place it near sources of heat such as radiators or in direct sunlight. Do not enclose in a cupboard. Do not place directly on
carpet.
A at, smooth surface is required. As with all high resolution audio equipment, your 903 is sensitive to vibration, strong
magnetic elds and radio interference. A dedicated, high performance equipment platform sited away from other appliances
is the optimum location.
Power Supply
The AC input voltage has been set for the country where it was purchased. Check that the label on the rear panel matches
your AC supply voltage before connecting the supply. The provided AC inlet cable should be used.
The 903 must be earthed through the IEC inlet connector. Do not disconnect the AC earth at any time. If in doubt about any
aspect of power supply, consult your Trilogy dealer or a qualied electrician.
To realise your preamplier’s full potential we recommend high quality mains conditioning. See www.Isol-8.co.uk for more on
power supply and system solutions from our highly acclaimed sister company. If you are not using a mains conditioner for
best performance, make a direct connection to a mains outlet. Avoid using adapters where possible.
The IEC inlet provides the unit with power. Connect with the supplied AC input cable. It can be left connected at all times
to ensure reliable operation. If not being used for extended periods of time, switch off at the mains outlet or the rear panel
power switch. The 903 carries internal fuses for protection which are not user replaceable. If the standby indicator does
not light when power is applied and power has been tested and available on the cable IEC socket, return the unit to an
authorised Trilogy dealer for servicing.

6

7
Connections
It is good practice to complete all interconnections before switching on to avoid any damage to your system’s loudspeakers
while plugging in.
Connect the supplied AC input cable. The 903 can be left connected at all times to ensure reliable operation. If not being
used for extended periods of time; switch off at the mains outlet or at the rear panel power switch. See the Menu Operation
section for timed, sleep and remote switching.
The 903 offers six stereo audio inputs, all on RCA phono connectors. When the optional internal phono stage is installed the
rst input is phono level and inputs 2-5 are line level, otherwise all are line level inputs. Connect your sources to these inputs
as required.
Input 6 is associated with auxiliary loops. The 903 allows separate selection of the source to be amplied, and the line
level source for output SEND to a recorder, AV or multi-room system. Input 6 should be used for any return signal from the
recorder etc. To prevent howl round, this 6/RTN cannot be selected as the SEND output.
Two sets of main line level outputs are provided. Connect MAIN 1 to your power amplier via RCA phono cables. MAIN 2
is provided for connection to a second power amplier for applications such as bi-amping. MAIN 2 is not independently
buffered or controlled.
Twin TAS link connectors allow interconnection, control and monitoring of other Trilogy products via our proprietary TAS link
technology. The associated LEDs on the rear panel give status information. The TAS link section of this manual contains
further information. TAS link cables are available from your Trilogy dealer in various lengths.
A binding post is available to allow an earth connection from your turntable when the optional phono stage is tted. This is
not a safety mains earth, the 903 must be earthed via the IEC inlet connector.
8
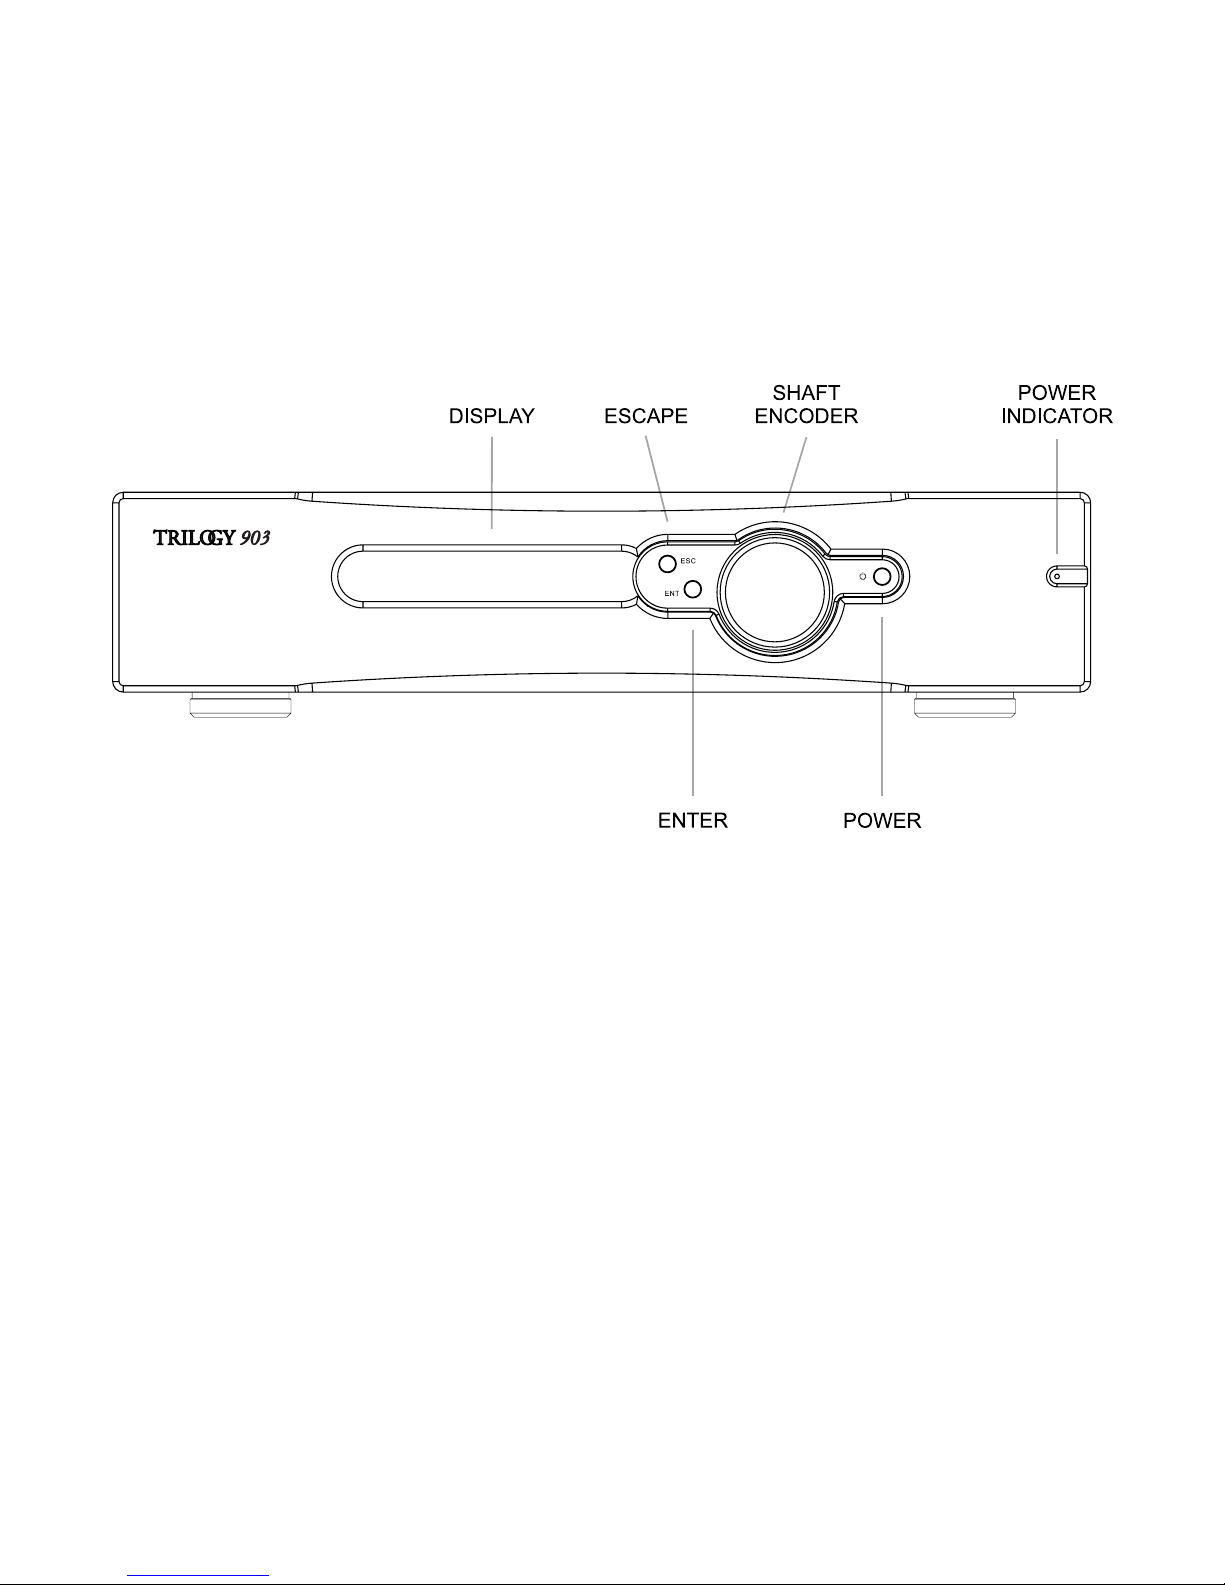
Pin Code
[enter]
00----
Rotate [shaft encoder] to display rst Pin Code pair
52----
[enter]
5200--
Rotate [shaft encoder] to display second Pin Code pair
5225--
[enter]
522500
Rotate [shaft encoder] to display third Pin Code pair
522594
[enter]
Warm up...
The number used above is purely an example.
Your unique PIN Code is detailed in the separate sheet accompanying your 903.

9
Mains Supply
Having made and checked all appropriate input, output and AC connections, power can be applied by pressing the [rear
panel rocker switch]. The [power indicator] will be dimly lit to indicate the 903 is in standby. To turn on the 903 press the
[power button] on the front panel.
Security
Each 903 comes with its own unique PIN for your security. Please take precautions to remember your PIN and make sure it
cannot fall into the hands of others. Should you not be able to enter the correct PIN, contact your Trilogy dealer.
PIN Code Protection
When the preamplier is rst powered, or unplugged for approximately fteen minutes, the preamplier requires a security
PIN code to be entered. When the display says PIN Code, press [enter] and the display will read
00----
where 00 are the
rst two digits of the PIN code you are entering. Set these digits correctly with the [shaft encoder], noting you can move
backwards through 00 to 99 for speed. Press [enter], adjust the next pair of digits, [enter] to change the last pair then [enter]
again to complete PIN code entry.
If the PIN is entered incorrectly, press [enter] at the warning but note that after three failures, the unit will be locked out for
two minutes before prompting again for PIN entry.
PIN request when power is applied can be disabled in the appropriate menu should you prefer.
Table des matières
Autres manuels Trilogy Amplificateur


