Tranzeo TR-Series Manuel utilisateur

iAirSync2.2QuickConfigurationGuide–TranzeopBS
Tranzeo
WiFi
TR-Series Quick Configuration Guide
Copyright©2008TranzeoWirelessTechnologies
ALLRIGHTSRESERVED
Notice:Nopartofthispublicationmaybereproducedortransmittedinanyformorbyanymeans,
electronicormechanical,includingphotocopyingandrecording,orstoredinadatabaseorretrievalsystem
foranypurposewithouttheexpresswrittenpermissionofTranzeo.
Tranzeoreservestherighttomakechangestothisdocumentatanytimewithoutnoticeandassumesno
responsibilityforitsuse.
ProximetryandAirsyncaretrademarksofProximetry,Inc.,intheUSAandothercountries.Windowsisa
registeredtrademarksofMicrosoftCorporation.Allotherbrandorproductnamesareormaybe
trademarksorservicemarksofandareusedtoidentifyproductsorservicesoftheirrespectiveowners.

TR‐SeriesQuickConfigurationGuide ii
TABLE OF CONTENTS
PREFACE ............................................................................................1
DocumentRevisionLevel .............................................................................................................1
DocumentConventions ................................................................................................................1
1 QUICK CONFIGURATION.................................................................3
1.1Step1:Accesstothedevice ..............................................................................................3
1.2Step2:NetworkConfiguration..........................................................................................4
1.3Step3:WirelessSettings ...................................................................................................5
2USING AIRSYNC WITH TR SERIES DEVICES..................................6
2.1AirSyncsupportedfunctionality ........................................................................................6
2.2Registrationprocessanddevicedetailview .....................................................................6
2.3Configurationmanagerandinterfacedetailview.............................................................8
2.4Statisticsandmonitoring.................................................................................................11

TR‐SeriesQuickConfigurationGuide 1
Preface
This guide provides all the information you need to manage the Tranzeo TR Series
Devices with AirSync. This document is intended for system administrators who are
familiar with fundamentals of WLAN (Wireless Local Area Networks) technology and
already have already installed AirSync server and AirConsole.
Document Revision Level
Revision Date Description
Version 1.0.0 October 2008 Preliminary Release
Version 1.0.1 November 2008 Cosmetics changes
Document Conventions
This guide uses the following typographic conventions:
Convention Description
Bold Text on a window, other than the window title, including menus,
menu options, buttons, and labels.
Italic Variable.
screen/code Text displayed or entered on screen or at the command prompt.
boldface screen font Information you must enter is in boldface screen font.
< italic screen > Variables appear in italic screen font between angle brackets.
[ ] Default responses to system prompts are in square brackets.
This guide uses icons to draw your attention to certain information. Warnings are the
most critical.

TR‐SeriesQuickConfigurationGuide 2
Icon Meaning Description
Note Notes call attention to important and/or additional
information.
Tip Tips provide helpful information, guidelines, or suggestions
for performing tasks more effectively.
Caution Cautions notify the user of adverse conditions and/or
consequences (e.g., disruptive operations).
WARNING Warnings notify the user of severe conditions and/or
consequences (e.g., destructive operations).

TR‐SeriesQuickConfigurationGuide 3
1 Quick Configuration
1.1Step 1: Access to the device
The TR Series Devices has a default, static IP address configured on its Ethernet
(eth0) interface with web access enabled. This IP address is printed on the packaging
in which the TR Series device was provided. We will use 169.254.253.253 as the
default IP address the device has been configured to use in this document. Web
access should be used for initial configuration of each TR series device, using the
default address specified on the TR Series device packaging.
To connect to the TR Series Device, first configure your PC Ethernet interface to
share the same subnet with the TR Series device. Next, connect the computer’s
Ethernet cable to the “PC” port on the TR Series Device PoE injector.
Now we can access the TR Series device’s web interface. Open a web browser on the
PC and enter this address directly in to the web browser, for example to
169.254.253.253. A login window such as shown below will open. Use the default
login of admin with password default:
Figure 1. Login page.

TR‐SeriesQuickConfigurationGuide 4
1.2Step 2: Network Configuration
After login via the webgui, click on the Network Configuration tab as illustrated
below:
Figure 2. Network Configuration page.
Set the appropriate parameters in the Network Configuration page. Especially: Bridge
or Router mode, WAN or LAN mode, IP address, net mask (set Gateway and DNS if
you selected LAN mode). To save the settings click the Apply button.

TR‐SeriesQuickConfigurationGuide 5
1.3Step 3: Wireless Settings
Next, enter the Wireless Settings page:
Figure 3. Wireless Settings page.
Set the appropriate parameters in the Wireless Settings page. Especially: Wireless
Mode, SSID, Channel, Tx Rate, Beacon Interval. To save the settings click the Apply
button.
Now the TR Series device is ready to use with AirSync and as a WiFI Access Point in
our network.

TR‐SeriesQuickConfigurationGuide6
2Using AirSync with TR Series Devices
2.1AirSync supported functionality
TR Series Devices are supported by AirSync in the following ways:
•Manual device registration – ability to manually register and then support a
device in AirSync system.
•Configuration management – ability to configure interface parameters from
AirConsole.
•Network monitoring – ability to observe on AirConsole charts with historical or
current traffic and radio parameters on interfaces and specific connections.
2.2Registration process and device detail view
To maintenance and monitor TR Series Devices in a managed network, first register
each device in AirSync. Each TR Series device must be manually registered with
AirSync. To accomplish this first enter AirConsole end enter the Devices tab.
Figure 4. The Manage ribbon tab.
TR‐SeriesQuickConfigurationGuide 7
To register each TR Series Device click the Add Device button, set the proper values
(especially Device Type, User Name and Password) within each empty white field,
and click Save.
Figure 5. Add Device.
Next you must add the device interface.
Figure 6. Add Device Interface.

TR‐SeriesQuickConfigurationGuide 8
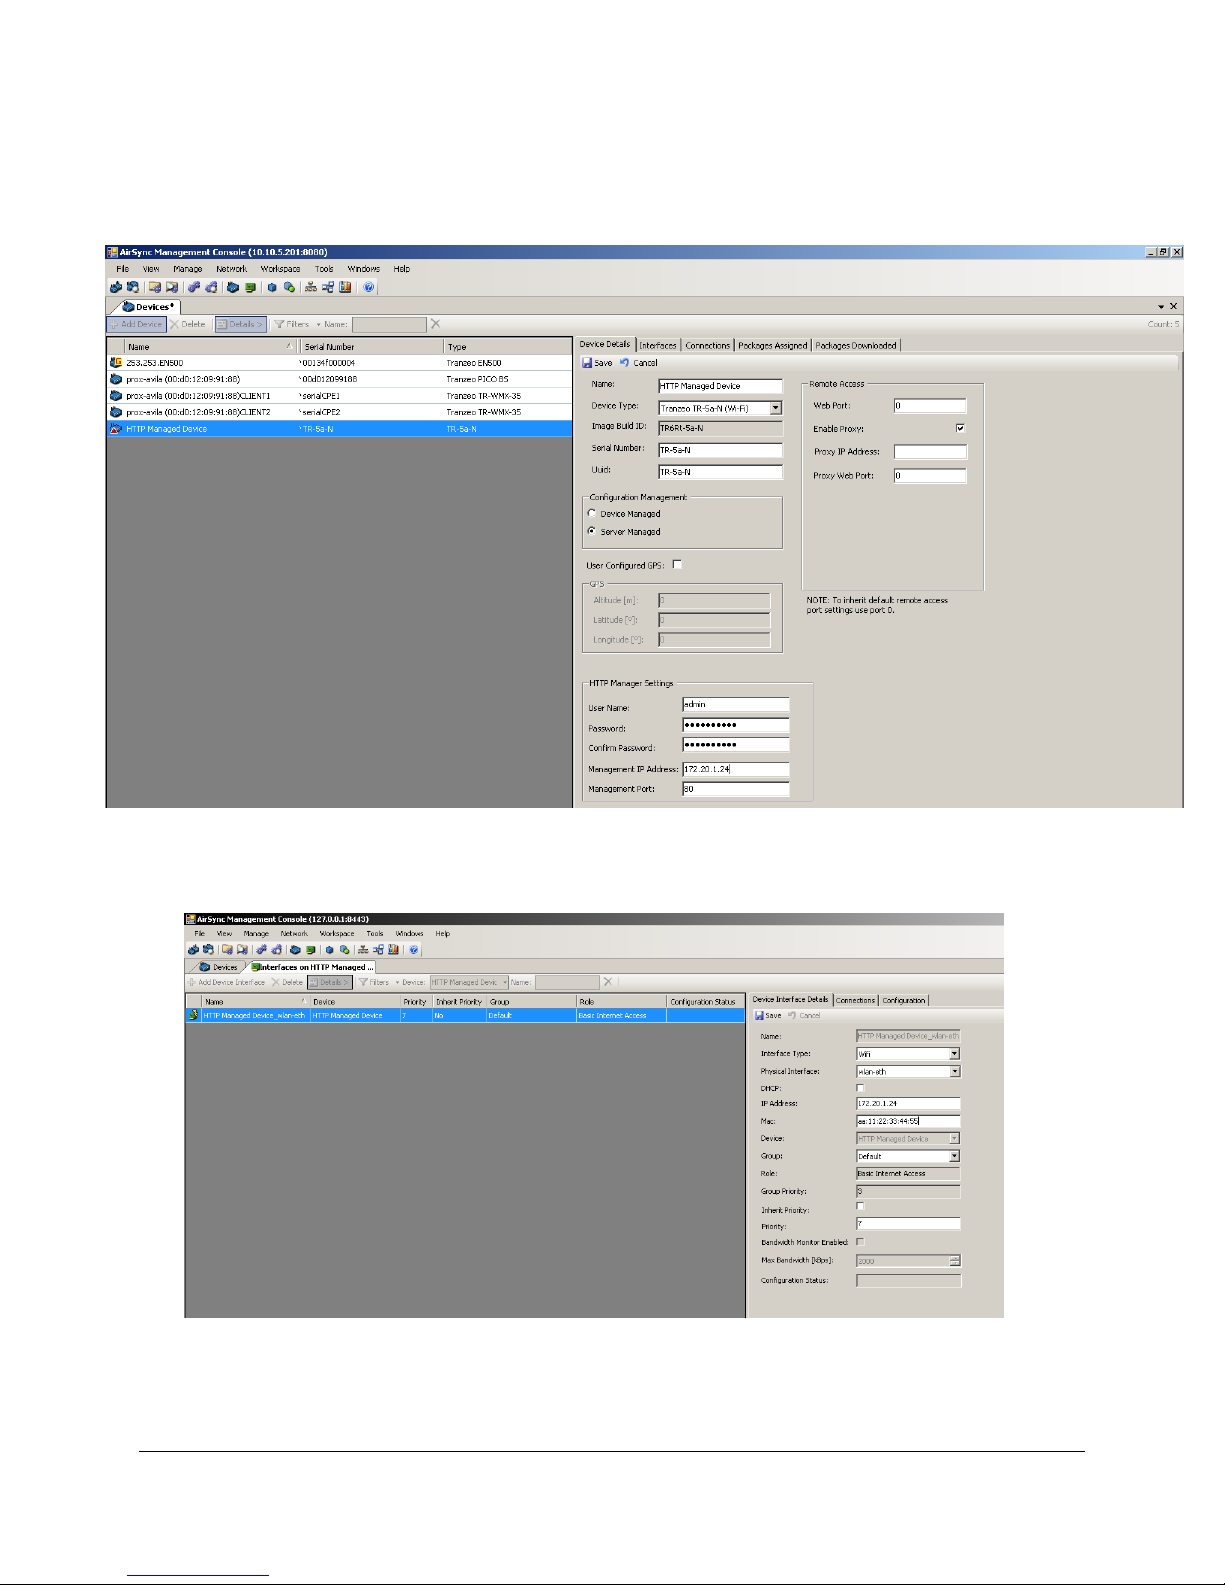
Set proper values in the Device Interface page (especially IP Address) and click the
Save button. If everything was set properly, the TR Series Device will be added to
the list and its status will be shown in AirConsole, as illustrated in the following
figure.
Figure 7. Device Tab, details view.
Figure7illustrates how AirConsole’s details view shows the status of each device. This
view is accessible using the Details button in AirConsole. The details view provides
basic information about each device such as the device: Name, Image Build ID, Uuid
etc. Within this view you can edit and change device specific information. To do this,
use the Edit button on Device details tab. You can change such field as Name,
Remote Access IP Address, HTTP management option and GPS parameters. After any
changes, you must save (use the Save button). You can always cancel any changes
and leave edit mode using the Cancel button.
2.3Configuration manager and interface detail view
To change interface parameters first we need to open the interface tab. There are a
few different ways to do this and one of them is to choose Device interface from the
manage tabs ribbon (for details see Figure 4. The Manage ribbon tab.).
Ourregistereddevicewith
proper(green)status.
HTTPManagersettings.
Editbutton.
Detailsbutton.
Ce manuel convient aux modèles suivants
1
Table des matières
Autres manuels Tranzeo Point d'accès sans fil


Manuels Point d'accès sans fil populaires d'autres marques

D-Link
D-Link DWL-2100AP - AirPlus Xtreme G Manuel utilisateur

Ubiquiti
Ubiquiti NanoStation NSM2 Manuel utilisateur

Cisco
Cisco Aironet 1550 Series Manuel utilisateur

Aruba
Aruba IAP-335 Manuel utilisateur

Advantek Networks
Advantek Networks AWN-AP-54MR Manuel utilisateur

IP-COM
IP-COM AP355 Manuel utilisateur


 Manuel utilisateur")
