
Toptec FutureTrac Manuel utilisateur
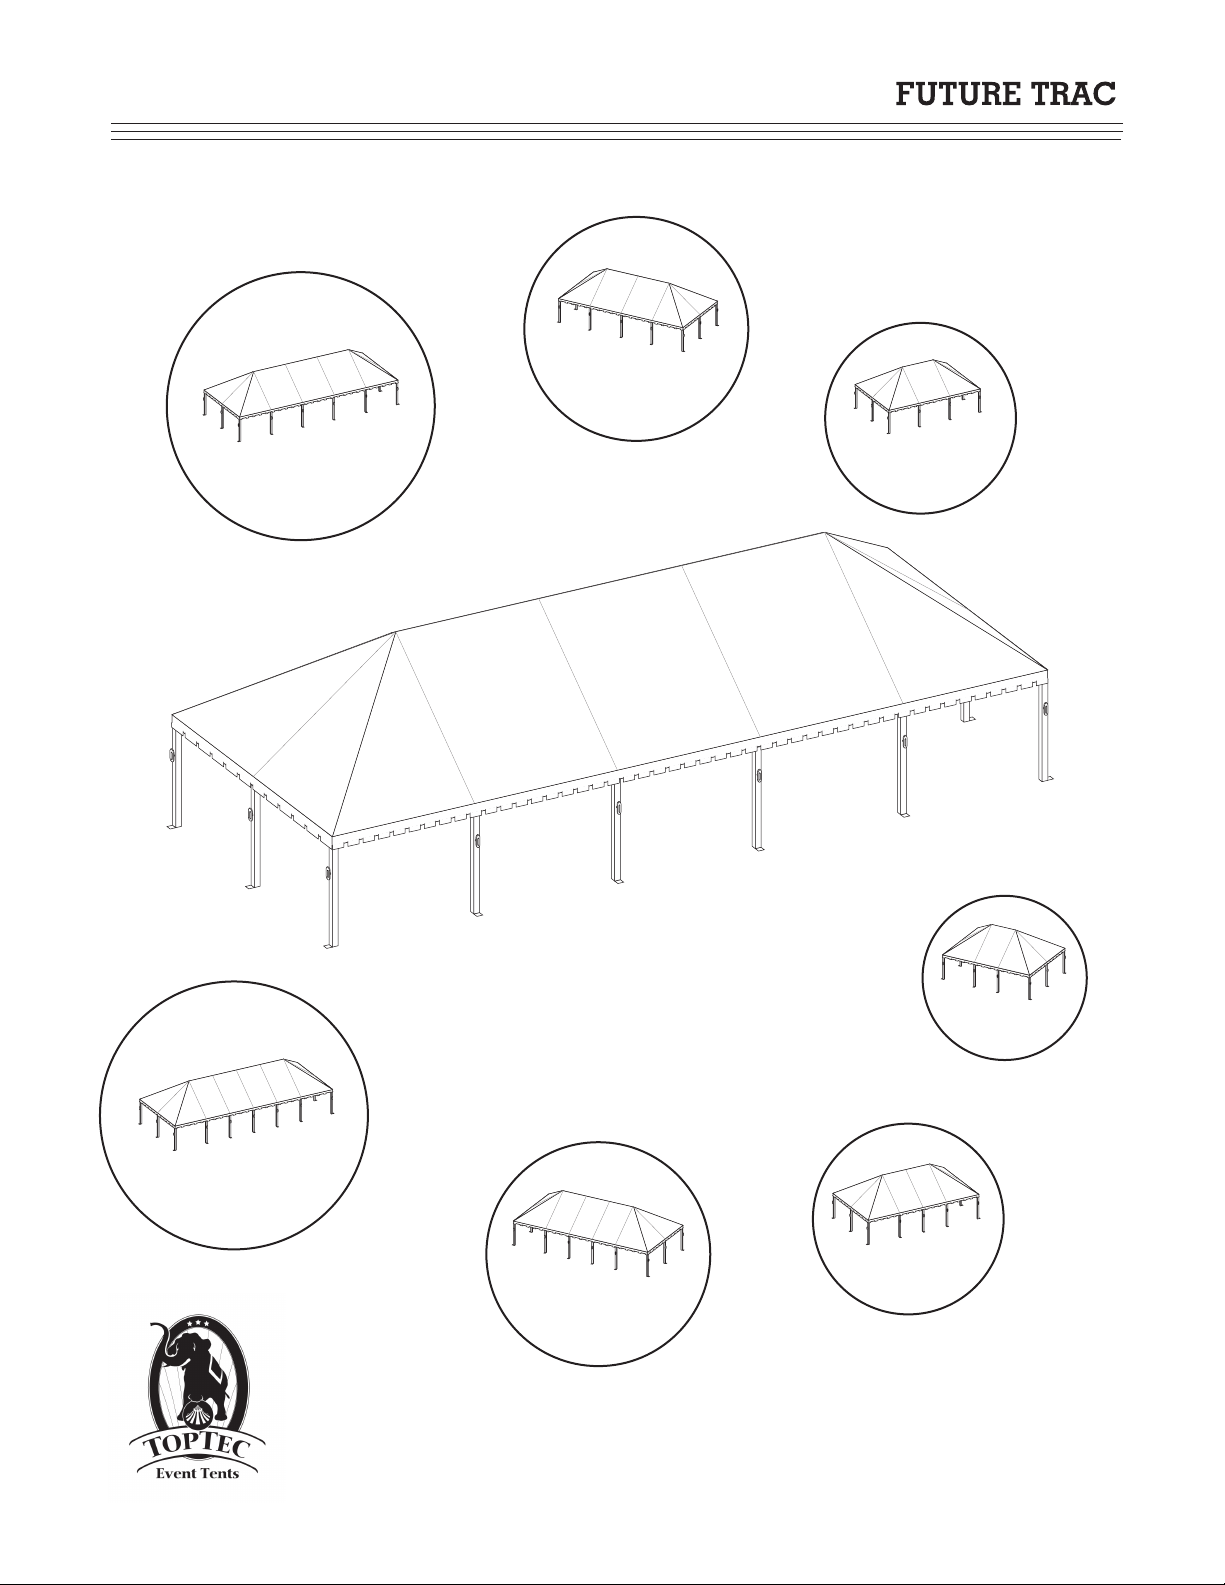
Assembly Instructions
30 - 40 Wide
40' X 60' w/ 20' MID
40' X 80' w/ 20' MID
40' X 100' w/ 15' MID
40' X 85' w/ 15' MID
40' X 70' w/ 15' MID
40' X 55' w/ 15' MID
40' X 100' w/ 20' MID
Form # 20011001
© 1999 TopTec
TopTec Products, LLC
7601 Highway 221
Moore, SC 29369
Phone: (800) 845-2830
Fax: (800) 921-7750
e-mail: [email protected]
www.TopTecProducts.com
Assembly Instructions
30 - 40 Wide
Form # 20011001
THANK YOU FOR PURCHASING A TOPTEC TENT
If you have questions about the installation, maintenance or disassembly, please call us at (800) 845 - 2830.
Our goal is that you are satisfied with our products. Please read this manual carefully and follow all instructions contained
herein. Please note that the installer is responsible for the site selection, installation and use. Do not erect during inclement
weather and follow all safety procedures during the installation process.
Please contact all utility companies for underground services. In many states, the utilities work together and have formed a
Utility Locating Service. It is your responsibility to locate all underground services, including speaking to the owner about
irrigation, pool and other special services the property owner may have installed.
To provide the quickest possible service, please fill in the information below so that we can efficiently help you should any
problem arise.
FUTURE TRAC SERIES TENT
FRAME SIZE (Width x Length)
END SECTION SERIAL NUMBER
END SECTION SERIAL NUMBER
MID SECTION SERIAL NUMBER
MID SECTION SERIAL NUMBER
MID SECTION SERIAL NUMBER
MID SECTION SERIAL NUMBER
AIFT 30/40

Assembly Instructions
30 - 40 Wide
Form # 20011001
Table of Contents
Limited Warranty .............................................................................................................................. ii
Shipping Damages & Shortages ........................................................................................................... ii
Blackout Material .............................................................................................................................. ii
Site Survey ............................................................................................................................................ ii
Site Plan ............................................................................................................................................ ii
Recommended Tools & Equipment ................................................................................................ iii
Installation Instructions
Frame Lay Out ............................................................................................................................. 1
Building Arch Assembly .............................................................................................................. 2
Raising Arch Assembly .............................................................................................................. 4
Building End Frame ...................................................................................................................... 4
Building Perimeter ...................................................................................................................... 5
Install Hip Pole Braces .............................................................................................................. 6
Adding 10' - 15' Mid Sections ....................................................................................................... 7
Building Final Mid/End Section ................................................................................................ 9
Install Brace Bars ........................................................................................................................ 9
Top Panel Installation .............................................................................................................. 10
Lifting Frame ............................................................................................................................. 11
Leg Installation ............................................................................................................................. 11
Corner Brace Installation .............................................................................................................. 12
Anchoring Tent ............................................................................................................................. 12
Tensioning Top Panels .............................................................................................................. 13
Installed Tent Inspection ...................................................................................................................... 13
Top Removal and Folding ............................................................................................................... 14
Lowering Frame ............................................................................................................................. 15
Disassemble Frame ............................................................................................................................. 15
Jack Assembly ..................................................................................................................................... 16
i
AIFT 30/40

Assembly Instructions
30 - 40 Wide
Form # 20011001
LIMITED WARRANTY
All new TopTec products are warranted to be free from defects in materials and workmanship which may cause failure under
normal usage and service when used for the purpose intended. If you feel that upon the receipt of our products, a possible
defect in material and workmanship exists, contact us immediately. If after examination, TopTec determines that there is a
defect in material and workmanship, TopTec Products, LLC will bear the cost of freight both to and from the factory for
repair. It will be at the factory's discretion to repair or replace the product at no cost to you.
TopTec is not responsible for damages which occur in shipment, weather related damage, damage caused by incorrect use of
the product, damage resulting from not using proper ground cloths nor damage resulting from the use of washing machines.
Any questions in regards to the proper installation procedures should be directed to the installation manual provided with the
product or directly to TopTec Customer Service.
SHIPPING DAMAGES/SHORTAGES
UPS Shipment: The customer is responsible for immediately inspecting merchandise and noting any damage directly with
UPS. UPS will then pickup merchandise for inspection. Do not destroy or throw out shipping container or merchandise. If
UPS determines merchandise was damaged in shipment, they will contact shipper to settle claim. It is important that you
notify shipper of any shipment damage. Credit will be issued as soon as claim is settled.
Motor Freight: TopTec is not responsible for products damaged or lost in transit. The customer is responsible for noting any
damages or shortages with the freight company upon delivery. Ownership of shipment passes to customer after it is loaded
on the truck. The customer must initiate a claim with the freight company and NOTE THE DAMAGE/SHORTAGES ON
THE FREIGHT BILL so customer can protect their right of claim. Concealed damage must be discovered within ten (10)
days and the claims made with the freight carrier. It is your responsibility to count and open all products immediately.
BLACKOUT MATERIAL
The benefits of blackout material has been well emphasized: first the tent's interior is cooler therefore the air conditioning
costs are lower at large events; secondly, stains, dirt, abrasions and patches are less noticeable since light does not pass
through the vinyl. However, blackout material can cause any puncture, hole, tent repair, even box stitching to show up as
starlights in the tops. In most cases these are not holes, only an absence of blackout film which allows the light to pass
through. If these situations occur, we have a self-adhesive Blackout Repair Kit available to solve this problem. Please
contact TopTec Customer Service for assistance.
SITE SURVEY
The major purpose of the site survey is to accomplish the following:
1. To gather all pertinent information regarding the function or event.
2. To ensure that the proper equipment is used to suit the site and function.
3. To organize the information so that it becomes an effective means of communication for all parties involved.
4. To serve as a permanent record of the entire transaction.
5. To serve as a means of ensuring that all codes and regulations are met.
SITE PLAN
The major purpose of the site plan is to accomplish the following:
1. To ensure that the tent and related equipment are installed in the proper manner.
2. To ensure that the layout conforms to local codes.
3. To locate obstructions.
4. To show access to the site.
5. To locate exit areas on tents and sidewalls.
6. To locate areas with specialized anchoring.
ii
AIFT 30/40

Assembly Instructions
30 - 40 Wide
Form # 20011001
RECOMMENDED TOOLS AND EQUIPMENT
Personal Safety
•Gloves - Hard Hat - Steel Toe Shoes - Safety Glasses - Ear Protection
Site Transport
•Hand truck for moving components
Staking Layout
•Two (2) each 100' tape measures (for up to 40' x 60' tents)
•Two (2) each 6" shank screw drivers for staking down tape measures
•Fast dry marking paint (preferably white)
Stake Installation and Removal
•1" capacity rotary hammer for drilling holes in pavement for stakes
•An 8 to 16 pound sledge hammer
•24" pipe wrench for spinning stakes out of wet soil
•Mechanical stake puller
Frame Assembly
•Various wrenches and other types of tools (varies according to tent size)
•Tent jacks for raising frame to install legs (minimum of two (2) for a 40' x 40' and one (1) additional jack
for each 10 ft.,15 ft. or 20 ft. mid section.
•Ladders - Minimum of one (1) 6 ft. step. Two (2) each is best, one (1) 6 ft. and one (1) 8 ft. or 10 ft.
depending on tent size.
Top Installation
•Ground cloths to protect the vinyl from dirt and abrasion.
•Cleaning supplies to remove any marks acquired during installation.
•"Pull Ropes" - Two (2) 75 ft. long by 5/8" diameter and a third smaller rope for a return rope.
Tool Bag
Binder with blueprints and set-up instructions; (2) each - 5/8" x 75 ft. poly rope with carabiner; (1) each -
3/8" x 75 ft. rope with carabiner; Scissors; Utility knife; 8" Cresent Wrench; Flat/Half Round File with
Handle; Pliers; Cats Paw Pry Bar; Punch; Ball Point Pens; Fifty (50) each Quick Pins; One (1) Dozen
3/8" D-Clasp Pins
Please read these instructions in advance of assembly. Always be cautious of wind and weather
conditions. Partially assembled tents are large sails in windy conditions. Always tie off frames
before installing the tops.
Check the inventory list to ensure all parts are available prior to assembly. Especially important to
the Future Trac tents are the brace bars and appropriate bolts and pins.
iii
AIFT 30/40
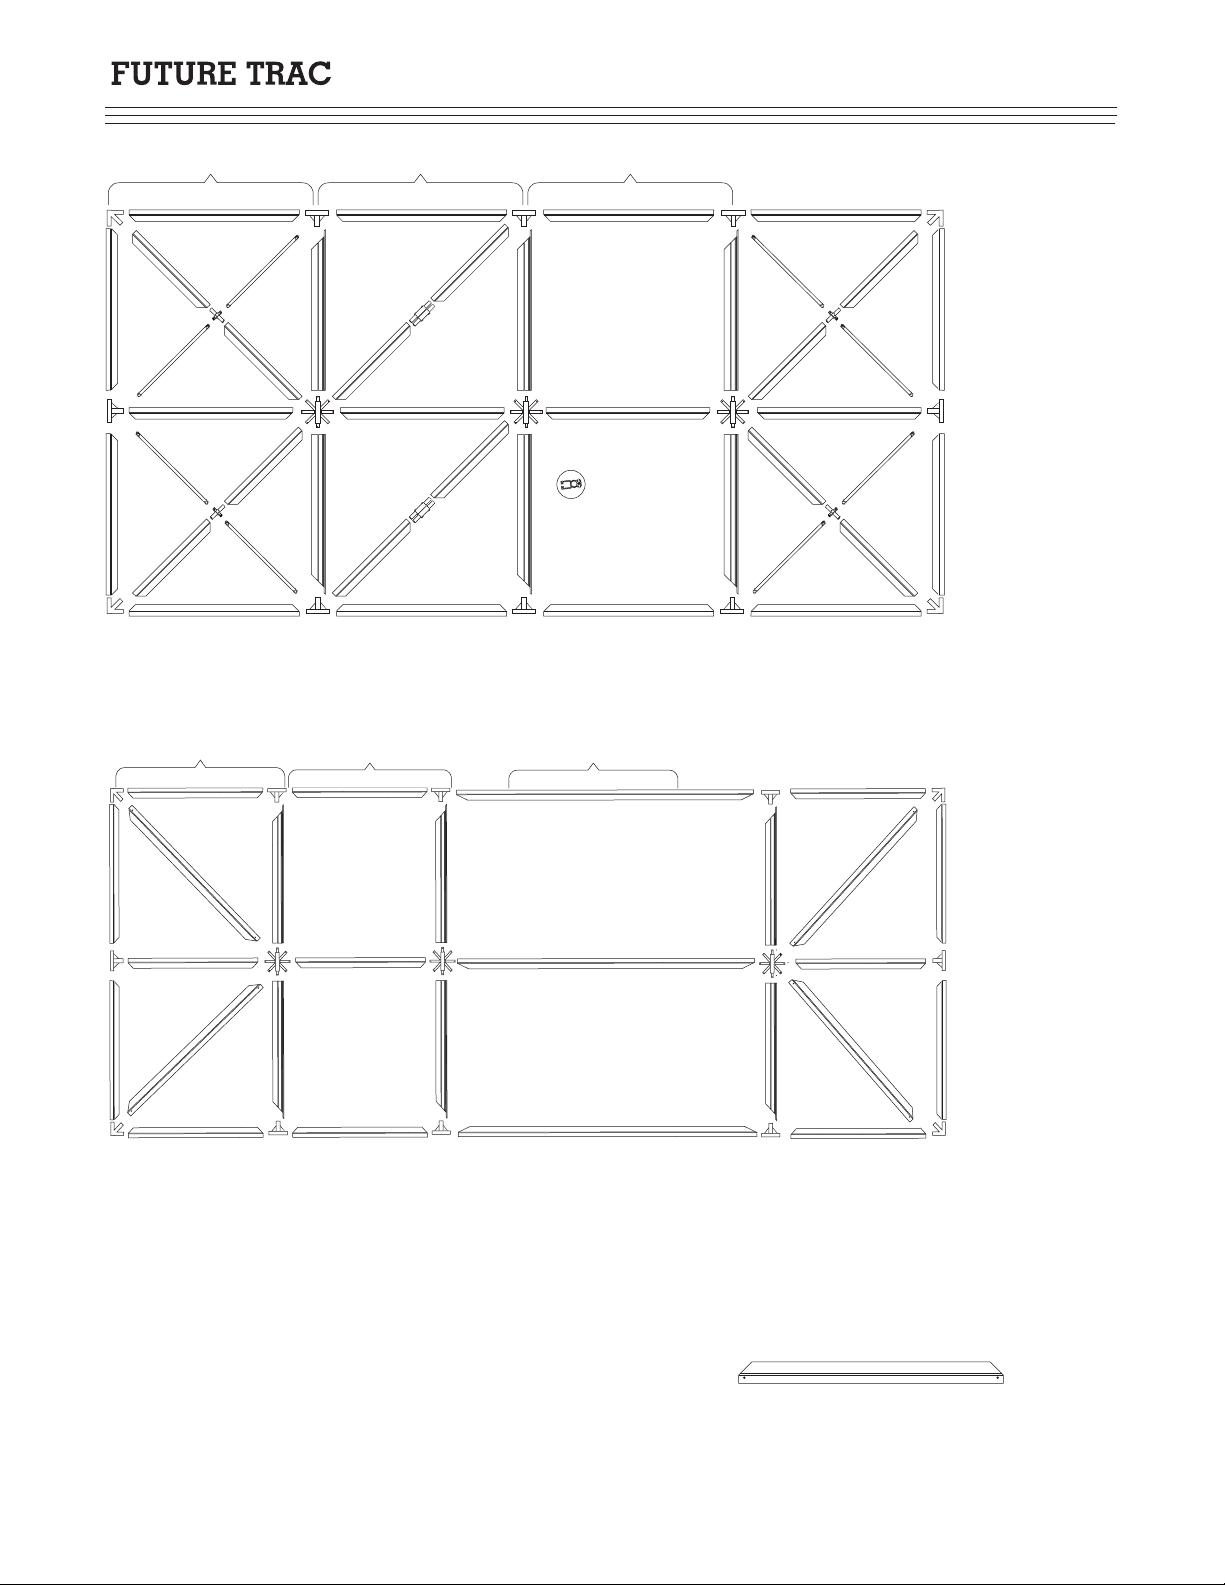
Note: During installation, ensure that all perimeter poles are positioned
so that the opening is towards the crown to match the 26 degree roof
pitch when installed. All poles will have a pin hole drilled through the
score line on the side of the tube. This score line should be facing
upward.
END SECTION
20 FT.
MID SECTION
10 OR 15 FT.
MID SECTION
40 Wide Layout: Position the Future Trac tubes and brackets around the perimeter of the tent as shown in the drawing
above. Please note the difference between the 10/15 ft. mid sections and the 20 ft. mid sections and lay them out
accordingly. There will be a brace bar and cross cable for each crown assembly and they must be installed before raising the
arch assembly.
Assembly Instructions
30 - 40 Wide
Form # 20011001
30 Wide Layout: Position the Future Trac tubes and brackets around the perimeter of the tent as shown in the drawing
above. There will be a brace bar for each crown assembly and they must be installed before raising the arch assembly.
END SECTION
20 FT.
MID SECTION
10 OR 15 FT.
MID SECTION
( 1 ) AIFT 30/40
Form # 20011001
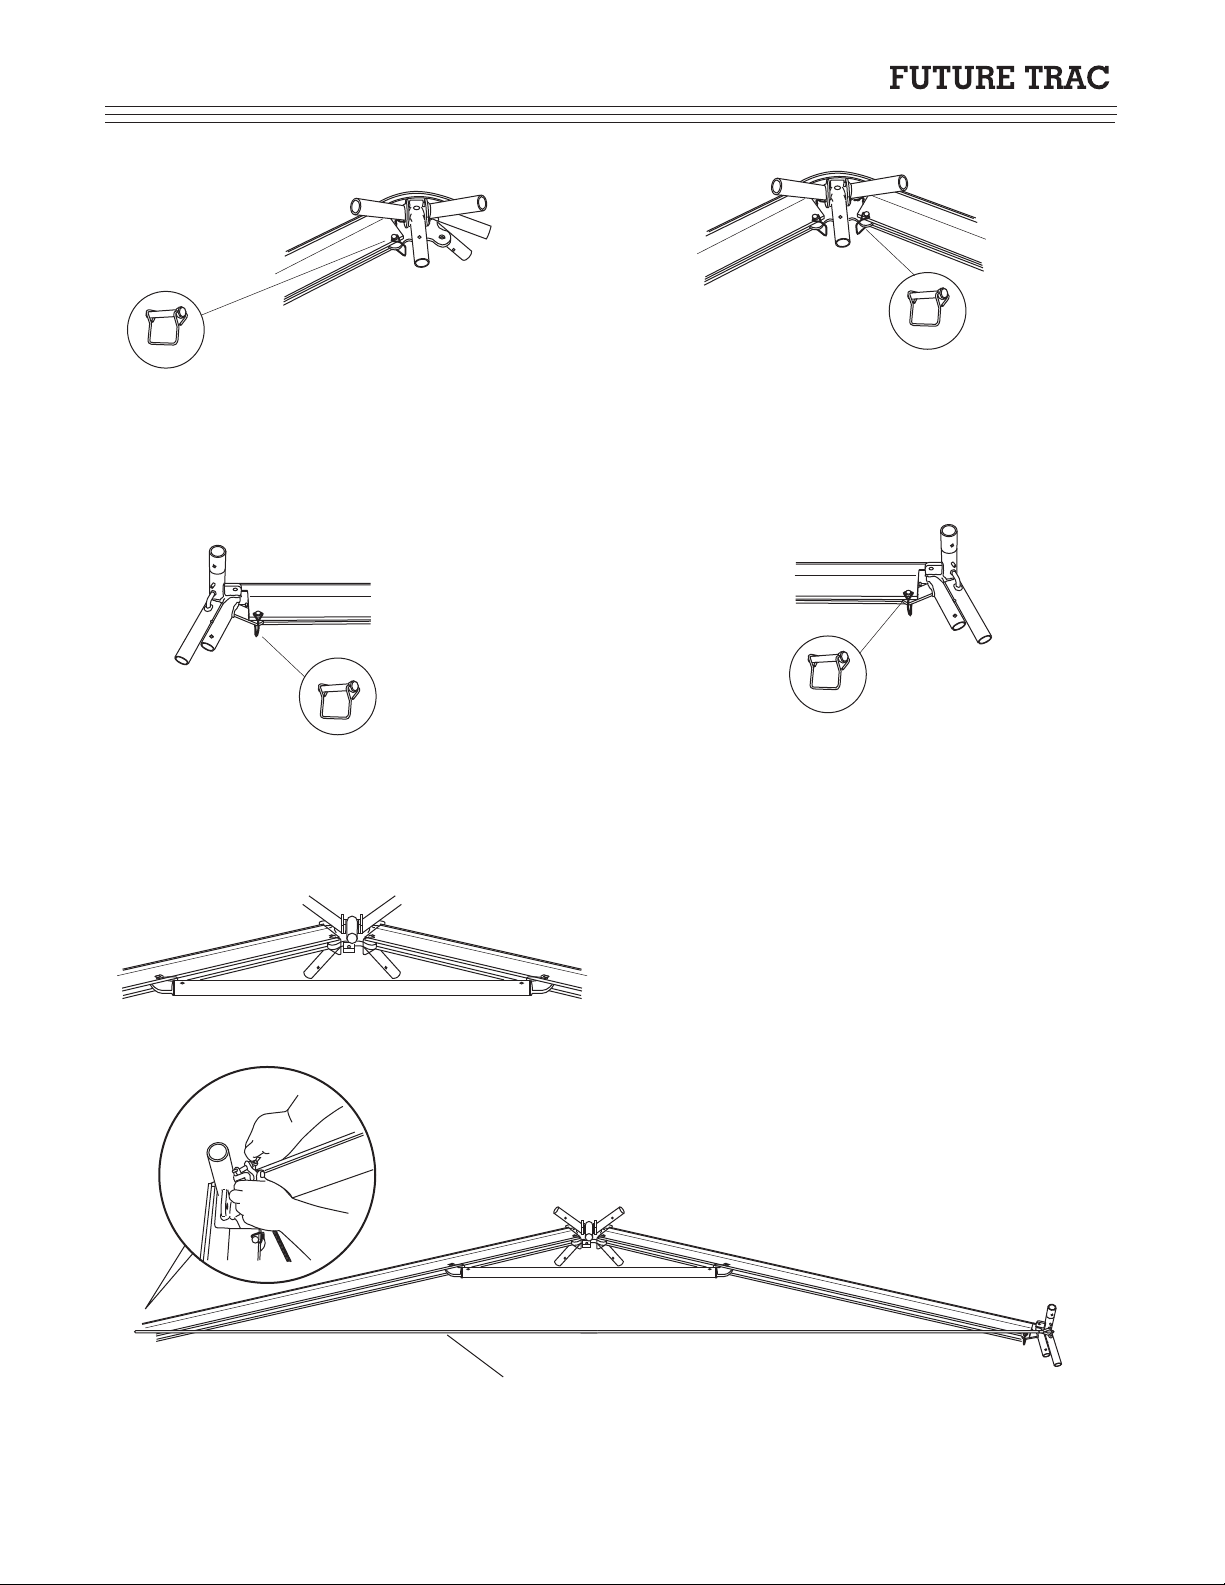
Next, attach an intermediate bracket with a
3/8" D-clasp pin as shown in the drawing
above.
Begin the assembly process, by attaching
the crown assembly to the Keder rafter as
shown using a 3/8" D-clasp pin.
Attach the opposite side Keder rafter to the
crown in the same manner as in the previous
step.
Repeat this procedure on the opposite side
intermediate bracket with a 3/8" D-clasp pin
as shown.
Step 1 Step 2
Step 3 Step 4
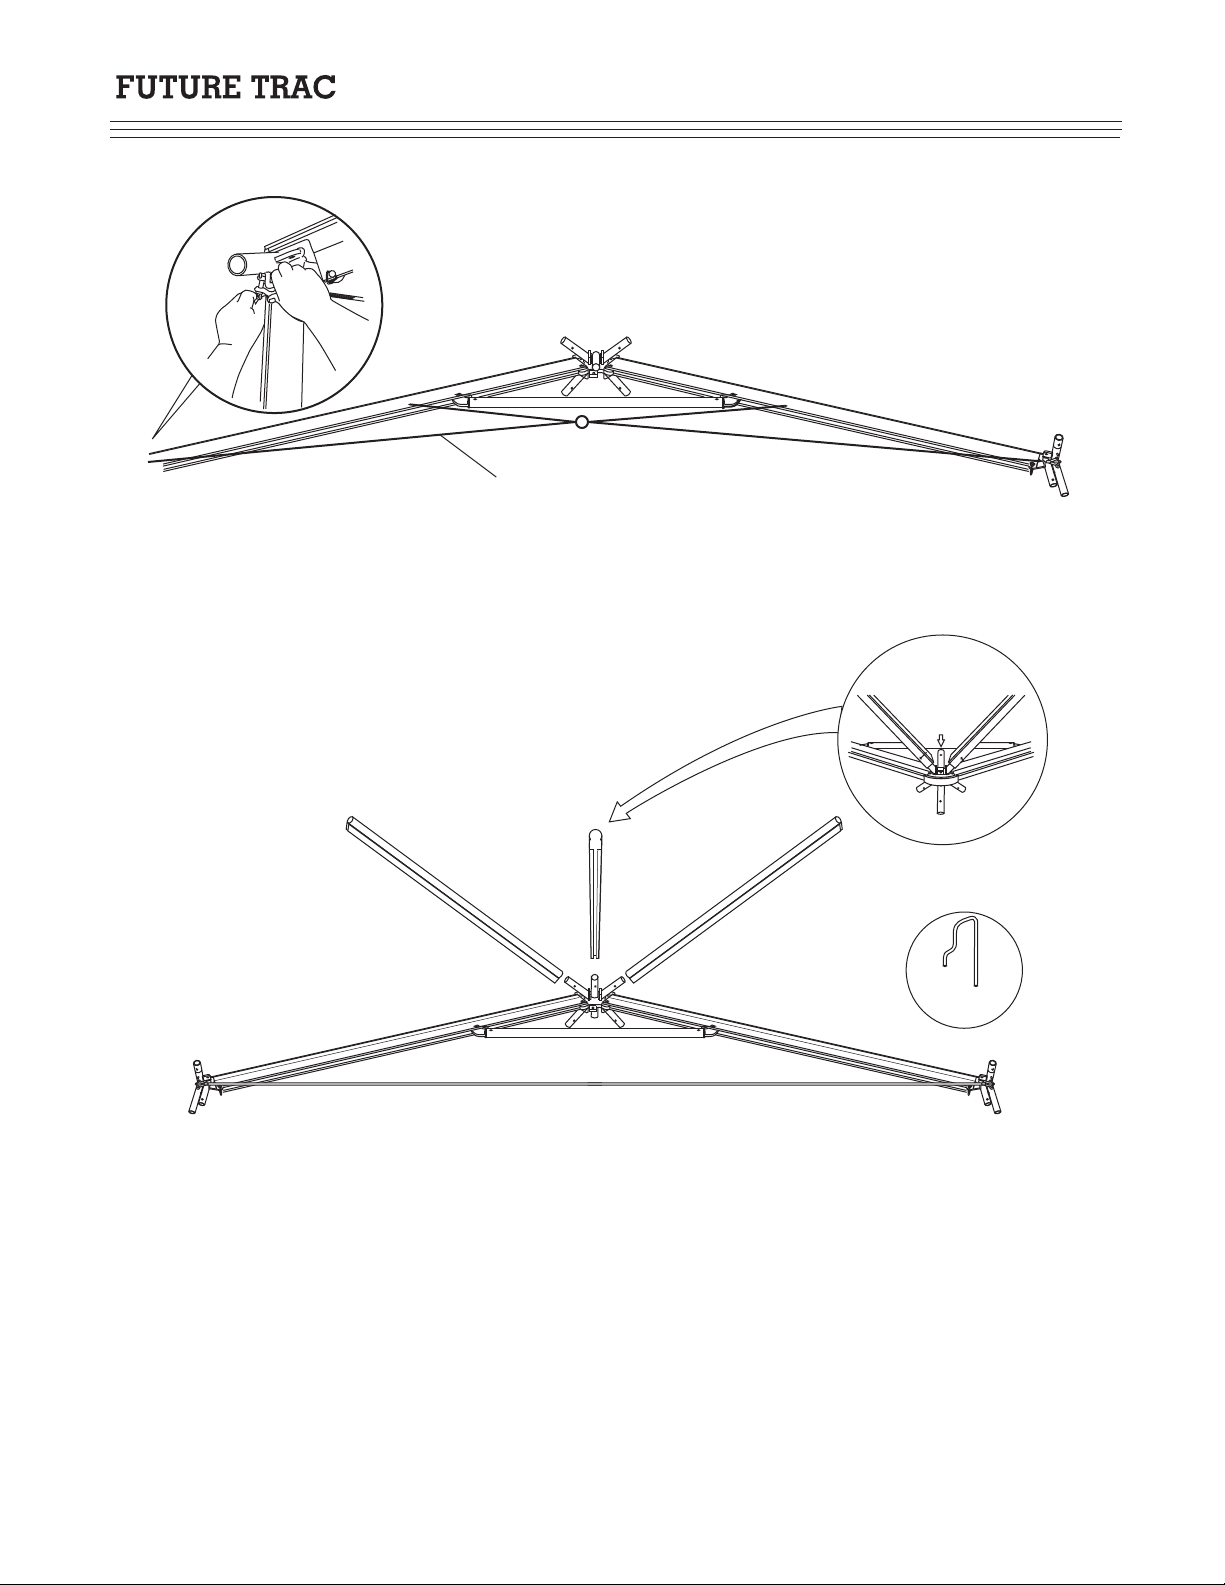
Important: Install the brace bar at the top of each arch. Slip
flat eye end into function slot of Keder rafter and pin with 3/8"
D-Clasp pin. Repeat prodedure for opposite side. It may be
necessary to move the rafter in or out to locate and pin this side.
Note: 30 Wide Future Trac tents will have a longer brace bar and
will be mounted lower on the Keder rafter however the installation
procedures will be the same.
Step 5
Cable - Straight (optional)
(Attaching Cable on Left Side)
Once the brace bar has been installed, connect one side of the cross cable with the clevis pin as show. Be sure that the pin is
installed so that it can be easily removed (if necessary). Attach opposite side using the same procedure as shown above. It
will require pulling the frame inward to install the clevis pin. This is a designed pre-load.
Step 6
Assembly Instructions
30 - 40 Wide
( 2 )
Building Arch Assembly
Cable Installation - 40 Wide Only
AIFT 30/40
Form # 20011001
AB
C
Insert Quick Pin
on A,B, and C
from top side QUICK PIN
The next step, prior to raising the arch assembly, is to install any accessory attachments to the frame while it is on
the ground. Connect both hip rafters A & B ( on 40' wide attach only the upper halves) with quick pin as shown,
then connect the end rafter (C) to the rotating spigot with the quick pin as shown in the call out above.
Step 7
Assembly Instructions
30 - 40 Wide
( 3 )
Once the brace bar has been installed, connect both of the long ends of the scissors truss cables with the clevis pin (as shown)
to the intermediate brackets. Next, pull the frame inward from each intermediate bracket and use 3/8" D-Clasp Pins to pin
the short ends of the scissors truss cables to the Keder rafters at the holes below the brace bar. This is a designed pre-load.
Step 6 - Scissors Truss Cable Installation (40 Wide Only)
Tip: Place clevis pins that fasten the scissors truss cable
to the intermediate bracket on the opposite side of where
the hip pole brace bars fasten. This will eliminate the
interference of the D-Clasp pin when installing the hip
pole brace bars.
Note: 30 wide Future Trac hip rafters (A & B) are single piece 21' 10" poles. These can be attached in the same
manner as above or the arch assembly can be raised as described in the next step and then attached.
AIFT 30/40
Scissors Truss Cable
(Attaching Scissors Truss
Cable on Left Side)
Note: The mounting hole for the scissors truss
cable is the first hole below the rafter brace bar.
Form # 20011001
A
B
C
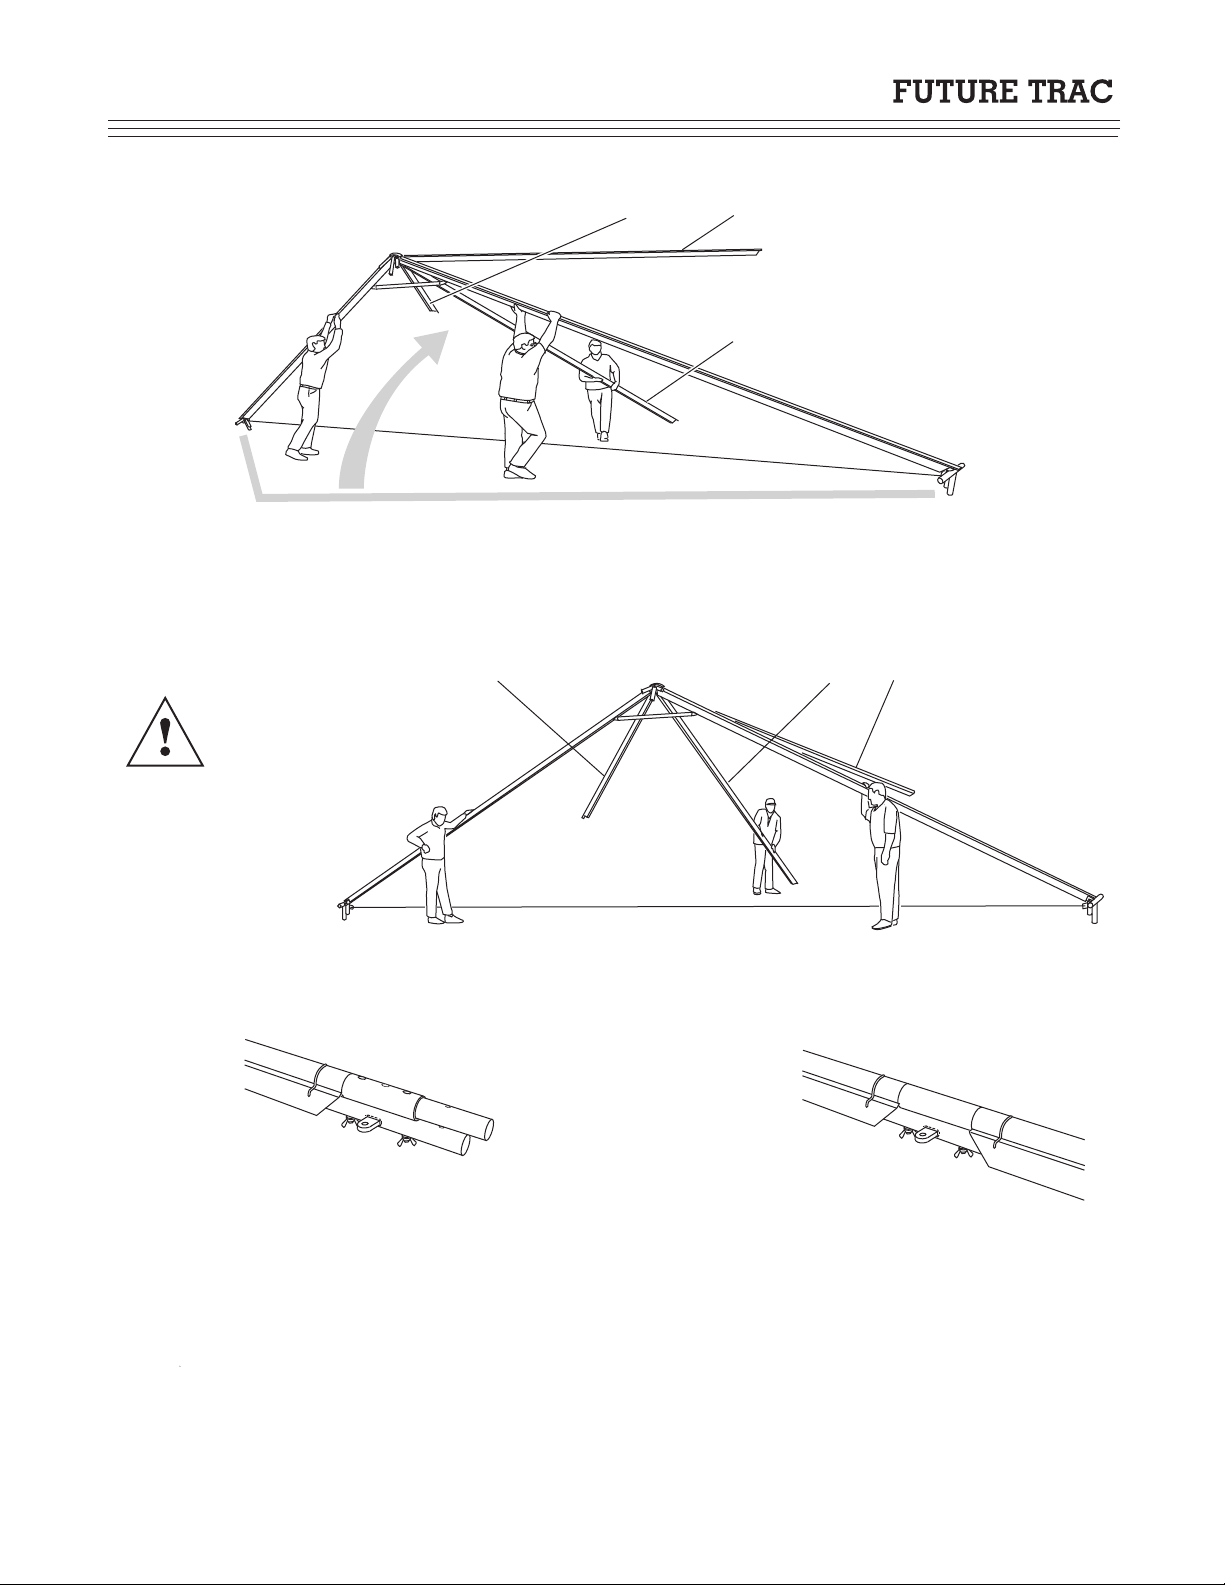
Rotating the arch assembly into its upright position is easiest when there is a crew of three (3) or more. Place the completed
arch with the intermediate brackets at the desired finish location and pick up the arch, as shown above, and rotate it to the
upright position. The person on the end rafter (C) pulls while the other two (2) lift the arch near the middle and work their
way out as the arch rotates into position.
CAUTION! Once the arch is upright,
one (1) person needs to steady it
(reference C) until the next steps
are complete.
AB C
Build the hip rafters out by installing the 4-way hip splices into upper rafters (A & B)
and quick pin. Then slip on the lower half of the hip rafter and quick pin as shown.
Tighten wing nuts to secure connectors to hip pole. Repeat this procedue on both
sides of this end frame assembly
Assembly Instructions
30 - 40 Wide
( 4 )
Raising Arch Assembly
Building End Frame
Step 8
Step 9
Step 10
Note: 30 Wide Future Trac tents do not have 4-way hip splices. The hip rafters are
single piece 21' 10" poles and once in place will steady the tent.
AIFT 30/40
Form # 20011001
Install Quick Pin
on Perimeter Pole
Perimeter Pole
Cable
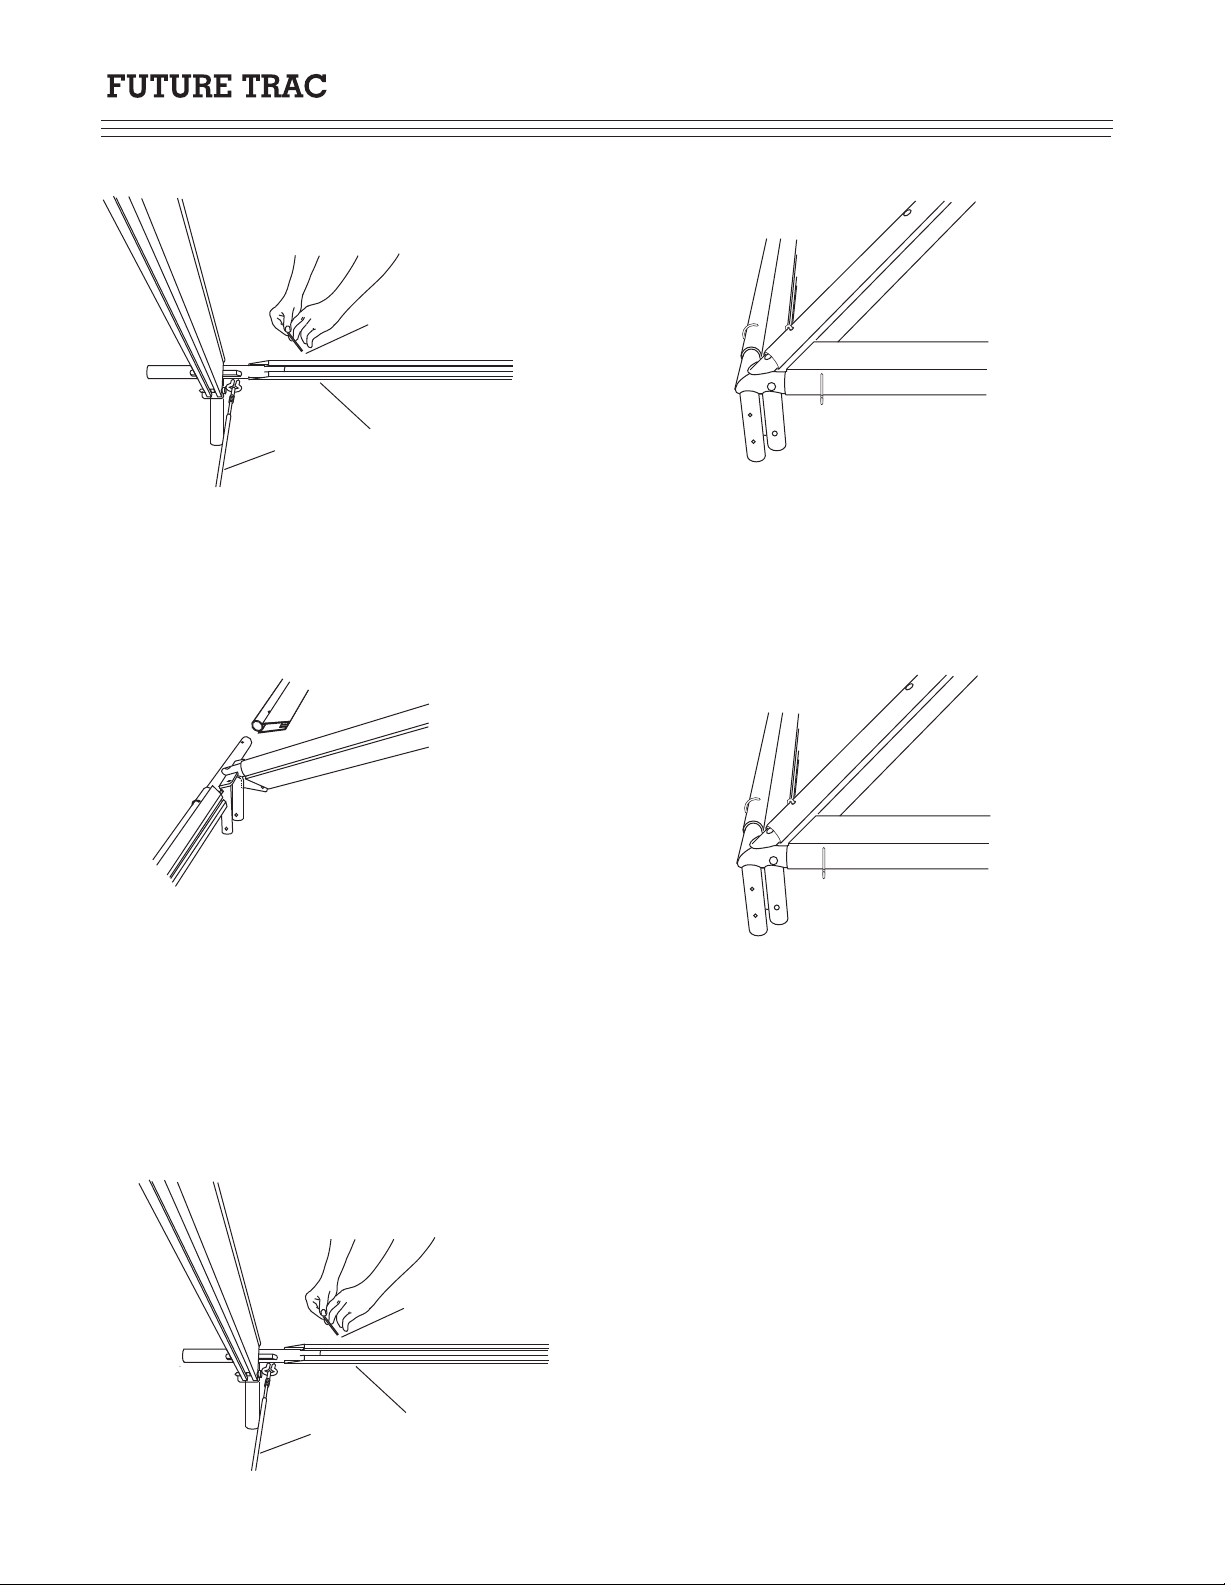
Next, assemble the perimeter of the frame, starting at an
intermediate on one side of the raised arch assembly.
Install Corner Hip Pole
Connect corner bracket by placing perimeter tube and hip
rafter tube together into the corner bracket and quick pin;
then install perimeter tube to end intermediate on corner
and quick pin.
Connect end rafter to intermediate bracket and quick pin,
then connect perimeter tubes to intermediate bracket and
quick pin. The frame should stand by itself at this point.
Assembly Instructions
30 - 40 Wide
( 5 )
Step 11 Step 12
Intermediate and End Rafter
Step 13
Install Corner Hip Pole
Connect remaining corner bracket by placing perimeter
tube from end rafter and hip rafter tube together into the
corner bracket and quick pin; then install the remaining
perimeter tube to corner bracket and quick pin. Note:
Frame may require squaring up to make this connection.
Lift corner to make final connection easier, then quick
pin.
Step 14
Install Quick Pin
on Perimeter Pole
Perimeter Pole
Cable
Step 15
Next, connect the perimeter tube to the arch and quick
pin (as shown).
AIFT 30/40
Autres manuels pour FutureTrac
1
Table des matières
Autres manuels Toptec Tente


