Tekview Alert Pal Manuel utilisateur

Alert PalTM
Quick Start Guide
TM
AlertPal


Get an SMS / MMS message when
motion detection / PIR is activated
Infrared LEDs enable the camera to
capture images in the dark
Instant alert by SMS (text), MMS
(picture) & Email (inc images)
Dial the Alert PalTM and listen in to
the monitored area
Quick and easy to set up, just send the
Alert PalTM a few simple commands
Get To Know Your Alert PalTM
!
!@*&
!@*&
*142
*1*
TM
AlertPal

Get To Know Your Alert PalTM
STEP 1. Prepare Your Alert PalTM
1. Slide the battery compartment cover downwards
2. Lift the battery cover away from the device
• WARNING: Always be sure to switch off the camera and disconnect the power
before inserting or removing the SIM card. Do not touch the gold contacts of the
SIM card
• NOTE: The SIM PIN must be checked. Use an ordinary mobile phone to check
and, if necessary, turn off SIM lock
3. Hold the SIM card in line with the dot (gold contacts on the underside) and slide
it in to position
4. Replace the battery compartment cover
www.tekview.co.uk
RESET
Power
switch
Reset key
Set key
Mini USB
(rubber
cover)
Infrared body
detector
Status
indicator
Infrared LED
lights
Camera
Mirror
Microphone
Mount screw
Power inlet
socket
Battery
compartment
Mount screw
TM
AlertPal

Important Information
Please read the information below before using your Alert PalTM
1. When inserting or using the SIM card, do not touch the gold connectors.
2. Use only the approved Alert PalTM AC power adaptor.
3. Treat your Alert PalTM carefully, store it safely and do not drop or throw it.
• DonotexposeyourAlertPalTM to dust, liquid, moisture or humidity
• DonotuseorstoreyourAlertPalTM at extreme high or low temperatures
• DonotexposeyourAlertPalTM to naked flames, lit tobacco products or other
heat sources
• DonotuseyourAlertPalTM in hospitals or near medical equipment
If you have personal medical devices such as a pacemaker consult your
physician for advice.
• DonotuseyourAlertPalTM in an aircraft or in any place where the use of
radio transmitters is prohibited
• DonotuseyourAlertPalTM in places where potentially explosive atmosphere
is present
• DonotuseyourAlertPalTM in proximity to car airbags
• DonotattempttotakeyourAlertPalTM apart, there are no user serviceable
components inside the product
• DonotallowchildrentoplaywithyourAlertPalTM, small parts such as SIM
cards could be detached and represent a choking hazard
For optimum performance do not cover your Alert PalTM, position it with
good access to the mobile signal.
You should not rely on any voice call / SMS / MMS capability that your Alert PalTM
provides for emergency or essential communication.
www.tekview.co.uk
TM
AlertPal
Get To Know Your Alert PalTM Continued…
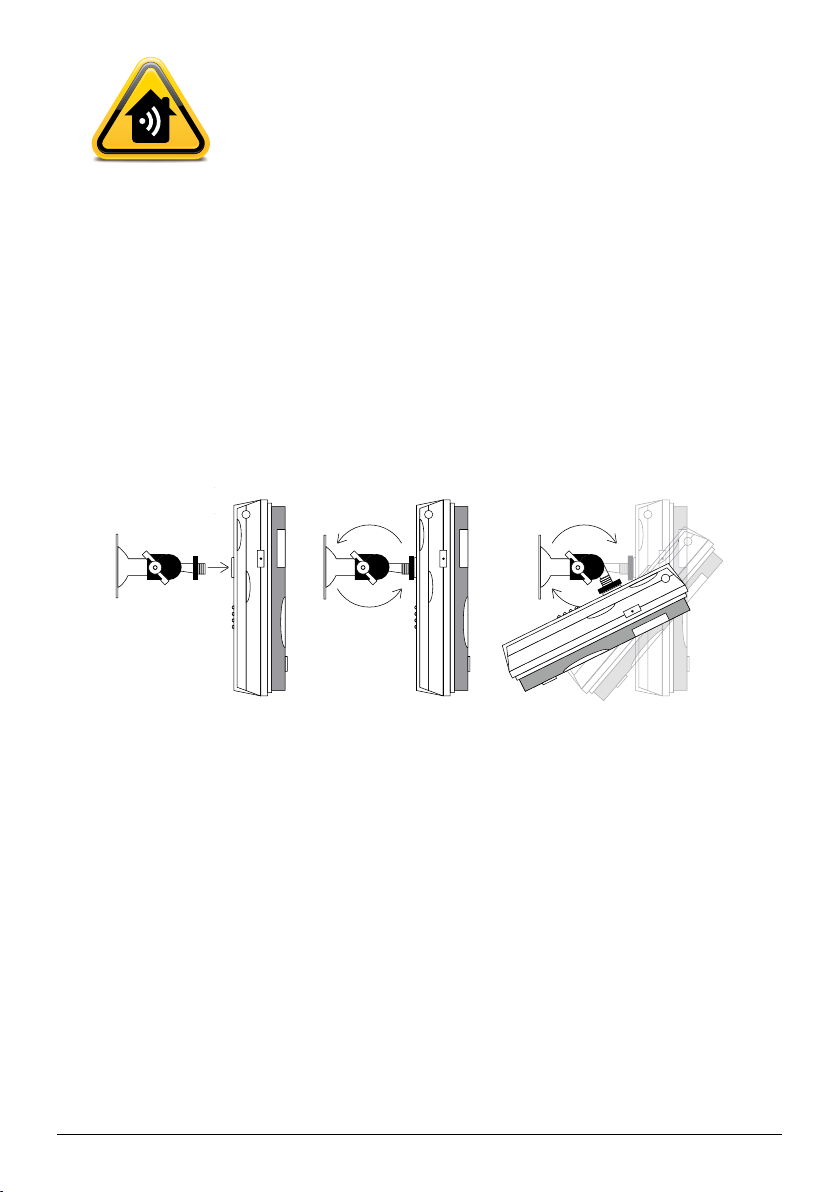
STEP 2. Mount the Alert PalTM Camera
1. Mount the bracket on the wall, ceiling or other surface as required
2. Attach the camera to the threaded tip of the bracket
3. Screw the round lock-nut towards the camera to secure the camera on the mount
4. Loosen the screw so the angle can be adjusted
5. Tighten the screw to the camera in the desired position
www.tekview.co.uk
Note: There is a second mount position on the underside of the camera. The
mount screw-threads are standard photographic size, so the camera can, for
example, be mounted on a camera tripod.
Note: For best results avoid pointing your Alert PalTM at a bright light or window.
STEP 3. Setting up your Alert PalTM
1. Connect the cable from the power adaptor to the power inlet socket on the
back panel as shown
2. Plug the power adaptor into a wall outlet or socket strip
3. Slide the power switch to the UP position to turn on your Alert PalTM
4. After approximately 60 seconds, the camera bleeps to indicate that the GSM
network has been found
5. From your mobile phone, send an SMS with text #00# to the camera, the camera
confirms your phone as the master by SMS meaning that you have full control
over your Alert PalTM
6. Your default password is ‘1234’
TM
AlertPal

Get To Know Your Alert PalTM Continued…
www.tekview.co.uk
Network MMS settings are configured automatically for the 3 major networks (PAYG)
Orange, Vodafone and O2. If you are using a contract SIM on Vodafone or O2, you
must now send the command indicated in order to configure MMS settings.
Vodafone: #145#vodafone# O2: #145#o2#
Your Alert PalTM is now operational
When armed, your Alert PalTM will raise the alarm when a sensor is triggered
By default the build-in infrared body sensor is enabled and camera movement
detection is enabled. When the alarm is raised your Alert PalTM sends an SMS to the
master followed by an MMS with images. Other options include voice call and email
alarms. Detector image and alarm settings can be configured – please download the
full guide from www.tekview.co.uk.
LED Status
Searching for network / SIM PIN enabled
Alarm triggered
No SIM card / System error / Camera start up
Loading wireless remote sensor
Armed
Disarmed / Waiting for master number
Sending messages / Ongoing voice call
Factory reset / Loading sensor
TM
AlertPal

Get To Know Your Alert PalTM Continued…
Key
Fast flash (two flashes per second)
Slow flash (one flash per second)
Two second flash
Changing your Alert PalTM password
We recommend that you change your password immediately to prevent any
unauthorised access (this can only be performed by the Master user).
1. Send your Alert PalTM an SMS with text #04#OldPassword#NewPassword#
(The password can only be a 4 digit number / the original password is 1234)
2. The Master user will receive an SMS reply that the password has been
successfully changed
STEP 4. Adding an additional user
(This can only be performed by the Master user)
1. Send your Alert PalTM an SMS with text #06#AdditionalUserNumber#
2. To add several emergency numbers to your Alert PalTM send an SMS with text
#06#AdditionalUserNumber#AdditionalUserNumber#
3. The Master user will receive an SMS reply that the additional user has been
added successfully
Arming your Alert PalTM
• SendanSMSwithtext#01#toarm
• SendanSMSwithtext#02#todisarm
www.tekview.co.uk
TM
AlertPal

Remote Control
Press to arm the Alert PalTM
Press to disarm Alert PalTM
www.tekview.co.uk
When the Emergency button is pressed on the remote, Alert PalTM
acknowledges with a bleep. The Alert PalTM calls the master number (only) at which
point the master can hear live audio from the Alert PalTM.
Note: Alert PalTM responds to the emergency button in both armed and unarmed
states. If the Alert PalTM is busy, for example sending images, the on-going
operation is cancelled in order to action the emergency alarm.
Pairing your Alert PalTM with the panic buttons
Before use, each panic button must be paired with your Alert PalTM, two are supplied.
1. Send your Alert PalTM an SMS with text #196#SOS1#
2. You will then get an SMS back to say it has accepted your command
3. You then press the panic button and the device is paired
4. To add an additional panic button just repeat the same process using #196#SOS2#
When the panic button is pressed Alert PalTM calls the master and each added
additional user for 5 seconds in turn until someone answers, at which point that
person can hear live audio from Alert PalTM.
Disarm
Indicator LED
(lights when any
button pressed
to indicate
transmission)
Arm
Emergency button
Cover slides
open & closed
TM
AlertPal

Remote Control Continued…
The LED indicator displays on-going voice call. Alert PalTM tries each number
up to three times until someone answers at which point it stops dialling.
Note: If Alert PalTM is calling a landline, check that hanging up the landline clears
the call, some telephone networks do not clear the call when the caller hangs
up making it impossible to dial a new call. We recommend that emergency calls
are made to mobile numbers. DONOTPROGRAMTHECAMERATOCALLTHE
EMERGENCY SERVICES.
Alternatively send #39#1# to Alert PalTM to change the settings to SMSMMS mode
ONLY when the panic button is pressed. Then when the panic button is pressed
Alert PalTM acknowledges with a bleep and sends an SMS alert followed by an MMS
with an image to the master and each added additional number.
Note: Alert PalTM responds to the panic button in both armed and unarmed states.
If the Alert PalTM is busy, for example sending images, the on-going operation is
cancelled in order to action the emergency alarm.
Request an MMS Image from your Alert PalTM
(This can be performed by the Master user / Additional User / Guest)
Master User / Additional User
Send an SMS with text #03# (This will send you one MMS image)
Guest
Send an SMS with text #03#Password#
To request up to 8 images change the command to:
#03#ImageQuantity# for Master User and Additional User and
#03#Password#ImageQuantity# for Guest
www.tekview.co.uk
TM
AlertPal
Table des matières
Manuels Système de sécurité populaires d'autres marques


EDM
EDM Solution 6+6 Wireless-AE Manuel utilisateur

Highway Safety Group
Highway Safety Group EA401 Manuel utilisateur

Siren
Siren LED GSM Manuel utilisateur

Detection Systems
Detection Systems 7090i Instructions de montage

Se-Kure Controls
Se-Kure Controls MicroMini SK-4841 Manuel utilisateur

Siemens
Siemens FDM273 Manuel utilisateur