Technicolor TG213 Manuel utilisateur


Power Wall Plug Repeater 2
Table of Contents
Chapter 1: Product Overview ...................................................................... 4
1.1 Features ................................................................................................................4
1.2 Package Contents.................................................................................................4
1.3 Product Overview.................................................................................................5
1.3.1 Front Panel............................................................................................ 5
1.3.2 Power Plug............................................................................................ 6
1.3.3 How to Reset......................................................................................... 7
1.4 Modes ...................................................................................................................8
1.4.1 Access Point........................................................................................... 8
1.4.2 Repeater................................................................................................ 8
Chapter 2: Repeater Mode .......................................................................... 9
2.1 Setting as Repeater ..............................................................................................9
2.2 Connecting Wireless Clients...............................................................................12
2.3 Modifying Extended Wi-Fi Settings ...................................................................13
Chapter 3: AP Mode................................................................................... 14
3.1 Using as Access Point .........................................................................................14
3.1.1 Connecting Wireless Devices.............................................................. 14
3.1.2 Wireless Settings of Your Device ....................................................... 16
3.2 Using as Station..................................................................................................17
3.2.1 Setting Your Device as AP Station ..................................................... 17
3.2.2 Connecting a Network ....................................................................... 19
Chapter 4: System Configuration .............................................................. 21
4.1 Login...................................................................................................................21
4.2 Using the Menu..................................................................................................22
4.3 Operation Menu ................................................................................................23
4.4 Network Menu ...................................................................................................23
4.4.1 Lan Setting.......................................................................................... 23
4.4.2 IPV6 Setting ........................................................................................ 24
4.5 Wireless Menu....................................................................................................25
4.5.1 Repeater Mode ................................................................................... 25
4.5.2 AP Mode - Access Point ...................................................................... 28

Power Wall Plug Repeater 3
4.5.3 AP Mode – Station.............................................................................. 32
4.6 Administrator Menu ..........................................................................................33
4.6.1 Management ...................................................................................... 33
4.6.2 Upload Firmware ................................................................................ 34
4.6.3 Settings Management ........................................................................ 35
4.6.4 Status................................................................................................... 36
Appendix .................................................................................................. 37
A. Configure the Computer....................................................................................37
B. Wireless Considerations .....................................................................................39
C. Regulatory & Safety Information.......................................................................40
D. Specifications......................................................................................................43

Product Overview
Power Wall Plug Repeater 4
Chapter 1: Product Overview
Thank you for choosing TechnicolorPower Wall Plug Repeater. You can use your
device as a Repeater to leverage your existing wireless network by repeating the
wireless network signal so that coverage range is extended. Or, use as an Access Point
to allow wireless clients to connect to a wired network. The various security features,
such as WPS, WPA2, and WPA protect your data and privacy online. The web-based
utility allows you to configure your Repeater easily.
1.1 Features
•Wireless AC gives high-speed wireless connectivity to devices
•Wireless 802.11n/g/b/a/ac backward compatibility
•Wireless speed of up to 750Mbps (300 2.4Ghz / 433 5Ghz)
•Dual-band connectivity for greater flexibility and reduced interference
•1x 10/100Mbps Auto-MDIX port
•WPA2/WPA wireless encryption to keep wireless communication secure
•Wi-Fi Protected Setup (WPS) for secure setup with simple press of a button
•Web-based configuration tools and management via Web Browser
•Supports statistics information
•Supports Station/AP/Repeater mode
1.2 Package Contents
Check if the package contains the following items. If any item is missing or appears
damaged, contact your dealer.
Power Wall Plug Repeater
Power Plug
Note: Plug type may differ depending on the location
where the device is purchased

Product Overview
Power Wall Plug Repeater 5
1.3 Product Overview
1.3.1 Front Panel
1
2
4
5
3
No.
LED
Description
1
Power LED
Lights up when the device is powered on.
•Solid GREEN – Indicates the device is powered ON and
operating normally
•Flashing GREEN – Indicates Ethernet traffic in progress
•Solid RED – Indicates the device is powering ON or the
system is defective.
•Flashing RED – The device is in recovery mode or the
device has malfunctioned.
•Flashing ORANGE – Cannot connect or be assigned an IP
address from the router
•Off – The device is powered off.
Wireless LED
Lights up to indicate wireless connection.
•Solid GREEN – A wired connection is established.
•Flashing GREEN – Data transmission is in progress.
Link LED
Lights up to indicate link activity.
•Solid GREEN – Wireless link between the Repeater and
the AP is above -55dBm RSSI
•Solid ORANGE – Wireless link between the Repeater and
the AP is above -75dBm and
-55dBm RSSI
•Solid RED – Wireless link between the Repeater and the
AP is below -75dBm RSSI

Product Overview
Power Wall Plug Repeater 6
No.
LED
Description
2
Ethernet port
Connects a computer and other Ethernet network devices to
the Repeater using RJ-45 cables.
3
Power/ Mode
Switch
Use the switch to select:
•AP – AP mode
•Repeater – Repeater mode
•Off – Turn off the device
4
Reset button
Press and hold this button for at least 10 seconds to restore
your device to its original factory default setting.
5
WPS Button and
LED
Press and hold for at least 5 seconds to enable WPS. The LED
lights up to indicate:
•Flashing GREEN – WPS connection in progress
•Solid GREEN – WPS connection is established
•Flashing ORANGE – WPS connection failed
1.3.2 Power Plug
Slide the bundled power plug into your device. The plug
type that comes with your device may vary depending on
the location where the device is purchased.
In case there is a need to replace the plug, press the lock
button and slide the plug upwards to remove the plug
from the device.

Product Overview
Power Wall Plug Repeater 7
1.3.3 How to Reset
Use the Reset button in case there is a need to reset the device and restore the
factory default settings.
Using a pointed object, press and hold the Reset button for at least 5 seconds to reset
the device.

Product Overview
Power Wall Plug Repeater 8
1.4 Modes
Your device can be used as:
•Access Point
•Repeater
1.4.1 Access Point
Use the AP (Access Point) mode to connect your device to a wired network and allow
other clients to connect to the network wirelessly.
1.4.2 Repeater
Use the Repeater mode to extend the coverage range of an existing wireless network.

Home Network
Power Wall Plug Repeater 9
Chapter 2: Repeater Mode
Use the Repeater mode to extend the coverage range of your existing wireless
network.
2.1 Setting as Repeater
1. Press the Power/Mode switch to Repeater.
2. Plug your device to a power outlet.
3. Connect by WPS: The easiest way to setup your device in Repeater mode is to
connect to a router or access point using Wi-Fi Protected Setup (WPS). This
feature is used only if the WPS pairing process is available on the router or
access point. Otherwise, skip to step 4.
a. Press the WPS ( ) button on your wireless router or
access point.
b. Push the WPS button on your Repeater device.
The WPS LED will blink green while pairing is in
progress. When pairing is successful, the WPS LED
turns solid green.
c. After pairing, skip to “Connecting Wireless Clients” on page 12 to start
connecting wireless clients to your device.

Home Network
Power Wall Plug Repeater 10
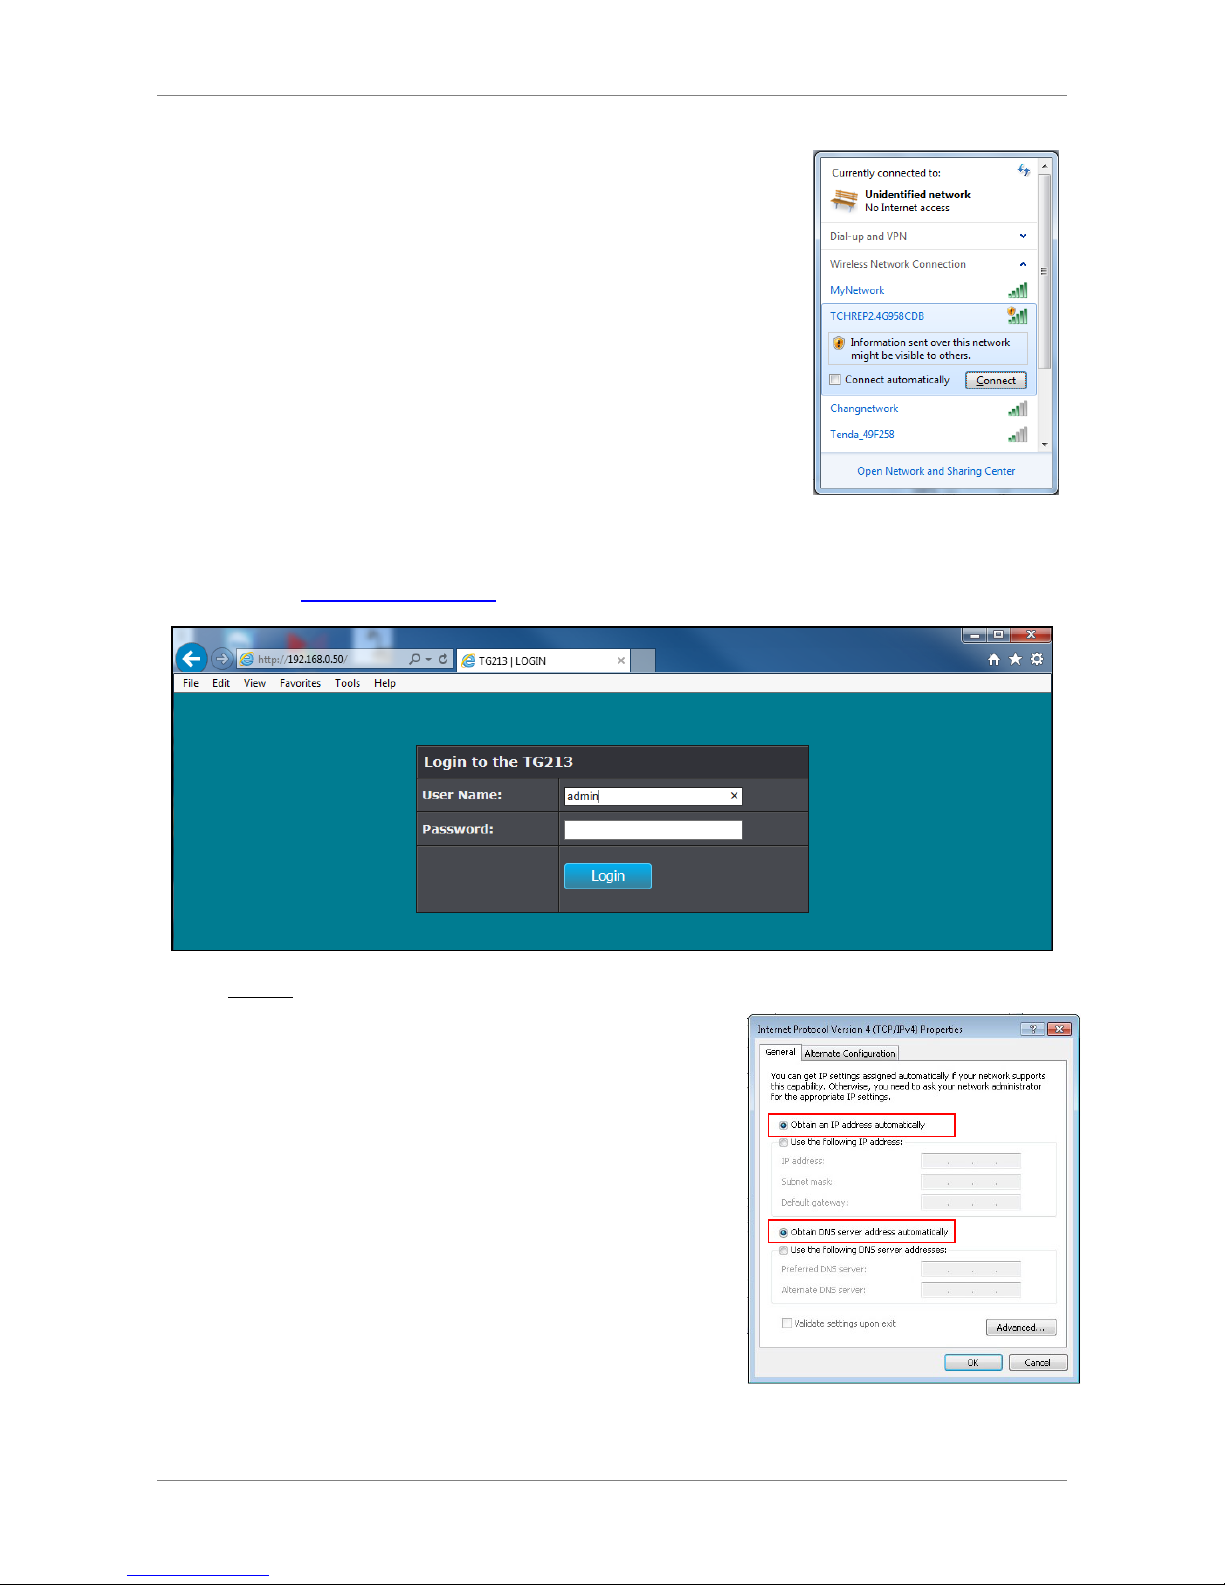
4. On your PC, search for available wireless networks.
The default SSID of your device is
“TCHREP2.4G958CD8” (2.4Ghz) or
“TCHREP5G958CD8” (5Ghz).
By default, the password is empty.
5. Once connected, open a web browser and type the default IP address of your
device http://192.168.0.50 on the URL address bar. The Login page appears.
NOTE:
•If you cannot connect to the web
configuration page, make sure your PC
belongs to the same network segment as
your device.
The easiest way to do this is to set the
Internet Protocol (TCP/IP) properties of
your PC to automatic. If not, configure it
accordingly.
See “Configure the Computer”on page 37
for more information.
Table des matières