Technica Del Arte uMi Manuel utilisateur
uMi Manual Version 1.0 SEPTEMBER 2016 PAGE 1 / 17

uMi Manual Version 1.0 SEPTEMBER 2016 PAGE 2 / 17
Table of contents:
1. Introduction Page 3
2. Features Page 4
3. What’s in the box? Page 5
4. Out of the box: etting-up Page 6
etting-up in Apple O X
etting-up for Apple iO
etting-up in Windows
5. Hardware & block diagram Page 9
6. uMi Control software Page 10
1. Overview
2. Knobs and sliders
3. Controls
4. Dynamic processes
7. Firmware update Page 15
8. Troubleshooting Page 16
9. Notices Page 17
1. Warranty
2. Maintenance
3. Repair service

uMi Manual Version 1.0 SEPTEMBER 2016 PAGE 3 / 17
1. Introduction
One interface to reach them all
TechnicaDelArte’s uMi U B Microphone interface is one of the world’s most flexible
professional Recording and Broadcasting interfaces. Delivering outstanding audio quality,
the uMi represents the centerpiece for recordings and live broadcasting. With the mobile
reporter in mind, our development team has designed a very robust and versatile
microphone amplifier.
The D P processing included within the uMi makes the user interface customizable. With
the help of uMi, your favorite microphone will sound the same, wherever you are.
24+1 bit/192 kHz ound Quality
Designed to play the central role in mobile situations, uMi delivers uncompromising audio
quality for all mobile devices: iO , Android, Mac O and Windows. By carefully selecting
the audio components we have built a device that offers extremely high-resolution sound,
with the lowest THD and high dynamic range.
Realtime D P processing
While the analogue sound is natural and transparent, the uMi can deliver a wide range of
dynamic processing, gain control and equalization via its hardware accelerated D P power.
Years of research and development by our experienced team has resulted in outstanding
audio quality processing algorithms, focused on mobile recording and broadcasting.
By saving presets within the device, sound colour and response can be adjusted simply by
the push of a button. The presets can be adjusted and stored in the device with the help
of the highly intuitive uMi Control user interface, available for Apple O and Windows.
Broadcasting two streams
Due to its flexible architecture, two uMis can be cascaded and used simultaneously in one
system. This feature has been created with the sports commentator in mind who, in most
cases, need separate microphones.
Elegant and robust hardware design
Working with the very best hardware materials and the most advanced manufacturing
processes, we have been able to deliver an outstanding quality device. Due to its
durability, the uMi can be used in the harshest of environments, which makes it the perfect
tool for on-the-road recording and broadcasting.

uMi Manual Version 1.0 SEPTEMBER 2016 PAGE 4 / 17
2. Features
Key Features
Professional U B audio interface for microphone.
D P processing inside for reliable cross-platform quality and performance.
Bus powered, compatible with iO devices. No need for external power or batteries.
Audio Interface
Premium quality AD converter
ample-rates up to 192kHz at 25 Bit resolution.
Ultra-low latency, 1ms U B bus latency at all sample-rates.
Up to 32-bit U B audio support.
U B 1.1 and 2.0 Class compliant. No drivers needed for Windows, O X or iO
Microphone Preamplifier
Microphone sensitivity up to -82 dBU Full cale.
Adjustable Phantom power (0V to 12V), suitable for most phantom powered
microphones.
Lockable gain. No more surprise gain changes when you switch apps or O .
uMi Inside
Acrylic capacitors for distortion free audio.
0.1% precision Thin Film resistors.
High quality Mogami Neglex quad microphone cable for enhanced RF/EM shielding
and improved signal to noise cancelling (10 to 20 dB).
No mechanical/moving parts in the audio signal paths for pristine audio quality and
no degradation over time.
32/64-bit Digital ignal Processing.
oftware
D P Channel strip functions on board: Lo-cut, Phase, Parametric EQ, Noise-gate,
Limiter etc. Available with every sample-rate, up to 192 kHz.
Free uMi Control software (available for Windows and MAC) to setup your uMi
presets and upgrade the uMi firmware.
Preset recall
All settings stored in device memory, so your connected Microphone will sound the
same on every device or O you use the uMi with.
2 Presets stored in device memory, easily selectable via a preset button.
Other
CNC machined and laser trimmed aluminum casing.
All hardware, software and firmware developed and designed in house by Technica
Del Arte in The Netherlands.
Manufactured in The Netherlands.

uMi Manual Version 1.0 SEPTEMBER 2016 PAGE 5 / 17
pecifications
EIN: -130 dBU (150 Ohm, A-weighted).
EIN: -132 dBU (0 Ohm, A-weighted).
Dynamic range: 108 dB (A-weighted).
THD: 0.0003% (- 42 dBU input level, maximum gain)
THD+N: 0.003% (– 32 dBU input level, maximum gain)
Max input level: -22 dBU
Measurements: 15 mm wide x 10 mm high x 50 mm long.
Weight: 115g
3. What’s in the box?
1 x uMi Microphone audio interface
2 x 4 bumpers: two different height connections
1 x Instruction manual
1 x LUCI Live Lite activation code
1 x uMi and microphone carrying bag
upported Operating ystems:
Apple O X
Apple iO
Microsoft Windows (7, 8, 10)
uMi Manual Version 1.0 SEPTEMBER 2016 PAGE 6 / 17
4. Out of the box: etting-up
The uMi interface can be used straight out of the box. Just connect it to your preferred
mobile device, attach a microphone and you are ready to broadcast/record.
The presets are pre-configured in such a way that the button on the device switches 12V
Phantom power On (blue light On) and Off ( blue light off) .
Pix: graphical representation of the uMi connected to a microphone.
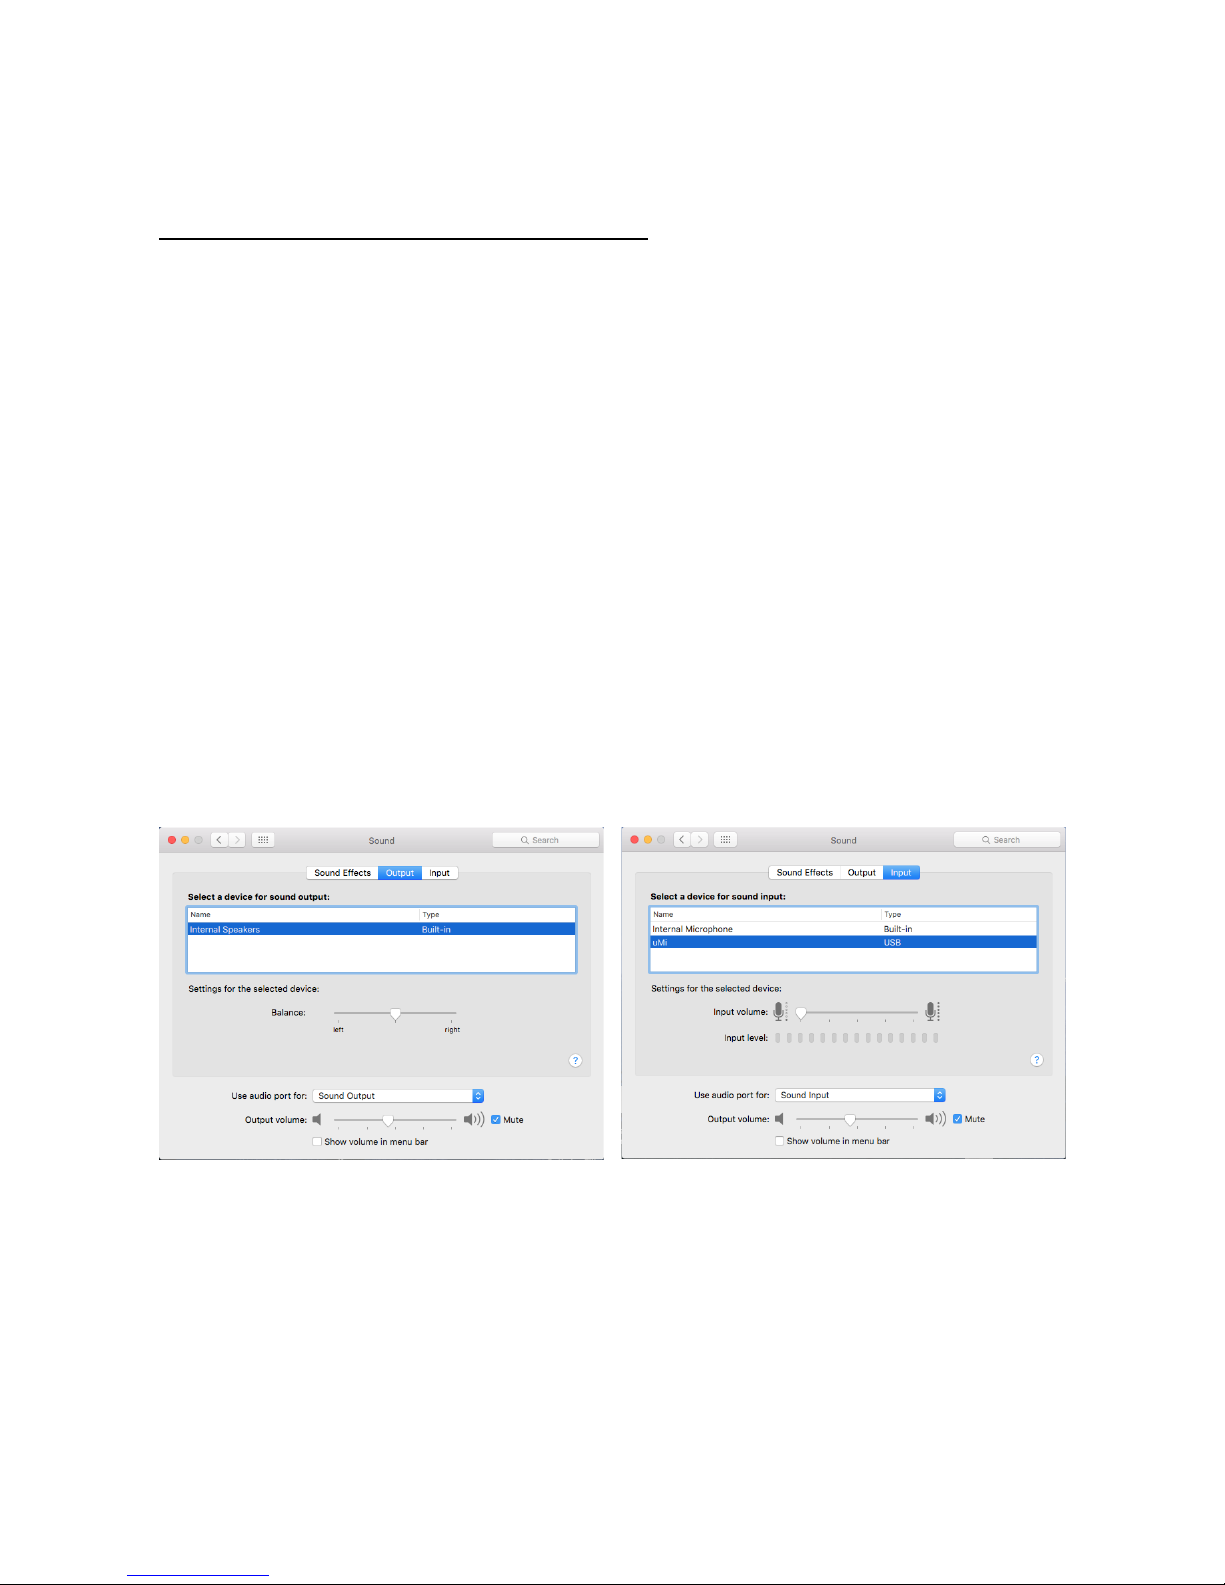
etting-up in Apple O X
Use ystem preferences to receive audio from the uMi and send audio to the computer
speakers/headphones.
1. Insert uMi audio interface into a free U B port
2. Open ystem Preferences from the top left drop-down menu
3. Click the ound icon
4. In the ound pane click the Output tab.
5. Choose the Built-in Internal speaker.
6. In the ound panel click the Input tab.
7. Choose uMi
8. Close the ound preferences. You are ready to use the uMi interface.
Using Audio MIDI etup to change the settings of the uMi interface
1. Open the Applications folder and then the Utilities folder.
2. Double click to open Audio MIDI setup.
3. elect uMi from the left side of the panel.
4. The sample rate and the bit-depth can be chosen. Preferred values are 48000,0 Hz and
1ch-24bit Integer.

uMi Manual Version 1.0 SEPTEMBER 2016 PAGE 7 / 17
etting-up for Apple iO
The uMi interface will work with Apple’s mobile hand-held devices. In order to connect the
uMi to an iPhone or iPad and broadcast/record, an Apple Lightning-to-U B Camera
Adapter or Camera Connection Kit is required. For more info, visit http://www.
apple.com/shop.
1. Plug the Camera Adapter/Connector into your Apple mobile device.
2. Plug the uMi into the Camera Adaptor/Connector’s U B port.
3. elect your desired mobile broadcast/record application.
4. Adjust microphone volume to desired level (not valid when you lock your uMi level, see
uMi Control description below).
etting-up for Android
The uMi interface will work with Android mobile hand-held devices that support OTG. To
connect the uMi to your Android device you will need an OTG cable compatible with your
device.
1. Plug the OTG Adapter/Connector into your mobile device.
2. Plug the uMi into the OTG cable's U B port.
3. elect your desired mobile broadcast/record application.
4. Adjust microphone volume to desired level (not valid when you lock your uMi level, see
uMi Control description below).
etting-up in Windows
Using Control Panel ound settings to receive audio from uMi, while sending sound to the
computer’s speakers:

uMi Manual Version 1.0 SEPTEMBER 2016 PAGE 8 / 17
1. Insert uMi into your computer’s U B port.
2. Go to tart menu and launch Control Panel.
3. Open Hardware and ound panel.
4. elect Recording.
5. elect the uMi as the recording device. Ensure it is the Default Device.
To setup advances settings:
1. Click the Properties button for more setup options.
2. Click the Advanced tab. Use the drop-down menu to choose the bit depth and sample
rate. Preferred value is 1 channel, 24-bit, 48000 Hz.

uMi Manual Version 1.0 SEPTEMBER 2016 PAGE / 17
5. Hardware & block diagram
(1) Microphone connector.
XLR Female connector for connecting any dynamic microphone or a condenser
microphone that supports a phantom power voltage of 12V or lower.
(2) Mogami Neglex quad cable
2m (6,5ft) quad-core microphone cable. Extends the distance between the microphone
and the mobile device. The quad-core is used to improve the noise canceling (10 to 20dB)
of the connection between the microphone and the preamplifier.
(3) Phantom power switch
The phantom power can be activated and controlled via the uMi Control software. The
output voltage can be set between 0 and 12V. This is done to lower the current drain from
the U B port. This feature will increase the live time of the mobile device and makes sure
the power can be supplied by the mobile device.
(4) Preamplifier
The microphone signal is pre-amplified by an ultra-low noise analogue amplifier with a
fixed gain. The preamplifier also provides adequate input impedance, matching most
microphones.
(5) Analog to Digital converter
For converting the analogue microphone signal to the digital domain. The converter used
is a premium quality Cirrus Logic Analogue to Digital converter. The two input channels of
the ADC are used to convert one Mono microphone signal. This improves the noise
response of the conversion.
(6) Digital ignal Processor
This is the main core of the uMi. The D P handles the digitally converted audio signal from
the ADC to the U B port. The D P includes a Channel- trip functionality containing several
hardware accelerated D P effects.

uMi Manual Version 1.0 SEPTEMBER 2016 PAGE 10 / 17
(7) Preset button
Two presets can be stored in the hardware memory of the uMi. The user can switch
between these two presets by pressing this button. A blue LED light will indicate the
currently active preset.
The push button can also be used to update the firmware of the uMi if needed.
(8) U B port connector
U B-A Male connector compatible with any U B-A port and / or a Lighting connector.
6. uMi Control software
The uMi Control software can be downloaded from http://umi-connect.com/
Installing the uMi control software
After downloading the installer, double-click the installer icon and follow the onscreen
instructions until completed.
The User interface
Main feature: uMi is capable of storing two presets in its hardware memory. witching
between the two presets is achieved by pressing the hardware push button.
The selected OFF and ON -presets (9)/(10) are indicated with the LED placed in the
button's cap.
Table des matières


