Taurus T300 Manuel utilisateur

Instruction Manual
T300, T330, T350, T400, T500, T600
taurustelescopes.com

1
WARNING!
Telescope Taurus brings together a large amount of
sunlight. You should avoid aiming the telescope at the sun
without the mirror cover. Sunlight reflected by a mirror and
focused on the focal can severely burn people staying
nearby, damage their eyes, damage the telescope and start
a fire. Do not use the telescope to observe the sun. This may
cause an immediate loss of vision! Children should always
have adult supervision while observing.

2
Contents
1. Elements of the set.............................................................................................................................. 3
2. Usage................................................................................................................................................... 5
2.1. Assembling .......................................................................................................................... 5
2.2. Disassembling...................................................................................................................... 9
2.3. Preparation of the telescope to observe........................................................................... 10
2.4. Finder adjustment. ............................................................................................................ 10
2.5. The use of 2” eyepiece ...................................................................................................... 10
2.6. Using 2” filters with 1,25” eyepiece.................................................................................. 10
2.7. Shifting the focus............................................................................................................... 11
3. Collimation. ....................................................................................................................................... 12
3.1. Collimation of the secondary mirror................................................................................. 12
3.2. Primary mirror collimation................................................................................................ 13
4. Maintenance...................................................................................................................................... 14
4.1. Cleaning the main mirror. ................................................................................................. 14
4.2. Cleaning the secondary mirror.......................................................................................... 15
4.3. Removing the primary mirror............................................................................................ 15
4.4. Cleaning the covers. .......................................................................................................... 17
4.5. Care of wood. .................................................................................................................... 17
5. Specifications..................................................................................................................................... 17

3
1. Elements of the set.
1. Top cell
2. Bottom cell with the primary mirror
3. Base
4. Runners
5. Trusses
6. Top cel lock knobs
7. Bottom truss lock knobs
8. Spider adjustment
9. Spider 3- vanes
10. Collimation adjustment(secondary
mirror)
11. Finder (optional)
12. Crayford style focuser 2" dual rate
13. Collimation adjustment knobs
14. Runner's lock knobs
15. Adapter from 2" to 1,25"
16. Focus knob
17. Fine fous knob 1:10
18. Focus lock and tension adjustment
knobs
19. Truss shroud

4

5
2. Usage.
2.1. Assembling
When assembling the telescope should be remembered that all the elements should be put
together in two stages. First, the pre-turn with each individual elements so that they pass
well and then tighten the screws.
Step 1. If the top cell and bottom cell are connected together for transport, they should be
disconnected by unscrewing 3 knobs marked in red.
Note:
Do not raise cells fastened together by grabbing the top cell.
This can lead to damage and breakage of the element. Cells
should be pulled from the box alone or by grabbing lower cells.

6
Step 2. Bottom cell put on the ground and screw one runner into it. Then assemble one tube
spacers into runners screwed before and then screw in the second runner. Making sure it is
facing front of the telescope.
Step 3. Put the prepared cell on the base, so that the runners entered between teflon slides.

7
Step 4. Spread the truss, so that the elements of the screws are on the bottom, then set it to
the bottom of the cell. The screws should partially fall into the bottom cell holes, pre-tighten
them so that was still have 0,5-1 turns to be done. The white marker should be at the front
of the telescope.

8
Step 5. We put the top cell on the truss, the screws should partially fall into the hole for easy
installation. The screw that is nearest to the focuser should be at the back of the telescope.
Screw in and tighten the screws at the top cell, and then tighten the screws at the bottom of
the truss.
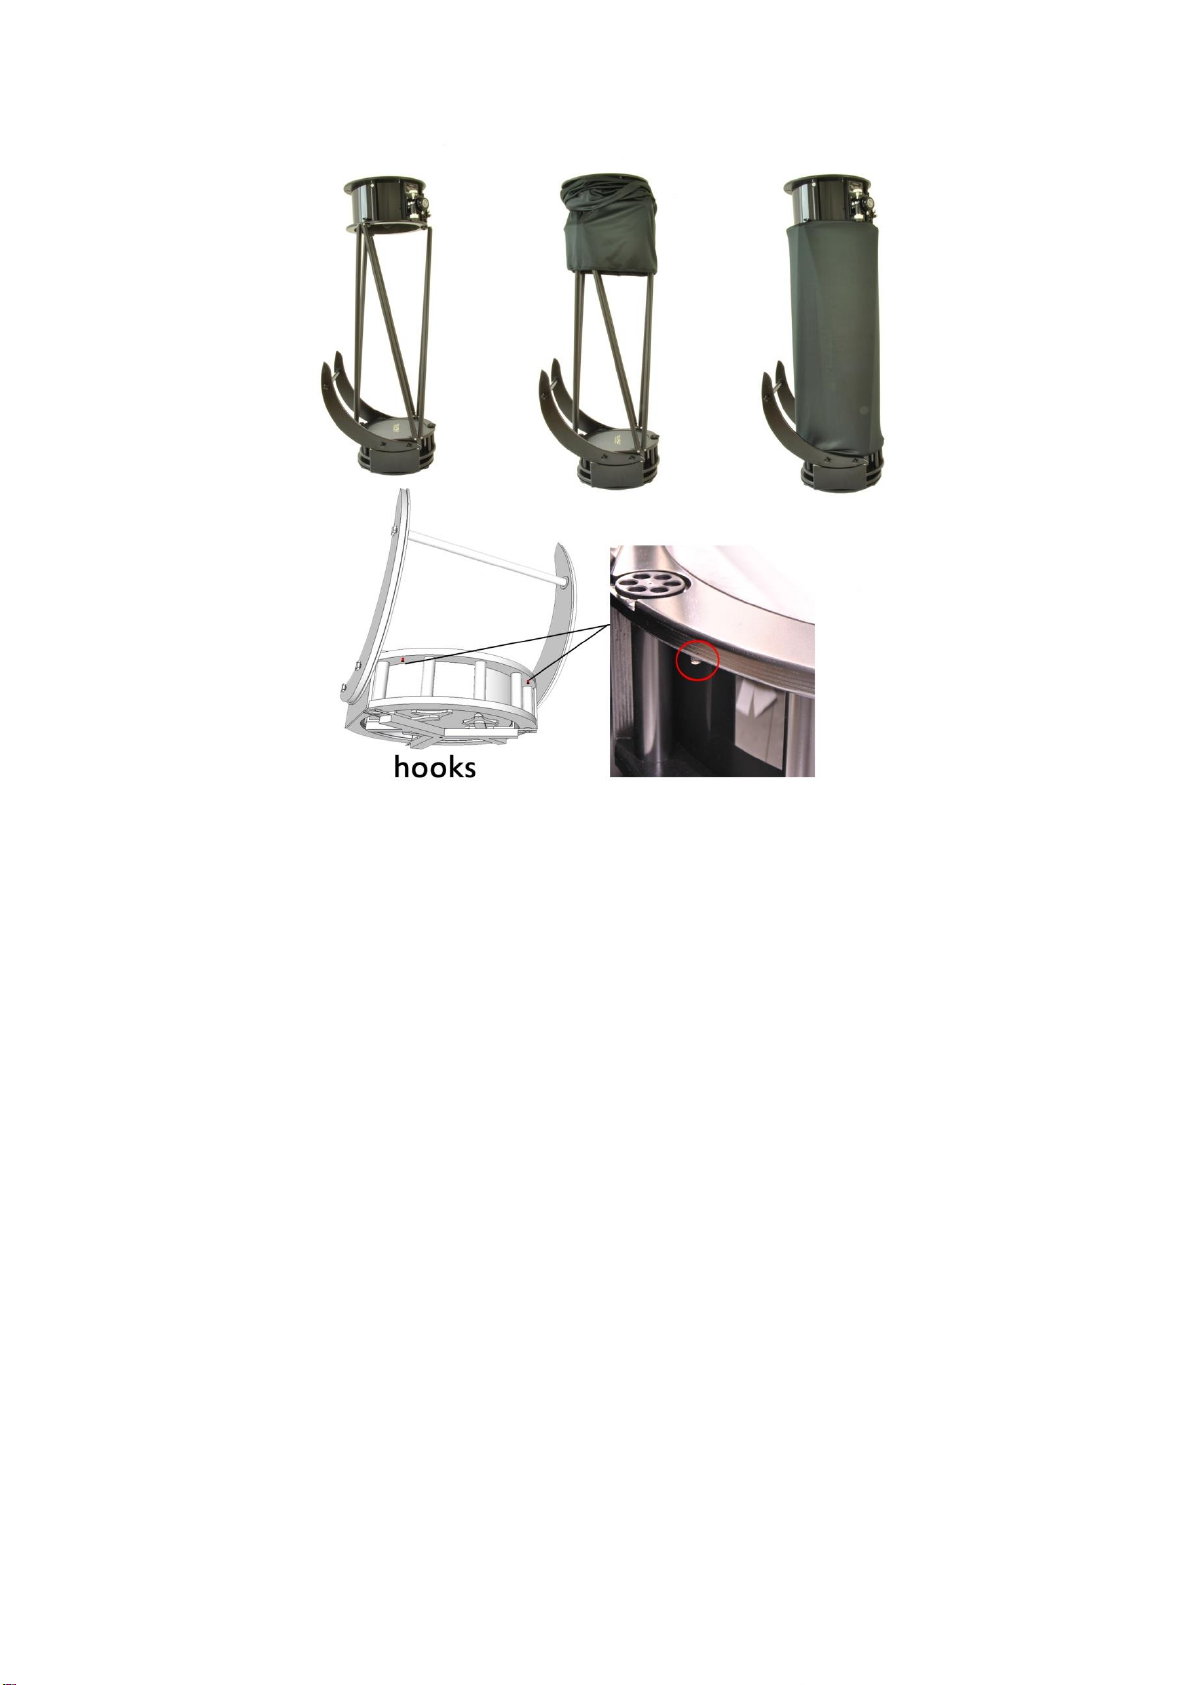
Step 6. If necessary, attach the tube shroud. Start from the top of the telescope was on the
front of the telescope. Take off the primary and secondary mirror cover. The drawcord
should be put on two hooks located in front of the bottom cell
9
Step 7.Check if the telescope is properly collimated. If so, mount the eyepiece and the
telescope is ready for use. If the telescope needs to improve the collimation, see instruction,
point 3.
Step 8. Place the finder(not included in the set) in the base and lock it with the screw.
2.2. Disassembling.
Disassembling the telescope is done in the reverse order as above. Pay special attention to
the primary mirror the installation of the protective cover.
Ce manuel convient aux modèles suivants
5
Table des matières


