Super SK Manuel utilisateur

OPERATION MANUAL
SK/SL/GKD/SKH/GK/CL Chemical Filter
Superior Performance
Unbeatable Pricing
Pride in Workmanship
Energy Efficient
Rugged Construction
Please Read This Manual Carfully Before Operating.

1.Installation Precautions.......................................................................................2
•Examples.....................................................................................................3
2.Instructions.........................................................................................................4
•GKD Features and Operation......................................................................5
3.Maintenance and Repair
•Precautions..................................................................................................6
•Filter Part.....................................................................................................6
•Filter Maintenace.........................................................................................6
•Filter Replacement ...................................................................................7,8
4.Troubleshooting.................................................................................................9
5.Appendix
•Type B Cartridge Nut Diagram...................................................................10
•Type C Cartridge Plate Fixture Diagram....................................................10
•Type K Star Cloth Bag Diagram.................................................................11
•Type P Paper Filter Diagram.....................................................................11
•Type U Bag and Type D Bag+Cartridge Diagram .....................................12
•Part Reference Chart..................................................................................13
6. Note.................................................................................................................14
•Filter Maintenance Card............................................................................15
•Product Warranty.......................................................................................16
Table of Contents

2
1.Installation Precautions
1. Make Sure The Pipeline Are Fully Secure And Sealed.
2. Pipeline With Lots Of Bends Please Install A Water/Solution Inlet Pipe
3. If The Filter Must Be Installed Outdoors,It Is Essential To Provide Adequate
Covering.
4. Base On The Chemical And Solution Temperature Please Select The Most
Suitable Pipe Material. (Ex: PP Is Use For Solution Exceeding 60oC)
5. Before Connecting Any Pipeline To The Pump,Pipe Should Be Washed To
Remove Any Extraneous Matter There May Be Such As Welding Pellets,
Cut-Offs From Gaskets, Etc.
6. Secure The Inlet Pipe To Keep It From Moving Or Bending If Using Soft Pipes.
(We Recommend Stiff Pipes Inside The Tank.)
7. Place The Machine In An Upright Position And On A Sturdy Resting Place.
8. When The Pump In/Outlet Are Lower Than The Liquid Level Of The Tank,
Install Valves On The In/Outlet Pipe To Prevent Siphoning.
9. Please Make Sure The In/Outlet Connection Flange Are Equal In Diameter
With In/Outlet Flange. Please Make Sure All The Bolts And Nuts Are
Adequately Tightened, Including The Wing Nuts On Top Cover.
10.The Wire Connection Diagram Could Be Found In The Connection ox On
The Motor For Various Voltages.
11. Use A Electromagnetic Switch. It Will Automatically Cut-Off The Power
Supply If The Motor Overloads. When Installing A Fuse Or A Motor
Protection Device,Choose The One Which Allows Current Higher Than
Rated.
(Please Refer To The Current Rating And Voltage On The Marking To Motor By 10 ~ 20 %.)

3
Installation Method
1. Set The Filter Pump High (A1) And Chemical Solution/Water Level (A2) A1=A2
2. Chemical Solution/Water Outlet (B2) ,Chemmical Solution/Water Holding
Tank (B2) B1=B2.
3. Please Install A Flow Monitor (D) On The OutLet
4. Pump Inlet (C) Should Be Installed With A Foot-Valve Or Strainer. Please
Make Sure That There Is No Leakage From The Inlet Pipe.
5. If There Are Bubbles Flowing In Flow Monitor (D) During Normal Operation,
Please Examine If Air Is Being Sucked In Somewhere Along The Inlet Pipe.
6. When The Pump Inlet And Outlet Are Lower Than The Liquid Level Of Tank,
Install A Chck Valves On The Inlet And Outlet Pipe To Prevent Siphoning.
7. Install Check Valve on In/Outlet If The Pump Is Located Under The Chemical
Solution/Water Tank, For Easy Cleaning & Maintenance Purpose
•Example
Pump
Drain
Air Release
Flow Monitor
Foot Valve
Drill A Hole About 5~10 M/M In Diameter
On The Outlet Pipe Or Install A T-Strainer
To Prevent Siphoning. (5 CM Above Water
Level)

4
2. Instructions (Please Read The Instructions Carefully)
1. Make Sure The Pipeline Are Fully Secure And Sealed.
2. Fill The Pump With Water (Pg. 18 Figure 1), Open Air Release Valve (19) &
Water Injection Valve(10),Fill Tube (8) With Water,Open Tube Valve (10) Let
Water Fill Up The Pump, Or Open Cover (7), Fill The Filter Barrel With Water.
Make Sure The Inlet Is Filled With Water To Prevent Pump From
Dry-Running.
3. Check The Voltage and Motor Junction Box For Any Miswire Before Starting
The Motor.
4. Before Starting The Motor Close Tube Valve (10) Then Let Air Water
Escape from Air Release Valve(19),To Tube (8)
5. Before Turning The Power On Check the In/Outlet Are Connect Correctly.
Example:Sign of Damage on Pipeline,In/Outlet Valve Are Open & ETC.
6. After Above Procedure.Turn On The Pump,Make Sure The Pump Is Turning
At the Right Direction.If Not, There Won't Be Water Coming Out From The
Outlet.Simply Switch It the Direction From Motor Junction Box.
7. Make Sure Tube Valve(10) Is Close,And Tube (8) is Empty.Prevent Air From
Entering The Pump And Cause Cavitation or Dry-Running.
8. Check The Pressure Gauge (15) Before Operating The Filter And Make Sure
There Is Oil Inside The Gauge.
9. While Working In A Hostile Enviroment: Wear Protective Clothing (Gloves
Boots & Etc.)
10. Check All The Safty/Protection Switch:For Example: Holding Tank Liquid
Level, Power Protection Switch And Etc.

5
•GKD Features
(1) Activated Carbon Can Be Added Into the First Chamber to
Filter Out The Particles Contain in the solution, Second
Chamber Will Filter Out All The Organic Matter.
(2) Second Chamber's Filter Can Be Replace While First
Chamber Is Still Operating.
(3) Various Filtration Methods Are Available For Chamber One
. (Paper, Cartridge Plate Fixture, Strainer Plate Fixture &Star Cloth Bag)
•GKD Operation
(1) Please Read Page 10~12 For Guidence
(2) Valve(F)(G)Should Be Fully Open While Operating.Rest
Should Be Fully Closed. (Check Valve Function & Specication on Pg.4)
(3) Valve(E)Should Be Fully Open,When First Chamber Is
The Only Operating Chamber. Rest Should Be Closed.
(Check Valve Function & Specication on Pg.4)
•GKD Filter Replacement
(1) Before Replacing The Filter,Air Release Valve (I) Should
Be Open and Solution Should Be Fully Drained.
(2) Please Read Page 15 before Removing the Cartridge.
(3) First Remove Top Cover,Then Remove C Clamp,Pull The
Cartridge Vertically.The Stanchion Nut can Be Remove By
Turning Counter-Clockwise. Filter Media Can Be Access After
Above Procedure.
(4) After Replacing The Filter Reverse The Procedure On
Step 3 Before Operating.

6
3. Maintenance and Repair
• Precauctions
1. Turn The Power To OFF Position & Disconnect The Power
2. Drain AllThe Fluid From The Filter And Close The In/Outlet.
3. Se rvice personne l Mus t Wear Protective Clothing.( Gloves Boots
Goggle & Etc.)
4. Make Sure The Pump Is Not Siphoning From The Tank.
*Filter Part
Judging By Visual- Check The Capacity Of Liquid Flowing Out From The Filter.
If The Discharge Is Very Low, Take Apart The Filter Material For Cleaning.
Filter Maintenance
1. Put The Cartridges And Tamis Bags Into 5% HCl Solution. Soak Them
For 3-5 Hours, And Then Clean Them With Water.
*(Please Do Not Scrub The Cartridge and Tamis bags)
2. Rinse The Filter Medium With Clean Water.
*3. Filter Maintenance Card (Pg.24)For Routine Filter Maintenance and Request.
* Do Not Exceed 80% of Its Pressure Range. Barrel Are Design To Withstand
Maximum of 3kg of Pressure.
Judging On Cartridge Replacement
Put The Cleaned Cartridge Into The Filter And Start The Filter.If The
Pressure Increases Quickly,It Means That The Cartridges Are Seriously
Blocked.It Has Become Ineffective, And Must Be Replaced.
7
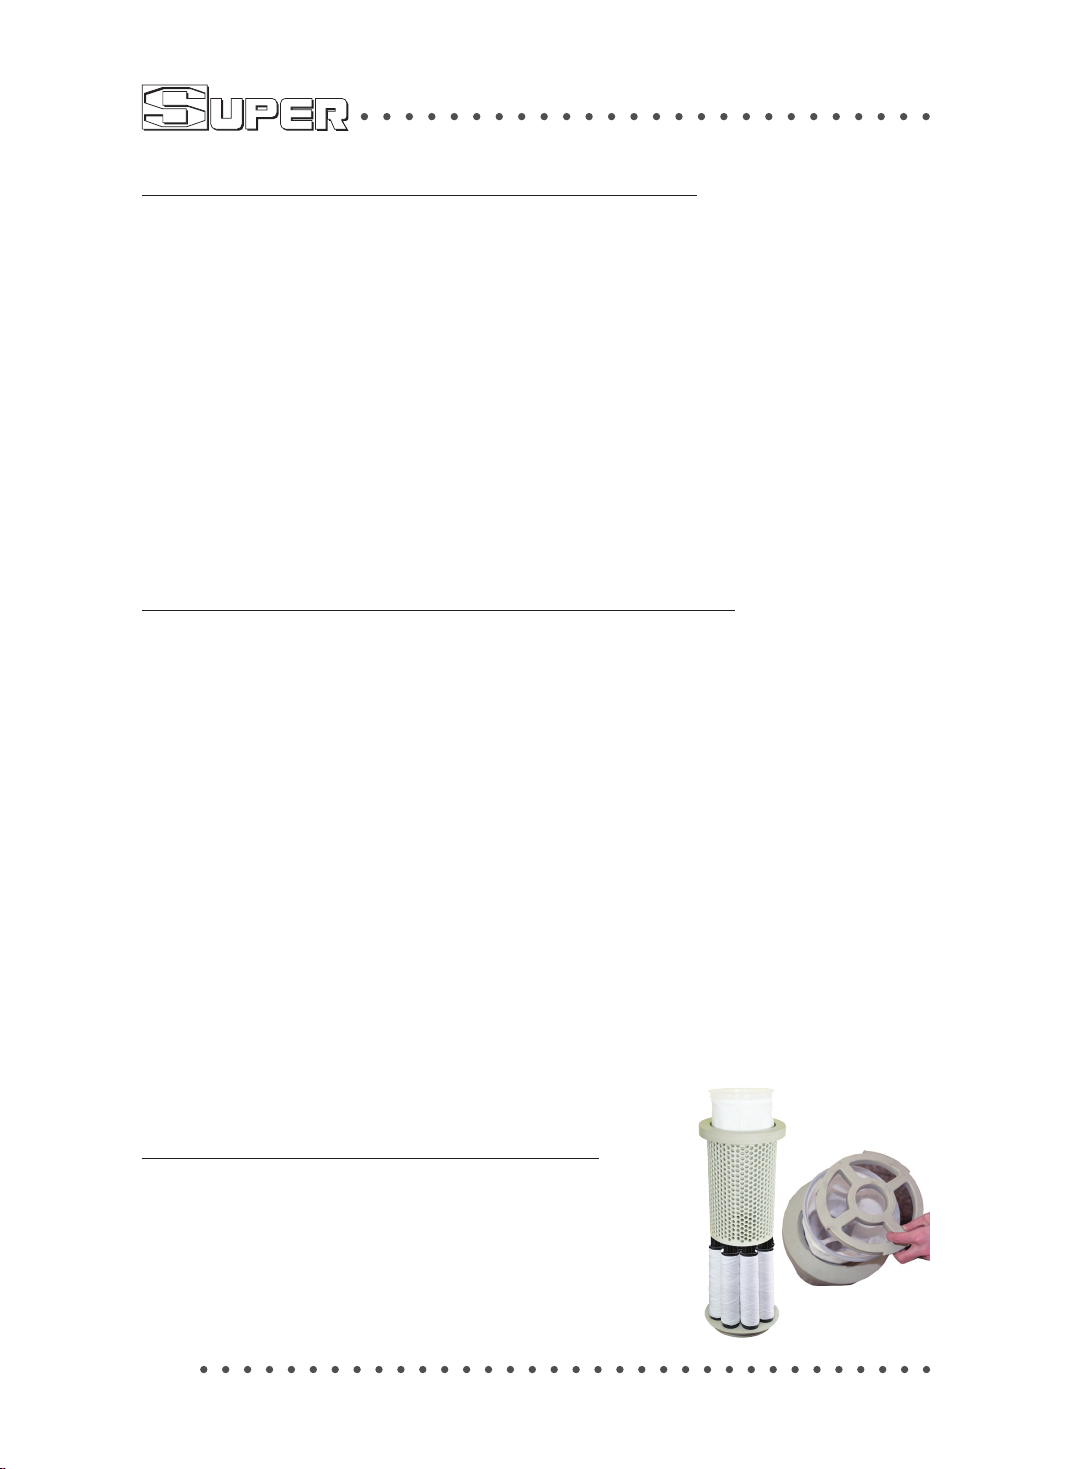
Maintenance Of Cartridge Nut Type Filter Medium
Refer To Figure 1 Of The Appendix. Page 18:
1. Turn The Cover Handles (26) Clockwise To Close, Counter Clockwise
To Open.
2. Before Opening The Cover (7),Drain The Air Out By Opening
Air Release Valve(19).
3. Open The Cover.Each Cartridge Is Enclosed By A Tamis Bag (29).
4. Untie The Tamis Bag.There Is One Nut(30) Inside.Turn The Nut
Counterclockwise To Loosen It.
5. Take The Nut (30) Off The Filter And Pick Up The Tamis Bags (29).
Clean Or Replace Them. Perform These Steps In Reverse To
Reassemble The Filter.
Maintenance Of Cartridge Fixture Type Filter Medium
Refer To Figure 2 Of The Appendix.Page18:
1. Turn The Cover Handles (26) Clockwise To Close, Counter Clockwise
To Open.
2. Before Opening The Cover (7),Drain The Air Out By Opening Air Release
Valve(19).
3. There Is One Nut(32) Inside.Turn It Counterclockwise To Loosen It.
4. Take The Stanchion Fastening Screw (32) Off The Filter, Pick Up The
Fixture Plate (33).
5. The Medium Can Be Removed Easily, And Then The Tamis Bag (29)
Can Be Untied.
6. Remove The Top Washer (35), Tamis Bag (29) And Spring (34) On
Top Of Cartridge(20). Clean Or Replace The Tamis Bags (29)
And Cartridges (20), Assemble The Medium In The Reversed Steps,
Lock The Stanchion Fastening Screw (32) And Cover (7). The Filter
Should Now Be Able To Function.
Maintenance Of Bag Type Filter Medium
Refer To Figure On This Page
1.Turn Clockwise To Secure,
Counter Clockwise To Release the Bag.
2.Replace Or Clean The Bag With Clean Water
3.Perform These Steps In Reverse To Reassemble

8
Maintenance Of Star Cloth Bag Type Filter Medium
Refer To Figure 3 Of The Appendix. Page 19:
1. Turn The Cover Handles (26) Clockwise To Close, Counter Clockwise
To Open.
2. Before Opening The Cover (7),Drain The Air Out By Opening
Air Release Valve(19).
3. Open The Cover.There Is One Nut(32) Inside.Turn The Nut
Counterclockwise To Loosen It.
4. Filter Can Be Remove By Lifting The Filter Handle(43)Upward
5. Put The Cartridges And Tamis Bags Into 5% HCl Solution. Soak Them
For 3-5 Hours, And Then Clean Them With Water.
***(Please Do Not Scrub The Cartridge and Tamis bags)* * *
6. Rinse The Filter Chamber With Water, Drain The Water By Using
Drain Valve (27)
7. Close Drain Valve(27) After Rinse.Assemble The Medium In The
Reversed Steps, Lock The Stanchion Fastening Screw (32) And
Cover (7). The Filter Should Now Be Able To Function.
8. For Star Cloth Bag,Diatomite Can Be Use To Increase Filtration.
Maintenance Of Paper Filter Type Filter Medium
Refer To Figure 4 Of The Appendix. Page 19:
1. Turn The Cover Handles (26) Clockwise To Close, Counter Clockwise
To Open.
2. Before Opening The Cover (7),Drain The Air Out By Opening
Air Release Valve(19).
3. Rinse The Filter Chamber With Water, Drain The Water By Using
Drain Valve (27)
4. Turn The Filter Handle (47)&(48) Counter Clockwise To Loosen It.
Rinse The Filter Medium With Clean Water.
5. Assemble The Medium In The Reversed Steps
6. Before Starting The Filter,Make Sure In/Outlet Valve Are Open And
,Close The Drain Valve .

9
Failure scenarios Cause Of Failure Approach
Insufcient
Filtrations
• Filter Bag Is Not Installed
Properly.
• Filter Bag Or Cartridge Is Clogged.
• Make Sure Parts Are Installed
Properly.
• Clean The Debris Or Residues
That Might Cause The Clog.
No Flow From
Outlet,High
Pressure
• Clogged Pipline / Filter Or Valve Is
Closed
• Clean The Pipline/Filter
• Open The Valve
Cleaned
Filter With High
Pressure
• Cartridges / Filter Bag Are Seriously
Blocked.It Has Become Ineffective • Cartridge / Filter Must Be Replace.
No Flow From
Outlet,No
Pressure
• Jammed Pump Impeller
• Pump Failure
• Clogged Inlet
• Closed Inlet Valve
• Clean/Free The Impeller
• Repair or New Pump
• Check The Inlet
• Open Inlet Valve
Bubbles From
Outlet
• Air Been Inhaled Into The Pump Check For Leaking
• Loose Pipeline,Or In-Tank Air Line
Is Too Close To The Inlet
• Move The In-Tank Air Line
• Secure Or Reseal Inlet PipeLine
Pump Leaking • Damaged Seal
• Damaged Pump Parts • Replace Damaged Part
Burnt Motor
• Jammed Impeller • Clean Impeller and Add Strainer
• Single-Phase Operation • Install Overload Shut-Off Switch
• Check Power Switch
Pressure Gauge
Does Not Move
• Bad Pressure Gauge Seat Seal
• Damagd Pressure Gauge
• Reseal And Reinstall Pressure
Gauge
• New Pressure Gauge
Inaccurate
Pressure Gauge
• Gauge Is Leaking Fluid
• Damaged Diaphragm
• Defected Pressure Gauge
• Rell Guage With Water
• New Diaphragm
• New Pressure Gauge
Filter Top Cover
Is Leaking
•Debries Build Up On Cover
Packing
• Damaged Cover or Cover O-Ring
•Clean The O-Ring & Cover
Packing
• New Cover/ O-Ring
Low Flow And
No Sign Of Filter
Clogging
• Pump Is Spinning At The Wrong
Direction. • Correct The Spinning Direction
• Clogged/Stucked Impeller
• Clogged/Blocked Foot Valve/
Strainer
• Remove/Clean The Impeller
• Remove/Clean Foot Valve/
Strainer
4.Troubleshooting
Ce manuel convient aux modèles suivants
5
Table des matières
Autres manuels Super Système de filtration d'eau

Manuels Système de filtration d'eau populaires d'autres marques

Wisy
Wisy LineAir 100 Manuel utilisateur

Schaffner
Schaffner Ecosine FN3446 Series Manuel d'utilisation

Pentair
Pentair FLECK 4600 SXT Guide de l'utilisateur

H2O International
H2O International H20-500 Manuel utilisateur

Renkforce
Renkforce 2306241 Manuel utilisateur

Neo-Pure
Neo-Pure TL3-A502 Manuel utilisateur


