
Supa Q Series Manuel utilisateur

SUPA Q Series
QN(10 Zone)
User Manual
Copyright © 2008 AASMSB Co. No. 135844-U. All Rights Reserve
www.ealarm.com.my

Indicate symbol
Light On Zone Light Blink
Light Blink Zone Light On
♪ Buzzer Sound Speaker
LC Layout
AWAY-System in AWAY arm mode
HOME-System in HOME arm mode
REA Y-System in isarm Mode
NOT R Y- Any zone have open and when arm the system ,the zone open will auto bypass
Online -Panel is call out to CMS/Personal
Bat -When Battery low ,this will display ,buzzer keypad will sound and EVENT Light on. To stop
buzzer keypad sound just press * and to clear EVENT light just disarm.
Ac -When Ac Power failure ,this will display and buzzer keypad will sound and EVENT light on. To
stop buzzer keypad sound just press * and to clear EVENT light just disarm.
Copyright © 2008 AASMSB Co. No. 135844-U. All Rights Reserve 1
www.ealarm.com.my

LE Layout
LINE - System is call out.
- When light on ,System is call to CMS
- When light blinking ,System is call to Personal
BATT - When light on ,that indicate Battery low
AC - When light on,that indicate AC power Failure
ARM1- System arm
- Away arm
- Home arm
1 2 3 4 5 6 7 8 9 10
Numbering is indicate zone
Copyright © 2008 AASMSB Co. No. 135844-U. All Rights Reserve 2
www.ealarm.com.my

Away Arming
The ARM Light will turn on The ARM1 Light will turn on
Press [ ∗ ] + [ AWAY ]
( f Quick Away option is enabled)
Or
Press [ ∗ ] + [ AWAY ] + [ User Co e ]
( f Quick Away option is disabled)
♪ Leave the premises within the Exit time. Exit beeping will continue until Exit time expires.
Online at LCD to indicate system dialler performing CMS reporting/Personal reporting..
Away
Information:
•Away arming will activate all zones of your alarm security system except bypassed zones. All interior and
external perimeters are armed. Use this mode when leaving your premises.
•Before arming your system to Away mode, all zones should be closed. There should not be any movement in the
rooms protected by motion detectors and each doors or windows protected by reed switches should be properly
closed.
•Key-switch input is available on the control panel and can be used to toggle between Arm and Disarm.
•Your system can be configured to Arm periodically at a customized time and also Disarm at another time.
•f an illegal code is entered to Arm in Away mode, the system responds by a long error beep.
•f an attempt to Arm a previously armed system, a long error beep is issued.
•The system cannot Arm while in other operation mode. Press [ ∗ ] + [ ∗ ] to exit from other operation mode first.
Options to be programme by Installer:
•Personal Open/Close report:
f anyone of User-6 to User-10 arms in Away mode, the system will dial the first programmed telephone
number (usually the Master User’s contact number) to report of the Arm activity to the intended receiving
party. Personal reporting format must be enabled first.
•No Force Arm:
The system will not be allowed to Arm via keypad if an nstant zone is left open but not if it is a delay zone. A
long error beep is issued to warn you of such situation. f you want Force Arm function, any zones left
opened after arming will be automatically bypassed and are reported to CMS as zone bypass and to
Personal telephone as zone open. The system will resume monitoring the zone once it is closed again for
the duration of that armed period.
•Force Arm Siren Warning:
The siren will continuously sound or squawk to indicate a Force Arm situation. You should Disarm the panel,
check the premises and then Arm again. Continual warnings could mean there is a problem with a detection
device and that particular zone may have to be manually bypassed.
•Away Squawk:
Siren will output two squawks upon arming the system in Away mode and output a single squawk when the
system is disarmed.
•No Arm f Battery Low:
You may not Arm the system if the back-up battery is determined as low and A.C power is not present.
•Exit Beep:
Keypad beeper will beep continuously for the duration of Exit time.
Please consult your installer to enable the above options!
Copyright © 2008 AASMSB Co. No. 135844-U. All Rights Reserve 3
www.ealarm.com.my

Home Arming
☼ The ARM light will blink. ☼ The ARM1 light will blink.
Press [ ∗ ] + [ HOME ]
( f Quick Home option is enabled)
Or
Press [ ∗ ] + [ HOME ] + [ User Co e ]
( f Quick Home option is disabled)
Home
Information:
•Home Arming will only activate external perimeter portion of your alarm security system. nterior protection is not
armed, which allows movement within premises without causing alarm. Use this mode when you are in the
premises.
•Your installer must program which zones to be active in Home arming mode.
•f an illegal code is entered to Arm in Home mode, the system responds by a long error beep.
•f an attempt to Arm a previously armed system, a long error beep is issued.
•The system cannot Arm in Home mode while in other operation mode. Press [ ∗ ] + [ ∗ ] to exit from other
operation mode.
Options to be programme by Installer:
•Personal Open/Close report:
f anyone from User-6 to User-10 arms in Home mode, the system will dial the first programmed telephone
number (usually the Master User’s contact number) to report of the Arm activity to the intended receiving
party. Personal reporting format must be enabled first.
•No Force Arm:
The system will not be allowed to Arm via keypad if an nstant zone is left open but not if it is a delay zone. A
long error beep is issued to warn you of such situation. f you want Force Arm function, any zones left
opened after arming will be automatically bypassed and are reported to CMS as zone bypass and to
Personal telephone as zone open. The system will resume monitoring the zone once it is closed again for
the duration of that armed period.
•Force Arm Siren Warning:
The siren will continuously sound or squawk to indicate a Force Arm situation. You should Disarm the panel,
check the premises and then Arm again. Continual warnings could mean there is a problem with a detection
device and that particular zone may have to be manually bypassed.
•Home nstant:
All zones will automatically convert into nstant zones if you Arm in Home mode.
•Home Squawk:
Siren will output two squawks upon arming the system in Home mode and output a single squawk when the
system is disarmed.
•No Arm f Battery Low:
You may not Arm the system if the back-up battery is determined as low and A.C power is not present.
Please consult your installer to enable the above options!
Copyright © 2008 AASMSB Co. No. 135844-U. All Rights Reserve 4
www.ealarm.com.my

System Disarm
Press [ User Co e ]
☼ The L NE, BATT, AC, ARM1, ARM2 lights will blink once.
The ARM light will turn off. The ARM1 light will turn off.
System Disarm
Information:
•Disarming the alarm security system will deactivate all the burglary zones of the system.
•Enter the premises through a programmed delay zone and disarm the system before Entry time is over. f the
system is not disarmed by the end of the Entry time, an alarm will occur.
•During disarmed mode, any violated zones will not enable burglary alarm except 24-hour zone. The 24-hour
zones are active irrespective whether the system is under armed or disarmed status.
•Disarming the system also resets triggered siren and strobe light.
•Key-switch input is available on the control panel and can be used to toggle the system to Arm and Disarm
alternately.
•A previously armed system would not Disarm if an illegal User code is entered. You may have up to 20 tries of
continual key entry of the correct 4-digit code in sequence before the keypad goes into a lock-out period of 10
seconds.
Options to be programme by Installer:
•Personal Open/Close report:
f anyone from User-6 to User-10 disarms, the system dials the first programmed telephone number to report
of the Disarm activity and which User code was used to the intended receiving party. Personal reporting
format must be enabled first.
•Entry Beep:
Keypad beeper will beep continuously for the duration of Entry time.
•Chime:
A beep to indicate a zone is opened during system Disarm state. This function is temporarily canceled
during Arm state.
Please consult your installer to enable the above option!
Copyright © 2008 AASMSB Co. No. 135844-U. All Rights Reserve 5
www.ealarm.com.my
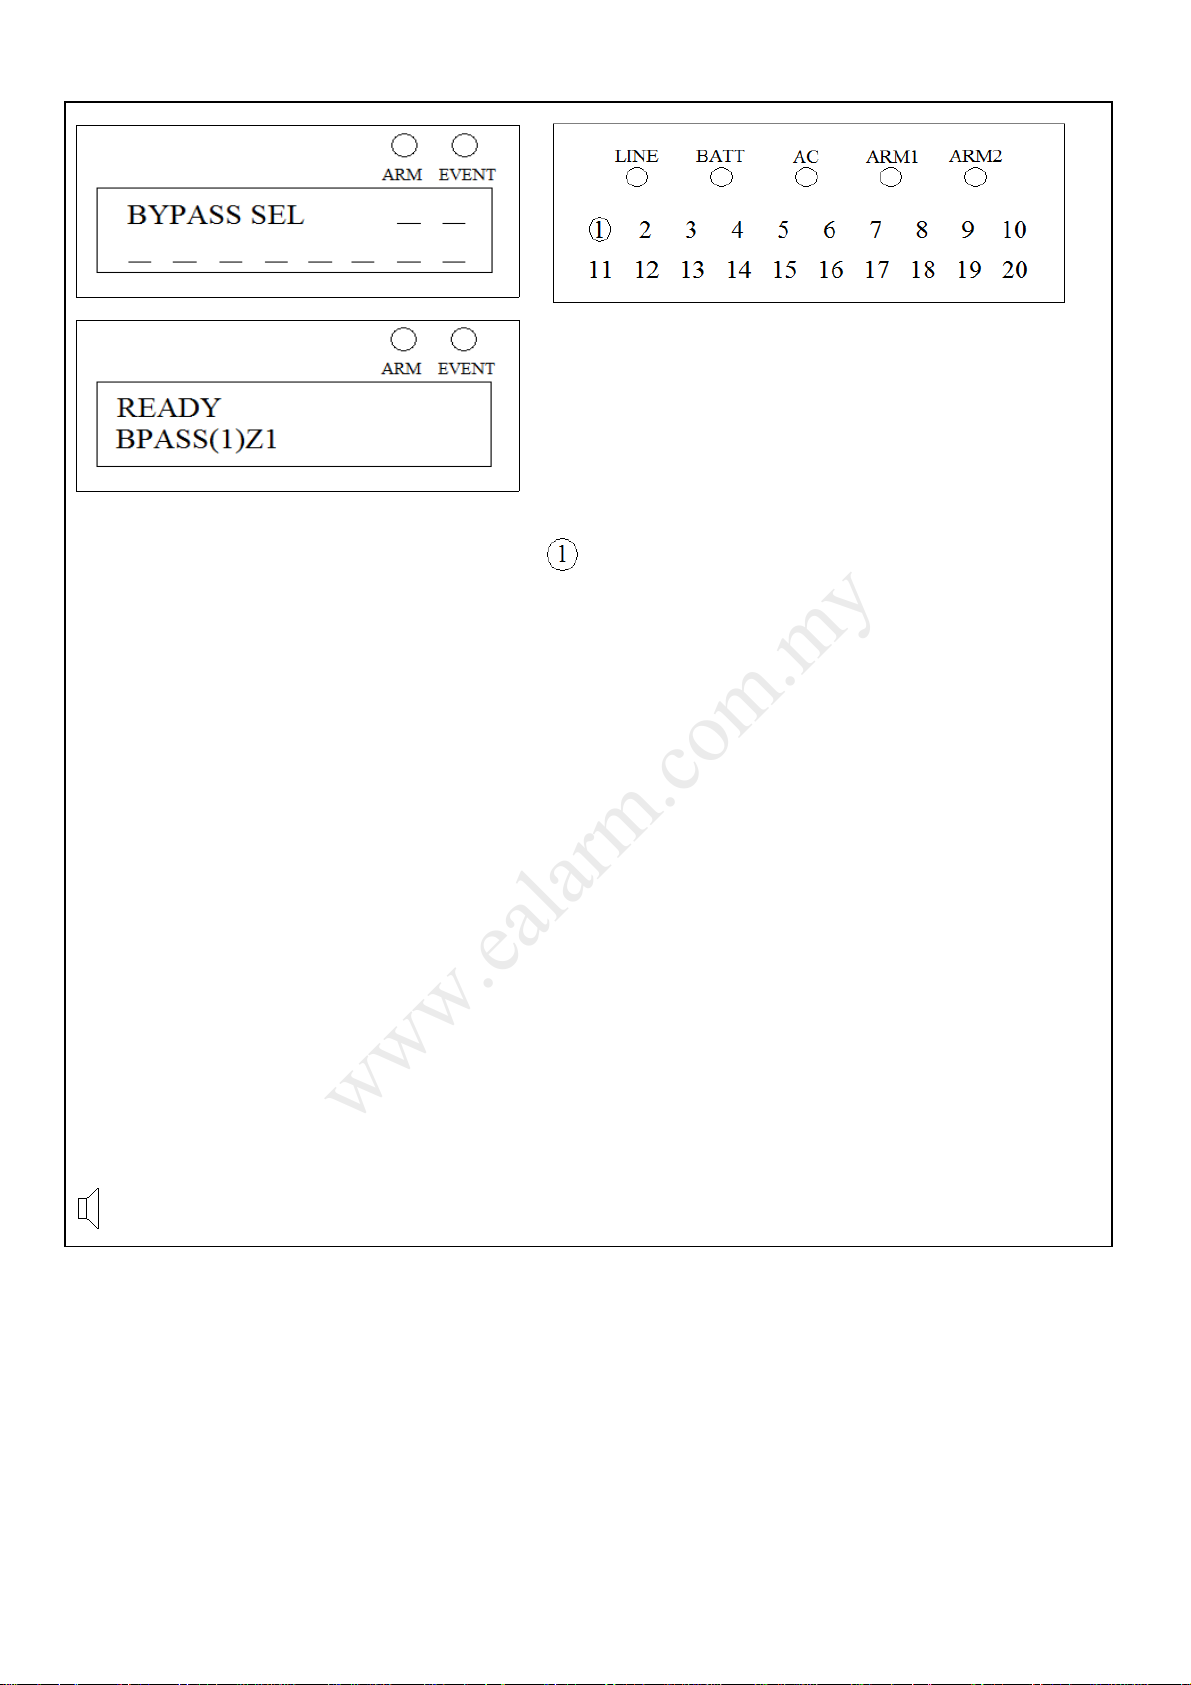
Bypass Zone
(1) mean total zone bypass The respective zone 1 light will turn on to indicate the
. zone is bypassed.
1) Press [ ∗ ] + [ BYPASS ]
( f Quick Bypass is enabled)
Or
Press [ ∗ ] + [ BYPASS ] + [ User Co e ]
( f Quick Bypass is disabled)
2) Press [ Zone Number ]
3) Press [ ∗ ] to exit Bypass mode
☼ The L NE light will turn off to indicate exit from Bypass mode.
♪ 3 beeps to indicate exit from Bypass mode.
Remark:
Press digit ‘0’ to bypass or un-bypass zone 10.
Bypass, Zone X bypass
Information:
•Bypass is performed to eliminate burglary zones that are not ready or faulty from activating burglary alarm.
Protection to a bypassed zone is temporarily switched off until the next system arming.
•To un-bypass previously bypassed zones, simply Disarm the system to cancel bypass state of all zones or enter
bypass mode and press the corresponding bypassed zone number to toggle its bypass state to un-bypass state.
After un-bypassing a zone, the bypass indication will be removed from that particular zone.
•No bypass or un-bypass of zones is allowed during system Arm.
•The system cannot enter Bypass mode while in other operation mode. Press [ ∗ ] + [ ∗ ] to exit from other
operation mode.
Copyright © 2008 AASMSB Co. No. 135844-U. All Rights Reserve 6
www.ealarm.com.my

Review Event Memory
Numbering display will indicate zone triggered ☼ The L NE light will blink to indicate Review mode.
The ZONE light will turn on to indicate any zone triggered.
☼ Blinking zone light indicates latest zone triggered.
Press [ ∗ ] + [ REVIEW ]
( f Quick Review is enabled)
Or
Press [ ∗ ] + [ REVIEW ] + [ User Co e ]
( f Quick Review is disabled)
Press [ 0 ] to clear the event memory.
Press [ ∗ ] to exit Review mode.
The L NE light will turn off to indicate exit from Review mode.
♪ 3 beeps to indicate exit from Review mode.
Review
Information:
•n this mode, the keypad can display all faulted zones after an alarm condition had occurred. The zone faults will
remain in the system memory until it is cleared by entering digit ‘0’ or when the next arming occurs or after
system reset.
•You may not enter Review event mode via keypad if the system is in Arm state.
•The system cannot enter Review event memory mode while in other operation mode. Press [ ∗ ] + [ ∗ ] to exit
from other operation mode.
Copyright © 2008 AASMSB Co. No. 135844-U. All Rights Reserve 7
www.ealarm.com.my

Walk-Test
☼ The L NE light will blink to indicate Walk-test mode.
The respective zone light will turn on to indicate the zone
is tested.
1) Enter [ ∗ ] + [ 5 ] + [ User Co e ]
2) Trigger all used zones.
3) Press [ 1 ] to activate siren
[ 2 ] to activate strobe light
Press the same digit again to switch off respective alarm output.
4) Press [ ∗ ] to exit Walk-test mode
The L NE light will turn off to indicate exit from Walk-test mode.
Walk Test
Information:
•Walk-test allows all zones, siren and strobe to be tested for functionality. Perform Walk-test periodically to
ensure the system is in a working condition.
•Ensure all zones are closed and there is no one within the premises before conducting Walk-test.
•Walk-test mode is not allowed during system Arm.
System Test
Enter [ ∗ ] + [ 8 ] + [ User Co e ]
LCD Keypad
“ Online” will show system is call out
LE Keypad
The L NE light turns on to indicate system dialler performing CMS reporting.
☼ The L NE light blinks to indicate system dialler performing Personal reporting.
Test
Information:
•System test sends a test report to CMS and Personal telephone number (whichever reporting mode is enabled).
•Please inform your installer to activate this function if you wish to perform this operation.
Copyright © 2008 AASMSB Co. No. 135844-U. All Rights Reserve 8
www.ealarm.com.my

Fire Alarm
Press [ ∗ ] + [ 3 ]
LCD Keypad
“ Online” will show system is call out
LED Keypad
The L NE light turns on to indicate system dialler performing CMS reporting.
☼ The L NE light blinks to indicate system dialler performing Personal reporting.
Fire
Panic Alarm
Press [ ∗ ] + [ 6 ]
LCD Keypad
“ Online” will show system is call out
LED Keypad
The L NE light turns on to indicate system dialler performing CMS reporting.
☼ The L NE light blinks to indicate system dialler performing Personal reporting.
Panic
Me ical Alarm
Press [ ∗ ] + [ 9 ]
LCD Keypad
“ Online” will show system is call out
LED Keypad
The L NE light turns on to indicate system dialler performing CMS reporting.
☼ The L NE light blinks to indicate system dialler performing Personal reporting.
Medical
Information:
•The Fire, Panic, Medical alarms will activate the system dialler to report of an emergency as well as activating
the siren and strobe light output.
•The Fire, Panic and Medical alarms can be activated at all times, during system Arm or Disarm.
•You can enter your User code to cancel the triggered siren and strobe light output.
•Key-switch input is available on the control panel and can be used to activate Panic alarm if enabled.
•f your system cannot perform Fire, Panic, Medical alarm functions means that the system is in other
operation mode. Press [ ∗ ] + [ ∗ ] to exit from other operation mode before attempting emergency alarm.
Copyright © 2008 AASMSB Co. No. 135844-U. All Rights Reserve 9
www.ealarm.com.my
Ce manuel convient aux modèles suivants
1
Table des matières
Autres manuels Supa Système de sécurité


Manuels Système de sécurité populaires d'autres marques


EDM
EDM Solution 6+6 Wireless-AE Manuel utilisateur

Highway Safety Group
Highway Safety Group EA401 Manuel utilisateur

Siren
Siren LED GSM Manuel utilisateur

Detection Systems
Detection Systems 7090i Instructions de montage

Se-Kure Controls
Se-Kure Controls MicroMini SK-4841 Manuel utilisateur

Siemens
Siemens FDM273 Manuel utilisateur