Sunrise Pro Wake Up Light Manuel utilisateur

Content
Pairing Your Device with Smart Life App 04
Sunrise Alarm Clock Setting 08
Snooze 10
Ambient Lamp 11
Sleep-aid Setting 12
FM Radio 14
Clock &Display Setting 06
Music 15
01
Night Light 15
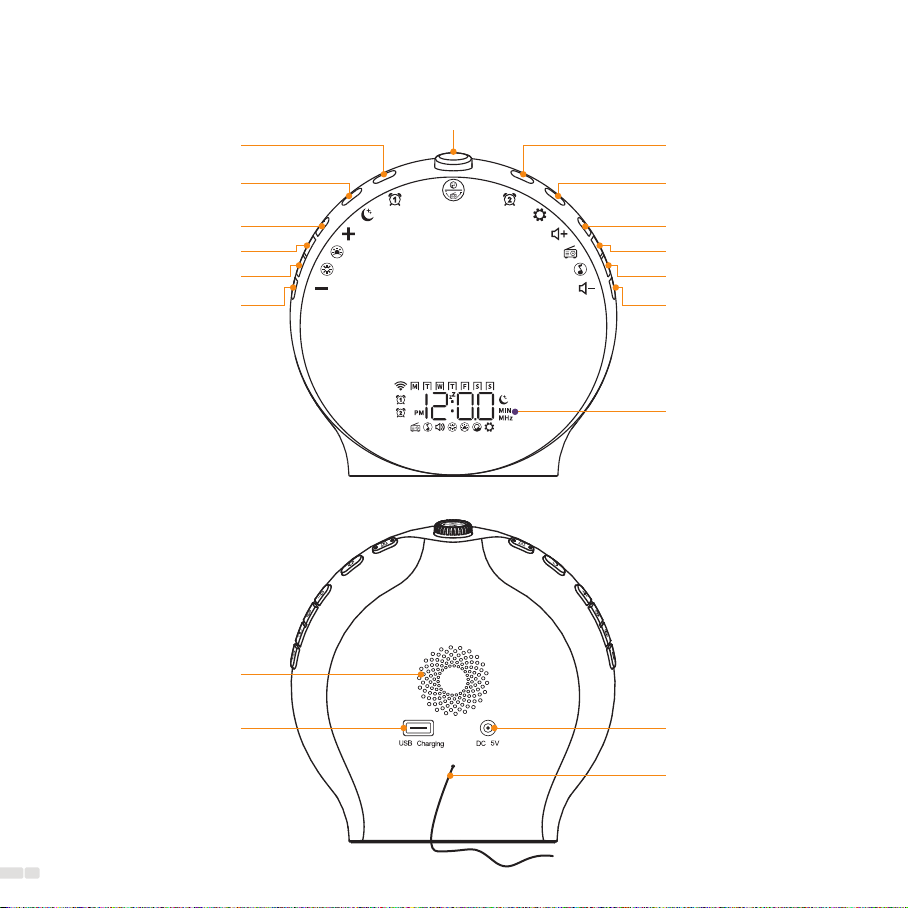
Product Overview
Power out Interface
Speaker
FM Antenna
Power in Interface
Alarm 2Alarm 1
Ambient Lamp
Night Light
Brightness +
Brightness -
Sleep Aid
Volume -
FM Radio
Music
Volume +
LCD Display
Time Setting/Screen
Brightness Adjustment
Snooze/Setup+-/FM Radio Tuning
02
Get Started
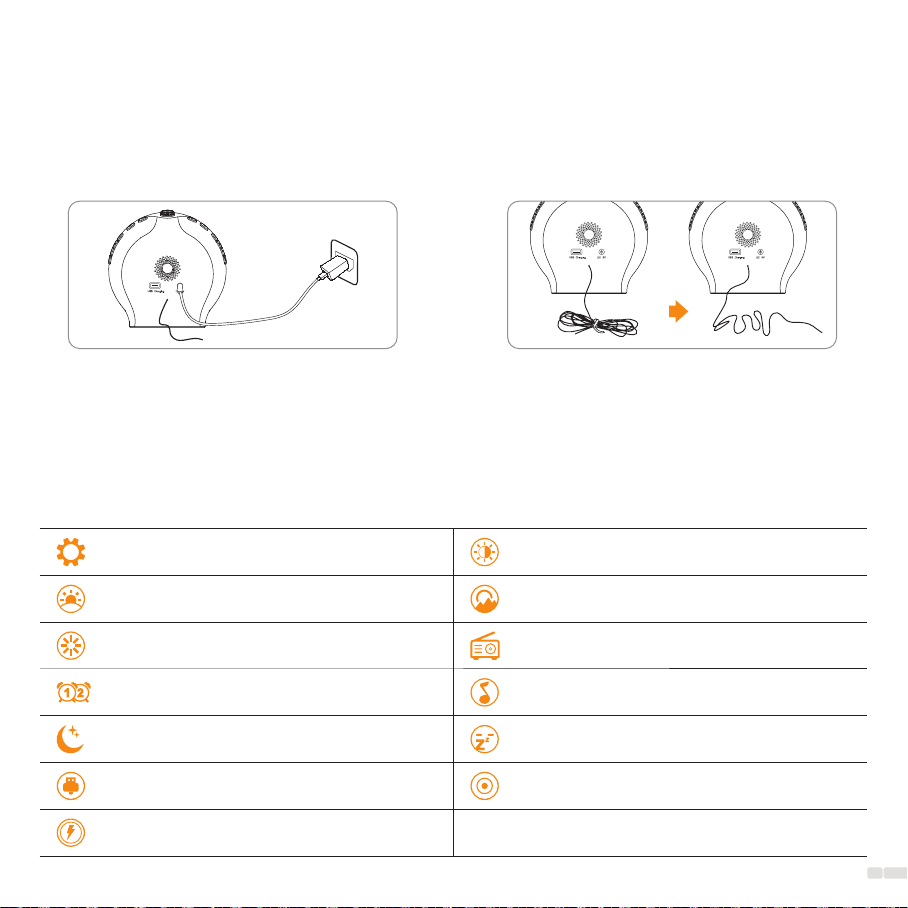
1. Power Connection: Connect the Wake-up Light
to the DC cable and adapter provided, then plug
it into a power source to power it.
2. FM Radio Reception: Loosen the tie that
secures the FM antenna and unroll the wire to
improve FM radio signal reception.
Features
3. Power On/O: Important: This product does not have a power on/o button. It will turn on automatically
once the power adapter is plugged into a socket. To disconnect power, please unplug the power adapter.
12/24H Time Display
Sunrise Simulation
10 Ambient Lights
Dual Alarm Clocks
8 kinds of Sleeping Sound
USB Electronic Device Charging Port
Button Battery
Adjustable LCD Time Display Brightness
Sunset Simulation
FM Radio 76.0-108.0 MHz
7 kinds of Ringing Sound
Snooze Function
DC Outlets Powered
03
04
What You Need:
1. A 2.4GHz Wi-Fi (5GHz is not supported)
2. A Smartphone or Tablet
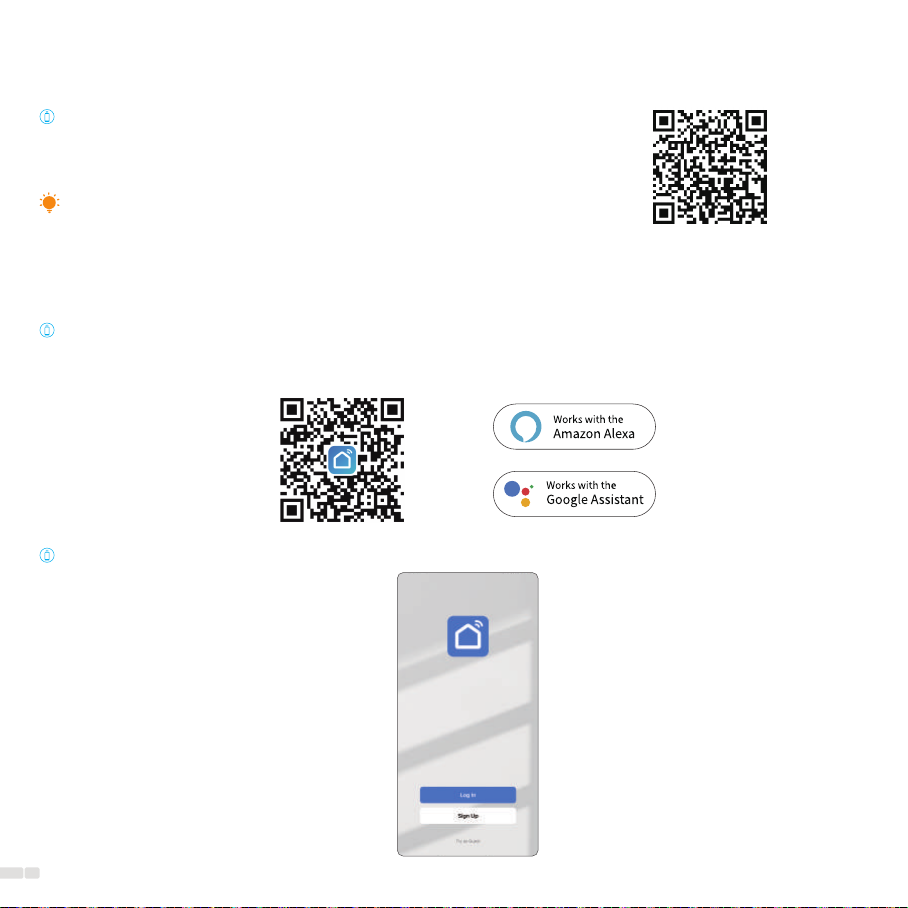
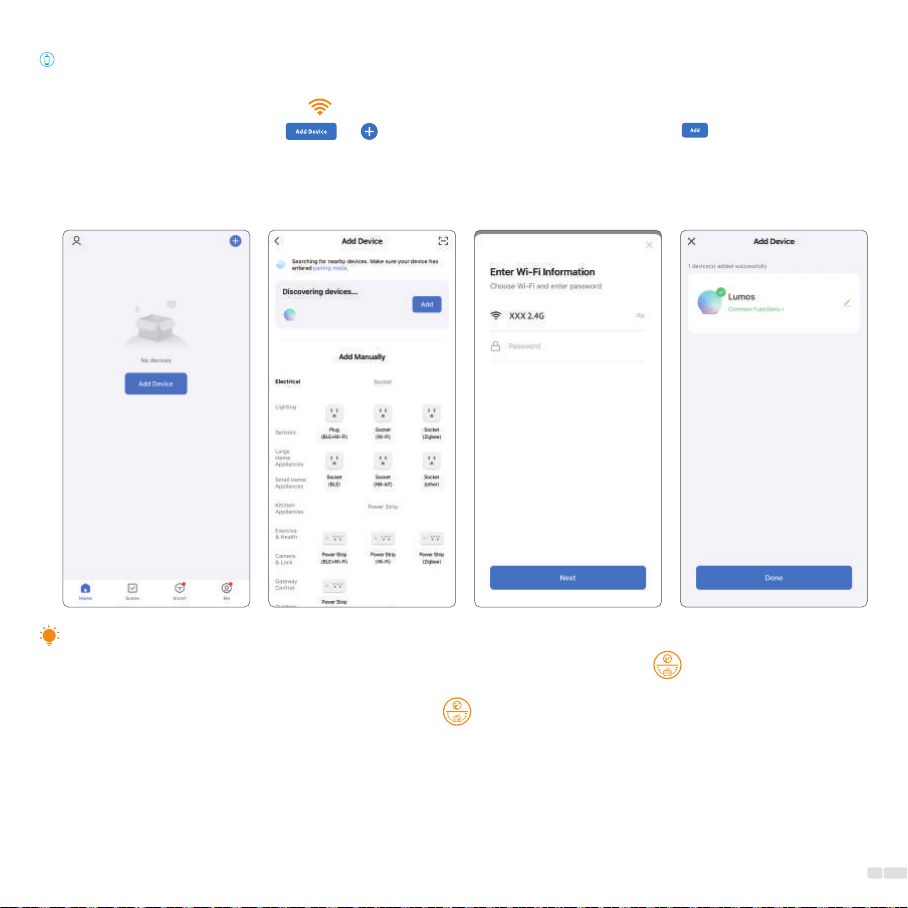
Pairing Your Device with Smart Life App
Follow the steps below to set up your Smart Wake-up Light via Smart Life App.
Download and install Smart Life app:
Go to App Store/Google Play or scan the QR code below to download the Smart Life app on your iOS or
Android smartphone or tablet.
Sign up or log in with Smart Life App:
If you only have 5GHz Wi-Fi, scan the QR code on the
right to learn how to split your Wi-Fi into dual-band
2.4GHz &5GHz.
Split WiFi into dual band 2.4GHz &5GHz
05
1. If the Wi-Fi indicator remains constantly lit or is not visible, press and hold the for approximately 5
seconds to reset the device to pairing mode.
2. To reconnect your device, please tap and hold the for about 5 seconds, the Wi-Fi icon will disappear
first and then start blinking again (This should take approximately 10 seconds).
Note:
After you successfully set up your Smart Wake-up Light, you will see the homepage of the Smart Life app.
Here you can view and manage the device that you've added to Smart Life.
Pairing Instructions:
1. Turn on Bluetooth on your smartphone/tablet.
2. Plug in to power, wait for the to start flashing, indicating that the device has entered pairing mode.
3. Open the app, and tap the or button in the top right corner, then tap and wait for the
app to dicover devices.
4. Enter Wi-Fi information (2.4GHz WiFi Only) to pair with the device, and then select the device you want
to add and follow step-by-step app instructions to complete the setup.
06
The required buttons are: Setting button and buttons:
1. Setting Button: Long press to enter settings and press to confirm parameters
2. Buttons: Used to select parameter values.
Basic principle for setting up all functions is as follows:
1. Long press the function key to enter the setting for that specific function.
2. Rotate the top button to select the desired option.
3. Press the function key again to confirm and move on to the next parameter setting.
4. Repeat steps 2-3 to select and confirm all desired parameters.
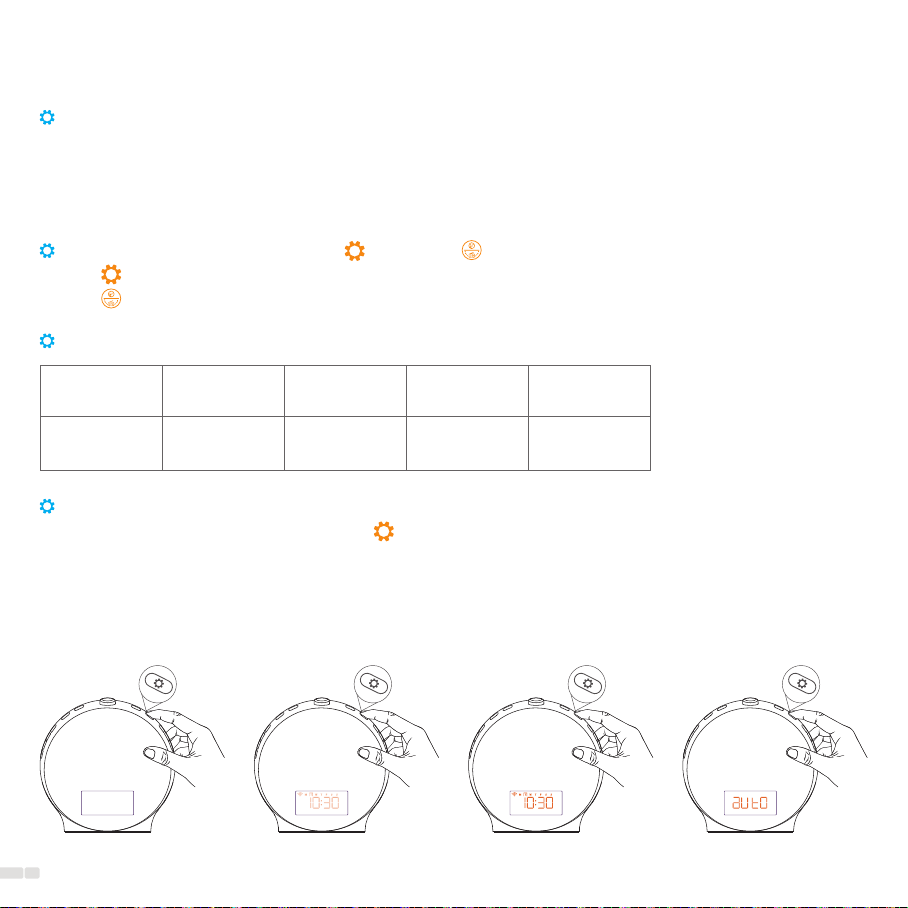
Clock &Display Setting
Setting steps:
Long press to
start setting
Set
12H/24H
Set
the hour
Set
the minute
Step 1 Step 2 Step 3 Step 4
Set
the weekday
Step 5
Setting time display brightness:
1. Operation instruction: Press setting to switch display contrast.
2. There are four levels of time display brightness: O, Night, Day, and Auto.
Auto: The screen brightness is set to the Night level between 10:00 PM and 6:00 AM, and at the Day
level during all other times.
*Please note that the time display brightness in night mode can only be clearly seen in a completely
dark environment.
OFF Night Day Auto
07
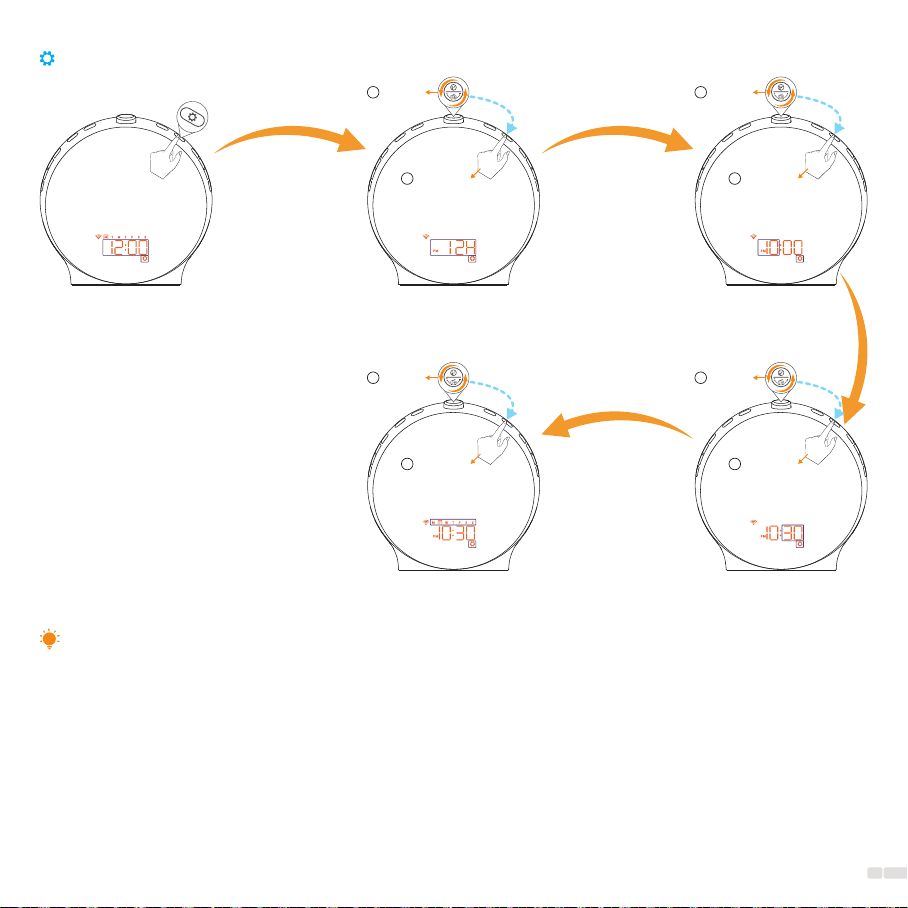
1. Long press to
start setting 4. Set the minute
Time setting process diagram:
2. Set time format 3. Set the hour
5. Set the weekday
Select
1
Confirm
2Confirm
2
Confirm
2
Confirm
2
The wake-up light cannot enter time-setting mode when the time is not displayed.
Note:
Select
1
Select
1
Select
1
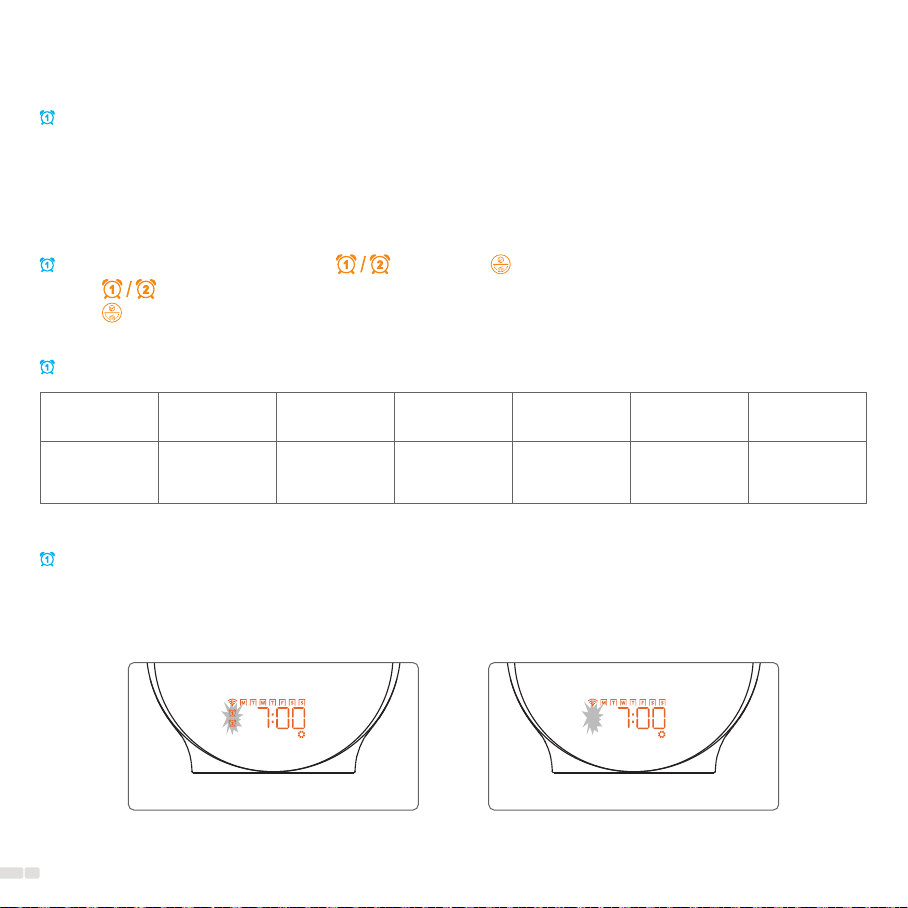
The required buttons are: Alarm button and buttons:
1. Alarm Button: Long press to enter settings and press to confirm parameters.
2. Buttons: Rotate to select parameter values.
Basic principle for setting up all functions is as follows:
1. Long press the function key to enter the setting for that specific function.
2. Rotate the top button to select the desired option.
3. Press the function key again to confirm and move on to the next parameter setting.
4. Repeat steps 2-3 to select and confirm all desired parameters.
Sunrise Alarm Clock Setting
Long press to
start setting
Switching the alarm on/o:
1. Press alarm 1 or alarm 2 if you want to switch the alarm on or o.
2. The corresponding icon appears on the display when you switch on the alarm.
It disappears when you switch o the alarm.
Setting steps:
Set
the hour
Set
the minute
Set
repeat days
Step 1 Step 2 Step 3 Step 4
Set
alarm sound
Set
alarm volume
Step 5 Step 6
Set
sunrise duration
Step 7
ON OFF
08
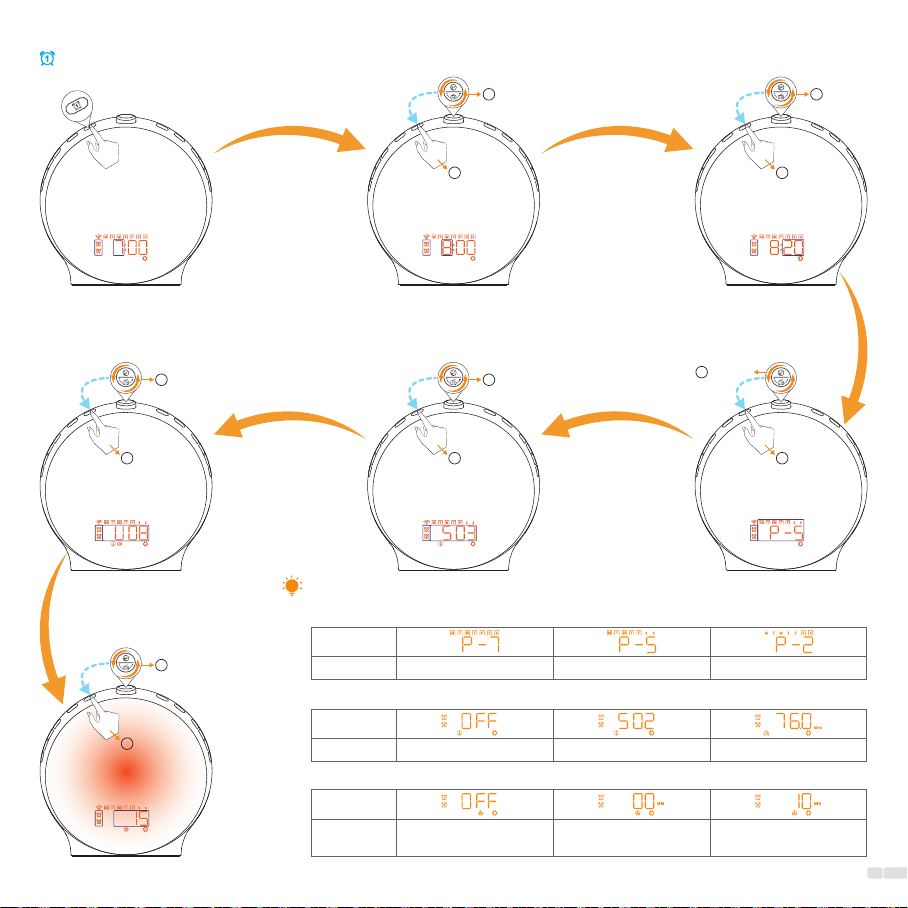
1. Long press to
start setting 4. Set repeat days
7. Set sunrise duration
P7
*4: When setting repeat day:
Note:
Icon
Repeat Everyday Monday-Friday Saturday - Sunday
*7: When setting sunrise duration:
Icon
Duration No wake-up light Light and sound go
o at the same time
Gradual light increases
5-120 mins prior to alarm
*6: When setting alarm sound:
Icon
Sound No alarm sound Alarm sounds FM radio
Sunrise alarm clock process diagram:
2. Set the hour 3. Set the minute
6. Set alarm volume 5. Set alarm sound
Confirm
2Confirm
2
Confirm
2
Confirm
2
Confirm
2
Confirm
2
Select
1Select
1
Select
1
Select
1
Select
1
Select
1
09
Ce manuel convient aux modèles suivants
1
Table des matières
Autres manuels Sunrise Réveil


