Sunbeam FoodSaver VAC780 Manuel utilisateur
Please read these instructions carefully
and retain for future reference.
®
Home Vacuum Packaging System
Instruction Booklet
VAC780 - VS7800


Important Safeguards 4
Important Tips 5
Features of your FoodSaver® VAC780 6
Using your FoodSaver® VAC780 10
How to Vacuum Package using FoodSaver®
Canisters and Bottle Stoppers 13
Storage and Cleaning Instructions 14
Vacuum Packaging Non-Food Items 15
Food Preparation and Storage Guide 16
Guidelines for Vacuum Packaging 17
Preservation Guidelines 19
Troubleshooting 21
Contents
Important instructions – retain for
future use.

Sunbeam’s Safety PrecautionsImportant Safeguards
Read the Instructions Carefully.
For your own safety, always follow these basic precautions when using the FoodSaver® appliance:
4
If you have any concerns regarding the performance and use of your appliance,
please visit www.sunbeam.com.au or contact the Sunbeam Consumer Service Line.
Ensure the above safety precautions are understood.
Sunbeam is very safety conscious when
designing and manufacturing consumer products,
but it is essential that the product user also
exercise care when using an electrical appliance.
Listed below are precautions which are essential
for the safe use of an electrical appliance:
• Read carefully and save all the instructions
provided with an appliance.
• Always turn the power off at the power outlet
before you insert or remove a plug. Remove
by grasping the plug - do not pull on the cord.
• Turn the power off and remove the plug
when the appliance is not in use and
before cleaning.
• Do not use your appliance with an extension
cord unless this cord has been checked
and tested by a qualified technician or
service person.
• Always use your appliance from a power
outlet of the voltage (A.C. only) marked
on the appliance.
• This appliance is not intended for use by
persons (including children) with reduced
physical, sensory or mental capabilities, or
lack of experience and knowledge, unless they
have been given supervision or instruction
concerning use of the appliance by a person
responsible for their safety.
• Children should be supervised to ensure that
they do not play with the appliance.
• The temperature of accessible surfaces may be
high when the appliance is operating.
• Never leave an appliance unattended while
in use.
• Do not use an appliance for any purpose
other than its intended use.
• Do not place an appliance on or near a hot gas
flame, electric element or on a heated oven.
• Do not place on top of any other appliance.
• Do not let the power cord of an appliance hang
over the edge of a table or bench top or touch
any hot surface.
• Do not operate any electrical appliance with
a damaged cord or after the appliance has
been damaged in any manner. If damage is
suspected, return the appliance to the nearest
Sunbeam Appointed Service Centre
for examination, repair or adjustment.
• For additional protection, Sunbeam
recommend the use of a residual current
device (RCD) with a tripping current not
exceeding 30mA in the electrical circuit
supplying power to your appliances.
• Do not immerse the appliance in water
or any other liquid unless recommended.
• Appliances are not intended to be operated
by means of an external timer or separate
remote control system.
• This appliance is intended to be used in
household and similar applications such
as: staff kitchen areas in shops, offices and
other working environments; farm houses; by
clients in hotels, motels and other residential
type environments; bed and breakfast type
environments.

When Vacuum Packaging:
1. Vacuum packaging is NOT a substitute for
refrigeration.
2. Use ONLY bags, rolls and canisters
manufactured by Sunbeam Products Inc.
3. Do not allow the Vacuum Channel to fill up
with liquids. This will render the machine
unusable. To prevent it, avoid overfilling the
bags and freeze liquids first.
4. You can prevent liquids from being
drawn into the appliance by placing a
folded paper towel at the top of the bag,
but below the seal area, before vacuum
packaging.
5. Do not attempt to create your own side
seals for a FoodSaver® Bag. These bags
are manufactured with special side seams
which are sealed all the way to the outer
edge. Creating your own side seams can
actually leave air channels exposed which
will cause leakage and prevent a vacuum
from being formed.
6. Always make sure you leave at least
2.5cm of extra bag material for each
time you plan to reuse the bag. To avoid
possible illness, do not reuse bags after
storing meats, fish or greasy foods.
7. If you are not sure whether you have
achieved a complete seal, simply seal the
bag again about 1cm above the first seal.
8. Bulky items sometimes make it difficult
to achieve a smooth sealing surface.
Gently stretch the bag flat along the
Sealing Strip before closing the lid.
9. When packaging products with sharp
edges (dry spaghetti, silverware, etc.),
protect the bag from punctures by
wrapping the products in a cushioning
material, such as paper towels, styrofoam,
tissue, etc. Products can also be vacuum
packaged in canisters to avoid any
possibility of puncturing a bag.
10. Avoid drawing powdery or fine-grained
products such as, flour, sugar and coffee
grinds into the appliance. This will inhibit
the vacuuming and sealing process and
may clog the unit, preventing it from
drawing a good vacuum. To prevent this
from occurring, avoid overfilling the bags.
11. If using the FoodSaver® appliance to
re-seal packets, ensure that these have
been previously commercially heat sealed.
Do not use the sealing strip to re-seal
conventional plastic wrap, sandwich bags
and plastic bags as they may melt over
the sealing strip.
Important Tips
5
VAC780 28cm vacuum packaging
system with multi-function control
panel and roll storage
6
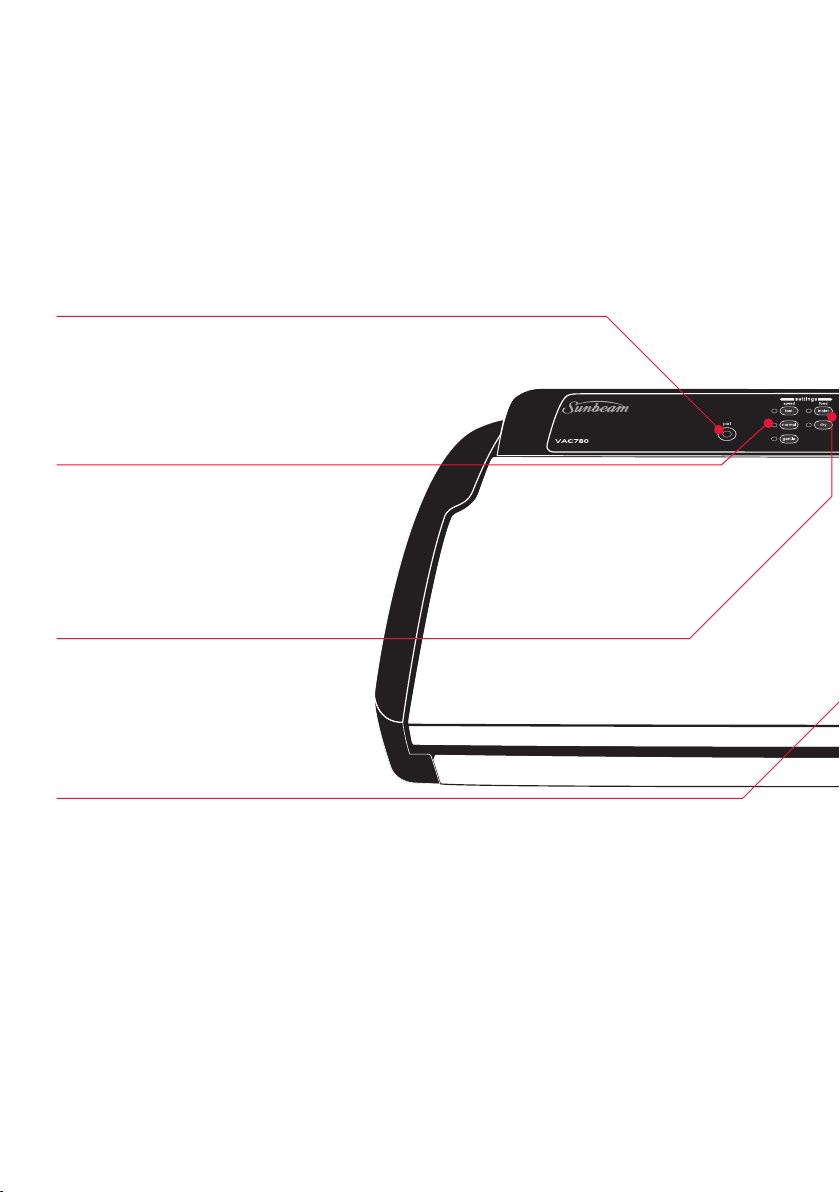
Accessory Port
Attach accessory hose here and use to
vacuum package with FoodSaver® Canisters
and bottle stoppers.
Speed Setting
Select speed to optimise the vacuum.
'Gentle' for delicate foods; 'Normal' for all
average-sized bags, canisters and bottles;
'Fast' for larger-sized bags & canisters.
Adjustable Food Setting
Select food type to optimise the seal.
'Dry' (normal seal time) for food without
liquid; 'Moist' (longer seal time) for
juicy foods.
Progress Indicator Lights
Signal progression of the vacuum and sealing
process. All three lights shut off when the
full process is complete.
7
Vacuum & Seal Button
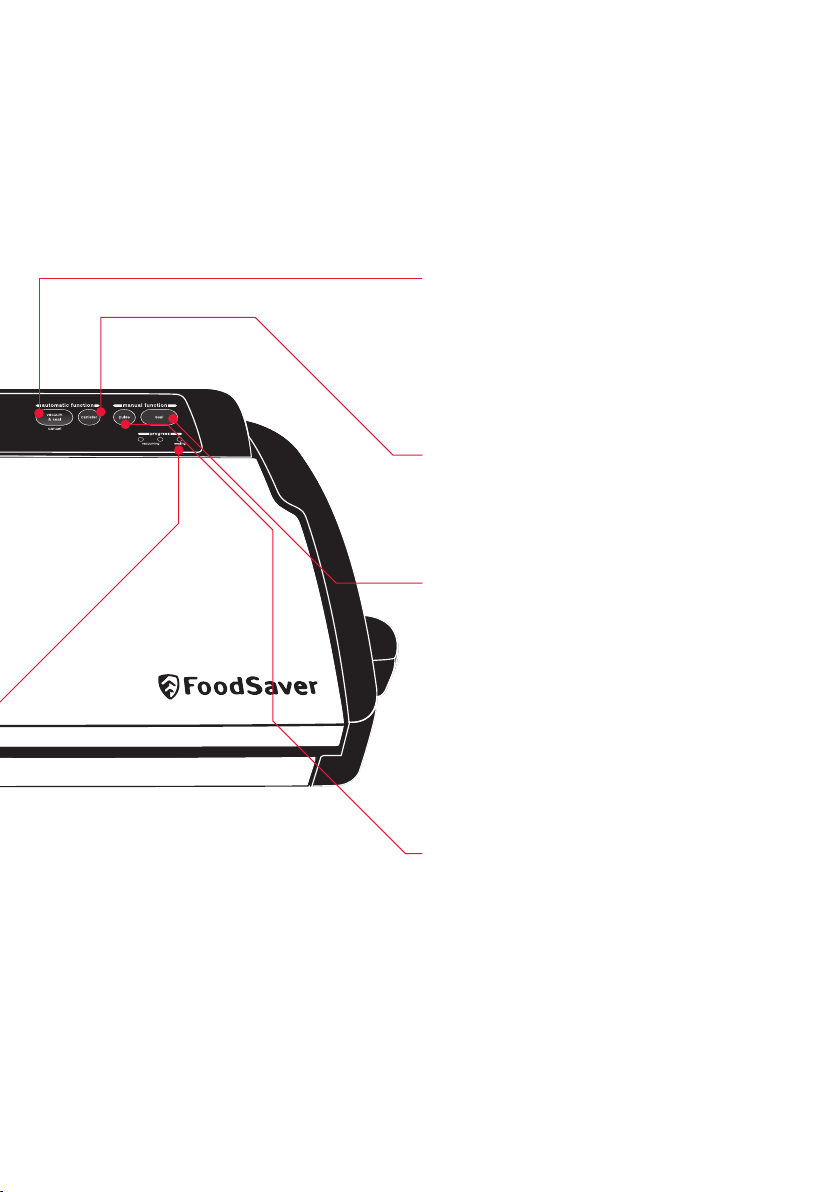
This button has two uses:
1. Press to vacuum package and seal with
a single touch. Shuts off automatically.
2. Press to cancel process at any time.
Canister Vacuum Button
Press to achieve best vacuum results for
canisters and bottle stoppers.
Seal Button
This button has four uses:
1. Press to immediately stop the vacuum
process and begin sealing the bag.
2. Press to create a seal when making bags
from a FoodSaver® Roll.
3.Press to create a seal on foil-based chip
and cereal packets.
4.Press during Pulse mode to seal bag.
Pulse Button
Press to remove air-as much or as little as
required - then press seal to complete.
VAC780 28cm vacuum packaging
system with multi-function control
panel and roll storage
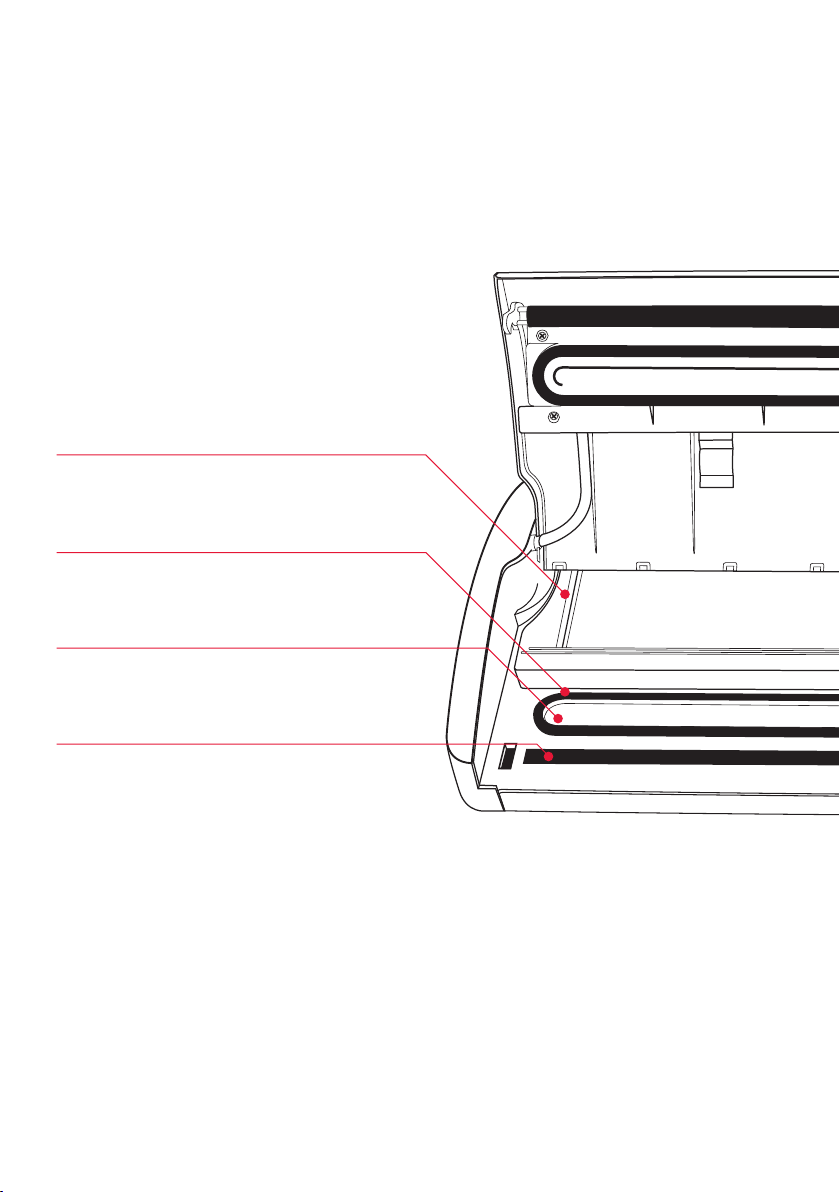
Roll Storage Compartment
Foam Gasket
Easy Clean Drip Tray
Extra-wide Sealing Strip
8
VAC780 28cm vacuum packaging
system with multi-function control
panel and roll storage
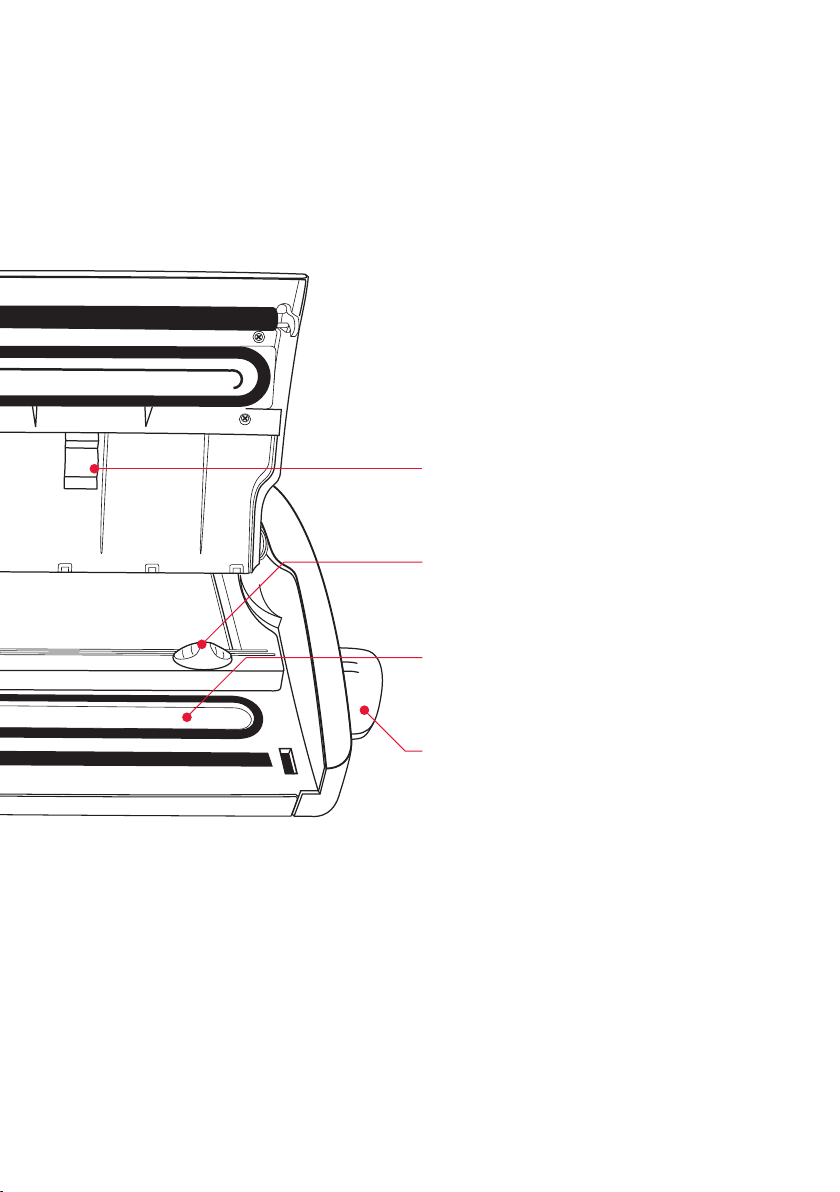
Pen Storage
Bag & Roll Cutter
Vacuum channel
Easy-lock latch
9

10
Using your FoodSaver® VAC780
How to make a Bag from a FoodSaver® Roll
1. Place appliance on a flat, dry surface
and plug the supply cord into a standard
electrical outlet.
2. Unlock side latch, open lid and position
open bag over the sealing strip.
3. Close lid and lock side latch into 'operate'
position. (Do not place edge of bag into
vacuum channel when sealing bags).
4. Press 'Seal' button to begin automatic
sealing process.
5. When seal indicator light turns off,
unlock latch, lift lid and pull out desired
bag length for vacuum packaging.
6. Using the inbuilt bag cutter, slide across
to cut a straight edge. It is now ready for
vacuum packaging.
How to Vacuum Package with FoodSaver® Bags
1. Place appliance on a flat, dry surface
and plug the supply cord into a standard
electrical outlet.
2. Place item(s) in bag, allowing at least
7.5cm of space between bag contents
and top of bag.
3. Open FoodSaver® lid and place open end
of bag into the Vacuum Channel.
4. Close and lock lid by locking side lock into
the 'operate' position.
5. Select appropriate 'Food Setting' button.
Choose 'Moist' for juicy foods or 'Dry' for
foods without liquid. Appliance will default
to the 'Dry' setting.
6. Select appropriate Speed setting button.
Choose 'Normal' for average-sized bags
and canisters; 'Fast' for larger sized bags
and canisters or 'Gentle' for delicate foods.
Appliance will default to 'Normal'.
7. Press 'Vacuum & Seal' Button to begin
automatic vacuum and seal process.
Wait 20 seconds before vacuuming and / or
sealing again.
Press
Slide
Ce manuel convient aux modèles suivants
1
Table des matières
Autres manuels Sunbeam Food Saver


