Stewart Audio APEX Manuel utilisateur

1
POWER . UNLEASHED
USER MANUAL
2
CERTIFICATION:
This machine has been tested and
conforms to:
EN 61000-6-3:2007+A1:2011
FCC Part 15 Class B
EN 61000-6-1:2019
IMPORTANT NOTICES:
This red box is used from time to
time in this manual to indicate a
potentially hazardous situation
which, if not avoided, could result
in damage to the product, serious
injury or death.
IMPORTANT INFORMATION
This machine is designed solely for the
transportation of golf equipment on a golf course.
Warnings and important safety instructions
appearing in this manual are not meant to cover all
possible conditions and situations that may occur.
Common sense, caution and care must be exercised
when operating or cleaning this equipment.
Always contact Stewart Golf Customer Care Team
(details on page 20) or your local distributor/dealer
about problems or conditions that you do not
understand.
INTELLECTUAL PROPERTY
The design and technology within the APEX, as well
as the Stewart Golf brand is protected by numerous
trademarks, design registrations and patents. For
a full register of Stewart Golf intellectual property
please visit stewartgolf.com/ip
BAG TYPE & WEIGHT
The APEX has been optimised for use with a cart
or tour style bag weighing 14kg (31lbs). This is the
optimum weight for stability when on the course.
Using a light and often ‘top heavy’ stand bag reduces
the load on the front wheels, and the machine will
spend more time on the stabiliser than is desirable.
The new Cortex chip will adjust steering automatically
to match your bag weight.
Using a golf bag heavier than advised increases the
strain and wear on the structure of the APEX, reduce
your battery life and increase the risk of overloading
the electronics and motors.

3
Congratulations on buying a Stewart Golf APEX: The
most advanced remote golf trolley in the world.
First things rst: resist the temptation to take your
APEX straight out for a round immediately – Read
this manual fully as it contains important safety
information, but more importantly tips and advice
on how to get the very best experience when
using the machine.
BEFORE YOU GET TOO EXCITED:
The rst thing that you should do is give both the
main battery and handset a full charge, (instructions
are found on pages 10 and 13.)
Next, practice with it. Find an area of open grass
with your normal golf bag on the machine, with all
your clubs and everything else in it: we recommend
a weight of 14kg or 31lbs. Using it on grass is
important: speed and steering are both affected
by the surface the APEX is on, and it’s obviously
designed to be used on grass.
Remember to practice with both modes of
operation: manual and remote. Even though the
word “Remote” is used in the name, manual steering
(holding the handle), is recommended on occasion.
You should steer the machine manually from the
handle when on paths or in a car park (for example)
or by using remote control when you’re on the open
golf course, in the rough or around tees and greens.
Please see pages 14-17 for more on this.
There are lots of videos available at:
www.stewartgolf.com and on our YouTube channel
(youtube.com/stewartgolf): they’ll help you get the
most from your APEX.
CONTENTS
Important Information
Welcome
APEX Anatomy
Unfolding
Fitting Golf Bag
Folding
Carrying
SmartPower Battery
SmartPower Charging
Battery Care
Handset Guide
Handset Charging & Care
Manual Operation
Remote Operation
Other Features
FAQ
Warranty Information
Trouble-Shooting Guide
WELCOME
2
3
4
5
6
7
8
9
10
11
12
13
14
16-17
18
19
20
21
4
1
4
7
8
9
10
12
3
11
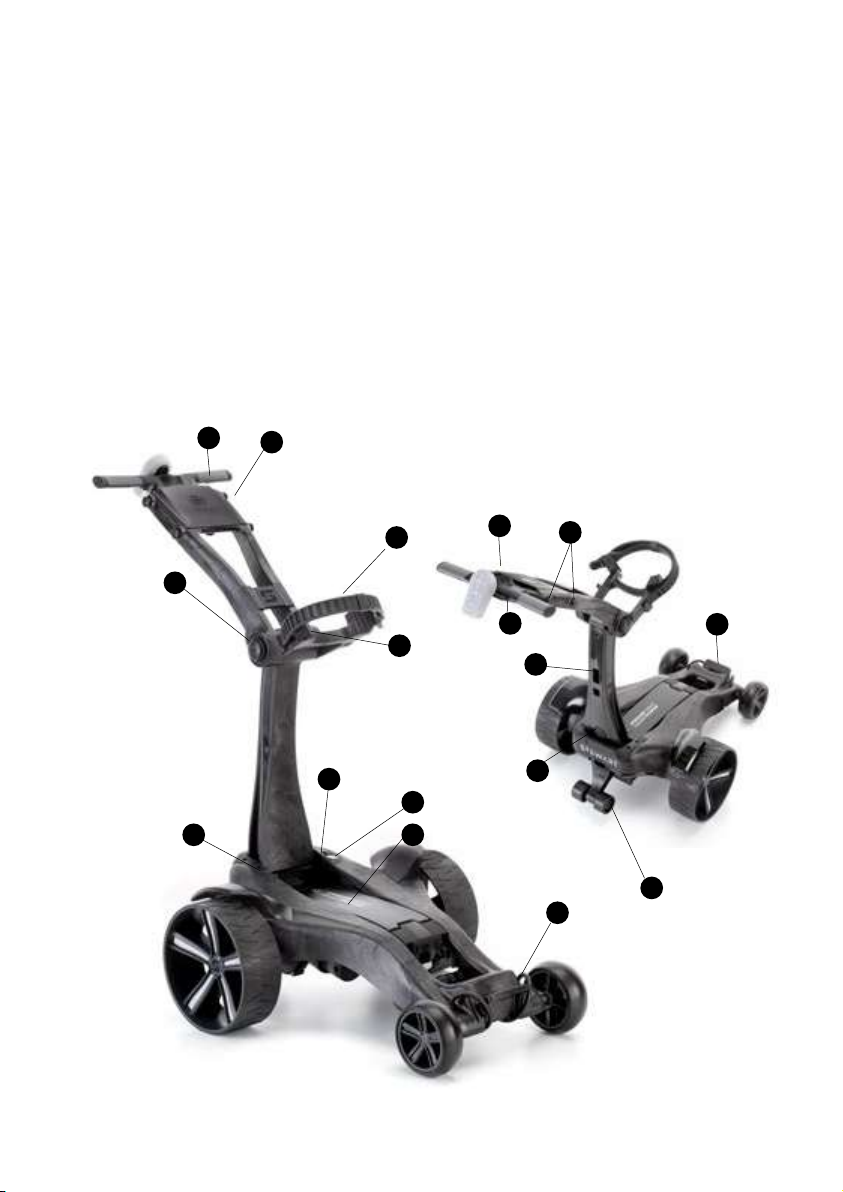
The APEX Remote is built from a unique micro-cellular composite structure and
precision injection mouldings. Get to know its main features here as we’ll be referring to
them in this manual:
2
APEX REMOTE ANATOMY
1. Scorecard holder
2. Dual Handle
3. Bag cradle
4. Silicone bag strap
5. Handle release button
6. LED indicator
7. On/Off button for trolley
8. SmartPower Battery
9. On/Off button SmartPower Battery
10. Lower bag strap
11. Rear stabiliser wheels
12. Main support release button
13. Handset storage
14. Accessory points
15. Handset cradle
16. Umbrella holder mount
17. Front chassis
15
4
1
13
17
16 14
5
3
6
5
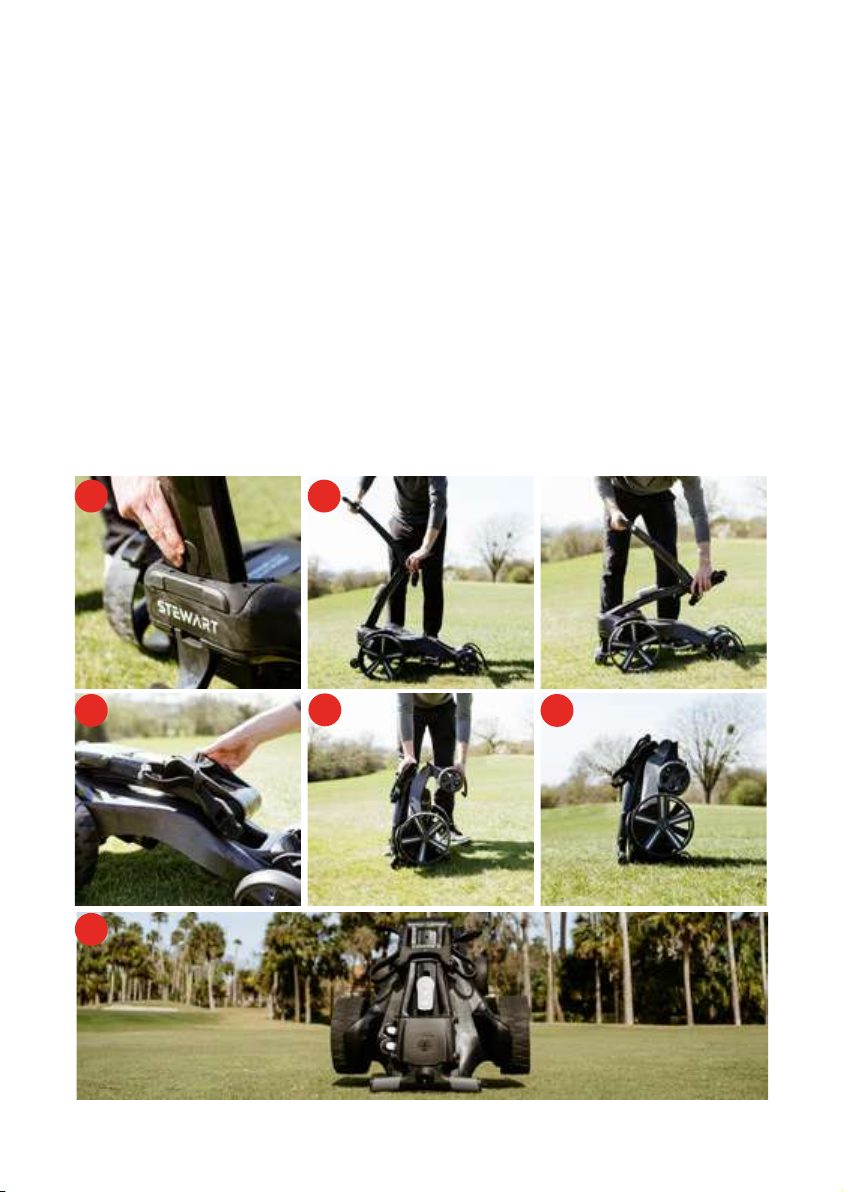
UNFOLDING YOUR APEX
Stand the machine vertically:
1. Squeeze the slider on the front chassis (between the
front wheels) to release.
2. Rotate the front chassis 180° until it clicks in to place.
3. Grabbing the front chassis, put the machine on all four
wheels.
4. Unfold the bag cradle all the way out. This
automatically releases a hidden lock that secures the
main support to the chassis.
5. Now press the handle release button and
simultaneously lift the handle and main support. Until
they both click in to place. As the main support is
lifted, the stabiliser wheels automatically deploy.
Note: Lifting the main support without rst pressing the handle release button may
damage internal components.
1. 2.
3.
5.
4.
6
FITTING YOUR GOLF BAG
1. Stand the base of your golf bag on the front chassis.
2. Ensure the bag cradle is fully lowered and straps are to the side, lean the golf bag
back until it rests on the silicone bag pads.
3. Pull the dual bag strap around the bag evenly and x.
4. Note the strap does not have to be pulled tight as the silicone material will gently
grip the bag surface. Pull the lower bag strap over the bottom of the bag using the
handle.
Note: The APEX has been optimised for use with a cart or tour style bag weighing 14kg
(31lbs.)
SCAN THE QR CODE BELOW TO WATCH
OUR UNFOLDING VIDEO
OR FOLLOW THE LINK:
http://bit.ly/3Gz1b4A
1. 2.
3. 4.
7
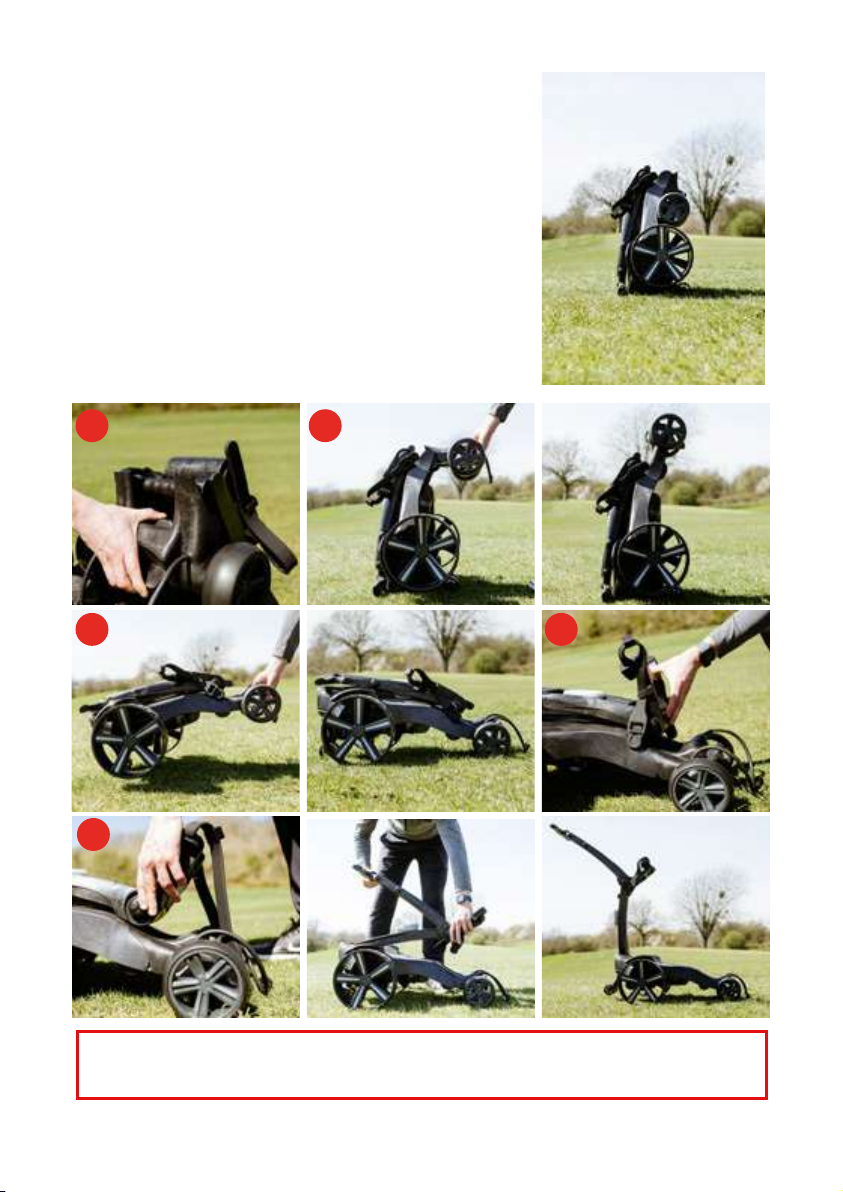
FOLDING YOUR APEX
Prior to folding, clear any debris from the trolley using compressed air or a soft brush or
cloth (never use water). Pay particular attention to the battery tray and gear at the base of
the main support. See the FAQ for a cleaning guide.
1. With your golf bag removed, turn your APEX battery OFF and trolley switch (see page 8
and 10 for the battery) and press the main support release button, then press the handle
release button
2. You can now lower the handle and main support to rest on the chassis. You will see that
the stabiliser has automatically retracted.
3. Close the bag cradle. This automatically locks the handle and main support to the
chassis so that it won’t fall open during transportation.
4. Now stand the APEX up so it is standing vertically.
5. Squeeze the slider on the front chassis, then fold the front chassis 180° to its stowed
position. Once it clicks in to place, the trolley is completely folded.
You can store your handset on the main support. Be sure to keep the handset in its
silicone case to avoid marking the main support and prevent water damage (presented in
image 6.)
1. 2.
3. 5.
4.
6.
8
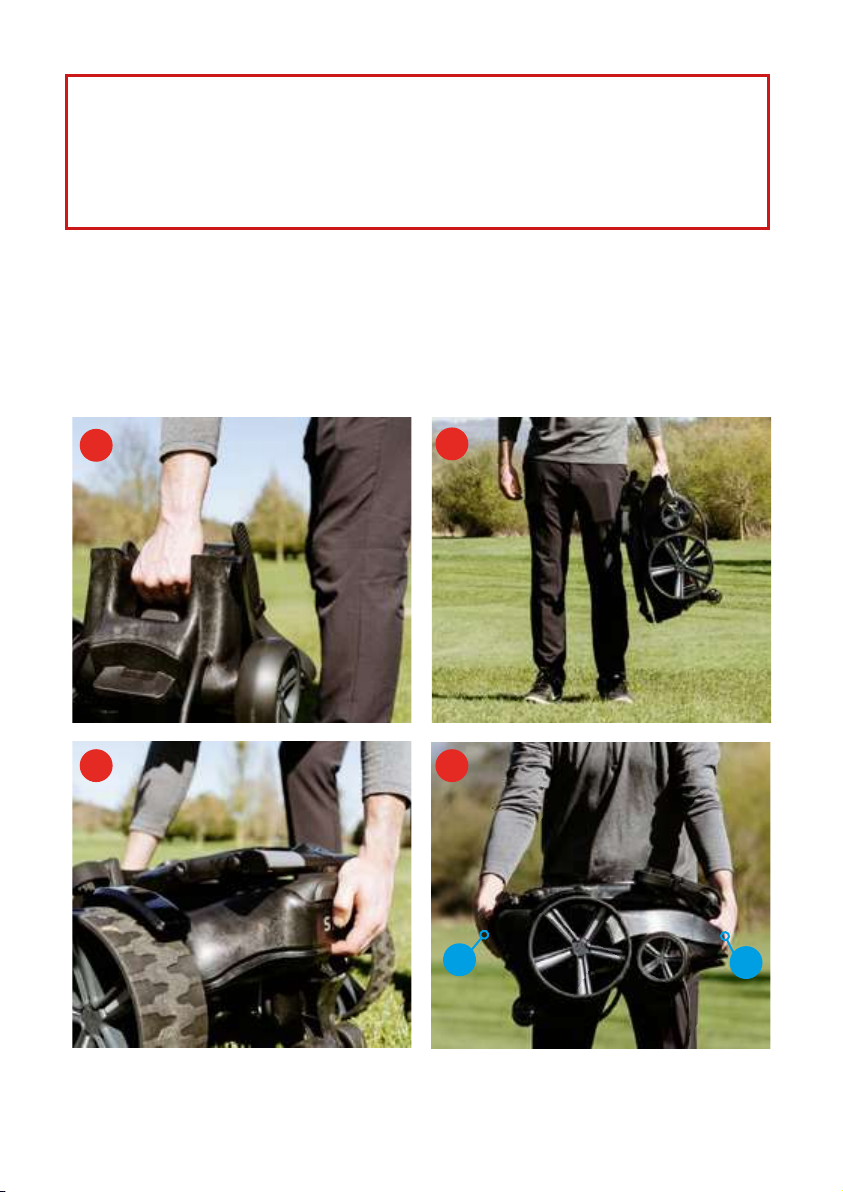
You can pick up your APEX vertically or
horizontally.
Vertical: When folded, the carry handle
is in the centre of the trolley and clearly
visible.
Horizontal: When folded, lay the APEX
at onto the oor. Lift from the rear of the
trolley, above the stabilizer (shown in image
3) and front, shown in image 4. (You can
lift from points A and B.)
WARNING:
Always ensure that your APEX battery is turned OFF when not in use (see page 10) .
Leaving it ON will drain the SmartPower battery totally and risk irrecoverably damaging it.
This will ensure that the trolley is not accidentally activated in transit.
You may choose to remove the SmartPower battery prior to folding to enable you to
charge it.
CARRYING YOUR APEX
2.
3. 4.
AB
1.
Never pick up the APEX by any points other than those described, doing so may cause
damage. DO NOT lift by wheel arches.
9
Bluetooth Connectivity
Simply connect your phone via the
Stewart Golf app and check the
battery.
Free Of Charge
No hidden charges. Just scan the QR
codes to download.
Power Updates
Never be caught out on the course.
Use the app to receive real-time
battery usage.
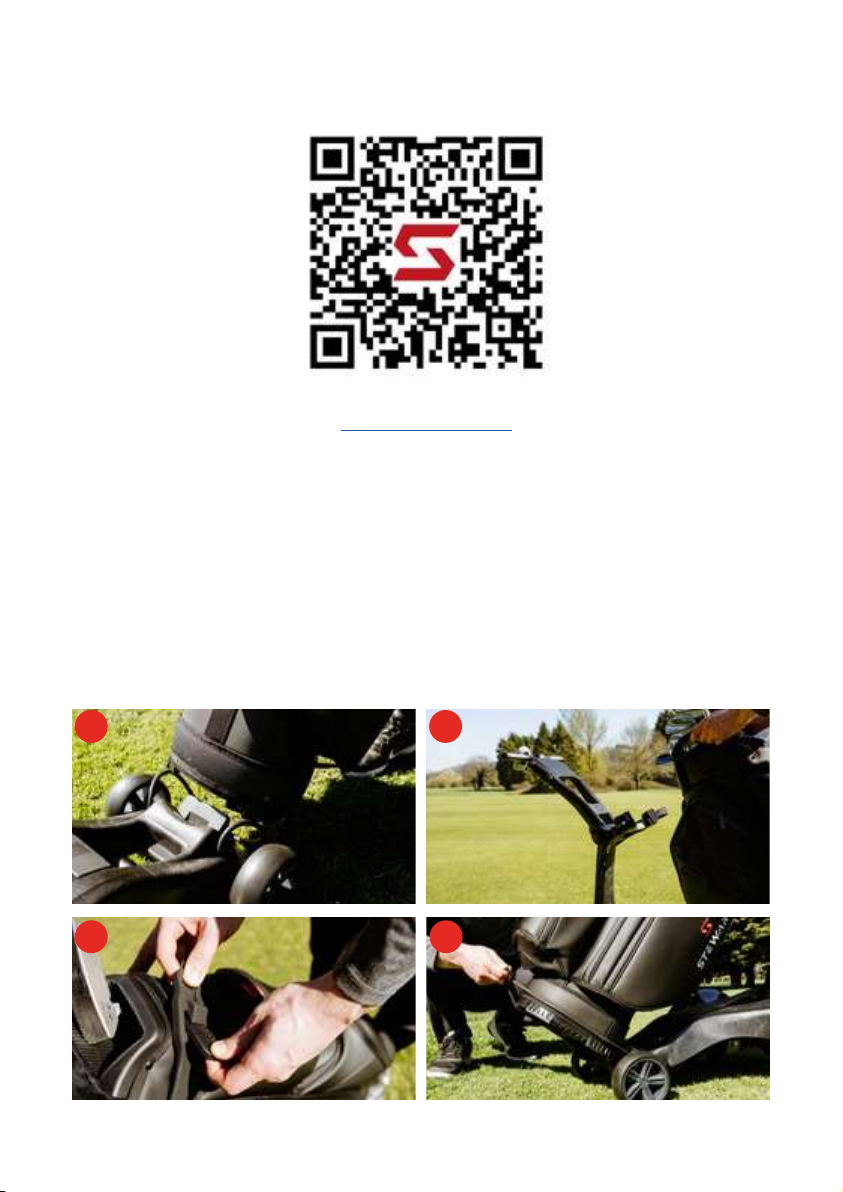
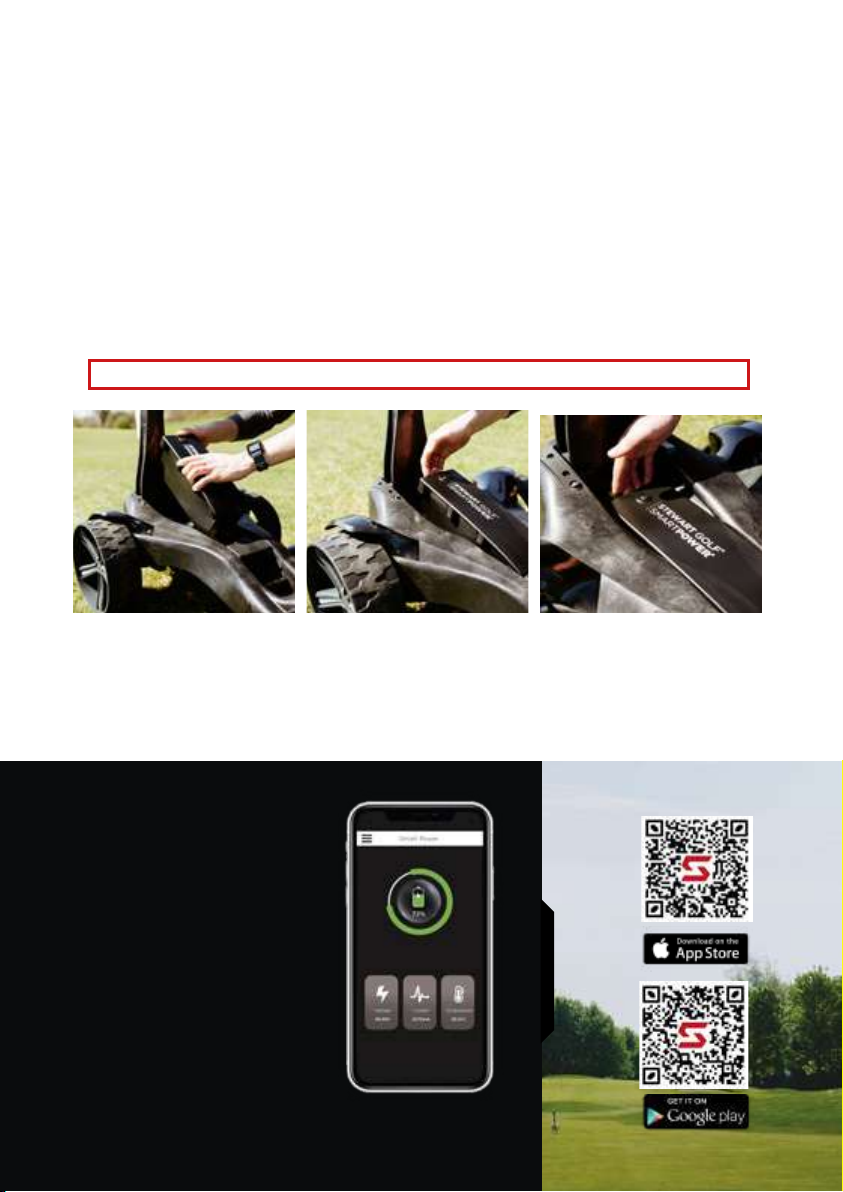
SMARTPOWER BATTERY
Your APEX has a purpose designed SmartPower battery that slots seamlessly into the
chassis, connecting automatically.
Removal: Press the release button at the end of the case, just behind the battery ON/
OFF button. Press the release button in and simultaneously pivot the battery around
the front edge, pulling the battery towards you if necessary. Once the battery is partially
out, take it with your other hand and lift away.
Insertion: Place the front of the battery under the small front battery clip and slowly
pivot into place with your ngers on the release button. If it does not click in to its
secured position automatically, press gently on the top of the battery until you hear a
‘click’.
DO NOT drop the battery in to the chassis as this may damage the connections.
SMARTPHONE APP
Developed specically for use with the SmartPower technology in the APEX, the free
app lets you monitor both on and off the course.
To download the app, please scan the codes below with your smartphone.
9

10
CHARGING THE SMARTPOWER BATTERY
Always start a charging cycle by following these steps:
1. Turn the SmartPower battery ON
2. Connect the charger to the battery
3. Connect the charger to the wall
4. Switch the wall socket on
The charger has an indicator light on it:
RED: Indicates the battery is charging.
GREEN: Indicates that the charge cycle has nished or connected to the battery.
*Green can also mean the battery is OFF and not charging, if SmartPower button is not
pressed before connected to charger.
The charge cycle time varies depending on how much power has been used: the
average charge should take 3-4 hours, but can be up to 10 hours. You can accurately
check the power level of the battery with the free smartphone app, even while it is
charging.
BEST PRACTICE
If the battery is being used regularly (once a week for example), it is OK to leave it
connected to the charger, with the charger turned on. The Battery Management System
(BMS) within the battery will prevent any damage.
However it is good practice to disconnect the battery from the charger once the green
light shows.
TECHNICAL INFORMATION
• Operating temperature: -10°C to 50°C (14°F to 122°F)
• Charging & storage temperature: 15°C to 25°C (59°F to 77°F)
• Battery lifespan: >1000 charge cycles
• Nominal voltage: 12.8V
• Charge current: 2~5A
10
Ce manuel convient aux modèles suivants
1
Table des matières


