Spypoint Geopad Manuel utilisateur


THANK YOU FOR CHOOSING A SPYPOINT PRODUCT.
This manual will guide you through all the features of your device so that you
will get optimal use out of your SPYPOINT product.
Our priority is to provide outstanding customer service. If you need support
for your product, please contact the SPYPOINT technical support or visit our
website.
CONTACT
1-888-779-7646
www.spypoint.com
ABOUT US
-
mainly used for hunting and residential/commercial surveillance. They
are distributed and shipped all over the world and the market never stops
growing. Prosperous and respected, GG Telecom is a company that constantly
keeps abreast of new technologies and listens to its customers to deliver cut-
ting-edge products with practical solutions that improve hunting and outdoor
activities.
JOIN THE SPYPOINT COMMUNITY
facebook.com/SPYPOINT
twitter.com/SPYPOINTcamera
youtube.com/SPYPOINTtrailcam

3
In the box .................................................................................. 4
Components .............................................................................. 4
Getting started ........................................................................... 6
mySPYPOINT app ...................................................................... 8
Uploading new photos ............................................................... 10
Conguring the advanced settings ............................................. 11
Included applications ................................................................ 13
Managing applications ............................................................... 14
Features .................................................................................... 15
Installing the screen protector ................................................... 16
Troubleshooting ......................................................................... 17
Limited warranty ....................................................................... 18
Repair service ............................................................................ 18
Regulation ................................................................................. 19
Table of contents

4
GEOPAD
USB Cable
Components
SD card
reader
Front camera
Adjustable strap
USB port/SD card reader
1/8" audio output jack
Reset
Back camera
Tripod mount
1
7
6
5
4
3
2
SD card reader holder
Speaker
Microphone
Power button
Volume control
MicroSD card slot **
10
9
8
11
12
Quick start
guide
** The microSD card is easier to insert using
a pointed tool.
Screen
protector *
*Installation instructions at page 16.
13

5
FRONT
REAR
TOP
BOTTOM
SIDES
4
3
5
10
1211
13
1
2
9
86 7

6
1. CHARGING THE TABLET
Using the included USB cable, connect the GEOPAD to a USB power source.
2. TURNING THE TABLET ON/OFF
To turn the tablet on:
Press the power button and hold it until the SPYPOINT
logo appears.
Language, Date &
Time and Wi-Fi).
To lock or unlock the screen:
Press the power button and release it immediatlely.
Slide the lock icon to enter the home screen.
To turn the tablet o:
Press the power button until a menu appears. Tap on
Getting started

7
1
10 9 8 7 6
5
432
12 11
3. HOME SCREEN
App icon - Your favorite hunting apps. Tap on the icon to open
Back - Returns to the previous page
Home - Returns to the home screen
Recent - Displays recently used apps that are still open
All apps - Shows all your apps
Time
Battery level
Brightness control
Sync- Synchronizes data from the device to Google service’s server.
Refer to “Settings / Accounts” for details.
Location- Enables/Disables GPS functions
Bluetooth connectivity
Wi-Fi connectivity
1
10
9
8
7
6
5
4
3
2
12
11

8
mySPYPOINT app
1. ONLINE ACTIVATION OF YOUR MYSPYPOINT ACCOUNT
(The mySPYPOINT app & online account are for SPYPOINT trail cameras only)
Make sure your GEOPAD is connected to a Wi-Fi network to access the
mySPYPOINT website and to do a synchronisation.
If you are new to mySPYPOINT:
1. Tap on the mySPYPOINT app icon.
2. Tap on “REGISTER”. You will be redirected to the registration form on
mySPYPOINT.com.
3. Fill out the information to create a new account, then click on “SUBSCRIBE
NOW”.
4. An email from “[email protected]” will automatically be sent to
you. In this email, click on “click here to activate your account”.
5.
“ADD A NEW DEVICE”.
The addition of a new SPYPOINT trail camera must always be done via
your mySPYPOINT online account. It cannot be added via the application.
6.
with your GEOPAD, your account will automatically be upgraded to “Gold”.
7. Then, enter your trail camera’s information and click “
OUT
8.
app with your GEOPAD, your account will automatically be upgraded to “Gold”.
If you already have a mySPYPOINT account:
1. Tap on the mySPYPOINT app icon.
2.
automatically be upgraded to “Gold”. If you already have a “Silver” or
“Gold” account, you will automatically receive a credit in SPYDOLLARS.
Your “Gold” account will be valid for one year as of that date.

9
2. MYSPYPOINT APP FUNCTIONS
Allows you to view photos and manage your trail cameras on the spot.
Calendar
Assign names and
GPS coordinates
to your cameras
Add new photos
Your photos are
automatically
sorted in the
calendar
Photos
Navigate through
your albums Manage your
albums
Apply tags to
your photos
Gives general information about your
cameras and about the last synchro-
nization to your mySPYPOINT online
account.
When a Wi-Fi network is available, tap on
this icon to apply the last changes to your
mySPYPOINT online account.
It is highly recommended that the
GEOPAD be fully charged before the
rst synchronization.
Status Synchronization
10
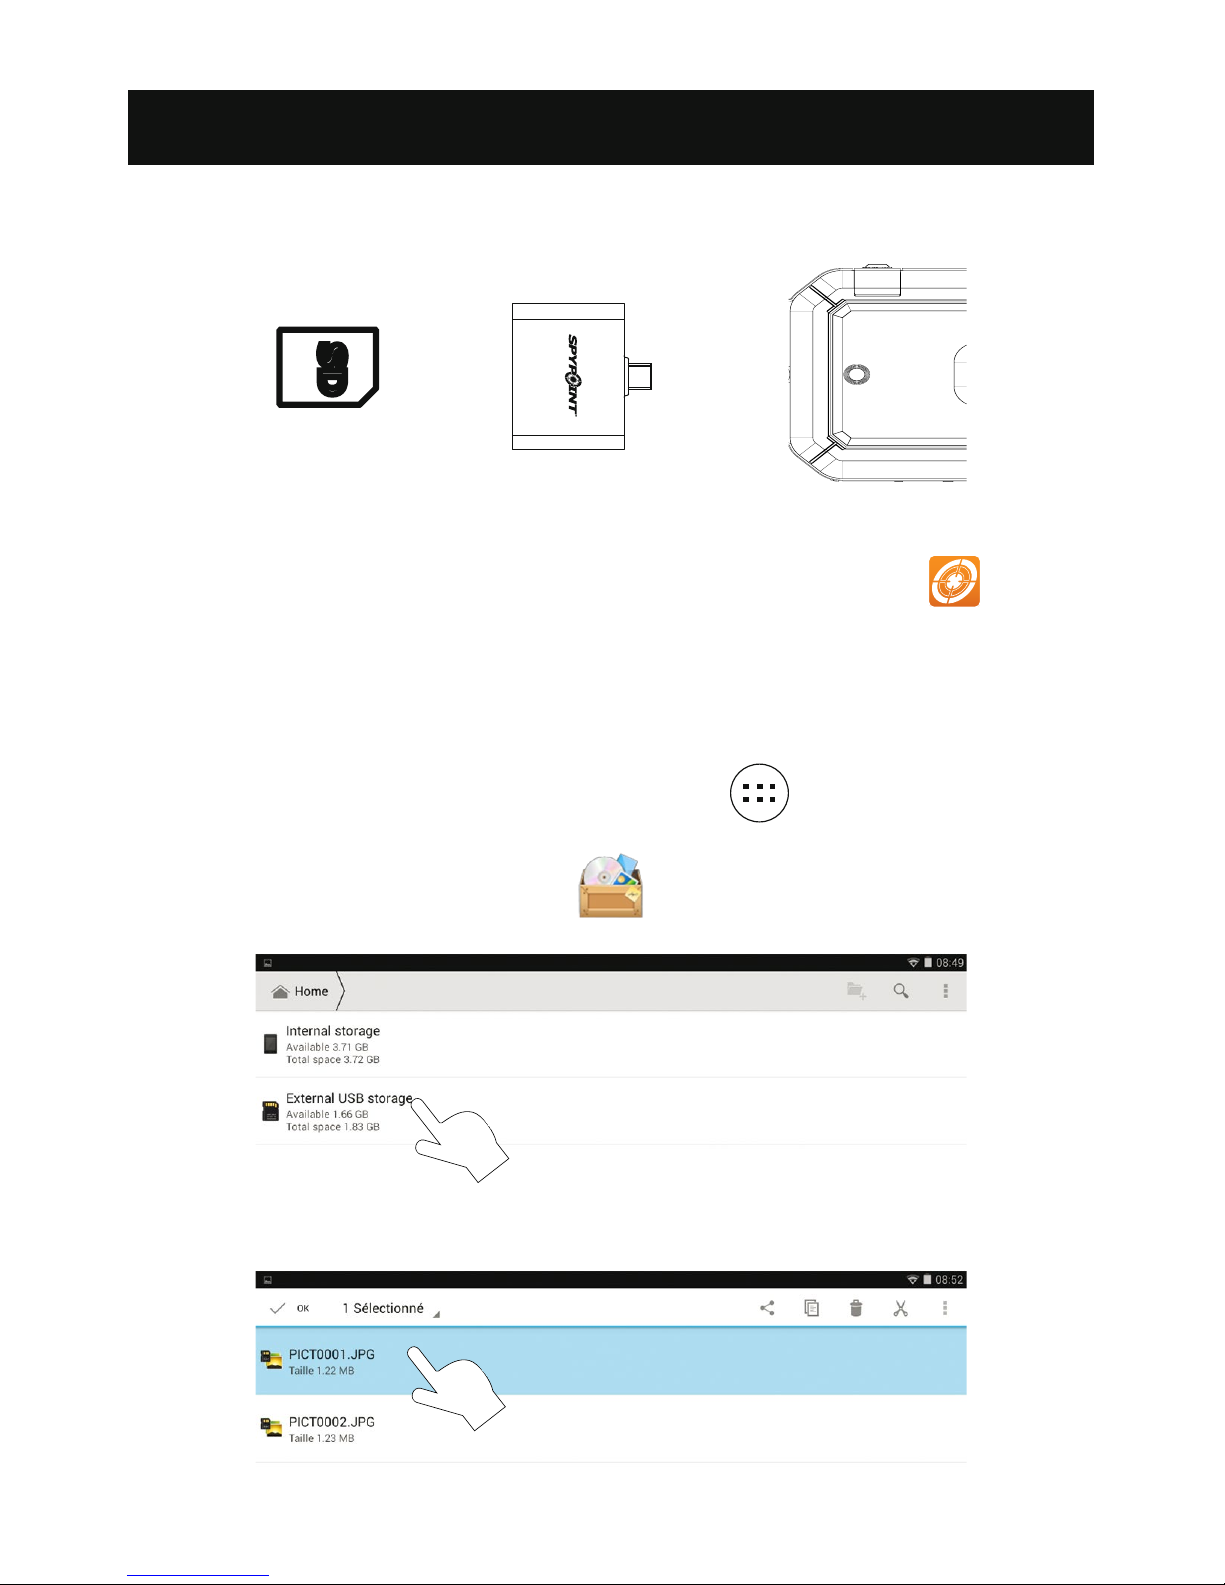
Insert the SD card in the reader, gold contacts facing down. Then, insert the
reader in the USB port.
UPLOADING PHOTOS INTO MYSPYPOINT(For SPYPOINT cameras only)
After inserting an SD card, run the mySPYPOINT application and
follow the easy instructions on screen. Your photos will automatically be
organized by date and time in the calendar.
UPLOADING PHOTOS DIRECTLY INTO THE GEOPAD
1. After inserting the SD card, tap on “All apps” .
2. Tap on the “Files manager” icon.
3.
4.
Uploading new photos
Autres manuels pour Geopad
2
Table des matières


