Spypen oboe Manuel utilisateur

User’s Manual
2
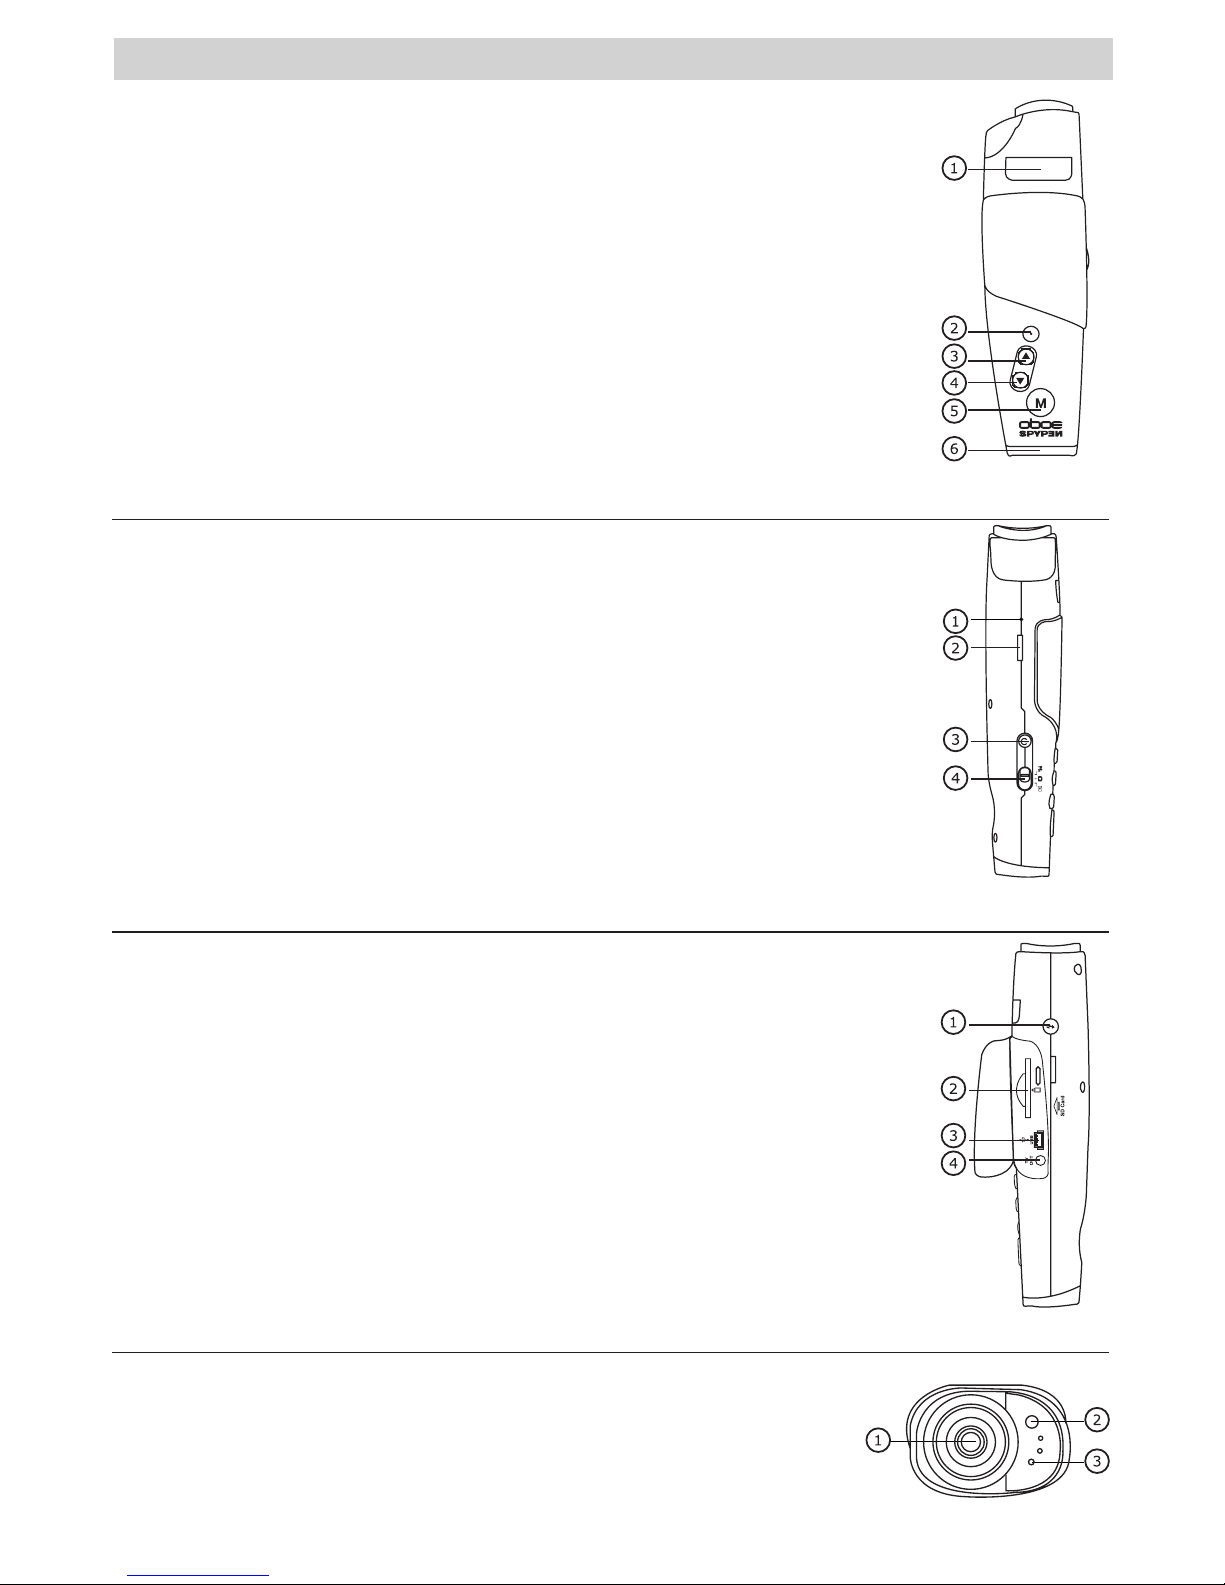
Product Overview
1. Flash
2. Shutter button
3. Up / Zoom In button
4. Down / Zoom Out button
5. Menu button
6. Viewfinder
Top view
1. Reset switch
2. Camera stand clip
3. Power button
4. Mode selector
Side view
1. Flash Pop-up button
2. SD card slot
3. USB port
4. TV-out terminal
Side view
1. Lens
2. Self-timer/Charge LED
3. Microphone
Front view

3
Table of Contents
1 Getting Started ....................................................................................................................... 4
• Camera Package Contents ..................................................................................................... 4
• Using the Camera Stand........................................................................................................ 4
• Charging the Battery ............................................................................................................ 4
• Powering the Camera On and Off ............................................................................................ 5
• Checking the Battery Level .................................................................................................... 5
• Setting Auto Power Off.......................................................................................................... 5
• Reset Function ..................................................................................................................... 5
• Checking Camera Status ....................................................................................................... 6
2 Camera Setting....................................................................................................................... 6
• Camera Modes ..................................................................................................................... 6
• Setting the Beep Sound On and Off......................................................................................... 6
• Restoring the Factory Settings................................................................................................ 7
• Setting Display Language ...................................................................................................... 7
3 Taking Pictures ....................................................................................................................... 7
• Taking a Picture.................................................................................................................... 7
• Setting Exposure Compensation ............................................................................................. 8
• Setting the White Balance ..................................................................................................... 8
• Setting Image Resolution ...................................................................................................... 9
• Using the Flash .................................................................................................................... 9
• Setting Self-timer............................................................................................................... 10
• Using the 4X Digital Zoom Function ...................................................................................... 10
• Setting Frequency .............................................................................................................. 10
4 Recording Video Clips ........................................................................................................... 11
• Recording Video Clips.......................................................................................................... 11
5 Playback Pictures and Video Clips ............................................................................................ 11
• Reviewing Pictures on the Screen ......................................................................................... 11
• Playback Video clips on the Screen ....................................................................................... 11
• Protect/Unprotect the Pictures or Video Clips Against Deletion .................................................. 11
• Deleting One Picture or Video Clip......................................................................................... 12
• Deleting All Pictures and Video Clips...................................................................................... 12
• Setting TV-out ................................................................................................................... 13
6 Using SD (Secure Digital) Card ............................................................................................... 14
• Using the SD Card .............................................................................................................. 14
• To Format a Memory Card.................................................................................................... 15
• About DPOF ....................................................................................................................... 15
7 Installing Software onto a Computer........................................................................................ 16
• Installing the Software ........................................................................................................ 16
• Software Included with Your Camera..................................................................................... 16
• Computer System Requirements........................................................................................... 17
8 Transferring Pictures, Video Clips to Your Computer ................................................................... 18
• Before You Transfer Pictures and Video Clips .......................................................................... 18
• Mass Storage/PC CAM ......................................................................................................... 18
• Connecting to Your Computer............................................................................................... 18
• Transferring and Viewing the Pictures and Video Clips on PC..................................................... 19
• Transferring and Viewing the Pictures and Video Clips on Mac ................................................... 19
9 Using the Camera as a Web Cam (PC only) ............................................................................... 19
• Setting up NetMeeting™ ...................................................................................................... 19
• Start NetMeeting™ ............................................................................................................. 19
10 Troubleshooting Problems....................................................................................................... 20
11 Getting Help ......................................................................................................................... 21
• Online Services .................................................................................................................. 21
• Customer Support .............................................................................................................. 21
• ArcSoft Software Help ......................................................................................................... 21
12 Appendix ............................................................................................................................. 22
• Technical Specifications ....................................................................................................... 22
• Tips, Your Safety & Maintenance........................................................................................... 22
• Uninstalling the Camera Driver (PC only) ............................................................................... 22
• Regulatory Information ....................................................................................................... 23

4
1 Getting Started
The Spypen oboe camera provides you easy-to-use features. It has now easier and more enjoyable. Here
are a few examples of what you can do with your camera.
Enjoy point & shoot operation.
Store pictures and video clips to the internal memory.
Playback of pictures and video clips on the screen or a computer.
Send the pictures and video clips over the Internet to family and friends.
• Camera Package Contents
USB Cable
AV Cable Camera stand
The CD-ROM includes
Digital Camera Driver (PC)
Arcsoft® Software Suite (PC & Mac)
Microsoft® NetMeeting™
Adobe® Acrobat® Reader (PC & Mac)
User’s manual in PDF format.
Warranty Card
Spypen oboe
• Using the Camera Stand
• Charging the Battery
A rechargeable battery (non-replaceable) is integrated into camera. Please fully charge the battery for
approximately 10 hours before you use the camera for the first time, and about 3 hours for subsequent
recharging.
The integrated battery should last for the life of the camera, but as is the case with all rechargeable
batteries the actual charge held may decline with use.
You can only charge the battery by connecting it to the computer via a USB cable. Your computer must be
powered on for your camera to charge. Please follow the steps below:
1. Plug the USB A plug into a USB port on your computer.
2. Plug the other end of the USB cable into the USB port on your camera.
3. The battery begins charging and the Charging LED lights up in green. The LED will blink when the battery
is fully charged.
NOTE:
Power off the camera before charging the battery. Otherwise, the Charge LED will light up in orange, indicating that the
camera is not in the charge mode.

5
• Powering the Camera On and Off
Press and hold the Power button to power on the camera. The
screen will be turned on in two seconds. You can see the screen
through the viewfinder. Press and hold the Power button again
will power the camera off.
Power button
• Checking the Battery Power Level
Check the battery power level before taking pictures.
1. Power on the camera.
2. Check the battery power level that appears on the camera screen.
Battery has adequate power.
Only half of the battery power is left.
Battery power is low. Please charge the battery.
• Setting Auto Power Off
This camera is designed to automatically power off to save battery life in 1 min. /3 min. of inactivity. Press
the Power button if you want to power on the camera again.
You can change the power saving setting by the following steps:
Power on the camera.
Press
Shutter button
Press
Press
Shutter button
Press
Shutter button
Select “Off” to disable the Auto Power off function.
• Reset Function
In the rare situation that the camera locks up (usually in a very low power situation), we have incorporated
a “camera reset switch” on the side of the camera that allows the camera processor to be reset without
losing any images.
To use the reset switch, simply depress the reset switch gently
using a paper clip or ball point pen. The camera will reboot and
return to the mode prior to the lock-up. It is important to note
that the camera needs to be recharged immediately in order to
avoid locking up again.
Reset switch

6
• Checking Camera Status
Power on the camera, view the camera screen to check which camera settings are active. If the feature icon
is not displayed, it means that particular feature is not activated.
Still Image Mode Playback Mode
00:12
Video Mode
Still Image Resolution
Camera Status
Battery Power Level
Other Features
Still Image Mode
SD Card inserted
Self-timer On
(Economic)
800 x 600
Flash Off
Half Low
The length of video
clip remaining
00:12
Locked le
Current le/Number
of les
Pictures remaining
Full
Flash On
Auto Flash
(Normal)
1600 x 1200
(Fine)
2048 x 1536
Video Mode
Recording
Zoom status bar
Focus Mark
2 Camera Setting
• Camera Modes
The camera has three working modes: Still Image mode
, Video mode
and Playback mode
. Use the Mode
selector to select the mode you prefer.
Mode selector
• Setting the Beep Sound On and Off
When the Beep sound is turned on, the camera will beep when you press the buttons. You can turn the
Beep sound on and off in the Still Image and Playback modes. We use Still Image mode as an example.
Power on the camera.
Press
Shutter button
Press
Press
Shutter button
Press
Shutter button

7
• Restoring the Factory Settings
You can easily change all the settings that you have made back to the camera default settings by the
following steps. You can restore the Factory default setting in the Still Image and Playback modes. We use
Still Image mode as an example. Power on the camera.
Press
Shutter button
Press
Press
Shutter button
Press
Shutter button
• Setting Display Language
Under this setting, you can select the language you prefer for the screen. You can change the Language
setting in the Still Image and Playback modes. We use Still Image mode as an example. Power on the
camera.
Press
Shutter button
Press
Press
Shutter button
Press
Shutter button
3 Taking Pictures
• Taking a Picture
1. Power on the camera. Set the Mode Selector to Still Image
mode .
2. Use the screen to frame your subject.
3. Hold the camera steady and press the Shutter button to take
a picture. A beep will sound when the picture has been taken.
The counter on the screen will decrease by one.
Shutter button

8
• Setting Exposure Compensation
You can adjust the exposure compensation value (EV) within the range of -1.5EV to +1.5EV in order to
compensate for current lighting conditions. This setting can be used to obtain better result when shooting with
backlighting, indirect indoor lighting, a dark background, and so on.
Power on the camera. Set the Mode selector to Still Image mode.
Press
Shutter button
Press
Press
Shutter button
Press
Shutter button
NOTE:
• A higher EV value is best for light-coloured subjects and backlight subjects. A lower EV value is best for dark-coloured
subjects and for shooting outdoors on a clear day.
• When shooting under very dark or very bright conditions, you may not be able to obtain satisfactory results even after
performing exposure compensation.
• Exposure compensation returns to its standard default setting (AUTO) after you power off and power on the camera
again.
• Setting the White Balance
Selecting the right type of white balance can help to make the colour of a subject appear more natural
under the type of lighting that is available.
Power on the camera. Set the Mode selector to Still Image mode.
Press
Shutter button
Press
Press
Shutter button
Press
Shutter button

9
• Setting Image Resolution
Picture resolution refers to the number of pixels in a digital picture. The higher the resolution, the more
pixels in your picture and the more memory space the picture uses. A higher resolution takes up more
memory but produces a higher quality digital picture when printed.
Power on the camera. Set the Mode selector to Still Image mode.
Press
Shutter button
Press
Press
Shutter button
Press
Shutter button
Here is the approximate number of pictures you can expect the camera to hold at each setting based on
the 16MB internal memory.
F: 2048 x 1536; approximately 17 pictures
N: 1600 x 1200; approximately 28 pictures
E: 800 x 600; approximately 105 pictures
• Using the Flash
Use the flash when you take pictures at night, indoors, or outdoors in heavy shadows. The flash icon that is
displayed on the screen is the active option. You can change the flash setting by the following steps:
Power on the camera. Set the Mode selector to Still Image mode.
Press
Shutter button
Press
Press
Shutter button
Press
Shutter button
Flash Mode On - The flash fires for every picture. Use this setting in high-contrast situations to
provide fill-light or use it indoors in low light.
Auto Flash Mode - The flash fires automatically as needed. Use this setting to take most
pictures.
NOTE:
• Flash is not available in Video mode.
• Never touch or block the ash with your ngers. Doing so can soil these components and interfere with the correct ash
operation.
• Effective ash light range: Approx. 3.3~5.0 feet (Approx. 1.0~1.5m)

10
• Setting Self-timer
Your camera is designed with a self-timer function, which allows you to take pictures with a 10-second built-
in timer. Place the camera on a flat surface or use a tripod when using the Self-timer function.
1. Power on the camera. Set the Mode Selector to Still Image mode .
2. Follow the steps below to activate the Self-timer function:
Press
Shutter button
Press
Press
Shutter button
Press
Shutter button
3. Frame your subject using the screen.
4. Press the shutter button to take a picture.
5. The self-timer LED blinks in red and the camera beeps to indicate that the countdown is being
performed. The camera beeps for 6 seconds and then quicker for 6 seconds. The self-timer turns off
automatically when the picture is taken.
• Using the 4X Digital Zoom Function
The digital zoom feature is available in Still Image and Video modes. This feature enlarges the central area
of an image and photograph only the enlarged portion of the image. Images can be enlarged up to 4 times
before the image is taken. A bar appears on the screen, indicating the zoom status. The zoom setting will
remain after taking pictures. Please zoom out to take standard pictures.
• Setting Frequency
In order to take a better indoor picture, the camera needs to be set to suit the correct lighting frequency.
Set the frequency to 60Hz for US, 50Hz for Europe.
You can change the Frequency setting in the Still Image and Playback modes. We use Still Image mode as
an example. Power on the camera.
Press
Shutter button
Press
Press
Shutter button
Press
Shutter button
Table des matières


