
Splash SLPLRND9 Manuel utilisateur

RoundMetalFramePoolSet
SLPLRND9-SLPLRND12-SLPORND15-SLPORND18
Above Ground Swimming Pool, Fast Setup and Durable,
Garden Backyard Lawn and Courtyard
IMPORTANTSAFETYRULES
Please read, understand, and follow
all instructions carefully before installing
and using this product.
Keep for future reference.
Serene

2 www.SereneLife.com
TABLE OF CONTENTS
IMPORTANT SAFETY RULES
METAL FRAME POOL PARTS LIST
POOL SETUP
FILTER PUMP INSTALLATION and INSTRUCTIONS
LADDER ASSEMBLY
POOL MAINTENANCE & CHEMICALS
GENERAL AQUATIC SAFETY
TROUBLESHOOTING GUIDE
LIMITED WARRANTY
SPECIAL INTRODUCTORY NOTE:
Please read this manual before setting up your pool. This information will help extend the pool
life and make the pool safer for your family's enjoyment. A team of 2-3 people is recommended
for pool set up. Additional people will speed up the installation.
3
5
7
11
14
16
19
19
20

3www.SereneLife.com
• Continuous and competent adult supervision of children and the disabled is required at all times.
• Secure all doors, windows and safety barriers to prevent unauthorized, unintentional or unsupervised pool
entry.
• Install a safety barrier that will eliminate access to the pool for young children and pets.
• Pool and pool accessories are to be assembled and disassembled by adults only.
• Never dive, jump or slide into an above-ground pool or any shallow body of water.
• Failure to set up pool on at, level, compact ground or over lling could result in the pool’s collapse and the
possibility that a person lounging in the pool could be swept out/ejected.
• Do not lean, straddle, or exert pressure on the inatable ring or top rim as injury or ooding could occur.
Do not allow anyone to sit on, climb, or straddle the sides of the pool.
• Remove all toys and otation devices from, in, and around the pool when it is not in use.
Objects in the pool attract young children.
• Keep toys, chairs, tables, or any objects that a child could climb on at least four feet (1.22 meters) away from
the pool.
• Keep rescue equipment by the pool and clearly post emergency numbers at the phone closest to the pool.
Examples of rescue equipment: coast guard approved ring buoy with attached rope, strong rigid pole not
less than twelve feet (12') [3.66m] long.
• Never swim alone or allow others to swim alone.
• Keep your pool clean and clear. The pool oor must be visible at all times from the outside barrier of the pool.
• If swimming at night use properly installed articial lighting to illuminate all safety signs, ladders, pool oor
and walkways.
• Stay away from the pool when using alcohol or drugs/medication.
• Keep children away from pool covers to avoid entanglement, drowning, or other serious injury.
• Pool covers must be completely removed before pool use.
Children and adults cannot be seen under a pool cover.
• Do not cover the pool while you or anyone else is in the pool.
• Keep the pool and pool area clean and clear to avoid slips and falls and objects that may cause injury.
• Protect all pool occupants from recreational water illnesses by keeping the pool water sanitized.
Don’t swallow the pool water. Practice good hygiene.
• All pools are subject to wear and deterioration. Certain types of excessive or accelerated deterioration can
lead to an operation failure, and can ultimately cause the loss of large quantities of water from your pool.
Therefore, it is very important that you properly maintain your pool on a regular basis.
• This pool is for outdoor use only.
• Empty pool completely when not in use for a longer period and safely store the empty pool in such a way
that it does not collect water from rain or any other source. See storage instructions.
• While the swimming pool is in use, you will need to operate the lter pump to ensure that there is at least one
complete turnover of water a day. Consult your pump’s manual to calculate the necessary operating hours.
IMPORTANT SAFETY RULES
Read, Understand and Follow All Instructions Carefully Before Installing and Using this Product.

4www.SereneLife.com
POOL BARRIERS AND COVERS ARE NOT SUBSTITUTES FOR CONTINUOUS AND COMPETENT ADULT
SUPERVISION. POOL DOES NOT COME WITH A LIFEGUARD. ADULTS ARE THEREFORE REQUIRED TO ACT
AS LIFEGUARDS OR WATER WATCHERS AND PROTECT THE LIVES OF ALL POOL USERS, ESPECIALLY CHILDREN,
IN AND AROUND THE POOL.
FAILURE TO FOLLOW THESE WARNINGS MAY RESULT IN PROPERTY DAMAGE, SERIOUS INJURY OR DEATH.
Advisory:
Pool owners may need to comply with local or state laws relating to childproof fencing, safety barriers,
lighting, and other safety requirements. Customers should contact their local building code enforcement
office for further details.
Please read, understand, and follow all instructions carefully before installing and using this product.
These wamings, instructions, and safety guidelines address some common risks of water recreation, but they
cannot cover all risks and dangers in all cases. Always use caution, common sense, and good judgment when
enjoying any water activity. Keep for future reference. Packaging must be read carefully and kept for future
reference. See product for additional warnings
General
Check pins, bolts and/or screws for rust; splinters or any sharp edges regularly, especially accessible surfaces
to avoid injuries.
Non swimmers safety
• Continuous, active, and vigilant supervision of weak swimmers and non-swimmers by a competent adult is
required at all times (remembering that children under ve are at the highest risk of drowning).
Designate a competent adult to supervise the pool each time it is being used.
• Weak swimmers or non-swimmers should wear personal protection equipment when using the pool.
• When the pool is not in use, or unsupervised, remove all toys from the swimming pool and its surrounding
to avoid attracting children to the pool.
Safety devices
• It is recommended to install a barrier (and secure all doors and windows, where applicable) to prevent
unauthorized access to the swimming pool.
• Barriers, pool covers, pool alarms, or similar safety devices are helpful aids, but they are not substitutes for
continuous and competent adult supervision.
Safety equipment
• It is recommended to keep rescue equipment (e.g. a ring buoy) by the pool.
• Keep a working phone and a list of emergency phone numbers near the pool.
Safe use of the pool
• Encourage all users especially children to team how to swim.
• Learn Basic Life Support (Cardiopulmonary Resuscitation - CPR) and refresh this knowledge reguilarly.
This can make a life-saving difference in the event of an emergency.
• Instruct all pool users, including children, what to do in case of an emergency.
IMPORTANT SAFETY RULES

5www.SereneLife.com
• Never dive into any shallow body of water. This can lead to serious injury or death..
• Do not use the swimming pool when using alcohol or medication that may impair your ability to safely use
the pool
• When pool covers are used, remove them completely from the water surface before entering the pool.
• Protect pool occupants: from water related illnesses by keeping the pool water treated and practicing good
hygiene. Consult the water treatment guidelines in the user's manual.
• Store chemicals (e.g.water treatment, cleaning or disinfection products) out of the reach of children.
• Removable ladders shall be placed on a horizontal surface.
• Observe and follow the warnings and safety signs on the pool wall.
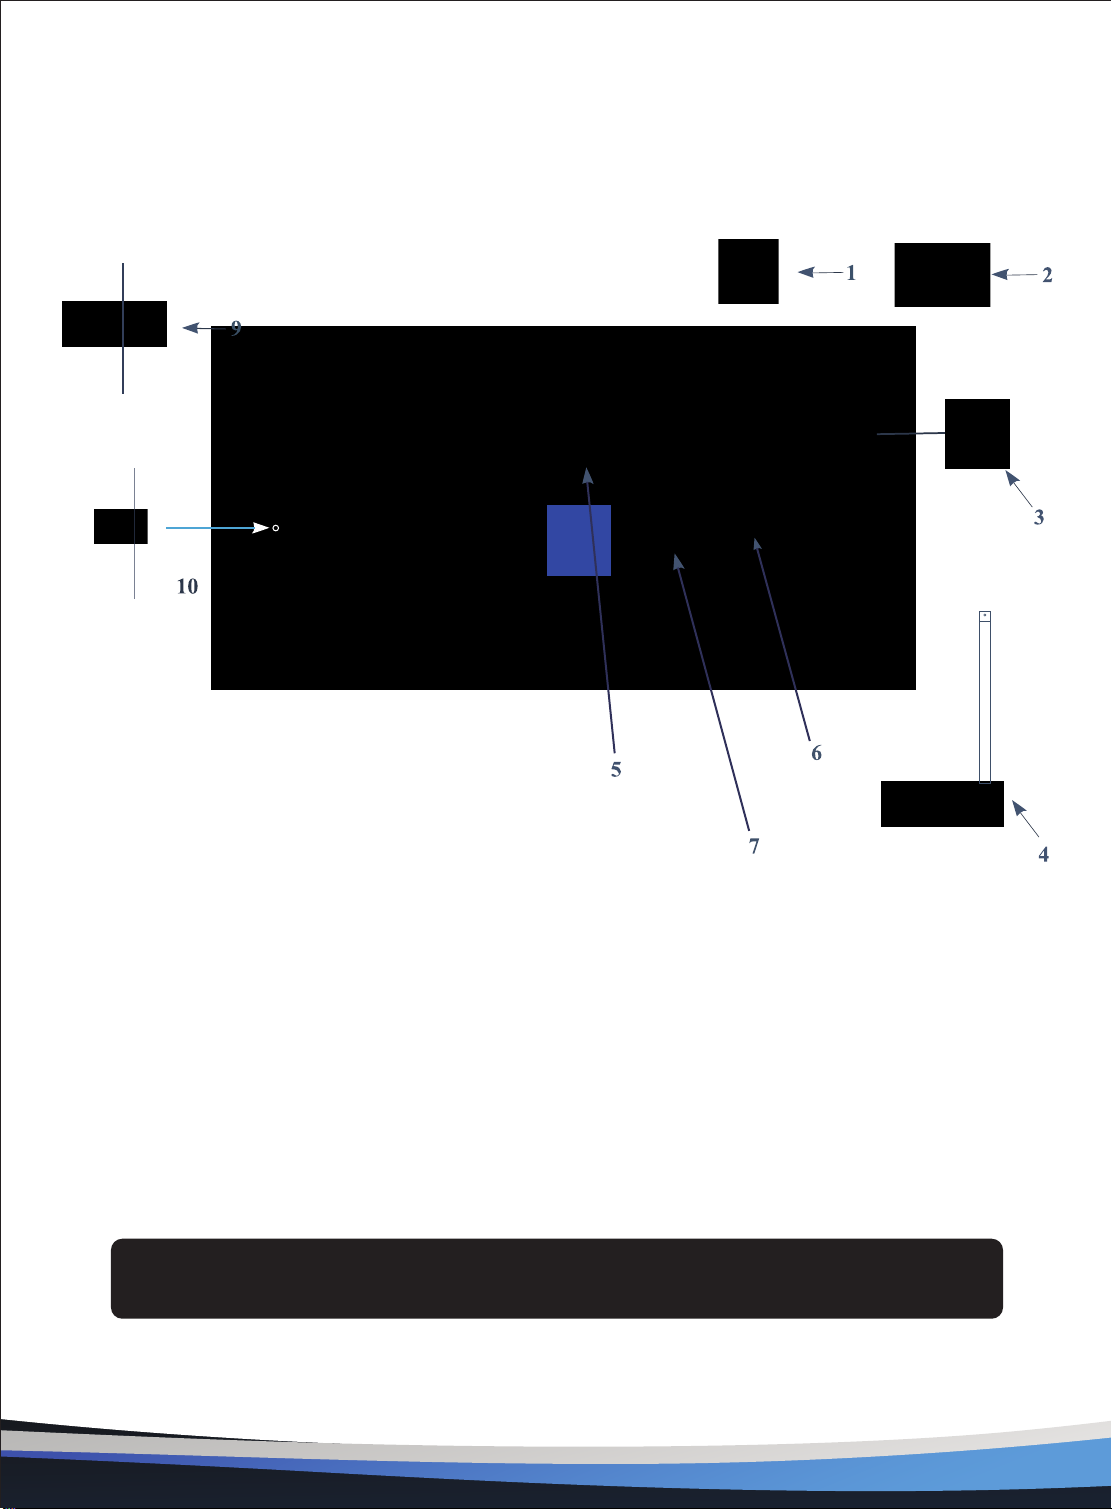
METAL FRAME POOL PARTS LIST
Item Image SLPLRND9 SLPLRND12 SLPORND15 SLPORND18
5
7
Pool cover
Support foot for the corner
vertical tube
Pool
Connection for the vertical
and horizontal tubes
12
12
1 1 1 1
1 1 1 1
12
12
12
12
12
12
16
16
16
16
16
16
16
16
6www.SereneLife.com
PARTS REFERENCE
Before assembling your product, please take a few minutes to check the contents and become familiar
with all the parts.
NOTE: Drawings for illustration purpose only. Actual product may vary. Not to scale.
(The number of pieces will vary depending on the pool size)

7www.SereneLife.com
IMPORTANT SITE SELECTION AND GROUND PREPARATION INFORMATION
• The pool location must allow you to secure all doors, windows, and safety barriers to prevent unauthorized,
unintentional or unsupervised pool entry.
• Install a safety barrier that will eliminate access to the pool for young children and pets.
• Failure to set up the pool on at, level, compact ground and to assemble, and ll with water in accordance
with the following instructions could result in the pool’s collapse or the possibility that a person lounging
in the pool could be swept out/ejected, resulting in serious injury or property damage.
• Risk of electric shock: connect the lter pump only to a grounding type receptacle protected by a ground-
fault circuit interrupter (GFCI) or residual current device (RCD). To reduce the risk of an electric shock, do not
use extension cords, timers, plug adapters or converter plugs to connect the pump to electric supply.
Always provide a properly located outlet. Locate the cord where it cannot be damaged by lawn mowers,
hedge trimmers, and other equipment. See Filter Pump manual for additional warnings and instructions.
• Risk of serious injury: DO NOT attempt to assemble pool in high wind conditions.
Select an outdoor location for the pool with the following requirements in mind:
1. The area where the pool is to be set up must be absolutely at and level.
Do not set up the pool on a slope or inclined surface.
2. The ground surface must be compacted and rm enough to withstand the pressure and weight of a fully
set up pool. Do not set up the pool on mud, sand, soft or loose soil conditions.
3. Do not set up the pool on a deck, balcony or platform, which may collapse under the weight of the lled
pool.
4. The pool requires at least 4 feet of space all around pool from objects that a child could climb on to gain
access to the pool.
5. Grass under the pool will be damaged. Splash out chlorinated pool water could damage the surrounding
vegetation.
6. Eliminate all aggressive grasses rst Certain types of grass such as St. Augustine and Bermuda, may grow
through the liner. Grass growing through the liner it is not a manufacture defect and is not covered under
warranty.
7. The area shall facilitate drainage of the pool water after each use and/or for long term pool storage.
POOL SETUP
IMPORTANT
Before allowing anyone to use the pool, hold a family meeting. Establish a set of rules that include,
at a minimum, the important safety rules and general aquatic safety information in this manual.
Review these rules on a regular basis and with all users of the pool, including guests.
8www.SereneLife.com
You may have purchased this pool with the lter pump. The pump has its own separate set of installation
instructions. First assemble your pool unit and then set up the lter pump.
Estimated assembly time 30-60 minutes, (Note the assembly time is only approximate and individual
assembly experience may vary.)
1. Liner Preparation
• Find a at, level location that is free and clear of stones, branches or other sharp objects that may puncture
the pool liner or cause injury.
• Open the carton containing the liner, joints, legs, etc., very carefully as this carton can be used to store the
pool during the winter months or when not in use.
• Take out the ground cloth (8) (if included) and spread it
over the cleared area. Then take out the liner (6) and
spread it out over the ground cloth, with the drain valve
directed towards the draining area. Place the drain valve
away from the house. Allow the sun to warm up the liner
before inserting the beams (5) into the sleeve openings.
IMPORTANT: Always set up the pool unit with at least
2 persons Do not drag the liner across the ground as this
can cause liner damage and pool leakage (see drawing 1).
• During the setup of this pool liner, point the hose connections or openings in the direction of the electric
power source. The outer edge of the pool should be within reach of the pump's electrical connection.
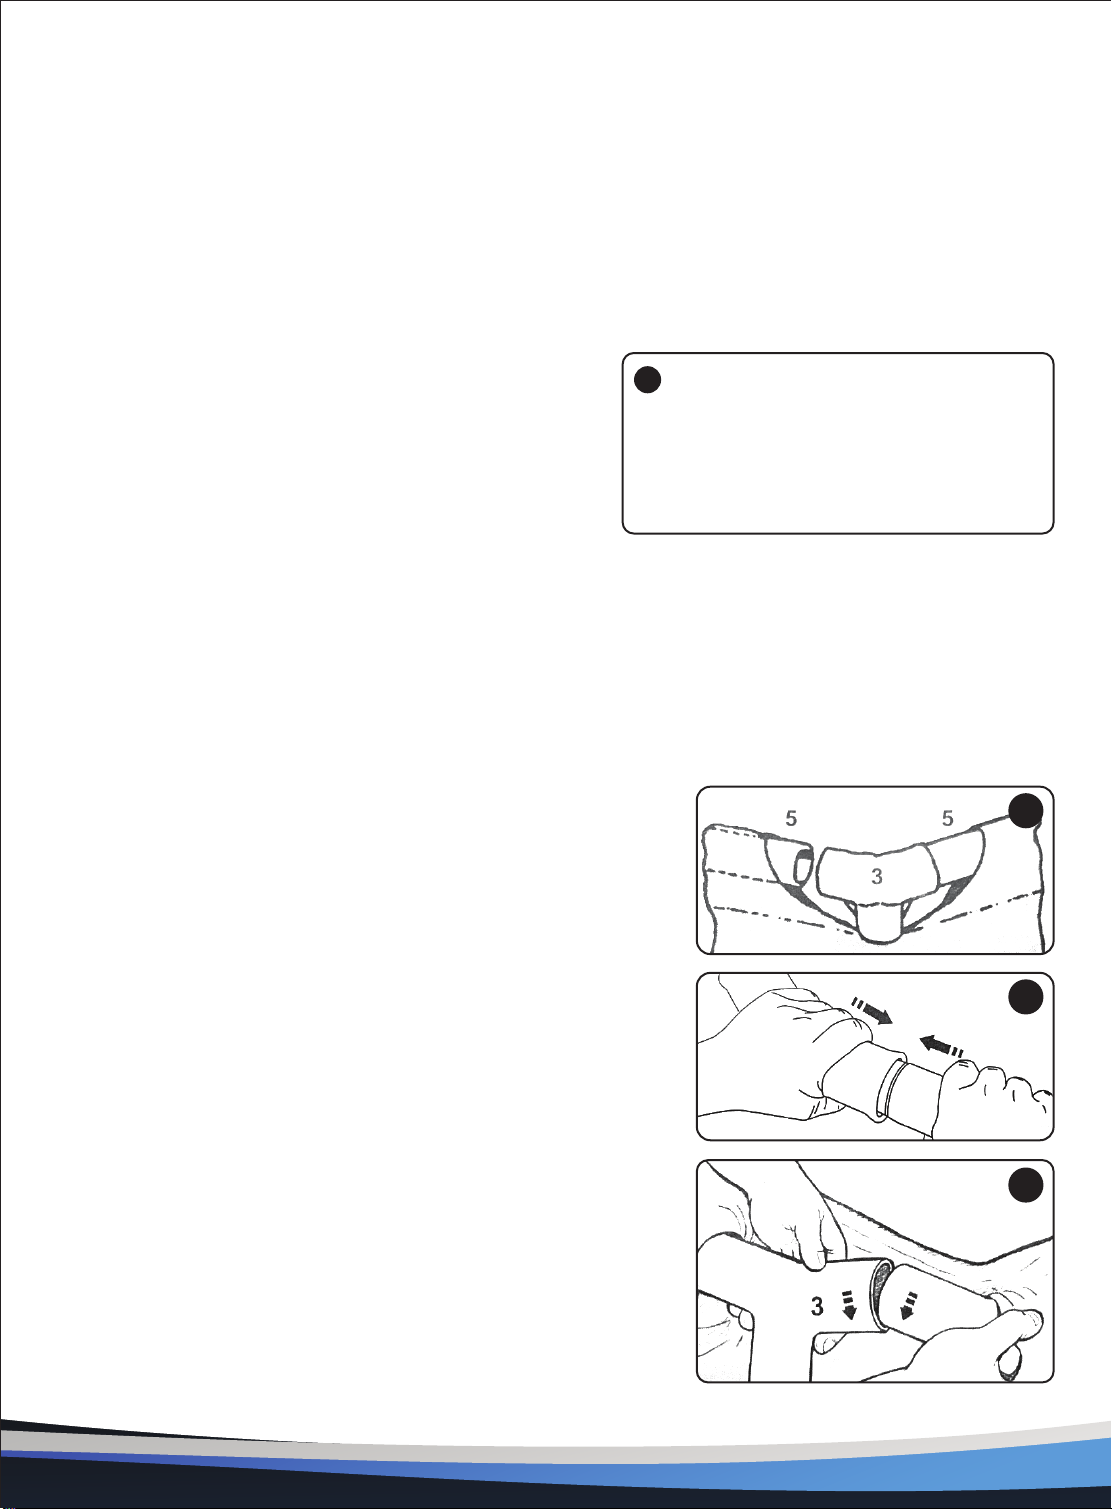
2. Horizontal Beams Assembly
• The frame pool's legs (7) and beams (5) fall into two groups. The larger diameters are the horizontal beams
that are slid (pushed) into the sleeve openings at the top of the liner. The smaller diameters are the vertical
legs. Both these legs and beams t into the T-joints (3).
6
1
2.1
2.2
2.3
NOTE: Sprinkle some talcum powder over the horizontal beams
before sliding them into the pool liner sleeve. This will make
removal of the beams from the liner easier during the disassembly
or the pool.
• Starting at any location, but always working in the same direction,
push the horizontal beam into the sleeve. Once the beam is centered
take one of the T-joints and attach the joint to one end of the beam.
Push the beam rmly into the T-joint. Repeat this procedure in a
circular fashion until all the beams and joints have been connected
(see drawings 2.1 & 2.2).
NOTE: It's important to start from one location and work in the
same direction until the last attachment. Do not start from multiple
locations as this will make the connections difficult for the last few
beams and joints.
The last joint connection may be dicult to complete. You can do
it though, if you rst simultaneously raise the last joint and beam
about 2 inches (5 cm). Now insert the beam into the joint while
lowering the pieces into position. The beam will easily slide into
the joint (see drawing 2.3). Ensure that the last joint is fully
connected before proceeding to connecting the legs.
9www.SereneLife.com
3. Vertical Legs Assembly
4. Filling of the pool
• The following applies to pool liners with hose connectors. The pool was purchased with a lter pump, insert
one of the two plugs (8 & 9) into the lter pump outlets. Please follow the Filter Pump Instructions rst and
then proceed to next installation step.
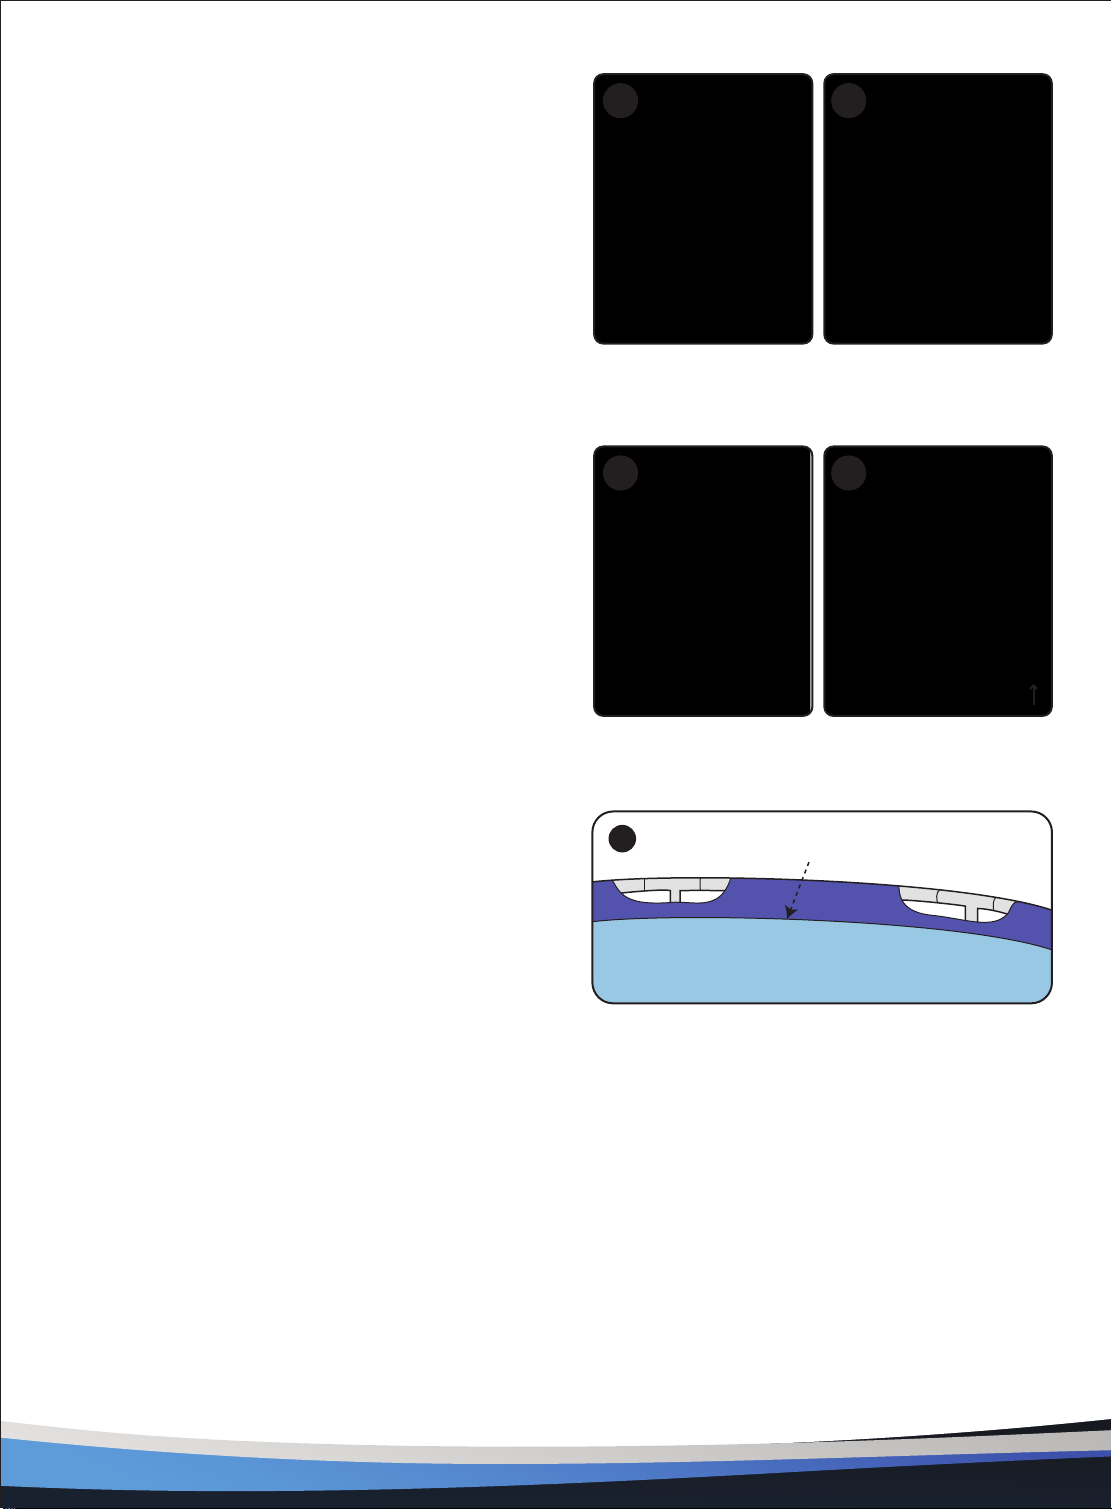
• Before lling the pool with water, ensure that the drain plug (1) inside the pool is closed and that the drain
cap (2) on the outside is screwed on tightly. Fill the pool with no more than 1 inch. (2.5 cm) of water.
Check to see whether the water is level.
Water level
4
For 8"x20" (244cm x 51cm):
Attach the legs end cap (4) to the bottom of each leg (7)
rst. With the beams and T-joints assembly resting on the
ground, insert the top of the leg into the bottom of the
T-joint (3) (see drawing 3.1). Continue the process with
all the vertical legs.
NOTE: This pool size does not come with an all-around
center belt.
Lift the beams assembly and make sure all the legs are a
vertical position (see drawing 3.2). Push all the T-joints
downward to ensure they are rmly connected to the legs.
For 10" (305cm) and above sizes:
Attach the legs end cap (4) to the bottom of each leg (7)
rst. With the beams and T-joints assembly resting on the
ground slide one vertical leg into the belt loop located
in the middle of the pool liner and insert the top of the
leg into the bottom of the T-joint (3) (see drawing 3.3).
Continue the process with all the vertical legs.
• Lift the beams assembly and make sure all the legs are
in a vertical position (see drawing 3.4). Push all the
T-joints downward to ensure they are rmly connected
to the legs.
• Pull gently in an outward direction, the bottom of the
leg making sure the leg is vertical and perpendicular
to the level ground.
3.1 3.2
4
3.3 3.4

10 www.SereneLife.com
IMPORTANT: If the water In the pool ows to one side, the pool is not completely level. Setting up the
pool on unlevel ground will cause the pool to tilt resulting in the sidewall material bulging and a potential
collapse or move the pool if the pool is not completely level, you must drain the pool, level the area or
move the pool to a dierent area that is level, and re-ll the pool following the above directions.
• Smooth out the bottom liner wrinkles (from inside the pool) by pushing out where the pool oor and pool
sides meet. Or, (from outside pool) reach under the side of the pool, grasp the pool oor and pull in an
outward direction. If the ground cloth is causing the wrinkles, have 2 people pull from opposite sides to
remove all wrinkles. Use the properly assembled pool ladder when entering or exiting the pool during this
process. Also make sure all the legs are vertical and perpendicular to the ground.
• Fill the pool with water up to just below the sleeve line. (see drawing 4)
CLEANING OR REPLACING FILTER CARTRIDGES
It is recommended that the lter cartridge be replaced at least Regularly monitor the lter clogging level.
1. Make sure lter pump is not operating. Disconnect line cord.
2. To prevent water from escaping the pool, unscrew the pool inlet nozzle (10) and strainer grid (11) from the
strainer connectors and insert the hat-like plugs into the strainer connectors.
3. In a counter-clockwise motion, remove the lter housing collar (12) and threaded cover (3).
Be careful not to lose the cover seal (4).
4. Remove lter cartridge (5) to clean it. The lter may be cleaned from the spray from a water hose.
5. Use judgement as to whether cartridge needs to be replaced. Only use the original lntex cartridge for
replacement. See "Parts Reference" section for detail.
6. Return cartridge to ltering position.
7. Return the seal (4) and threaded cover (3) to their original positions and in a clockwise direction re-screw
the housing collar (12) onto the lter housing.
8. After service, open the air release valve, remove the plugs, allow any air to escape through the valve before
tightening the valve again and replace the pool inlet nozzle (10) and strainer grid (11).
The pump is now primed with water again and may be turned on.
9. Check the inlet and outlet openings regularly to ensure they are not obstructed thus preventing a good
ltration.
10. The disposal of any used lter media should be in accordance with applicable local regulation and
legislation.
Filter Information
300 gallons: 3.14× 3.54 inch
Ce manuel convient aux modèles suivants
3
Table des matières


