Soundwave 7.1 Manuel utilisateur

1
USBSoundWave7.1Digital
Quick Installation Guide
Introducing the USB SoundWave 7.1
The USB SoundWave 7.1 Digital is a portable sound card
that brings a home theater atmosphere to notebook or
desktop computers.
FeaturesandBenefits
• Externalvolumeandmiccontrolswithmutebuttons
• 2 microphone inputs and 1 stereo headphone
output
• Supportsrecording throughS/PDIF-in/Mic/Line-
in
• S/PDIF out – provides digital surround sound
output
• Provides2.1/5.1/7.1connectionforsurroundsound
speakers
Requirements
• PC computer with an available USB 2.0 port
• Windows®XP (32-/64-bit) / Server 2003 & 2008
(32-/64-bit) / Vista (32-/64-bit)
04-0577A
2
PackageContents
•USB SoundWave 7.1 Digital
• USB cable
• Software CD
• Quick Installation Guide
Layout
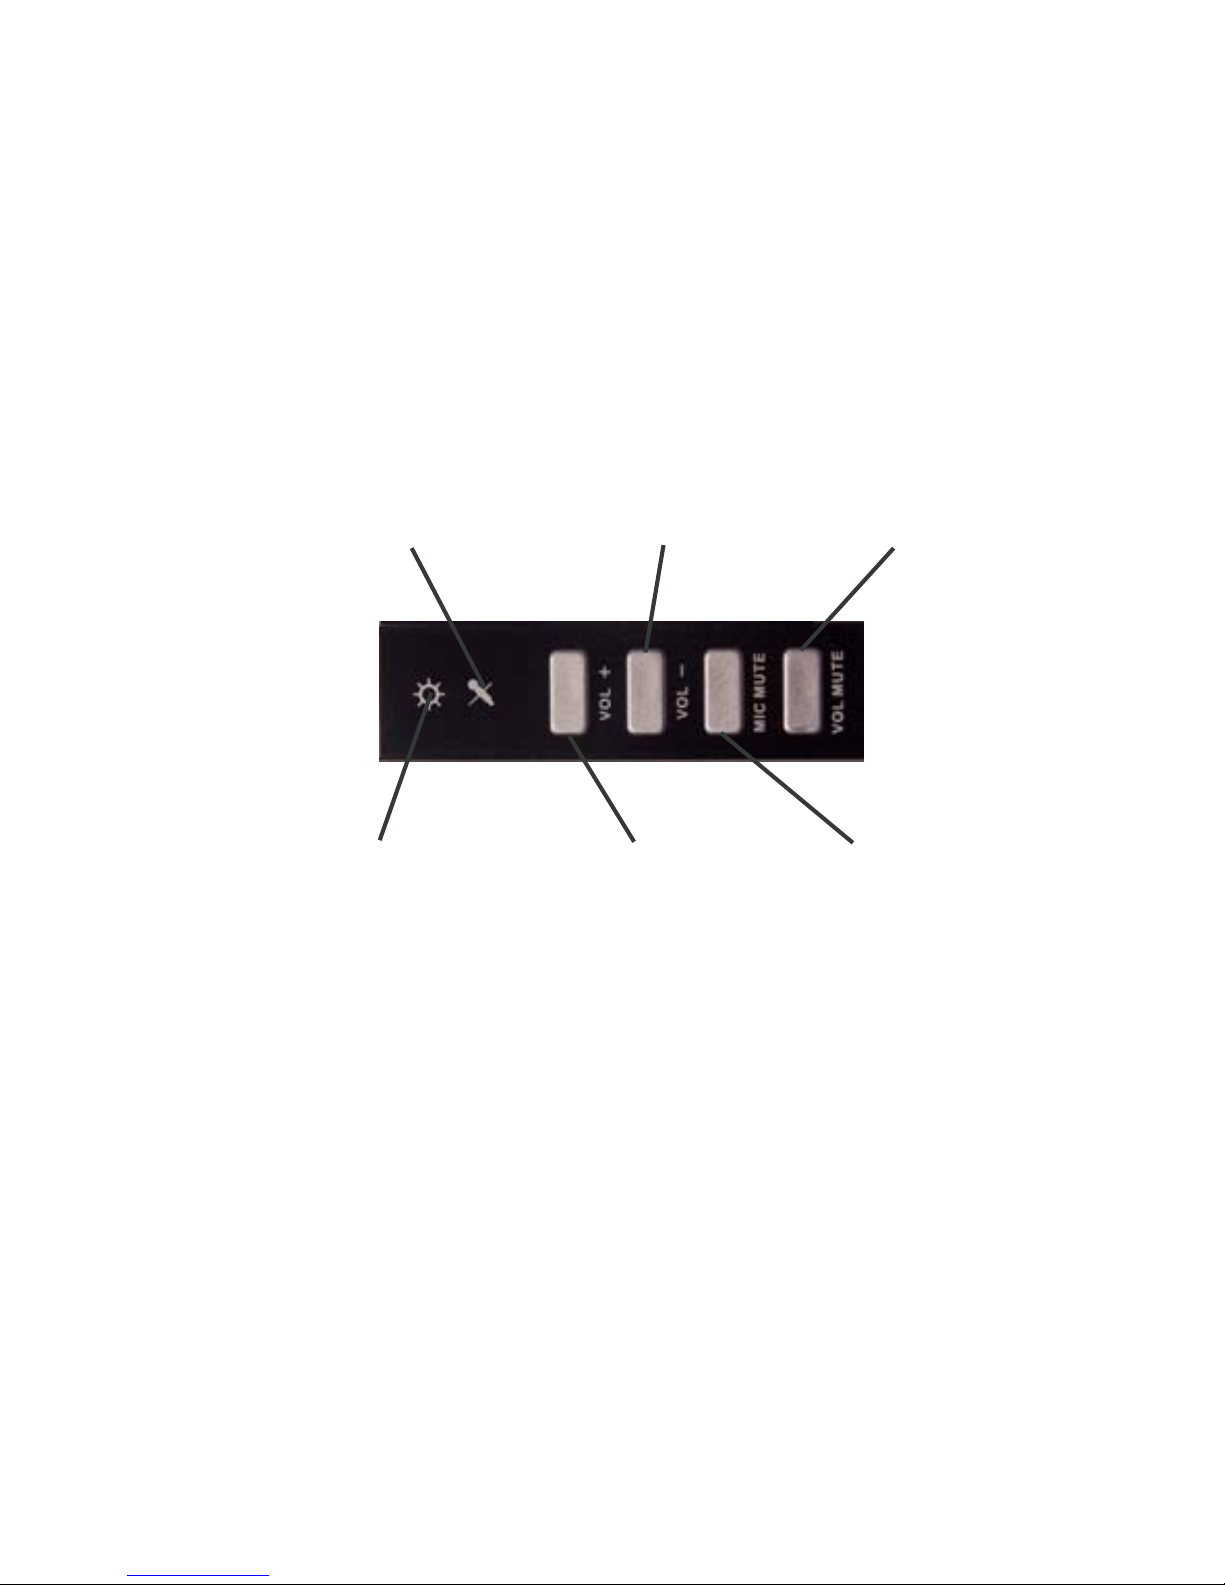
Figure 1. Top view
Power/Activity LED Volume Up
Volume Down
Microphone Mute
Volume Mute
Microphone
Mute LED
•Volume Mute: Press this button to
mute/un-mute audio outputs
•Microphone Mute: Press this button to
mute/un-mute microphone
•Volume (UP, Down): Increases or
decreases audio output volume
•Microphone Mute LED: When the
microphone inputs are muted, the light
will turn on
3
•Power/Activity LED: The light will be on when the
system is powered up. The light will blink when
activity is detected
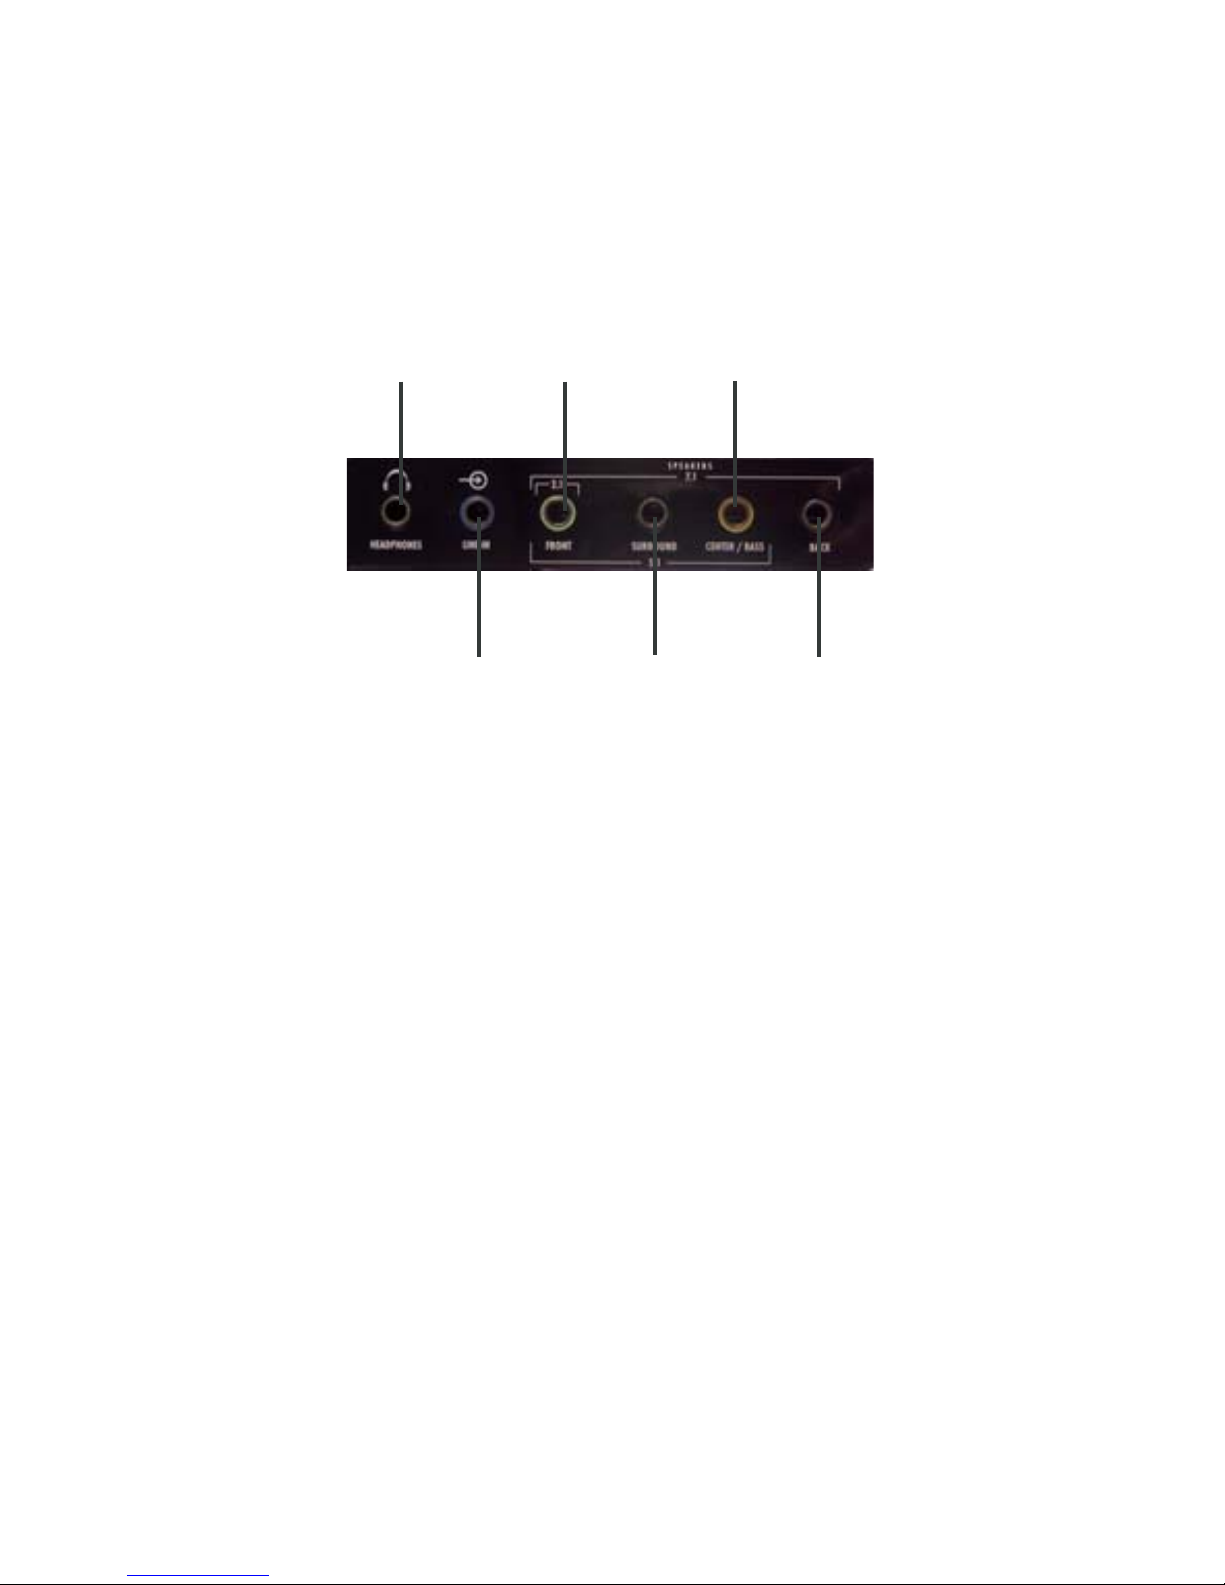
Headphone
Line In
Front
Speaker
Surround
Speaker
Center/Bass
Speaker
Back Speaker
Figure 2: Front connector
•Headphone: Connect to headphone.
•Line In: Connect to tape/CD/DVD
Player,or otheraudiosources foroutput
mixing and/or recording
•Front Speaker: Connect to Front
speakers (via external amplifier)
•Surround Speaker: Connect to
Surround speakers while in 4/6/8
channel modes (via external amplifier)
•Center/Bass Speaker: Connect to
Center/Bass speakers while in 6/8
channel modes (via external amplifier)
4
•Back Speaker: Connect to Back speakers while in 8
channel mode (via external amplifier)
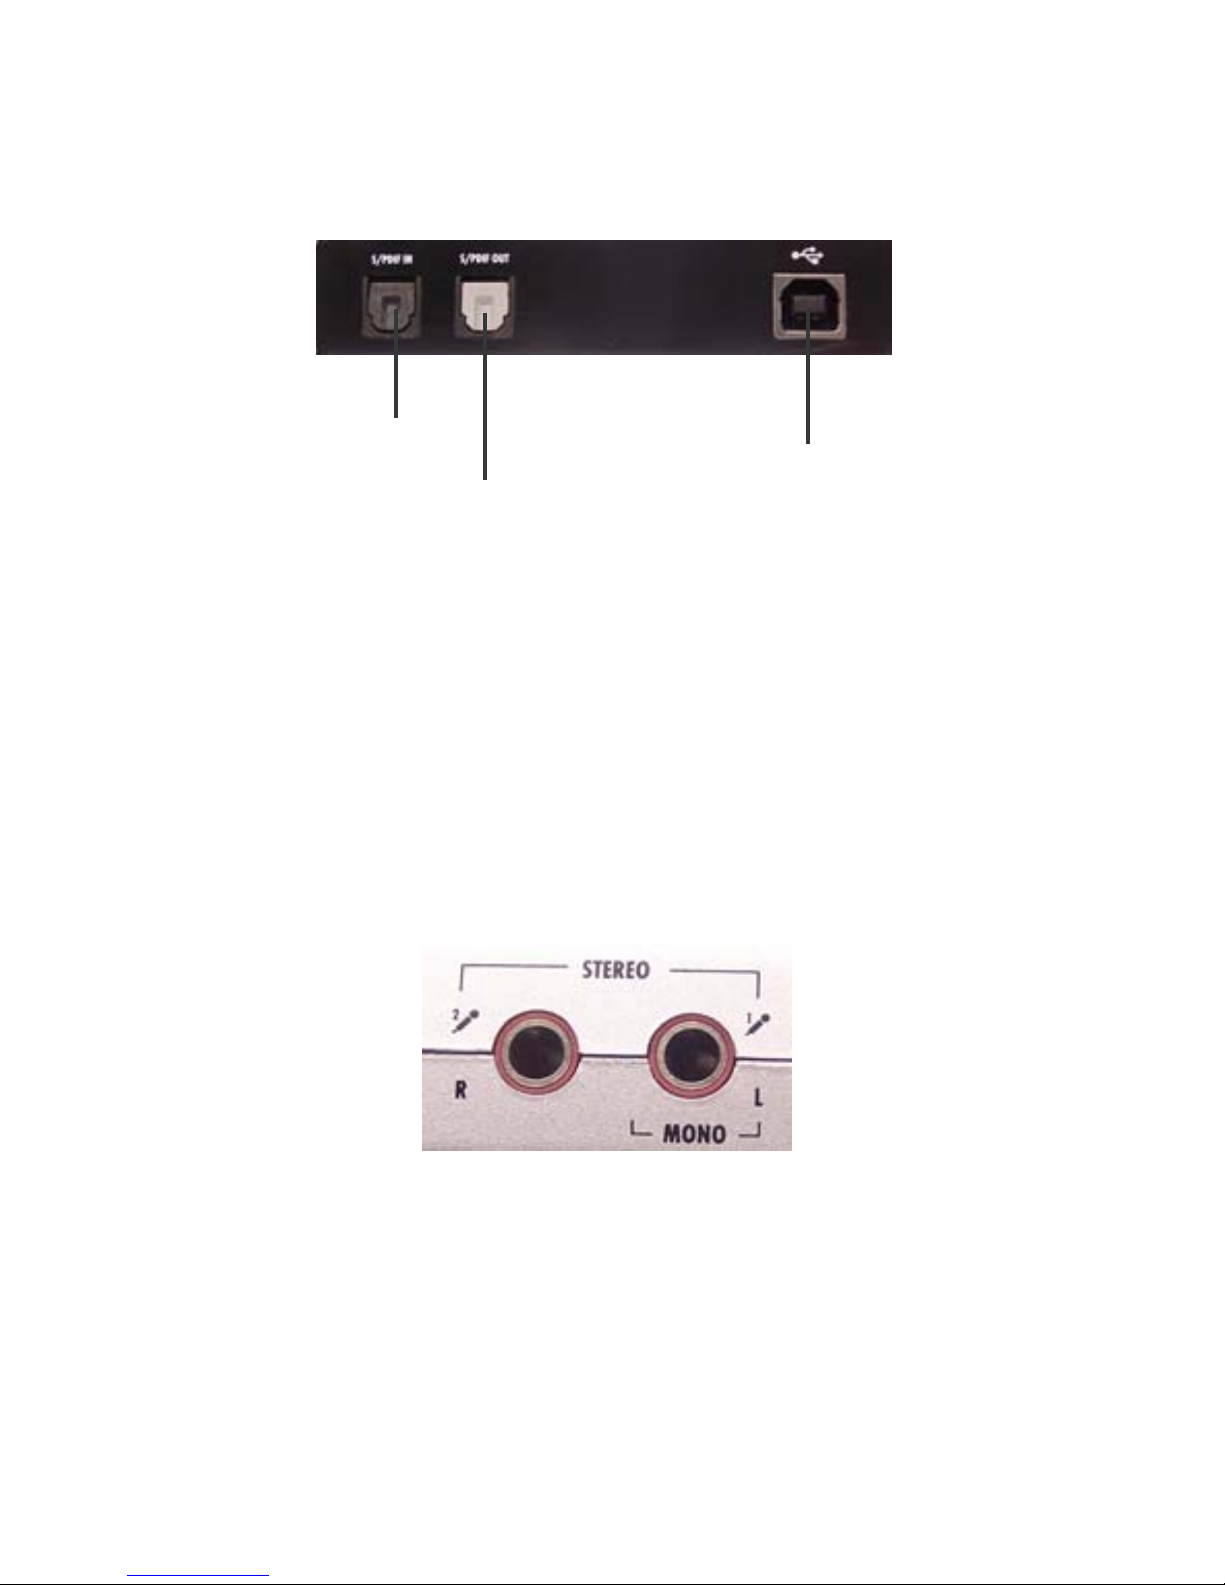
Figure 3: Rear connector
S/PDIF IN
S/PDIF OUT
USB Connector
•S/PDIF IN: Connect to digital output of external
audio device via an optical S/PDIF cable
•S/PDIF OUT: Connect to digital input of external
audio device via an optical S/PDIF cable (cable not
included)
•USB Connector: Plugs into the system’s USB port.
Figure 4: Side connector
•MIC (1) IN: Connect to a microphone (Mono left
channel)
•MIC (2) IN: Connect to a microphone (Mono right
channel)

5
Software Installation
WindowsXP/Server 2003&Vista willautomaticallyinstall
it's built-in driver for the USB SoundWave 7.1 Digital when
connected. To get USB Multi-Channel Audio Device
Utility, Mixer, Equalizer and simulated 7.1-channel sound
from headphones or stereo speakers, install the USB Multi-
Channel Audio Device software and driver from the CD.
Plug in the USB SoundWave 7.1 Digital and allow the
Windows driver to load before inserting the software CD.
WindowsXP/Server2003
1. Insert the software CD. Autorun should start the
installation. If Autorun doesn't start, click Start,
then Run. Type X:\setup.exe, then click OK.
(Change X: to match your CD-ROM drive letter)
2. Click Next, Next.
3. Select Yes, I want to restart my computer now,then
click Finish.
WindowsVista™
1. Insert the software CD. AutoPlay should start the
installation.
At the AutoPlay box: click Run Setup.exe.
If AutoPlay doesn't start: click Start, in Start Search,
type X:\setup.exe, then press Enter.(Change X: to
match your CD-ROM drive letter)
2. Select Yes, I want to restart my computer now,then
click Finish.

6
WindowsServer2008
1. Plug in the USBSoundWave 7.1Digital intoa avalible
USB port. The OS does not have a build in driver.
2. Insert the software CD. AutoPlay should start the
installation.
At the AutoPlay box: click Run Setup.exe.
If AutoPlay doesn't start: click Start, in Start Search,
type X:\setup.exe, then press Enter.(Change X: to
match your CD-ROM drive letter)
2. SelectYes, I want to restart my computer now, then
click Finish.
ToVerifyInstallation
1. Check Device Manager for proper installation:
For Windows Server 2008: right click Computer,click
Manage, double click Diagnostics, click Device
Manager.
For Windows Vista: right click Computer, click
Manage, click Continue, click Device Manager.
For Windows XP/2003: right click My Computer,
click Manage, click Device Manager.
2. Double click Sound, video and game controllers:
With USB Multi-Channel Audio Device driver: USB
Multi-Channel Audio Device will be displayed.
With Windows built-in driver: USB Audio Device
will be displayed.

7
USB Multi-Channel Audio Device Software
Utility
The USB Multi-Channel Audio Device quick start icon,
located in the taskbar by the clock, starts automatically
when Windows boots. Simply click on the quick start icon
to open it.
Enable/DisableOpticalS/PDIFOutput
The Optical S/PDIF out is enabled by default.
1. Click on the USB Multi-Channel Audio Device
quick start icon.
2. From the Main Settings tab, click on the radial
button next to S/PDIF Output.
Speaker Configuration
Windows XP
1. From the main desktop, click Start, Control Panel.
2. Click Sounds and Audio Devices.
3. Select the Audio tab.
4. Click Advanced under Sound Playback, then click
the Speakers tab.
5. Select your speaker type from the drop down list.
6. Click OK to save the settings.

8
WindowsServer2003
Make sure to log in as Administrator or an account with
administrative privileges.
1. From the main desktop click Start, Control Panel.
2. Click Sounds and Audio Devices.
3. Select the Audio tab.
4. Click Advanced under Sound Playback, then click
the Speakers tab.
5. Select your speaker type from the drop down list.
6. Click OK to save the settings.
WindowsVista/Server2008
Make sure to log in as Administrator or an account with
administrative privileges.
1. Right click the volume control icon located in the
taskbar by the system clock.
2. Click Playback devices, select Speakers USB PnP
Sound Device, click Configure.
3. Follow the on screen instructions to configure your
speakers.
Microphone Configuration
WindowsVista/Server2008
1. Right click the volume control icon located in the
taskbar by the system clock.
9
2. Click Playback Devices, under the Playback tab,
select Speakers USB PnP Sound Device, click
Properties.
3. Click the Levels tab. Click the speaker icon to either
enable or mute the microphone as indicated by the
red circle (muted) next to the icon.
4. Move the slider to change the volume level.
5. Click OK to save the changes.
6. Click the Recording tab.
7. Select Microphone USB PnP Sound Device, click
Properties.
8. Clickthe Levels tab.
9. Move the slider to the left to increase sensitivity.
10. Click OK to save the changes.
11. Click the Custom tab.
12. Check Microphone Boost, click OK.
Note: Microphone Boost increases sensitivity
by approximately 20dB. This setting is
optional and not be needed in most cases

10
Uninstalling USB Multi-Channel Audio
Device Software Utility
ForWindows XP/Server2003
1. Click Start.
2. Click Control Panel, double click Add/Remove
Programs.
3. Select USB Multi-Channel Audio Device, then
click either Change/Remove or Add/Remove.
4. Follow the on screen instructions to complete.
ForWindowsVista/Server2008
1. Click Start, Control Panel.
2. Click Classic View, double click Programs and
Features.
3. Select USB Multi-Channel Audio Device, then
click Uninstall/Change.
Windows Vista: click Continue.
Windows Server 2008: continue to step #4
4. Select Yes, I want to restart my computer now and
click Finish.
Table des matières
Autres manuels Soundwave Carte son


