Sound Sation LIVEMAKER X Manuel utilisateur

LIVEMAKER X
1800W Peak Power 2.1 Portable
Column PA System with DSP
Please read this manual carefully and properly take care of it
USER MANUAL
Leggete questo manuale e conservatelo per future consultazioni
MANUALE UTENTE

Dear customer,
First of all thanks far purchasing a SOUNDSATION® product. Our mission is to satisfy
all possible needs of musical instrument and professional audio users oering a wide
range of products using the latest technologies.
We hope you will be satised with this item and, if you want to collaborate, we are
looking for a feedback from you about the operation of the product and possible
improvements to introduce in the next future. Go to our website www.soundsation-
music.com and send an e-mail with your opinion, this will help us to build instruments
ever closer to customer’s real requirements.
One last thing: read this manual before using the instrument, an incorrect operation
can cause damages to you and to the unit. Take care!
The SOUNDSATION Team
Gentile Cliente,
Grazie per aver scelto un prodotto SOUNDSATION®. La nostra missione è quella di
orire ai nostri utenti una vasta gamma di strumenti musicali ed apparecchiature audio
e lighting con tecnologie di ultima generazione.
Speriamo di aver soddisfatto le vostre aspettative e, se voleste collaborare, saremmo
lieti di ricevere un vostro feedback sulla qualità del prodotto al ne di migliorare co-
stantemente la nostra produzione. Visitate il nostro sito www.soundsationmusic.com ed
inviateci una mail con la vostra opinione, questo ci aiuterà a sviluppare nuovi prodotti
quanto più vicini alle vostre esigenze.
Un’ultima cosa, leggete il presente manuale al ne di evitare danni alla persona ed al
prodotto, derivanti da un utilizzo non corretto.
Il Team SOUNDSATION

3
ENGLISH
TABLE OF CONTENTS
1. UNPACKING ...............................................................................................................6
1.1. Getting Started........................................................................................................................................................6
2. OVERVIEW..................................................................................................................7
2.1. Main Features..........................................................................................................................................................7
3. MAINS CONNECTION ...............................................................................................7
4. AUDIO CONNECTIONS..............................................................................................8
4.1. RCA Connections ...................................................................................................................................................8
4.2. JACK TS Connections............................................................................................................................................9
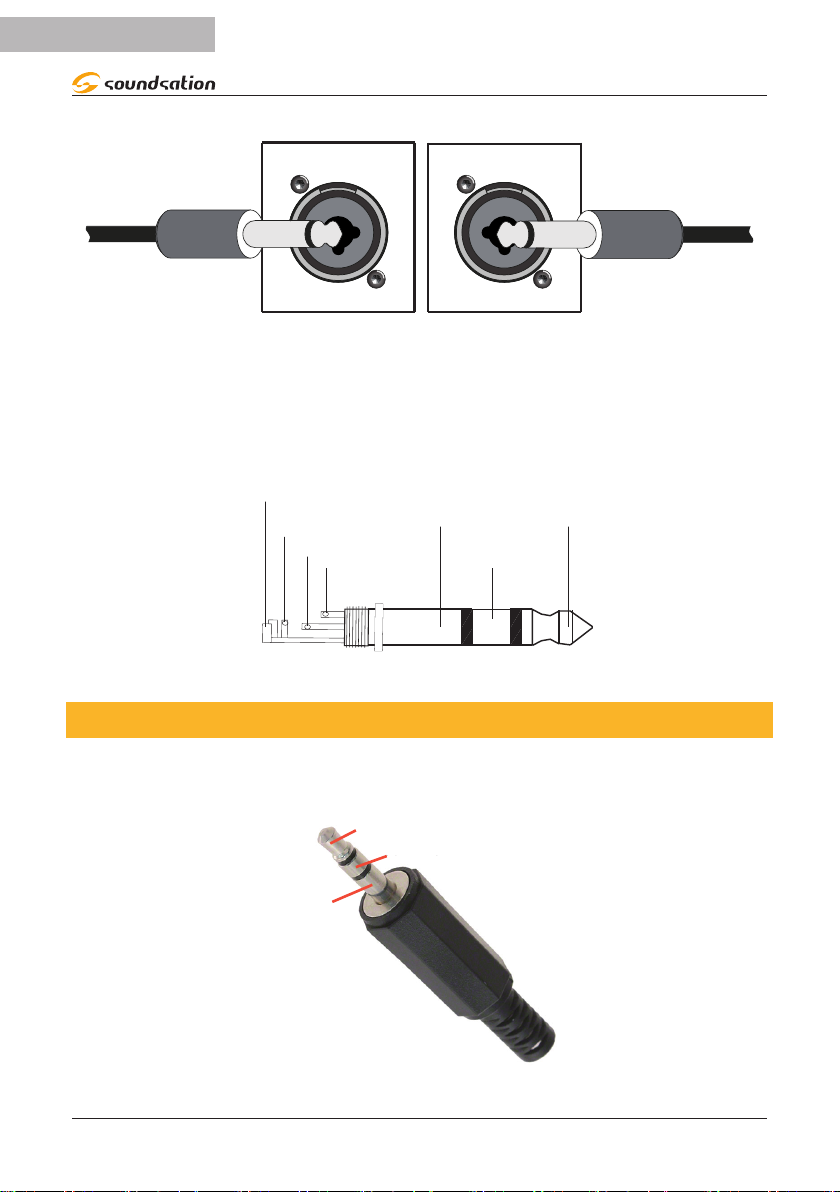
4.3. Mini Jack Stereo 3,5mm Connections..........................................................................................................10
4.4. XLR Connections ..................................................................................................................................................11
4.5. Speakon Connection ..........................................................................................................................................12
5. TOP PANEL ...............................................................................................................13
5.1. MONO MIC/LINE INPUTS (CH1/CH2) SECTION ......................................................................................14
5.2. AUX STEREO INPUT (CH3/4) SECTION........................................................................................................15
5.3. BLUETOOTH SECTION ........................................................................................................................................16
5.4. MASTER CONTROL SECTION ..........................................................................................................................16
5.5. 24 BIT DSP SECTION...........................................................................................................................................17
5.6. MIX OUT SECTION...............................................................................................................................................18
5.7. AUDIO PRESET (DSP) SECTION.......................................................................................................................18
6. REAR PANEL.............................................................................................................19
7. SPECIFICATIONS ......................................................................................................20
8. WARRANTY AND SERVICE .....................................................................................22
9. WARNING.................................................................................................................22

4
ENGLISH
IMPORTANT SAFETY SYMBOLS
The symbol is used to indicate that some hazardous live terminals are
involved within this apparatus, even under the normal operating con-
ditions, which may be sucient to constitute the risk of electric shock
or death.
The symbol is used in the service documentation to indicate that spe-
cic component shall be replaced only by the component specied in
that documentation for safety reasons.
Protective grounding terminal
Alternating current/voltage
Hazardous live terminal
Denotes the apparatus is turned on
Denotes the apparatus is turned o
WARNING: Describes precautions that should be observed to prevent the danger
of injury or death to the operator.
CAUTION: Describes precautions that should be observed to prevent danger of
the apparatus.
IMPORTANT SAFETY INSTRUCTIONS
fRead these instructions
fKeep these instructions
fHeed all warning
fFollow all instructions
1)^Water and Moisture
The apparatus should be protected from moisture and rain and can not be used near
water; for example near a bathtub, a kitchen sink, a swimming pool, etc.
2)^Heat
The apparatus should be located away from heat sources such as radiators, stoves or
other appliances that produce heat.
3)^Ventilation
Do not block areas of ventilation opening. Failure to do could result in re. Always
install according to the manufacturer's instructions.

5
ENGLISH
4)^Object and Liquid Entry
Objects do not fall into and liquids are not spilled into the inside of the apparatus for
safety.
5)^Power Cord and Plug
Protect the power cord from being walked on or pinched particularly at plugs, conve-
nience receptacles, and the point where they exit from the apparatus. Do not defeat
the safety purpose of the polarized or grounding-type plug. A polarized plug has two
poles; a grounding-type plug has two poles and a third grounding terminal. The third
prong is provided for your safety. If the provided plug does not t into your outlet, refer
to an electrician for replacement.
6)^Power Supply
The apparatus should be connected to the power supply only of the type as marked on
the apparatus or described in the manual. Failure to do could result in damage to the
product and possibly the user. Unplug this apparatus during lightning storms or when
unused for long periods of time.
7)^Fuse
To prevent the risk of re and damaging the unit, please use only of the recommend-
ed fuse type as described in the manual. Before replacing the fuse, make sure the unit
turned o and disconnected from the AC outlet.
8)^Electrical Connection
Improper electrical wiring may invalidate the product warranty.
9)^Cleaning
Clean only with a dry cloth. Do not use any solvents such as benzol or alcohol.
10)^Servicing
Do not implement any servicing other than those means described in the manual. Refer
all servicing to qualied service personnel only. Only use accessories/attachments or
parts recommended by the manufacturer.
WARNING: Please remember the high sound pressure do not only temporar-
ily damage your sense of hearing, but can also cause permanent damage. Be
careful to select a suitable volume.

6
ENGLISH
LIVEMAKER X User manual
1. UNPACKING
Thank you for purchasing LIVEMAKER X active portable PA system. Each unit has been
well tested and shipped in perfect operating conditions. Carefully unpack all the cartons
and check the contents to ensure that all parts are present and in good conditions:
f1 Subwoofer with integrated mixer
f2 x Satellite Passive speakers
f2 x Speakon cables to connect the subwoofer to satellite speakers.
f2 x Speaker stands.
f2 x Padded bag for Satellite Passive speakers.
f1 x Power Cable
fThis User manual
If anything damaged during transport, notify the shipper immediately and keep pack-
ing material for inspection. Again, please save cartons and all packing materials. If the
unit must be returned to the manufacturer, it is important that the unit is returned in
the original manufacturer’s packing. Please do not take any action without rst contact-
ing us.
WARNING: Packing materials are not toys. Keep out of reach of children.
Keep in a safe place the original packaging material for future use.
1.1. Getting Started
LIVEMAKER X is an active portable PA system. It is part of a wider range of SOUNDSA-
TION Pro Audio product line with characteristics of compactness, lightness and easy to
use. They are ideal for many music purpose. Make sure there is enough space around
the system for proper ventilation and prevent overheating especially regarding the
integrated mixer. LIVEMAKER X is connected to mains through the supplied cable. The
product meets the required safety standards. Blown fuses must be replaced with fuses
of the same type and specication.
Make sure that the system must be properly grounded. For your safety, you
should never remove any ground connector from electrical devices or power
cables, or make them inoperative.
Our products are subject to a continuous process of further development. Therefore
modications to the technical features remain subject to change without further notice

7
ENGLISH
LIVEMAKER X User manual
2. OVERVIEW
LIVEMAKER X is the result of years of experience gathered by SOUNDSATION in
Portable Sound systems, a segment where quality, versatility and value for money are
absolutely essential. LIVEMAKER X system with its powerful 1800-watt (Peak) power
amp delivers astounding performance for mobile applications especially for musicians
and DJs. The system is equipped with a high-performance 10” subwoofer, two satel-
lite speakers (6 x 2.75” Wide-band Speakers) and integrated mixer. In addition to the
Bluetooth, the system integrates a DSP for Audio with 4 Presets and a 24Bit DSP FX
with 16 genuine eects to add to the MIC inputs choosing the level for each channel.
The enclosures (ABS for the satellites and Plywood for the sub-woofer) are strong and
lightweight and have a pleasant look.
2.1. Main Features
f1 x Subwoofer with integrated mixer and 2 x Satellite Passive speakers.
fClass-D 2 x 600W (RMS) Amplier.
fOne 10” Woofer (Subwoofer) and 6 x 2.75” Wide-band Speakers (3 for each satel-
lite speaker).
f2 Microphones/Line Inputs with 3 Band Equalizer (Low/Middle/High frequencies)
fBluetooth.
fAUX Input with 1 Stereo RCA Line Input, 2 x JACK 1/4 Inputs and 1 x Mini Jack
Stereo Input
fDual Band Equalizer on AUX Input.
fA DSP for Audio output with 4 presets and a 24Bit DSP FX with 16 genuine eects.
f25 mm hole for satellite speaker pole mounting.
fSturdy, compact and lightweight cabinets (ABS for the satellites and Plywood for
the sub-woofer).
3. MAINS CONNECTION
Connect the device to the mains with the supplied power cable. The wire correspon-
dence is as follow:
Cable Pin International
Brown Live L
Blue Neutral N
Yellow/Green Earth
The earth must always be connected! Pay attention to the safety! Before tak-
ing into operation for the rst time, the installation has to be approved by an
expert.

8
ENGLISH
LIVEMAKER X User manual
4. AUDIO CONNECTIONS
You will need several audio cables for the various connections of the system. See the
pictures below that show the internal wiring of these cables. Be sure to use only high
quality cables.
4.1. RCA Connections
Use commercial RCA cables to connect unbalanced stereo sources with RCA output
connectors to the RCA Line stereo input ( AUX IN CH 3/4) of the built-in mixer.
Center
Signal
Body
Ground / Shield
Mixer
CD Player
MIN MAX
0
HIGH
MIN MAX
0
LOW
VOLUME
AUX IN
L R
LEFT
RIGHT
CH 3/4
MIN MAX

9
ENGLISH
LIVEMAKER X User manual
4.2. JACK TS Connections
Use mono 1/4” jack TS connectors to connect unbalanced stereo sources of external
devices such as musical instruments, mixer, etc to AUX IN 3/4 Input.
Unbalanced use of 1/4” jack TS connector
Strain relief
clamp
Sleeve
Tip
Sleeve
Ground shield
Tip
Signal
MIN MAX
0
HIGH
MIN MAX
0
LOW
VOLUME
AUX IN
L R
LEFT
RIGHT
CH 3/4
MIN MAX
Electronic Keyboard
Mixer
10
ENGLISH
LIVEMAKER X User manual
Mono 1/4” jack TS connectors may also be used for the CH1 and CH2 inputs.
CH 1 CH 2
These inputs are a combo sockets for 1/4” jack TS / XLR. It accepts also balanced 1/4”
Jack TS connector that will be as follows: .
Balanced use of 1/4” jack TS connector
Strain relief
clamp
Sleeve
Tip
Sleeve
Ground shield
Ring Ring
Cold (- Ve)
Tip
Hot (+ Ve)
4.3. Mini Jack Stereo 3,5mm Connections
Use Mini Jack Stereo (3,5mm) connectors to connect stereo sources of external devices
such as Laptops, smartphones, etc to AUX IN 3/4 Input.
Left Audio Signal (Tip)
Right Audio Signal (Ring)
Ground
Table des matières
Langues :
Autres manuels Sound Sation Système de haut-parleurs


Manuels Système de haut-parleurs populaires d'autres marques


Sondpex
Sondpex Active Speaker System and Digital Music... Manuel utilisateur

JVC
JVC NX-PN7 Manuel utilisateur

Marshall Amplification
Marshall Amplification AR-DM61-BT Manuel utilisateur

Yamaha
Yamaha NX-A01 - Speaker Sys Manuel utilisateur

SE Audiotechnik
SE Audiotechnik I-LINE Manuel utilisateur

Gemini
Gemini WRX-843 Series Manuel utilisateur